รู้จัก IBOutlet และ IBAction กับ Interface Builder (iOS , iPhone , iPad) |
รู้จัก IBOutlet และ IBAction กับ Interface Builder (iOS , iPhone , iPad) ก่อนหน้านี้เราได้ทดสอบการเรียนโปรแกรมเพื่อทำงานบน iPhone แบบง่าย ๆ ด้วยการรับค่าจาก Textbox และสั่งให้ปุ่มทำงานพร้อม ๆ กับแสดงข้อความโต้ตอบ กับผู้ใช้แบบง่าย ๆ แล้ว และศัพท์ที่เราอาจจะยังงง ๆ ว่ามันคืออะไร จะมีอยู่ 2 ตัว ที่ต่อไปนี้อราอาจจะต้องใช้งานมันบ่อย หรือแทบว่าจะทุก ๆ ครั้งเลยก็ได้ เราเรียกมันว่า IBOutlet และ IBActtion โดยทั้ง 2 ตัวนี้จะมีความหมายเหมือน ๆ กัน โดย IB ย่อมาจาก Interface Builder ส่วนความหมายเต็ม ๆ เรามาดูรายละเอียดแต่ล่ะหัวข้อ
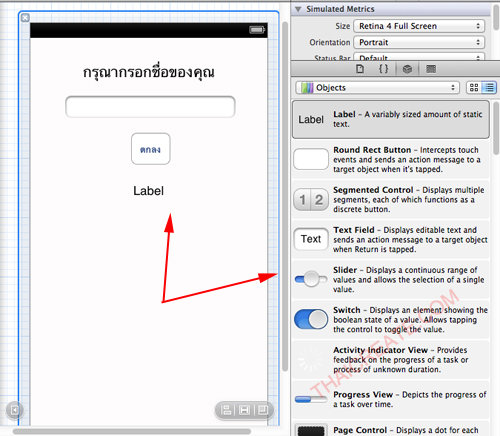 User Interface and Interface Builder
ก่อนอื่นเราจะต้องทำความเข้าใจก่อนว่า หน้าจอที่เป็น App ของ iPhone เราเรียกว่า UI (User Interface) ส่วน Object ต่าง ๆ เราเรียกว่า Object Library เราเรียกรวม ๆ กันทั้ง 2 นี้เมื่อทำการออกแบบเรียบร้อยแล้วว่า Interface Builder (IB)
IBOutlet (Interface Builder Outlet)
เป็นการประกาศให้ Interface Builder หรือ Object ต่าง ๆ เช่น Label , Textbox เชื่อมต่อหรือรู้จักกับตัวแปรที่เราประกาศขึ้นในส่วนต่าง ๆ ของ Object ถ้ายังไม่เข้าใจจะอธิบายเปรียบเทียบพวกโปรแกรมบน ASP.NET / VB.NET ที่ Object ต่า ๆ ที่อยู่ในหน้า Form เราจะสามารถเรียกใช้ได้ทันที แต่ใน Xcode สำหรับ iOS รายการ Object ต่าง ๆ ที่อยู่บน Interface Builder เราจะไม่สามารถเรียกใช้ได้ทันที แต่เราจะต้องประกาศตัวแปรที่ไฟล์ .h (header) จากนั้นทำการเชื่อมตัวแปร กับ Object ใน Interface Builder เราถึงจะสามารถเขียนโปรแกรมเพื่อควบคุมการทำงานของ Object นั้น ๆ ได้
IBAction (Interface Builder Action)
สำหรับ IBAction ความหมายเหมือน ๆ กับ IBOutlet แต่จะเป็นการเชื่อม หรือประกาศ Event ต่าง ๆ ระหว่าง Object ที่อยุ่ใน Interface Builder กับ Event หรือเหตุการณ์ที่เกิดขึ้น ถ้าเปรียบเทียบใน ASP.NET / VB.NET ก็คือการสร้าง Event Handler ให้กับ Button หรือเหตุการณ์ต่าง ๆ
การสร้าง IBOutlet และ IBAction บน Xcode สามารถสร้างได้หลากหลายวิธี แต่วิธีที่นิยมมากที่สุดก็คือใช้แบบ Drag and Drop ตามตัวอย่างนี้
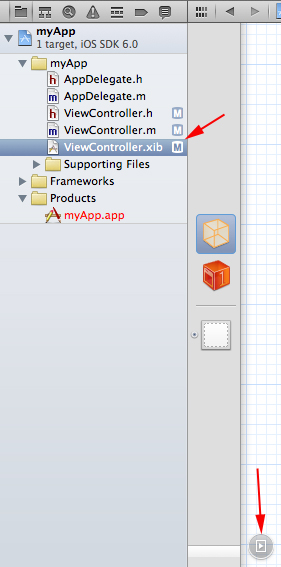
ภายใต้ Project ของเราให้เลือก xib ไฟล์ หรือไฟล์ที่เป็น User Interface และคลิกที่วงกลมดังรูป
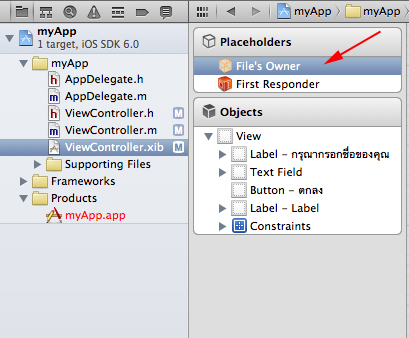
คลิกที่ File's Owner
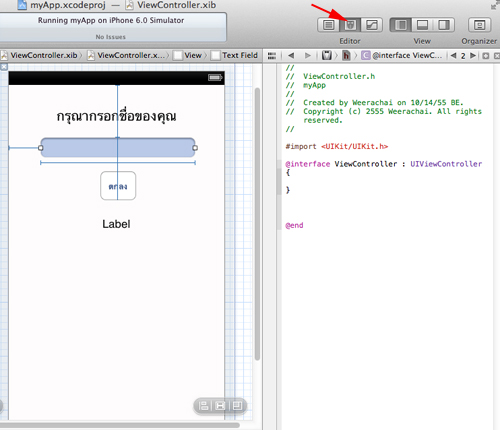
เลือกมุมมองของ Editor ที่เป็นระหว่าง .xib และ .h
โดยในตัวอย่างที่จะเห็นว่าเราจะมี Textbox และ Label โดย Textbox จะรับค่า และ Label จะแสดงผล ส่วน Button จะเป็น Action หรือ Event ในขั้นตอนนนี้เราจะสร้าง IBOutlet ให้กับ Textbox และ Label
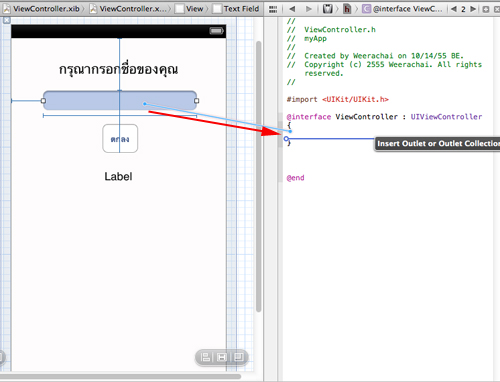
คลิกที่ Textbox จากนั้นให้คลิกปุ่ม Control (ที่ Keyboard) แล้วลากไปไว้ในตำแหน่ง {.....} ดังรูป (ถ้ายังไม่มีให้ใส่ปีกกาให้เรียบร้อยก่อน)
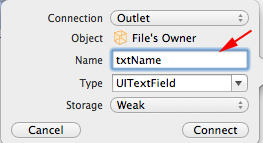
กรอกชื่อว่า txtName และเลือก Connect
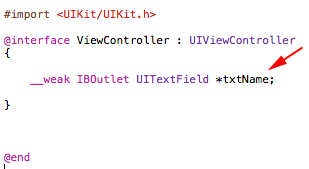
เราได้ค่าตัวแปรที่ชื่อว่า txtName เป็นชนิดแบบ UITextField ที่เชื่อมกับ Interface Buillder ของ Textbox เรียบร้อยแล้ว
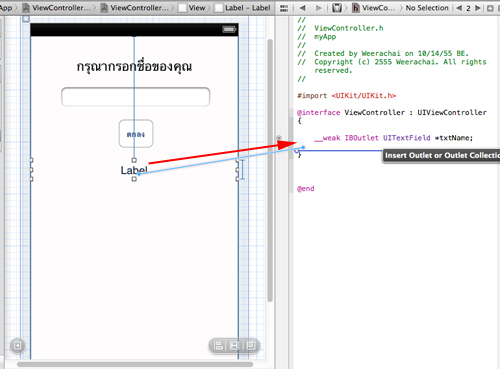
Label ก็ทำเช่นเดียวกัน
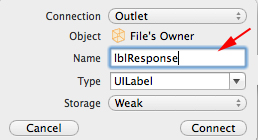
กรอกชื่อ lblResponse และเลือก Connect
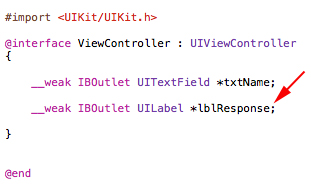
ได้รายการตัวแปร Property เรียบร้อย
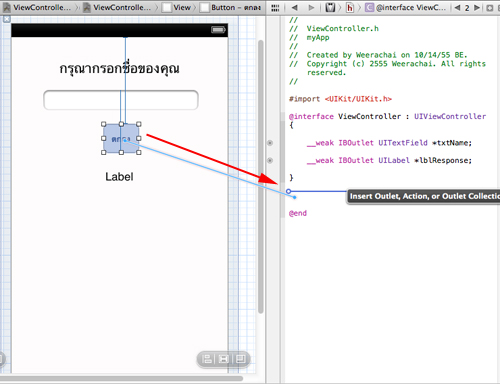
ต่อไปจะเป็น Button ให้ลากมาวางในตำแหน่งของนอกวงเล็บ ตัวนี้จะเป็น Action ซึ่งเราจะเรียกว่า Method หรือ Function ของ Class
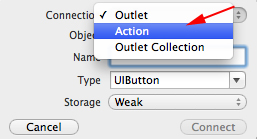
เลือก Connection เป็นแบบ Action
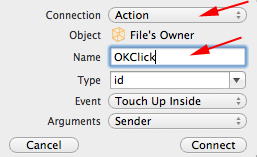
กรอกชื่อในที่นี้ให้ลองใส่ว่า OKClick
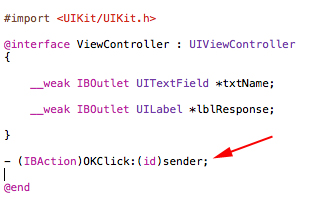
รายการ Method ของ Action ได้ถูก Add ลงเรียบร้อยแล้ว
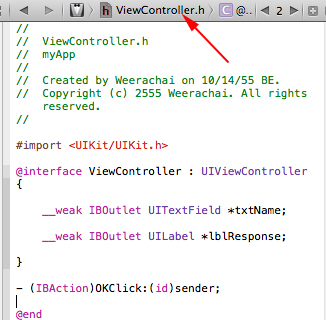
เลื่อนมาข้างบนให้คลิกที่ .h
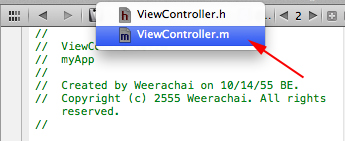
เลือกไฟล์ที่เป็น .m โดยขั้นตอนถัดไปเราจะเขียนให้โปรแกรมทำงานตามที่เราต้องการ
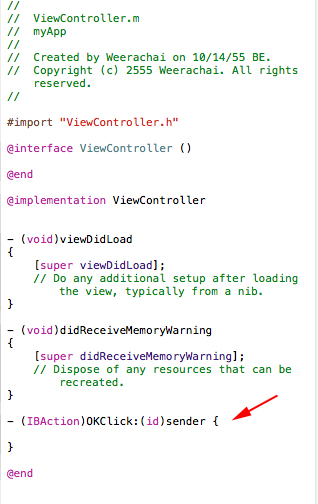
สังเกตุว่าทีไฟล์ .m (implement) จะมีการสร้าง Method ให้อัตโนมัติ เราแค่ใส่คำสั่งอื่น ๆ เข้าไปก็ใช้ได้ทันที

ทดสอบใส่คำสั่งในการแสดงผลง่าย ๆ
- (IBAction)OKClick:(id)sender
{

    NSMutableString *text;
    text = [NSString stringWithFormat:@" สวัสดีครับคุณ %@",[txtName text]];

    lblResponse.text = text;

}
เพิ่มเติม
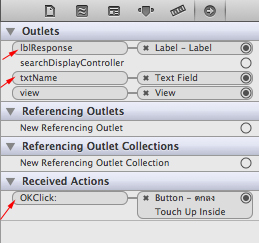
เมื่อดูในมุมมองของ Outlet จะเห็นว่ารายการ Interface Buillder ได้ทำการเชื่อมไว้กับ Object ต่าง ๆ ได้ ในกรณีที่เราลบ Object ในหน้า Interface Builder ทิ้งไป เราจะต้องมาลบในนี้ด้วย มิฉะนั้นโปรแกรมจะ Error แล้วทำการ Build หรือ รันไม่ผ่านครับ
Screenshot
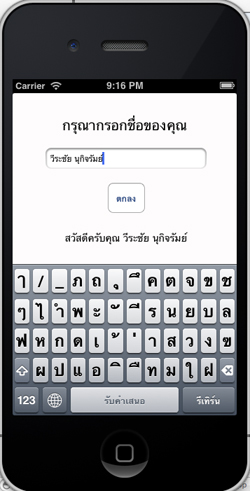
ได้ผลง่าย ๆ ดังรูป
Code ทั้งหมด
ViewController.h
#import <UIKit/UIKit.h>

@interface ViewController : UIViewController
{
    __weak IBOutlet UITextField *txtName;

    __weak IBOutlet UILabel *lblResponse;
}

- (IBAction)OKClick:(id)sender;

@end
ViewController.m
#import "ViewController.h"

@interface ViewController ()

@end

@implementation ViewController

- (void)viewDidLoad
{
    [super viewDidLoad];
	// Do any additional setup after loading the view, typically from a nib.
}

- (void)didReceiveMemoryWarning
{
    [super didReceiveMemoryWarning];
    // Dispose of any resources that can be recreated.
}

- (IBAction)OKClick:(id)sender
{

    NSMutableString *text;
    text = [NSString stringWithFormat:@" สวัสดีครับคุณ %@",[txtName text]];

    lblResponse.text = text;

}

@end
หรือจะดาวน์โหลด Code ทั้งหมดได้จากส่วนท้ายของบทความ
บทความอื่น ๆ ที่เกี่ยวข้องที่ควรศึกษา
Go to : การเขียน Coding ด้วยภาษา Objective-C กับการแสดงผลง่าย ๆ บน iOS (iPhone,iPad)
Go to : Objective-C กับการสร้าง Event และ Action (IBAction) โต้ตอบ บน iOS (iPhone,iPad)
Go to : Objective-C และ Outlet (IBOutlet) Action(IBAction) แบบง่าย ๆ ผ่าน Xcode (iPhone,iPad)
.
|
 ช่วยกันสนับสนุนรักษาเว็บไซต์ความรู้แห่งนี้ไว้ด้วยการสนับสนุน Source Code 2.0 ของทีมงานไทยครีเอท ช่วยกันสนับสนุนรักษาเว็บไซต์ความรู้แห่งนี้ไว้ด้วยการสนับสนุน Source Code 2.0 ของทีมงานไทยครีเอท
|
|
| |
By : |
ThaiCreate.Com Team (บทความเป็นลิขสิทธิ์ของเว็บไทยครีเอทห้ามนำเผยแพร่ ณ เว็บไซต์อื่น ๆ) |
| |
Score Rating : |
   |
|
| |
Create/Update Date : |
2012-10-21 22:15:38 /
2017-03-25 23:02:10 |
| |
Download : |

|
|
|
Sponsored Links / Related |
|
|

|
|
|
|
|

|

