|
| |
ASP.Net SignalR : ตัวอย่างการรับส่งข้อมูลแบบ Real Time และการจัดเก็บลงใน Database |
ASP.Net SignalR : ตัวอย่างการรับส่งข้อมูลแบบ Real Time และการจัดเก็บลงใน Database บทความนี้จะเป็นตัวอย่างการเขียน SignalR บน ASP.Net Web Application ในการรับส่งข้อมูลแบบ Real Time รับข้อมูลจาก Input จำนวน 2 รายการคือ Name และ Email โดยข้อมูลที่รับเข้ามานั้น จะแสดงผลไปยัง Client อื่นๆ ในรูปแบบของ HTML Table ที่เปิดหน้าจอไว้ในขณะนั้นๆ ซึ่งข้อมูลในทุกๆ Client จะแสดงผลแบบ Real Time ตลอดเวลา เมื่อมีข้อมูลใหม่ ๆ เกิดขึ้น และในตัวอย่างนี้ยังมีการนำข้อมูลไปจัดเก็บลงใน Table ด้วย
 ตัวอย่างการใช้ SignalR รับ-ส่งข้อมูลแบบ Real Time และการจัดเก็บลงใน Database
รู้จัก ASP.Net SignalR วิธีการรับ-ส่งข้อมูลแบบ Real Time - VB.Net,C#
ก่อนอื่นให้ทำความเข้าใจเกี่ยวกับ SignalR ในบทความก่อนหน้านี้ให้เข้าใจ ก่อนที่จะเริ่มในหัวข้อนี้

สร้าง Table ใหม่ชื่อว่า mytable มีคำสั่งดังนี้
CREATE TABLE [dbo].[mytable](
	[id] [int] IDENTITY(1,1) NOT NULL,
	[name] [varchar](150) NULL,
	[email] [varchar](150) NULL,
 CONSTRAINT [PK_mytable] PRIMARY KEY CLUSTERED
(
	[id] ASC
));
คำสั่งสำหรับสร้าง Table

Table ที่ได้

ตัวอย่างจัดเก็บข้อมูล
กลับมาที่ Project บน Visual Studio

ในส่วนของ Hub Class ให้ตั้งชื่อเป็น MyHub
MyHub.cs (C#)
using System;
using System.Collections.Generic;
using System.Linq;
using System.Web;
using Microsoft.AspNet.SignalR;
using System.Data;
using System.Data.SqlClient;
using Newtonsoft.Json;

namespace myWebApplication
{
    public class MyHub : Hub
    {
        public class mytable
        {
            public string name { get; set; }
            public string email { get; set; }
        }

        public void SaveData(string name, string email)
        {
            string json = string.Empty;

            SqlConnection objConn;
            SqlCommand objCmd;
            String strConnString, strSQL;
            SqlDataReader dtReader;

            strConnString = @"Server=localhost;UID=sa;PASSWORD=;database=mydatabase;Max Pool Size=400;Connect Timeout=600;";
            objConn = new System.Data.SqlClient.SqlConnection(strConnString);
            objConn.Open();

            // Insert New Data
            if (name != string.Empty && email != string.Empty)
            {
                strSQL = "INSERT INTO mytable (name, email) " +
                "VALUES ('" + name + "','" + email + "')";
                objCmd = new SqlCommand();
                objCmd.Connection = objConn;
                objCmd.CommandType = CommandType.Text;
                objCmd.CommandText = strSQL;
                objCmd.ExecuteNonQuery();
            }

            // Get Data
            strSQL = "SELECT * FROM mytable order by id asc";
            objCmd = new SqlCommand(strSQL, objConn);
            dtReader = objCmd.ExecuteReader();

            var ls = new List<mytable>();
            if (dtReader.HasRows)
            {
                while (dtReader.Read())
                {
                    ls.Add(new mytable { name = dtReader["name"].ToString(), email = dtReader["email"].ToString() });
                }
            }
            json = JsonConvert.SerializeObject(ls);

            dtReader.Close();
            objCmd = null;
            objConn.Close();
            objConn = null;

            // Call the displayData method to update clients.
            Clients.All.displayData(json);
        }
    }
}
จาก Code จะเป็นคำสั่งง่ายๆ คือ รับค่า name และ email เพื่อ Insert ลงใน table จากนั้นส่งค่าทั้งหมดกลับไปทุก ๆ client ในรูปแบบของ JSON
myWebForm.aspx
<%@ Page Language="C#" AutoEventWireup="true" CodeBehind="myWebForm.aspx.cs" Inherits="myWebApplication.myWebForm" %>


<!DOCTYPE html>
<html>
<head>
    <title>SignalR Simple</title>
    <style type="text/css">
        .container {
            background-color: #99CCFF;
            border: thick solid #808080;
            padding: 20px;
            margin: 20px;
        }
    </style>
</head>
<body>
    <div class="container">
        Name <input type="text" id="txtName" size="5" /> Email <input type="text" id="txtEmail" />
        <input type="button" id="btnSave" value="Save" />
    </div>

        <table width="400" border="1" id="myTable">
        <!-- head table -->
        <thead>
          <tr>
            <td width="200"> <div align="center">Name </div></td>
            <td width="200"> <div align="center">Email </div></td>
          </tr>
        </thead>
        <!-- body dynamic rows -->
        <tbody></tbody>
        </table>
    <!--Script references. -->
    <!--Reference the jQuery library. -->
    <script src="Scripts/jquery-1.10.2.min.js" "></script>
    <!--Reference the SignalR library. -->
    <script src="/Scripts/jquery.signalR-2.2.1.js"></script>
    <!--Reference the autogenerated SignalR hub script. -->
    <script src="/signalr/hubs"></script>
    <!--Add script to update the page and send messages.-->
    <script type="text/javascript">
        $(function () {


            // Declare a proxy to reference the hub.
            var chat = $.connection.myHub;

            // Create a function that the hub can call to broadcast messages.
            chat.client.displayData = function (jsonData) {

                $('#myTable > tbody:last').empty();

                var obj = jQuery.parseJSON(jsonData);
                $.each(obj, function (key, val) {
                    var name = val["name"];
                    var email = val["email"];
                    var tr = "<tr>";
                    tr = tr + "<td>" + name + "</td>";
                    tr = tr + "<td>" + email + "</td>";
                    tr = tr + "</tr>";
                    $('#myTable > tbody:last').append(tr);
                });

            };


            // Start the connection.
            $.connection.hub.start().done(function () {
                $('#btnSave').click(function () {
                    // Call the Send method on the hub.
                    chat.server.saveData($('#txtName').val(), $('#txtEmail').val());
                    // Clear text box and reset focus for next comment.
                    $('#txtName').val('').focus();
                    $('#txtEmail').val('').focus();
                });

                //First load
                chat.server.saveData('', '');
            });

        });
    </script>
</body>
</html>
Code นี้เป็นส่วนของ Client รับค่า JSON ที่ถูกส่งมาจาก Server จากนั้นแสดงผลบน HTML
Result

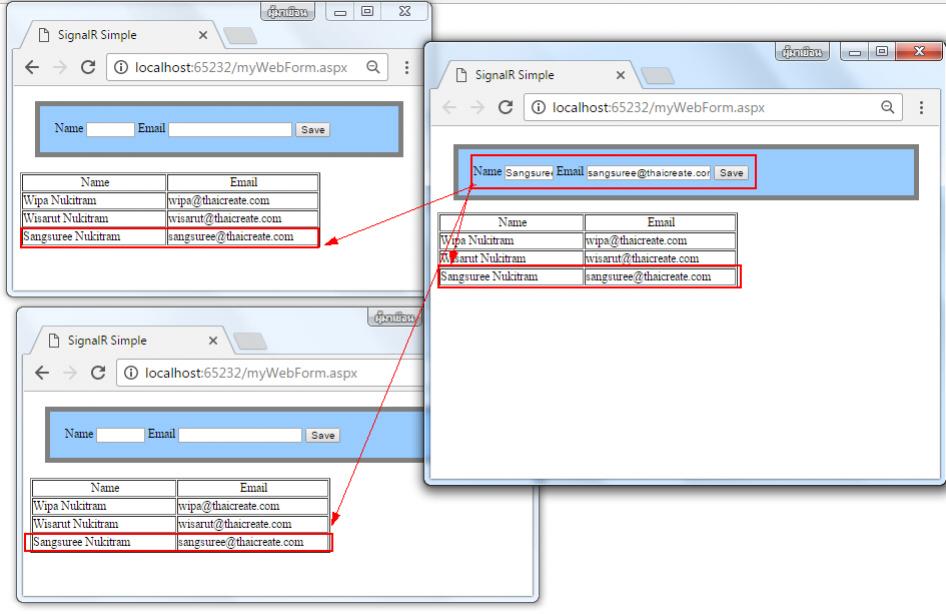
ทำการรันโปรแกรมและเปิดหน้าจอขึ้ยมา 3 หน้าจอ ในครั้งแรกจะเห็นว่าจะโหลดข้อมูลที่อยู่ใน Table มาแสดง
ทดสอบส่งข้อมูลจาก Form ใด Form หนึ่งจะเห็นว่าข้อมูลถูกส่งไปแสดงผลยังทุก ๆ Form ที่เปิดอยู่

ทดสอบจกา Form อื่น ๆ ก็จะได้ผลลัพทธ์เช่นเดียวกัน

เมื่อดูใน Database และ Table จะเห็นว่าข้อมูลถูก Insert เข้ามา
Download Code
Query ข้อมูลจาก SQL Server เป็น JSON และการ Deserialize (Decode) ข้อมูล (VB.Net,C#)
| |
|
|
|
|
 |
|
|
| |
By : |
TC Admin
|
| |
Article : |
บทความเป็นการเขียนโดยสมาชิก หากมีปัญหาเรื่องลิขสิทธิ์ กรุณาแจ้งให้ทาง webmaster ทราบด้วยครับ |
| |
Score Rating : |
 |
| |
Create Date : |
2017-01-19 |
| |
Download : |
No files |
|
|
|

|


