|
| |
ASP.NET การสร้าง Web Service และการเรียกใช้งาน Web Service ด้วย ASP.NET แบบ Step by Step |
ASP.NET การสร้าง Web Service และการเรียกใช้งาน Web Service ด้วย ASP.NET แบบ Step by Step หลายคนคงจะเข้าใจความหมายของคำว่า Web Service แต่ไม่รู้ว่ามันทำงานยังไง และจะเรียกใช้งานยังไง ถ้าจะให้เข้าใจง่าย ๆ Web Service เปรียบเสมือนช่องทางสำหรับการแลกเปลี่ยนข้อมูลระว่าง Server ต่อ Server หรือ Server ต่อ Client ซึ่งเว็บที่จะเปิดให้บริการ Web Service จะต้องทำช่องทางที่เว็บอื่น ๆ จะสามารถเข้ามาเรียกใช้งานได้ ข้อมูลที่แลกเปลี่ยนกันอาจจะเป็นข้อมูลต่าง ๆ เช่น ธนาคารแห่งประเทศไทย อาจจะเปิดช่องทางสำหรับการอ่านค่าอัตราแลกเปลี่ยน โดยกำหนดให้ Client จะต้องส่งค่า Currency และ Date (เช่น USD , 30-Apr-2012) ที่จะอ่านค่าอัตราแลกเปลี่ยน ซึ่งเมื่อ Client เรียก Web Service จะต้องโยนค่า Argument ที่เป็น Currency และ Date เข้าไปได้อีกด้วย
Screenshot
เริ่มต้นการสร้าง Web Service
การทำงานของ Web Service แบ่งออกเป็น 2 ส่วนด้วยกันคือ Web Service ฝั่ง Server และ Client ที่ทำหน้าที่เรียกใช้งาน Web Service
Web Service ฝั่ง Server
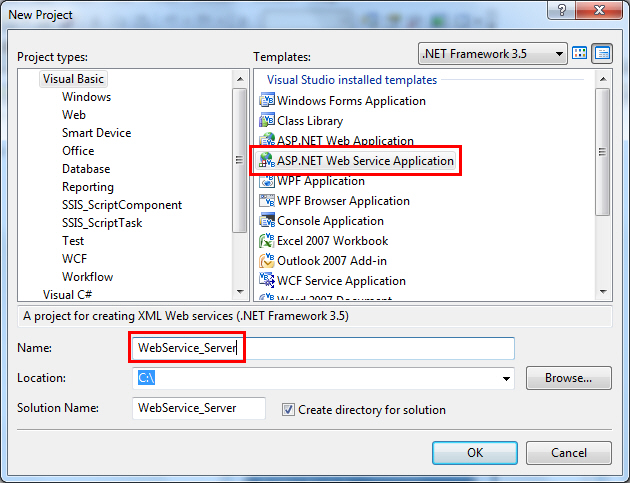
สร้าง Project ใหม่เลือกเป็น ASP.NET Web Service Application และกำหนดชื่อเป็น WebService_Server
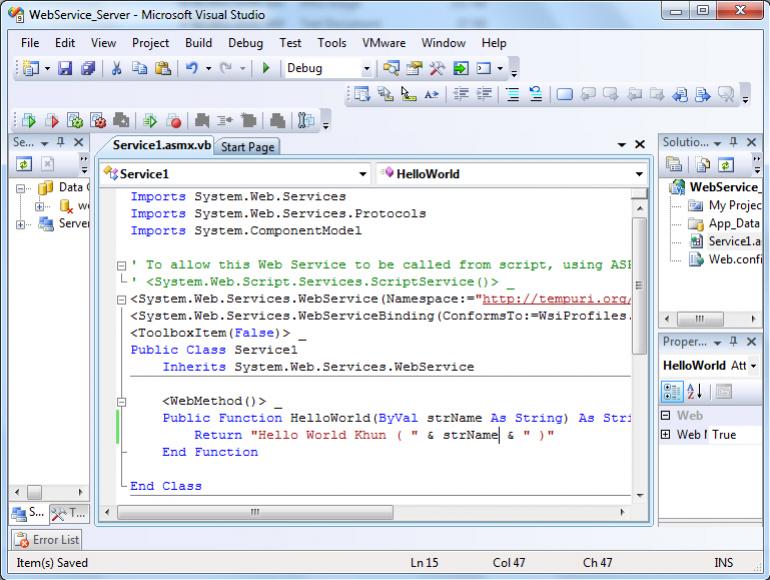
ในการสร้าง URL สำหรับเรียก Web Service นั้นจะต้องสร้างไฟล์นามสกุล .asmx เช่น Service1.asmx ตอนที่เรียกใช้จะได้ Service URL เป็น
http://server-name/Service.asmx
ซึ่งเราสามารถเขียน Method หรือ Property ต่าง ๆ ใส่ไว้ในไฟล์ Service.asmx ในตัวอย่างนี้จะสร้างชื่อว่า Service1 และ Method ที่ชื่อว่า HelloWorld รับค่า strName และส่งกลับ "Hello World Khun ( " & strName & " )"
- VB.NET
Service1.asmx.vb
Imports System.Web.Services
Imports System.Web.Services.Protocols
Imports System.ComponentModel

' To allow this Web Service to be called from script, using ASP.NET AJAX, uncomment the following line.
' <System.Web.Script.Services.ScriptService()> _
<System.Web.Services.WebService(Namespace:="http://tempuri.org/")> _
<System.Web.Services.WebServiceBinding(ConformsTo:=WsiProfiles.BasicProfile1_1)> _
<ToolboxItem(False)> _
Public Class Service1
    Inherits System.Web.Services.WebService

    <WebMethod()> _
    Public Function HelloWorld(ByVal strName As String) As String
        Return "Hello World Khun ( " & strName & " )"
    End Function

End Class
- C#
Service1.asmx.cs
using Microsoft.VisualBasic;
using System;
using System.Collections;
using System.Collections.Generic;
using System.Data;
using System.Diagnostics;
using System.Web.Services;
using System.Web.Services.Protocols;
using System.ComponentModel;

// To allow this Web Service to be called from script, using ASP.NET AJAX, uncomment the following line.
// <System.Web.Script.Services.ScriptService()> _
[System.Web.Services.WebService(Namespace = "http://tempuri.org/")]
[System.Web.Services.WebServiceBinding(ConformsTo = WsiProfiles.BasicProfile1_1)]
[ToolboxItem(false)]
public class Service1 : System.Web.Services.WebService
{

	[WebMethod()]
	public string HelloWorld(string strName)
	{
		return "Hello World Khun ( " + strName + " )";
	}

}
เมื่อเสร็จแล้วให้ทดสอบการรัน จะขึ้นหน้าจอดังรูป
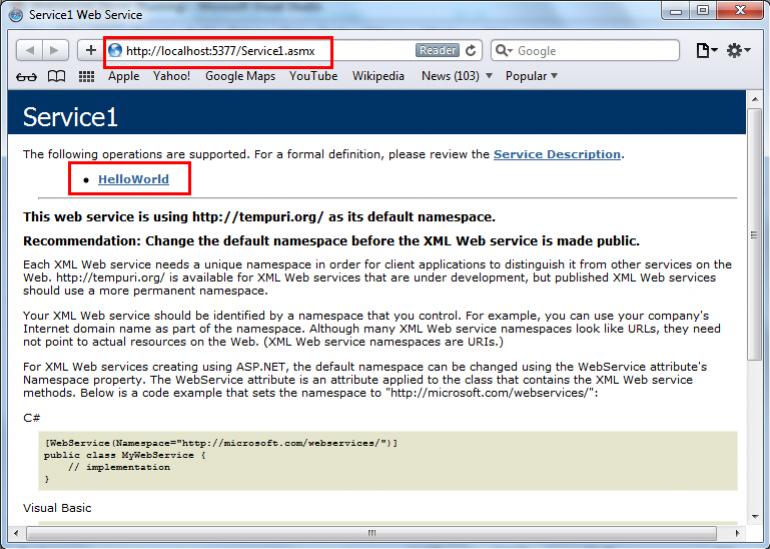
แสดงหน้าจอของ Web Service ที่ประกอบด้วย Method ชื่อว่า HelloWorld
ช่องทางเรียก Service Name
http://localhost:5377/Service1.asmx
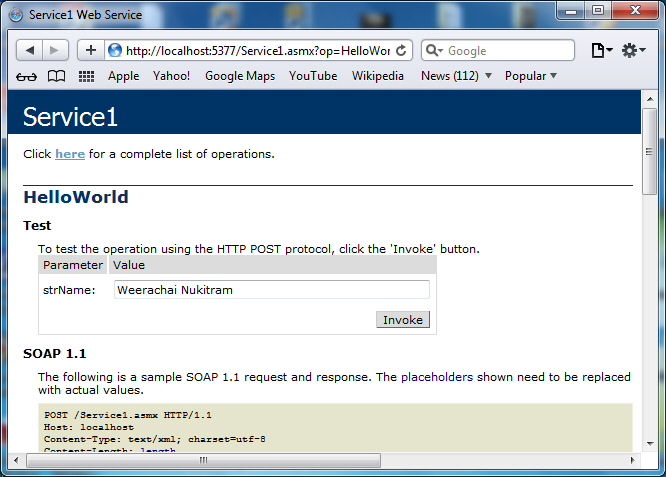
ทดสอบเรียก Method ที่ชื่อว่า HelloWorld โดยกรอกชื่อเข้าไป
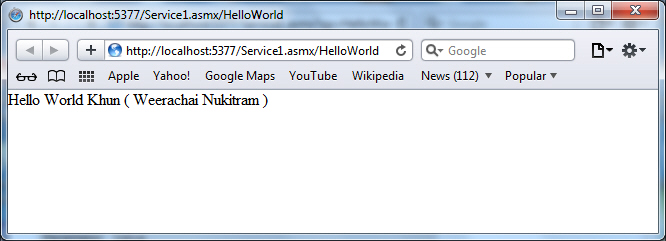
Web Service จะมีการ Return ค่าตามที่กำหนด

เมื่อ View Source ในรูปแบบของ XML
เมื่อได้ Web Service ที่ให้บริการแล้ว เราสามารถเขียนโปรแกรมทำการเรียก Web Service ใช้งาน โดย Application ที่เรียกใช้อาจจะเขียนด้วย ASP.NET หรือ Windows Form Application ใน .NET Framework หรือภาษาอื่น ๆ ที่นอกเหนือจาก .NET เช่น PHP หรือ JSP ก็สามารถทำได้เช่นเดียวกัน
Web Service ฝั่ง Client
ทดสอบการเรียกใช้งาน Web Service ด้วย ASP.NET Web Application
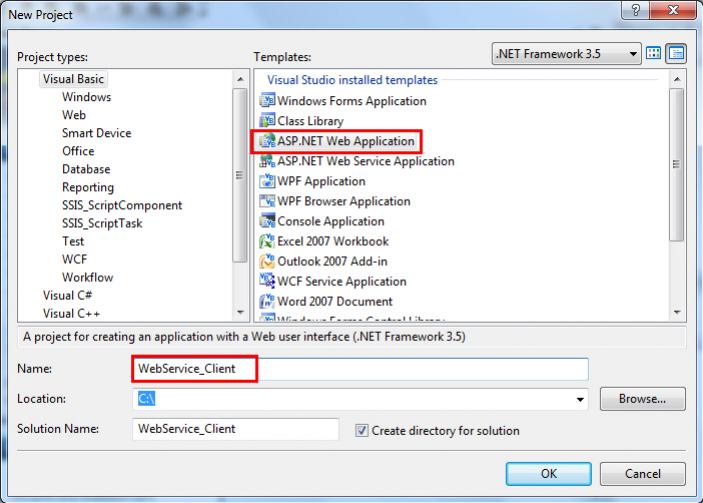
สร้าง ASP.NET Web Application ธรรมดา กำหนดชื่อเป็น WebService๘Client
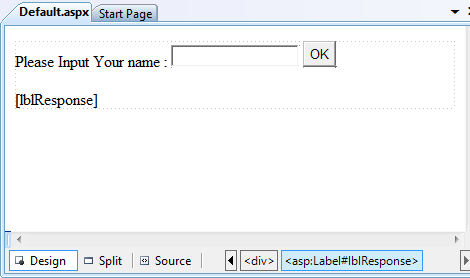
เปิดไฟล์ Default.aspx ขึ้นมา สร้าง Control ดังรูป
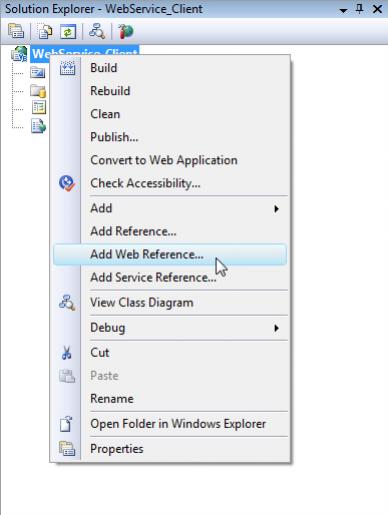
คลิกขวาที่ Project เลือก Add Web Reference
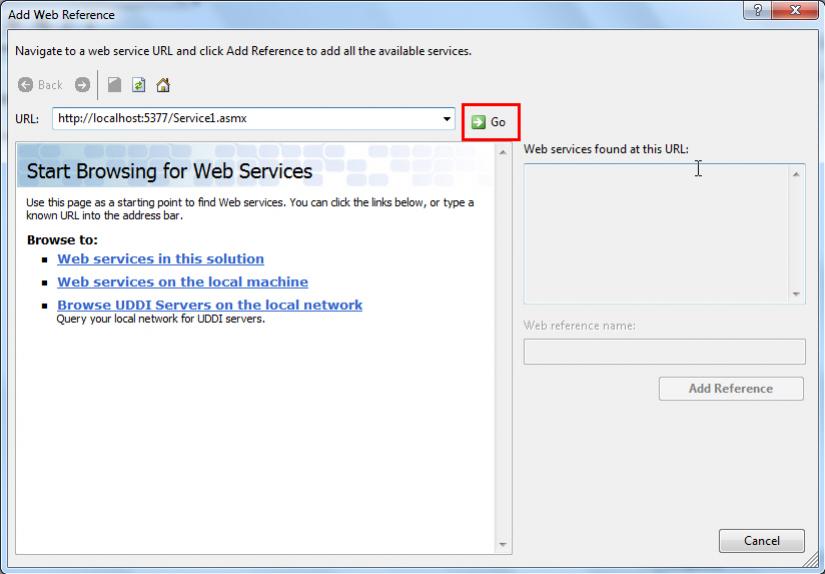
ใส่ URL ของ Web Service (กลับไปดูขั้นตอนการสร้าง Web Service Server) และเลือก Go
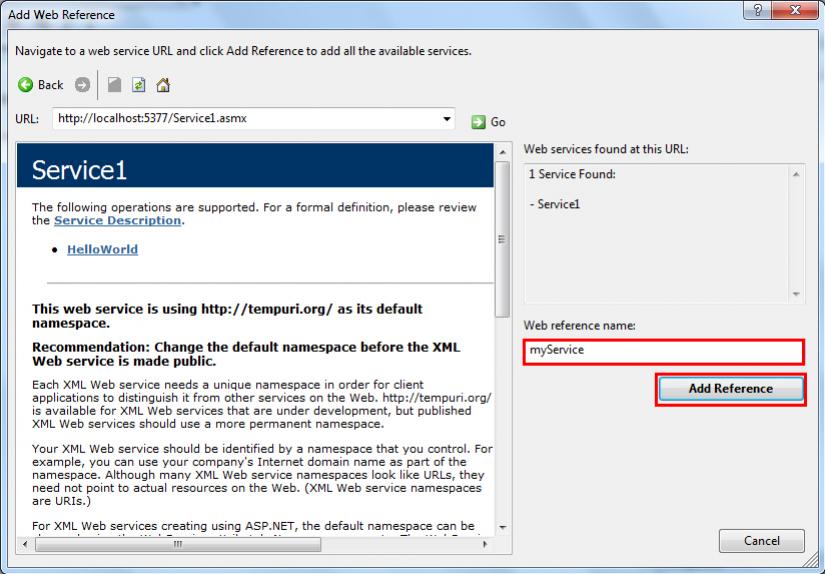
ถ้า URL ของ Web Service สามารถเรียกใช้งานได้ จะปรากฏหน่าจอดังรูป ให้กำหนดชื่อ Web reference name ของ Web Service ที่จะเรียกใช้งานบน Project
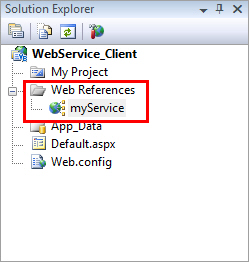
แสดง Web Reference ของ Web Service ที่ได้เรียกเข้ามาใน Project
กลับมาที่ไฟล์ Default.aspx สร้าง Event ของ Button
    Protected Sub btnOK_Click(ByVal sender As Object, ByVal e As EventArgs) Handles btnOK.Click
        Dim mySer As New myService.Service1
        Me.lblResponse.Text = mySer.HelloWorld(Me.txtName.Text)
    End Sub
เรียก Class ที่ชื่อว่า myServer และ Method ชื่อว่า Service1
Code ทั้งหมด
Default.aspx
<%@ Page Language="vb" AutoEventWireup="false" CodeBehind="Default.aspx.vb" Inherits="WebService_Client._Default" %>
<!DOCTYPE html PUBLIC "-//W3C//DTD XHTML 1.0 Transitional//EN" "http://www.w3.org/TR/xhtml1/DTD/xhtml1-transitional.dtd">
<html xmlns="http://www.w3.org/1999/xhtml" >
<head runat="server">
<title></title>
</head>
<body>
<form id="form1" runat="server">
<div>
<asp:Label ID="lblName" runat="server" Text="Please Input Your name :"></asp:Label>
<asp:TextBox ID="txtName" runat="server"></asp:TextBox>
<asp:Button ID="btnOK" runat="server" Text="OK" />
<br />
<br />
<asp:Label ID="lblResponse" runat="server"></asp:Label>
</div>
</form>
</body>
</html>
- VB.NET
Default.aspx.vb
Partial Public Class _Default
    Inherits System.Web.UI.Page

    Protected Sub Page_Load(ByVal sender As Object, ByVal e As System.EventArgs) Handles Me.Load

    End Sub

    Protected Sub btnOK_Click(ByVal sender As Object, ByVal e As EventArgs) Handles btnOK.Click
        Dim mySer As New myService.Service1
        Me.lblResponse.Text = mySer.HelloWorld(Me.txtName.Text)
    End Sub

End Class
- C#
Default.aspx.cs
using Microsoft.VisualBasic;
using System;
using System.Collections;
using System.Collections.Generic;
using System.Data;
using System.Diagnostics;
public partial class _Default : System.Web.UI.Page
{


	protected void Page_Load(object sender, System.EventArgs e)
	{
	}

	protected void btnOK_Click(object sender, EventArgs e)
	{
		myService.Service1 mySer = new myService.Service1();
		this.lblResponse.Text = mySer.HelloWorld(this.txtName.Text);
	}

}
ทดสอบการรันและเรียก Web Service ของ Client
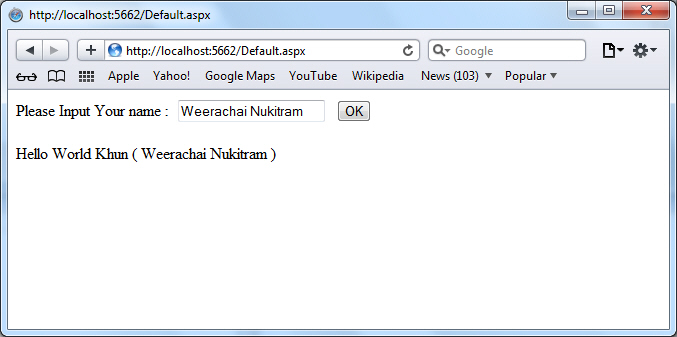
Screenshot

จะเห็นว่า Client มีการเรียก Web Service โดยทำการ Call Method ที่ชื่อว่า HelloWord และส่งค่า Me.txtName.Text และเมื่อฝั่ง Web Service Server ได้รับก็จะทำการ Return "Hello World Khun ( " & strName & " )" ค่าดังรูป
Windows Form Application ฝั่ง Client
กรณีเขียนร่วมกับ Windows Form Application
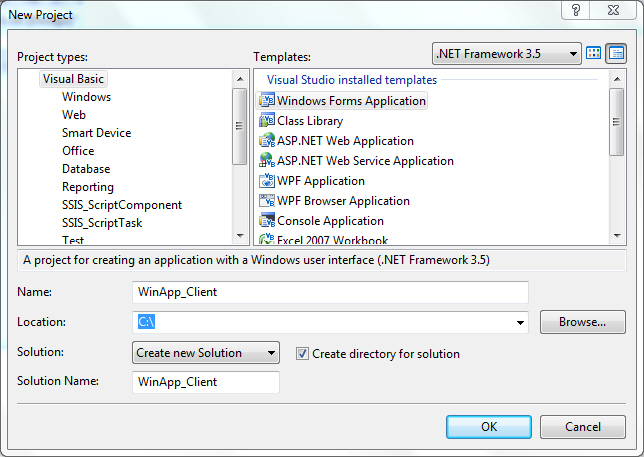
สร้าง Windows Form Application
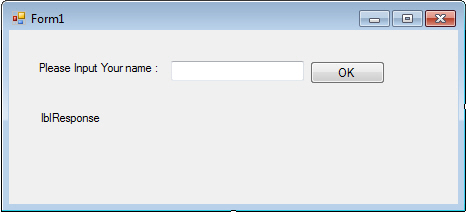
ออกแบบ Form ดังรูป
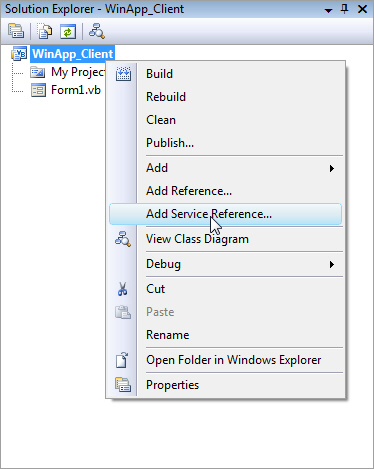
คบิกขวาที่ Project เลือก Add Service Reference
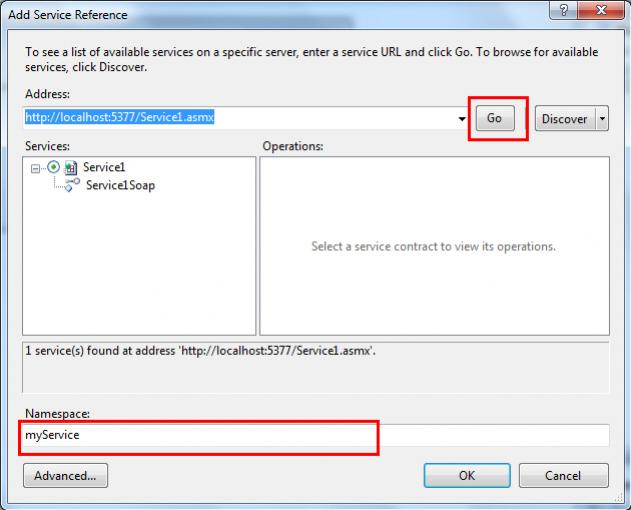
ใส่ URL ของ Web Service
http://localhost:5377/Service1.asmx
คลิกที่ Go กรอกชื่อ NameSpace ของ Web Service
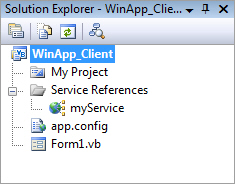
แสดง Service References
กลับมาที่ Form สร้าง Event Button โดยกำหนด Code ดังนี้
-VB.NET
Form.vb
Public Class Form1

    Private Sub btnOK_Click(ByVal sender As System.Object, ByVal e As System.EventArgs) Handles btnOK.Click
        Dim mySer As New myService.Service1SoapClient
        Me.lblResponse.Text = mySer.HelloWorld(Me.txtName.Text)
    End Sub

End Class
- C#
Form.cs
public class Form1
{

	private void btnOK_Click(System.Object sender, System.EventArgs e)
	{
		myService.Service1SoapClient mySer = new myService.Service1SoapClient();
		this.lblResponse.Text = mySer.HelloWorld(this.txtName.Text);
	}

}
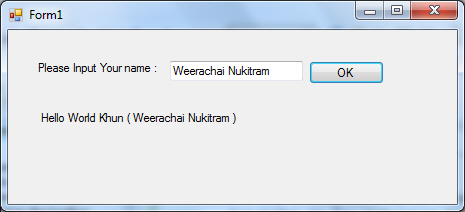
Screenshot

เพิ่มเติมสำหรับ Windows Form Application
กรณีที่ต้องการเรียกใช้งาน Web Service ในส่วนของ Windows Form Application ให้เรียกแบบ Add Web Reference
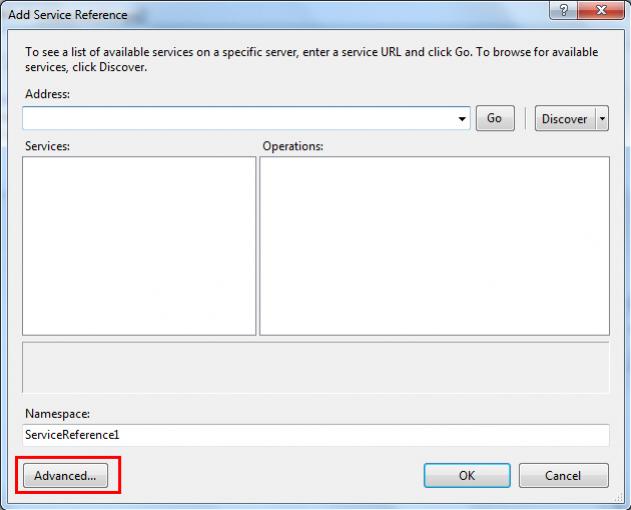
ตรง Add Service Reference จะมีปุ่มให้เลือก Advanced....
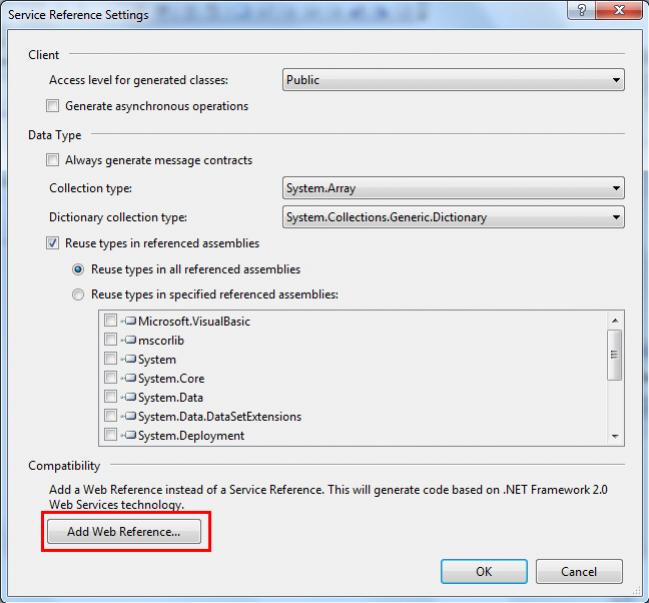
คลิกเลือก Add Web Reference
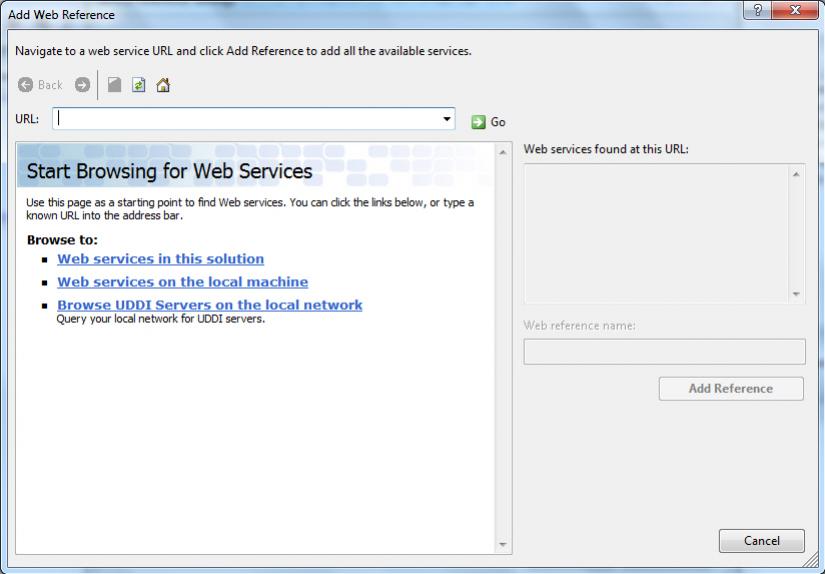
หน้าจอสำหรับ Add Web Reference ซึ่งสามารถเลือกรูปแบบและ คำสั่งจะเหมือนในส่วนของ ASP.NET Web Application
Download Code !!
บทความอื่น ๆ ที่เกี่ยวข้อง
Go to : ASP.NET กับ Web Service การเขียนเว็บเซอร์วิสดึงข้อมูลจาก Database ผ่าน DataSet และ DataTable
Go to : รบกวนขอความรู้เรื่อง dataset กับ Webservice หน่อยครับ
Go to : ดึงข้อมูลจาก Webservice มาแสดงใน Webpage ยังไงครับ
Go to : VB.NET รบกวนถามการเขียน Web Service ให้สามารถ Return ค่าในลักษณะของ DataSet ครับ
| |
|
|
|
|
 |
|
|
| |
By : |
TC Admin
|
| |
Article : |
บทความเป็นการเขียนโดยสมาชิก หากมีปัญหาเรื่องลิขสิทธิ์ กรุณาแจ้งให้ทาง webmaster ทราบด้วยครับ |
| |
Score Rating : |
    |
| |
Create Date : |
2012-04-30 |
| |
Download : |
No files |
|
|
|

|