|
| |
iOS - เริ่มต้นเขียนภาษา Swift บนแอพ iPhone รองรับ iOS 8 |
iOS - เริ่มต้นเขียนภาษา Swift บนแอพ iPhone รองรับ iOS 8 ตอนนี้ Apple ได้เปิดตัวระบบปฏิบัติการ iOS8 แล้วซึ่งภาษาโปรแกรมใหม่ที่รองรับ ก็จะประกอบไปด้วย Objective-C เหมือนเดิม และเพิ่มภาษาโปรแกรม Swift ขึ้นมาให้เราได้ลองศึกษาและใช้ดู
ตอนนี้ภาษา Swift นั้นจะต้องมีบัญชี Developer Account ของ Apple ดาวน์โหลด XCode6 BETA มาก่อนครับ ซึ่ง Swift นั้น เราสามารถเรียนรู้ได้ที่ http://swift-lang.org/downloads/ หรือลอง ดาวน์โหลดเปิด Ebook ไปศึกษาตามๆ กันไป ส่วน ไฟล์ EBook นั้น จะมีเนื้อหาให้เราศึกษาเรื่องของพื้นฐานการเขียนโปรแกรมภาษานี้ หลักถ้าหากดาวน์โหลดดูแล้วก็จะพบว่า เนื้อหามีส่วนประกอบสำคัญให้เราได้เตรียมพร้อม
ถ้าลองศึกษาดูแล้วเราจะพบว่า ภาษา Swift เป็นภาษาโปรแกรมตัวใหม่สำหรับพัฒนาแอพพลิเคชัน และโปรแกรมบน iOS และ OS X ซึ่งมีโครงสร้างที่ใกล้เคียงภาษา C และ Objective-C
การประกาศตัวแปรเบื้องต้นของภาษา Swift เกี่ยวกับ Constants และ Var ทั้งหมด
ตัวแปรที่เป็น Constants จะใช้ Keywords ว่า let ส่วน Var หรือ Variables จะใช้ Keyword ว่า var โดยมีตัวอย่างในการประกาศดังนี้
Code (C#)
let LoginCountNumberLimit = 5
var LoginCountNumber = 1
วามหมายก็คือ ตัวแปร LoginCountNumberLimit จะให้ค่า 5 เป็นจำนวนครั้งที่เราจะทำการ Action ใดๆ และเราจะใช้ LoginCountNumber เป็นการเก็บจำนวนครั้งที่ทำ Action นั่นคือการ Login ไปแล้วคืนกลับไปเทียบซึ่งค่าก็คือ 1 นั่นเอง
สำหรับการประกาศตัวแปรแบบ Multiple Constants หรือ Multiple Variables จะใช้เครื่องหมาย “,” หรือ Comma เป็นตัวคั่น ตัวอย่างเช่น
Code (C#)
var a=1.0, b=2.0, c=3.0
ส่วนการประกาศตัวแปร String หรือตัวอักษร ไปจนถึงประโยคต่างๆ ที่เราจะใช้งานสามารถประกาศการเริ่มต้นใช้งานดังนี้
Code (C#)
var Message: string
เป็นการอธิบายว่า ตัวแปร Message เป็นตัวแปรประเภทของ String ซึ่งเมื่อเราประกาศตัวแปรดังกล่าวเรียบร้อยแล้ว เราก็สามารถเรียกใช้งานได้ดังนี้
Code (C#)
Message = “Hello World!”
เป็นต้น เบื้องต้นเป็นการประกาศ Variables ของ String ดังตัวอย่างที่ว่าไป ส่วนการประกาศ Constants นั้น เราสามารถประกาศได้ดังนี้ (สามารถใส่ตัวอักขระ หรือ Emoticonลงไปได้ด้วย)
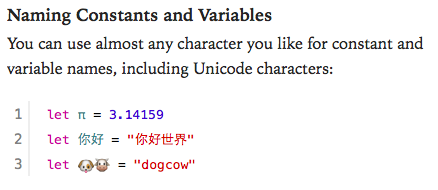
Code (C#)
let π = 3.14159
หรือใน Ebook ของ Swift นั้นจะเป็นไปตามนี้ครับ
คำสั่งในการ Print ค่า Constants หรือ Variables นั้นจะใช้คำสั่งของ ภาษา C เลยนั่นคือ println ตัวอย่างการใช้งานก็คือ
Code (C#)
println(Message)
ผลลัพธ์ที่ปรากฏก็คือ คำว่า “Hello World!”
เป็นการใช้ println มาแสดงผลตัวแปร อย่าง Constant หรือ Var ครับ แต่ถ้าหากต้องการ แสดงผลของ ข้อความไปเลยเราก็สามารถ อัดข้อความลงไปตรงๆ ใน ฟังก์ชัน println นี้ได้อย่างนี้ครับ
Code (C#)
println(“This is a Table”)
หมายเหตุ: ซึ่งใน Ebook ของภาษาโปรแกรม Swift นี้จะใช้ println ได้เทียบเท่ากับการ พิมพ์ log หรือใช้แทน NSlog ของ Cocoa บน XCode ของ Objective-C ได้เลยเป็นการทดสอบแอพพลิเคชันของเราครับ
ดังนั้นหาก เรามีตัวแปรที่เก็บไว้ และ อยากจะนำมา println ร่วมกับ String ที่อัดลงไปเราสามารถเขียนได้ดังนี้ครับ
Code (C#)
println(“”Message is: \(Message)”)
จะได้ผลลัพธ์คือ Message is Hello World!
ตัวแปร Array และการเขียนโปรแกรม ภาษา Swift
Code (C#)
var colors = ["red", "blue"]
var moreColors: String[] = ["orange", "purple"] // explicit type
colors.append("green") // [red, blue, green]
colors += "yellow" // [red, blue, green, yellow]
colors += moreColors // [red, blue, green, yellow, orange, purple]

var days = ["mon", "thu"]
var firstDay = days[0] // mon
days.insert("tue", atIndex: 1) // [mon, tue, thu]
days[2] = "wed" // [mon, tue, wed]
days.removeAtIndex(0) // [tue, wed]
การเรียกใช้ Class ต่างๆ
Code (C#)
class Counter {
  var count: Int = 0
  func inc() {
    count++
  }
  func add(n: Int) {
    count += n
  }
  func printCount() {
    println("Count: \(count)")
  }
}

var myCount = Counter()
myCount.inc()
myCount.add(2)
myCount.printCount() // Count: 3
การกำหนดเงื่อนไข Condition ของโปรแกรมภาษา Swift
IF THEN ELSE
Code (C#)
let happy = true
if happy {
    println("We're Happy!")
} else {
    println("We're Sad :('")
}
// We're Happy!
Code (C#)
let speed = 28
if speed <= 0 {
    println("Stationary")
} else if speed <= 30 {
    println("Safe speed")
} else {
    println("Too fast!")
}
// Safe speed
SWITCH CASE
Code (C#)
let n = 2
switch n {
    case 1:
        println("It's 1!")
    case 2...4:
            println("It's between 2 and 4!")
    case 5, 6:
        println("It's 5 or 6")
    default:
        println("Its another number!")
}
// It's between 2 and 4!
การใช้ Dictionary
Code (C#)
var days = ["mon": "monday", "tue": "tuseday"]
days["tue"] = "tuesday" // change the value for key "tue"
days["wed"] = "wednesday" // add a new key/value pair

var moreDays: Dictionary = ["thu": "thursday", "fri": "friday"]
moreDays["thu"] = nil // remove thu from the dictionary
moreDays.removeValueForKey("fri") // remove fri from the dictionary
ตัวแปร Enums
Code (C#)
enum CollisionType: Int {
 case Player = 1
 case Enemy = 2
}
var type = CollisionType.Player
การใช้ Loop For
Code (C#)
for var index = 1; index < 3; ++index {
    // loops with index taking values 1,2
}
for index in 1..3 {
    // loops with index taking values 1,2
}
for index in 1...3 {
    // loops with index taking values 1,2,3
}

let colors = ["red", "blue", "yellow"]
for color in colors {
    println("Color: \(color)")
}
// Color: red
// Color: blue
// Color: yellow

let days = ["mon": "monday", "tue": "tuesday"]
for (shortDay, longDay) in days {
    println("\(shortDay) is short for \(longDay)")
}
// mon is short for monday
// tue is short for tuesday
การประกาศฟังก์ชัน
Code (C#)
func iAdd(a: Int, b: Int) -> Int {
  return a + b
}
iAdd(2, 3) // returns 5

func eitherSide(n: Int) -> (nMinusOne: Int, nPlusOne: Int) {
  return (n-1, n+1)
}
eitherSide(5) // returns the tuple (4,6)
เปิด Xcode6 BETA ขึ้นมาครับ
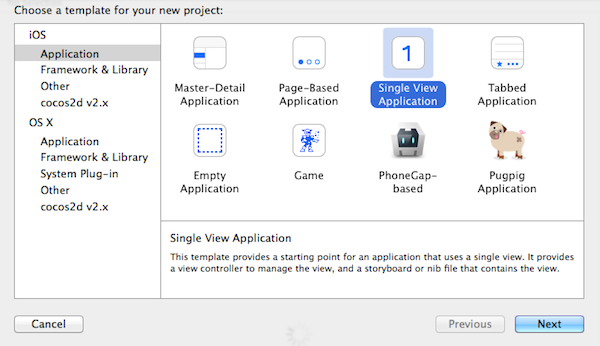
สำหรับ Single Application จะมีให้เลือกไม่ต่างจากเดิม
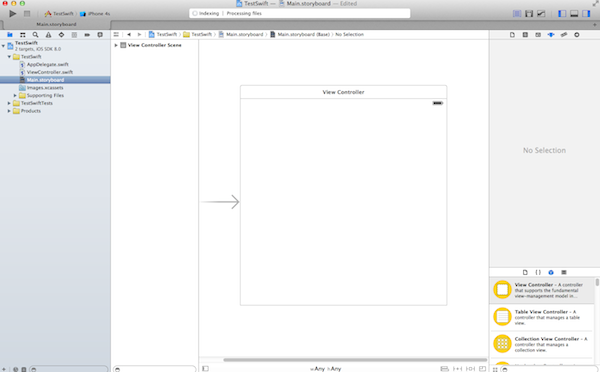
หน้า MainStoryBoard ก็รองรับเรื่องของ Auto Layout ที่แสนปวดหัวได้อย่างดี
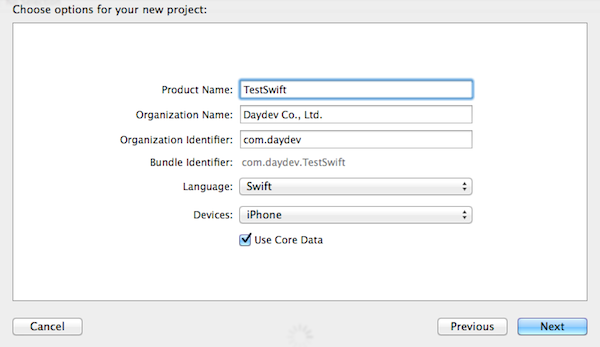
กลับมาที่ Single Application ก่อนครับ มาลองทำ Hello worlds กัน
ก็เปิดไปที่ไฟล์ ViewController.swift เลยครับ
หา เมธอด ViewDidLoad() แล้วก็เพิ่มคำสั่งยอดฮิตเข้าไปครับ คลาสทั้งหมดจะเป็นแบบนี้
Code (C#)
import UIKit

class ViewController: UIViewController {

    override func viewDidLoad() {
        super.viewDidLoad()
        // Do any additional setup after loading the view, typically from a nib.
        println("Hello World")
    }

    override func didReceiveMemoryWarning() {
        super.didReceiveMemoryWarning()
        // Dispose of any resources that can be recreated.
    }


}
ลองทำการ Run คำสั่งกันหน่อย
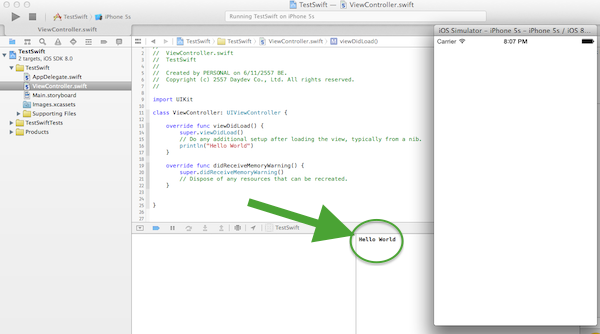
จะได้ ผลลัพธ์ว่า Hello World ครับ
Reference : http://www.daydev.com/category/developer/ios-developer
|
|
| |
By : |
Daydev
|
| |
Article : |
บทความเป็นการเขียนโดยสมาชิก หากมีปัญหาเรื่องลิขสิทธิ์ กรุณาแจ้งให้ทาง webmaster ทราบด้วยครับ |
| |
Score Rating : |
   |
| |
Create Date : |
2014-06-12 |
| |
Download : |
No files |
|
|
|

|