|
| |
PHP และ JSON กับ Web Service การรับส่งข้อมูลจาก MySQL ในรูปแบบของ JSON |
PHP และ JSON กับ Web Service การรับส่งข้อมูลจาก MySQL ในรูปแบบของ JSON การนำ JSON มาใช้งานร่วมกับ PHP Web Service ยิ่งทำให้การเขียนโปรแกรมที่ทำการส่งค่าระหว่าง Server กับ Client นั้นสะดวกยิ่งขึ้น จะเพิ่มความสามารถในการรัวส่งค่าตัวแปร ระหว่างกันได้ดียิ่งกว่าเดิม และสะดวกกว่าการรังส่งในรูปแบบ XML เพราะ JSON Code เป็น String ที่มีรูปแบบง่าย ๆ สามารถอ่านและเข้าใจได้ง่าย อีกทั้งในฝั่งของ Client และ Server ก็สามารถแปลงค่าจาก JSON ได้อย่างไม่ยากเช่นเดียวกัน
Screenshot
jQuery Ajax กับ JSON ทำความเข้าใจ การรับส่งข้อมูล JSON ผ่าน jQuery กับ Ajax
ก่อนอ่านบทความนี้ควรอ่าน 3 บทความนี้ก่อน
จากบทความก่อน ๆ เราจะใช้การรับส่งข้อมูลจาก Web Service ในรูปแบบของ String และ Array ซึ่งจะมีข้อกำกัดในกรณีที่ต้องการส่งข้อมูลในรูปแบบ Array ที่มีความซับซ้อน มี Key และ Value หลายตัว ทำได้ยากยิ่งขึ้น และการอ่านข้อมูลระหว่าง Server กับ Client ก็มีปัญหาในกรณีที่ Client ไม่สามารถรับค่า Array ได้โดยตรง เพราะฉะนั้นจึงเกิดมีการนำ JSON มาเป็นสื่อกลางในการรับส่งแลกเปลี่ยนข้อมูล
ฐานข้อมูลฝั่ง Server
CREATE TABLE `customer` (
  `CustomerID` varchar(4) NOT NULL,
  `Username` varchar(30) NOT NULL,
  `Password` varchar(30) NOT NULL,
  `Name` varchar(50) NOT NULL,
  `Email` varchar(50) NOT NULL,
  `CountryCode` varchar(2) NOT NULL,
  `Budget` double NOT NULL,
  `Used` double NOT NULL,
  PRIMARY KEY  (`CustomerID`)
) ENGINE=MyISAM DEFAULT CHARSET=utf8;

--
-- Dumping data for table `customer`
--

INSERT INTO `customer` VALUES ('C001', 'win', 'win001', 'Win Weerachai', '[email protected]', 'TH', 1000000, 600000);
INSERT INTO `customer` VALUES ('C002', 'john', 'john002', 'John  Smith', '[email protected]', 'EN', 2000000, 800000);
INSERT INTO `customer` VALUES ('C003', 'jame', 'jame003', 'Jame Born', '[email protected]', 'US', 3000000, 600000);
INSERT INTO `customer` VALUES ('C004', 'chalee', 'chalee004', 'Chalee Angel', '[email protected]', 'US', 4000000, 100000);
นำคำสั่ง SQL นี้ไปสร้าง Database ในฝั่งของ Web Service Server

เมื่อสร้างเสร็จจะได้โครงสร้างและข้อมูลดังรูป
สำหรับบทความนี้ใช้ Library ของ NuSoap สามารถดาวน์โหลดได้ที่
หรือจะดาวน์โหลดได้จากในส่วนท้ายของบทความ
Code เต็ม ๆ
Web Service ฝั่ง Server
WebServiceServer.php
<?php
		require_once("lib/nusoap.php");

		//Create a new soap server
		$server = new soap_server();

		//Define our namespace
		$namespace = "http://localhost/nusoap/index.php";
		$server->wsdl->schemaTargetNamespace = $namespace;

		//Configure our WSDL
		$server->configureWSDL("getCustomer");

		// Register our method and argument parameters
        $varname = array(
                   'strCountry' => "xsd:string"
        );
		$server->register('resultCustomer',$varname, array('return' => 'xsd:string'));

		function resultCustomer($strCountry)
		{
				$objConnect = mysql_connect("localhost","root","") or die(mysql_error());
				$objDB = mysql_select_db("mydatabase");
				$strSQL = "SELECT * FROM customer WHERE 1 AND CountryCode like '%".$strCountry."%' ";
				$objQuery = mysql_query($strSQL) or die (mysql_error());
				$intNumField = mysql_num_fields($objQuery);
				$resultArray = array();
				while($obResult = mysql_fetch_array($objQuery))
				{
					$arrCol = array();
					for($i=0;$i<$intNumField;$i++)
					{
						$arrCol[mysql_field_name($objQuery,$i)] = $obResult[$i];
					}
					array_push($resultArray,$arrCol);
				}

				return json_encode($resultArray);
		}

		// Get our posted data if the service is being consumed
		// otherwise leave this data blank.
		$POST_DATA = isset($GLOBALS['HTTP_RAW_POST_DATA']) ? $GLOBALS['HTTP_RAW_POST_DATA'] : '';

		// pass our posted data (or nothing) to the soap service
		$server->service($POST_DATA);
		exit();
?>
คำอธิบาย
จาก Code ของ Web Service ในฝั่ง Server เมื่อมีการ result ข้อมูลจาก MySQL ลงใน Array ได้แล้ว จะมีการ return ข้อความผ่านการ encode ในรูปแบบ JSON ด้วย function ของ php ชื่อว่า json_encode()
มุมมองของ Array
array(2) {
  [0]=>
  object(stdClass)#4 (6) {
    ["CustomerID"]=>
    string(4) "C003"
    ["Name"]=>
    string(9) "Jame Born"
    ["Email"]=>
    string(24) "[email protected]"
    ["CountryCode"]=>
    string(2) "US"
    ["Budget"]=>
    string(7) "3000000"
    ["Used"]=>
    string(6) "600000"
  }
  [1]=>
  object(stdClass)#5 (6) {
    ["CustomerID"]=>
    string(4) "C004"
    ["Name"]=>
    string(12) "Chalee Angel"
    ["Email"]=>
    string(27) "[email protected]"
    ["CountryCode"]=>
    string(2) "US"
    ["Budget"]=>
    string(7) "4000000"
    ["Used"]=>
    string(6) "100000"
  }
}
มุมมองของ JSON
[
{"CustomerID":"C003","Name":"Jame Born","Email":"[email protected]","CountryCode":"US","Budget":"3000000","Used":"600000"}
,{"CustomerID":"C004","Name":"Chalee Angel","Email":"[email protected]","CountryCode":"US","Budget":"4000000","Used":"100000"}
]
โดยสิ่งที่ Web Service ได้ return ค่ากลับไปก็เป็นค่าที่ถูกแปลง JSON เท่านั้น ซึ่งฝั่ง Client สามารถใช้ function ในการ decode รูปแบบ JSON ได้เช่นเดียวกัน
Web Service ฝั่ง Client ด้วย PHP
ทดสอบการเรียก Web Service ในรูปแบบฝั่ง Client ด้วย PHP แต่ถ้าหากต้องการรับส่งด้วย Array ก็สามารถอ่านได้ตามคำแนะนำจาก Link ข้างบน
WebServiceClient.php
<html>
<head>
<title>ThaiCreate.Com</title>
</head>
<body>

<form name="frmMain" method="post" action="">
	  <h2>Search Customer</h2>
	  Search by Country Code
	  <input type="text" name="txtCountry" value="<?php echo $_POST["txtCountry"];?>">
	  <input type="submit" name="Submit" value="Submit">
</form>

<?php
			if($_POST["txtCountry"] != "")
			{
					include("lib/nusoap.php");
					$client = new nusoap_client("http://localhost/nusoap/WebServiceServer.php?wsdl",true);
					$params = array(
							   'strCountry' => $_POST["txtCountry"]
					);
					$data = $client->call('resultCustomer', $params);

					//echo '<pre>';
					//var_dump(json_decode($data));
					//echo '</pre><hr />';

					$mydata = json_decode($data,true); // json decode from web service


					if(count($mydata) == 0)
					{
							echo "Not found data!";
					}
					else
					{
						?>
								<table width="500" border="1">
								  <tr>
									<td>CustomerID</td>
									<td>Name</td>
									<td>Email</td>
									<td>CountryCode</td>
									<td>Budget</td>
									<td>Used</td>
								  </tr>
								<?php
								foreach ($mydata as $result) {
								?>
									  <tr>
										<td><?php echo $result["CustomerID"];?></td>
										<td><?php echo $result["Name"];?></td>
										<td><?php echo $result["Email"];?></td>
										<td><?php echo $result["CountryCode"];?></td>
										<td><?php echo $result["Budget"];?></td>
										<td><?php echo $result["Used"];?></td>
									  </tr>
								<?php
								}
					}

			}
?>
</body>
</html>
คำอธิบาย
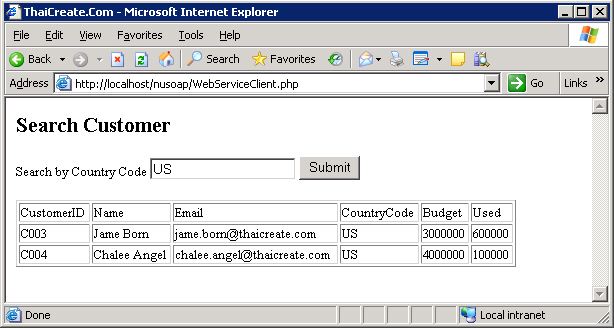
จาก Code ฝั่งของ Client มีการส่งค่า Country เพื่อไปค้นหาข้อมูลใน Web Service ฝั่ง Server และฝั่ง Server จะส่งข้อมูลกลับมาในรูปแบบของ JSON ซึ่งเมื่อ Client ได้ค่า JSON กลับมาก็ใช้การ decode ด้วย function ของ php ที่ชื่อว่า json_decode() โดยเมื่อผ่านการ decode ตัวแปรที่ได้จะอยู่ในรูปแบบของ Array และสามารถใช้ loop foreach หรืออื่น ๆ เพื่อทำอ่านการค่าออกมา
Screenshot

Web Service ฝั่ง Client ด้วย ASP.NET
อันนี้จะเป็นใช้ ASP.NET การเรียก Web Service ของ PHP ที่มีการส่งค่ากลับมาในรูปแบบของ JSON และใน ASP.NET เองไม่มี function สำหรับการ Decode ค่า JSON โดยตรง ที่แนะทำให้ใช้ Library ของ JSON.NET ซึ่งเป็น Open Source ที่สามารถดาวน์โหลดมาใช้งานได้ฟรี ๆ และรองรับกับ .NET ได้หลาย Version
Download JSON.NET Library
http://json.codeplex.com/
หลังจากดาวน์โหลดแล้วให้กับไปที่ ASP.NET Project ที่ได้สร้างไว้ (ตัวอย่างละเอียดสามารถอ่านได้จากบทความที่ได้แนะนำก่อนหน้านี้)
ตัวอย่างการสร้าง WebPage และการ Add Web Reference
ขั้นตอนการ Add Reference คลาส dll ของ JSON.NET เข้ามาใน Project
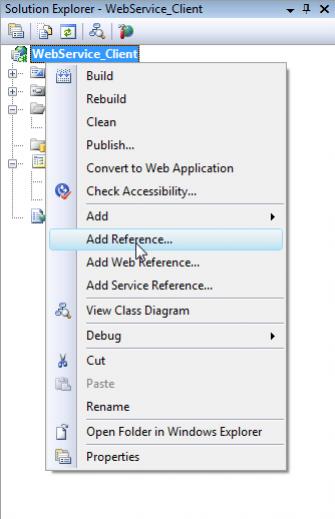
คลิกขวาที่ Project เลือก Add Reference ดังรูป
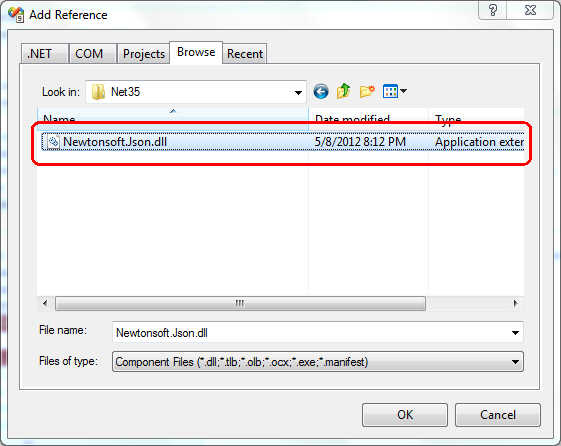
เลือก dll ของ JSON.NET ตาม Version ที่ได้ดาวน์โหลดมา
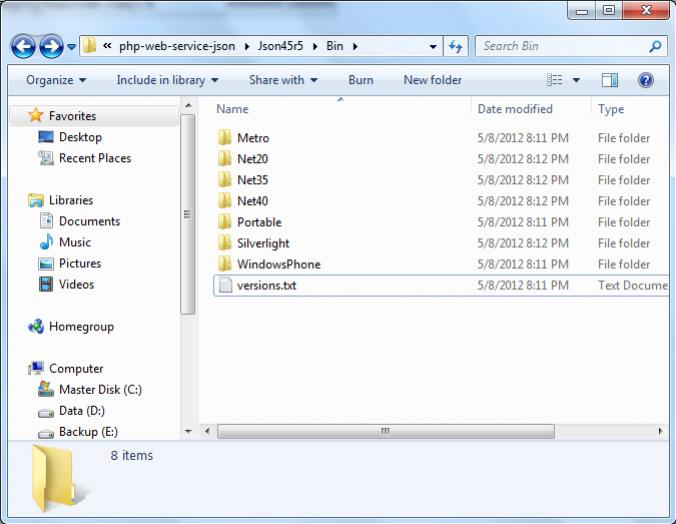
ในไฟล์ที่ดาวน์โหลดมาจะมีอยู่หลาย Version เช่น 2.0 , 3.5 , และ 4.5 (ใน 3.5 จะต้องเป็น Service Pack 1)
Screen Default.aspx
- สำหรับ VB.NET
Default.aspx.vb
Imports System.Data
Imports Newtonsoft.Json

Partial Public Class _Default
    Inherits System.Web.UI.Page

    Public Function DerializeDataTable(ByVal strJSON As String) As DataTable
        Dim dt As DataTable
        dt = JsonConvert.DeserializeObject(Of DataTable)(strJSON)
        Return dt
    End Function

    Protected Sub btnSearch_Click(ByVal sender As Object, ByVal e As EventArgs) Handles btnSearch.Click
        Dim cls As New clsGetCustomer.getCustomer
        Dim strJSON = cls.resultCustomer(Me.txtCountry.Text)

        GridView1.DataSource = DerializeDataTable(strJSON)
        GridView1.DataBind()
    End Sub

End Class
- สำหรับ C#
Default.aspx.cs
using System;
using System.Collections.Generic;
using System.Linq;
using System.Web;
using System.Web.UI;
using System.Web.UI.WebControls;
using System.Data;
using Newtonsoft.Json;

namespace WebService_Client
{
    public partial class _Default : System.Web.UI.Page
    {
	    public DataTable DerializeDataTable(string strJSON)
	    {
		    DataTable dt = null;
		    dt = JsonConvert.DeserializeObject<DataTable>(strJSON);
		    return dt;
	    }

	    protected void btnSearch_Click(object sender, EventArgs e)
	    {
		    clsGetCustomer.getCustomer cls = new clsGetCustomer.getCustomer();
		    string strJSON = cls.resultCustomer(this.txtCountry.Text).ToString();

		    GridView1.DataSource = DerializeDataTable(strJSON);
		    GridView1.DataBind();
	    }
    }
}
คำอธิบาย
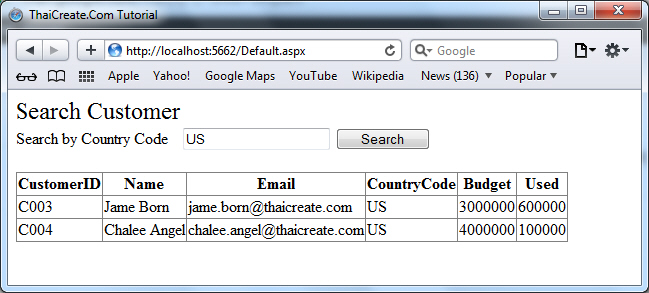
จาก Code จะ import ตัว namespace ของ Newtonsoft.Json เข้ามาใน Class และมีการเรียกใช้ JsonConvert.DeserializeObject<DataTable>(strJSON) เพื่อแปลงคา JSON ที่ถูกส่งมาจาก PHP Web Service ฝั่ง Server ให้อยู่ในรูปแบบ DataTable พร้อม ๆ กับโยนค่า DataSource ให้กับ GridView
Screenshot
ดาวน์โหลด Code ทั้งหมด ทั้งที่เป็น PHP Web Service และ ASP.NET by VB.NET or C#
Download Code !!
บทความอื่น ๆ ที่เกี่ยวข้อง
Go to : jQuery Ajax กับ JSON ทำความเข้าใจ การรับส่งข้อมูล JSON ผ่าน jQuery กับ Ajax
Go to : วิธีการสร้าง PHP กับ Web Service และ Return Array ไปยัง Client ด้วย NuSoap
Go to : PHP - Web Service กับ MySQL Database รับส่งค่า Result ผ่านเว็บเซอร์วิส (NuSoap)
Go to : การทำ Login Form และ Update MySQL Data ผ่าน Web Service ด้วย PHP (NuSoap)
Go to : PHP Create - Call Web Service สร้างและเรียกเว็บเซอร์วิส ด้วย PHP (NuSoap and Soap)
Go to : PHP สร้าง Web Service และใช้ .NET เรียก Web Service ของ PHP (ASP.NET and Windows Form)
Go to : php กับ web service ขอคำปรึกษาเรื่องการ return array ใน webservice ครับ
Go to : สอบถาม jquery ในส่วนของการนำ json data ที่เป็นภาษาไทย ในการนำไปใช้งานครับ
| |
|
|
|
|
 |
|
|
| |
By : |
TC Admin
|
| |
Article : |
บทความเป็นการเขียนโดยสมาชิก หากมีปัญหาเรื่องลิขสิทธิ์ กรุณาแจ้งให้ทาง webmaster ทราบด้วยครับ |
| |
Score Rating : |
   |
| |
Create Date : |
2012-05-25 |
| |
Download : |
No files |
|
|
|

|