|
| |
iOS - เขียนแอพบน iPhone แสดงข้อมูลจากไฟล์ Property List หรือ Plist ผ่าน UITableView |
iOS - เขียนแอพบน iPhone แสดงข้อมูลจากไฟล์ Property List หรือ Plist ผ่าน UITableView สำหรับแอพพลิเคชันที่ต้องการแสดงผลข้อมูลในเครื่องผ่าน UITableView นั้นมีหลายวิธี Plist หรือ Property List เป็นอีกทางเลือกที่ดีครับ
รูปแบบของ Property List นั้น ทำงานเหมือน Database อย่าง SQLite หรือ JSON WebService ครับ เพียงแค่มันมีการจัดการได้เองง่ายๆ ผ่าน XCode ของเราใน Bundle Project เลยครับ โครงสร้างของมันนั้นเหมือนการจัดการข้อมูลแบบ XML นั่นเอง
เป็นการแสดงผลข้อมูลในรูปแบบ Array วิธีหนึ่งผ่าน XML ครับ
วิธีการเขียนโปรแกรมเบื้องต้น
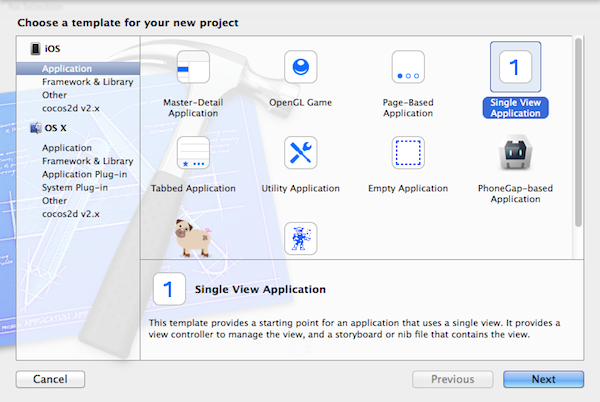
ให้ New Project ขึ้นมาใหม่ครับ เป็น Single View Application หลังจากนั้นก็ รอจนพร้อมใช้งาน
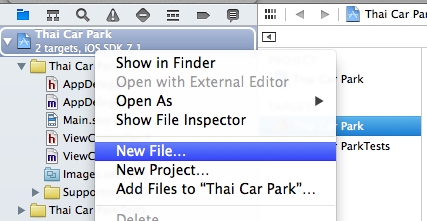
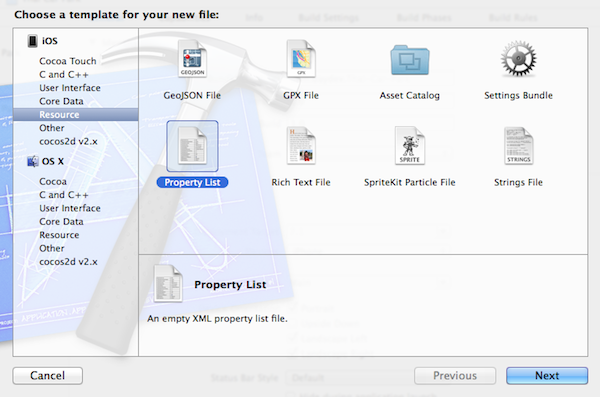
คลิกขวาที่ Project Tree ของเรา เลือก New File ครับ ต่อจากนั้นหา Property List แล้วทำการ Add เข้า Project ของเราครับ ตั้งชื่อว่า data.plist ต่อมาให้ทำการเพิ่มข้อมูลของ Plist ของเราครับ
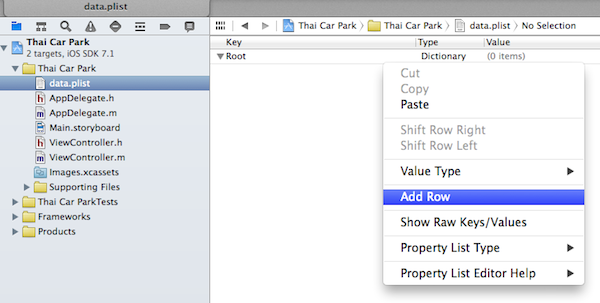
คลิกที่ data.plist ครับ คลิกขวา add row เข้าไป เพิ่มข้อมูลตามนี้ ครับ
Thumbnail จะเป็นการไปเรียกไฟล์ png หรือ jpg จาก Bundle Project ของเราครับ หากลอง คลิกขวาที่ไฟล์ data.plist แล้วเปิดดูแบบ Source code จะเห็นโครงสร้าง XML ของมันทันทีครับ
ข้อมูลทั้งหมด ที่ทำเป็นตัวอย่างจะเป็นดังนี้
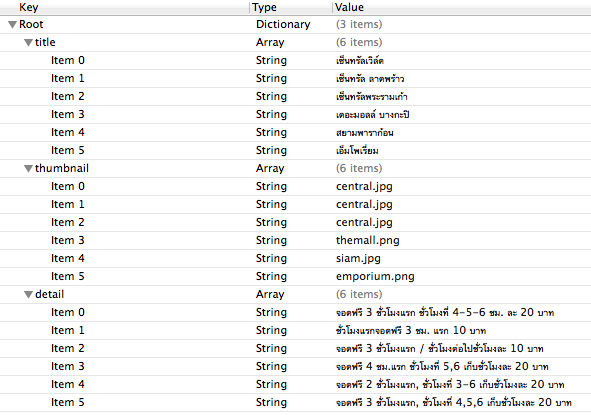
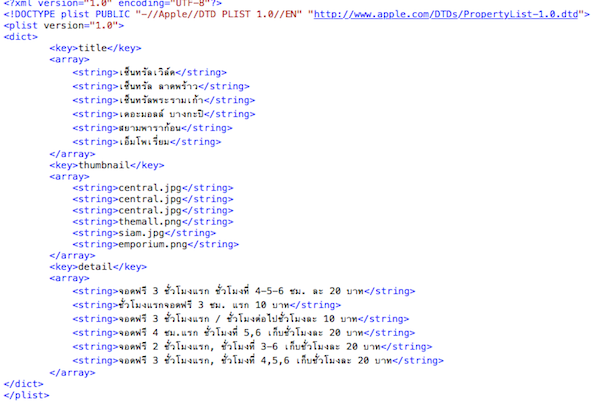
โครงสร้างแบบ XML จะได้แบบนี้ครับ
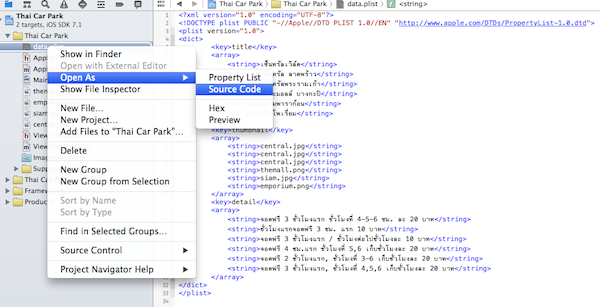
รูปแบบ โครงสร้าง XML
ต่อมาเขียนโปรแกรมเรียกข้อมูลมาโชว์บน UITableView กันครับ
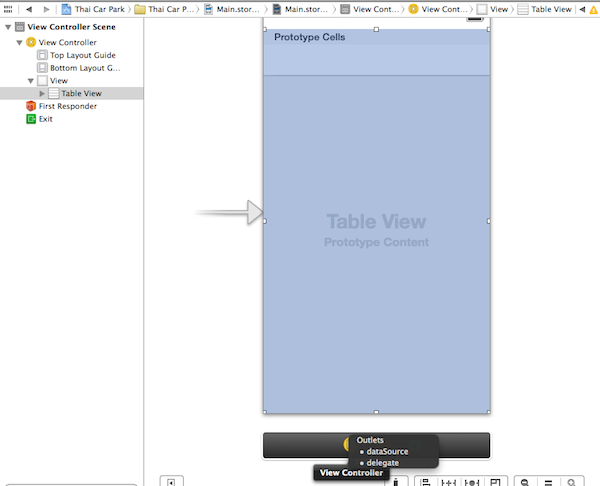
ลาก UITableView มาวางบน MainStoryBoard ครับ ทำการ DataSource และ Delegate ให้เรียบร้อยครับ ลิงค์ UITableView กับ ViewController.h ใหม่ IBOutlet ว่า tableData
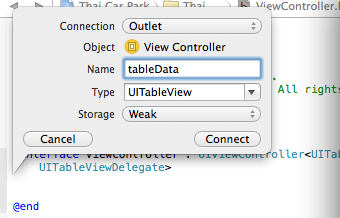
เปิด ViewController.h ขึ้นมาครับ สร้าง IBOutlet ดังนี้
Code (Objective-C)
@property (weak, nonatomic) IBOutlet UITableView *tableData;
อย่าลืมประกาศ <UITableViewDelegate>
Code (Objective-C)
@interface ViewController : UIViewController<UITableViewDelegate>
หากเสร็จแล้วตรวจสอบความเรียบร้อยว่า ViewController.h เป็นดังนี้
Code (Objective-C)
#import <UIKit/UIKit.h>
@interface ViewController : UIViewController<UITableViewDelegate>
@property (weak, nonatomic) IBOutlet UITableView *tableData;
@property (strong, nonatomic) NSArray *title_data;
@property (strong, nonatomic) NSArray *detail_data;
@property (strong, nonatomic) NSArray *thumbnail_data;
@end
เปิดไฟล์ ViewController.m ขึ้นมาทำการ @synthesize ตัวแปลครับ
Code (Objective-C)
@implementation ViewController

@synthesize title_data;
@synthesize thumbnail_data;
@synthesize detail_data;

@synthesize tableData = _tableData;
ใน เมธอด ViewDidLoad() ครับให้ทำการสร้างตัวแปรขึ้นมารับ data จาก Plist ดังนี้
Code (Objective-C)
- (void)viewDidLoad
{

    [super viewDidLoad];
    NSString *path = [[NSBundle mainBundle] pathForResource:@"data" ofType:@"plist"];

    // Load the file content and read the data into arrays
    NSDictionary *dict = [[NSDictionary alloc] initWithContentsOfFile:path];

     NSLog(@"title:%@",[dict objectForKey:@"title"]);
     NSLog(@"thumbnail:%@",[dict objectForKey:@"thumbnail"]);
     NSLog(@"excerpt:%@",[dict objectForKey:@"excerpt"]);
     NSLog(@"id:%@",[dict objectForKey:@"id"]);

    title_data = [dict objectForKey:@"title"];
    thumbnail_data = [dict objectForKey:@"thumbnail"];
    detail_data = [dict objectForKey:@"detail"];
// Do any additional setup after loading the view, typically from a nib.

}
สร้าง path สำหรับบอกตำแหน่งของไฟล์ data.plist ใน Bundle ของเรา
Code (Objective-C)
NSString *path = [[NSBundle mainBundle] pathForResource:@"data" ofType:@"plist"];
สร้าง dictionary ขึ้นมาเก็บข้อมูลของ Data ของเราจาก path ที่กำหนด
Code (Objective-C)
NSDictionary *dict = [[NSDictionary alloc] initWithContentsOfFile:path];
ลอง NSLog ดูค่าตัวแปรที่เข้ามาก่อนเล็กน้อยครับ ลอง Run ดู
Code (Objective-C)
     NSLog(@"title:%@",[dict objectForKey:@"title"]);
     NSLog(@"thumbnail:%@",[dict objectForKey:@"thumbnail"]);
     NSLog(@"excerpt:%@",[dict objectForKey:@"excerpt"]);
     NSLog(@"id:%@",[dict objectForKey:@"id"]);

    title_data = [dict objectForKey:@"title"];
    thumbnail_data = [dict objectForKey:@"thumbnail"];
    detail_data = [dict objectForKey:@"detail"];

โอเค มีค่าเข้ามาในตัวแปร dict ของเราแล้ว
ต่อมาทำการสร้าง Code ของ UITable View มาเรียกข้อมูล ก็คือคำสั่ง Code ปรกติของ UITableView เรียก Array นั่นแหละครับ แต่เปลี่ยนค่าที่แสดงเป็น
Code (Objective-C)
[title_data objectAtIndex:indexPath.row]; //ค่า title
เขียนเข้าไปแทนเท่านั้นเองครับ เขียน Code ตามนี้
Code (Objective-C)
- (NSInteger)tableView:(UITableView *)tableView numberOfRowsInSection:(NSInteger)section
{
    // Return the number of rows in the section.
    return [title_data count];
}

-(UITableViewCell *)tableView:(UITableView *)tableView cellForRowAtIndexPath:(NSIndexPath *)indexPath
{

    static NSString *simpleTableIdentifier =@"Cell";
    UITableViewCell *cell=[tableView dequeueReusableCellWithIdentifier:simpleTableIdentifier];

    if(cell == nil){

    cell =[[UITableViewCell alloc] initWithStyle:UITableViewCellStyleDefault reuseIdentifier:simpleTableIdentifier];
    }

    cell.textLabel.text = [title_data objectAtIndex:indexPath.row];
    cell.textLabel.numberOfLines = 2;
    cell.detailTextLabel.text =[detail_data objectAtIndex:indexPath.row];
    cell.detailTextLabel.numberOfLines= 2;
    cell.imageView.image =[UIImage imageNamed:[thumbnail_data objectAtIndex:indexPath.row]];

    return cell;

}
ลอง Run ตัว Project ของคุณอีกครั้ง ก็เป็นอันเรียบร้อยครับ ใช้งานได้ปรกติ
บทเรียนเบื้องต้นในการใช้ Plist อธิบายสั้นๆ ทำตามง่ายๆ ครับ ศึกษาหรือต้องการ Source Code ได้ที่ http://www.daydev.com
Reference : http://www.daydev.com/2014/uitableview-plist-tutorial.html
|
|
| |
By : |
Daydev
|
| |
Article : |
บทความเป็นการเขียนโดยสมาชิก หากมีปัญหาเรื่องลิขสิทธิ์ กรุณาแจ้งให้ทาง webmaster ทราบด้วยครับ |
| |
Score Rating : |
    |
| |
Create Date : |
2014-03-25 |
| |
Download : |
No files |
|
|
|

|