|
| |
SignalR (Windows Form) : ตัวอย่างการรับส่งข้อมูลแบบ Real Time และการจัดเก็บลงใน Database |
SignalR (Windows Form) : ตัวอย่างการรับส่งข้อมูลแบบ Real Time และการจัดเก็บลงใน Database บทความนี้จะเป็นตัวอย่างการเขียน SignalR บน Windows Form Application ในการรับส่งข้อมูลแบบ Real Time รับข้อมูลจาก Input จำนวน 2 รายการคือ Name และ Email โดยข้อมูลที่รับเข้ามานั้น จะแสดงผลไปยัง Client อื่นๆ ในรูปแบบของ DataGridView ที่เปิดหน้าจอไว้ในขณะนั้นๆ ซึ่งข้อมูลในทุกๆ Client จะแสดงผลแบบ Real Time ตลอดเวลา เมื่อมีข้อมูลใหม่ ๆ เกิดขึ้น และในตัวอย่างนี้ยังมีการนำข้อมูลไปจัดเก็บลงใน Table ด้วย
 SignalR(Win Form) : ตัวอย่างการรับส่งข้อมูลแบบ Real Time และการจัดเก็บลงใน Database
SignalR กับ Windows Form Application รับ-ส่ง ข้อมูลแบบ Real Time (VB.Net, C#)
ก่อนอื่นให้ทำความเข้าใจเกี่ยวกับ SignalR กับ Windows Form Application ในบทความก่อนหน้านี้ให้เข้าใจ ก่อนที่จะเริ่มในหัวข้อนี้
 Database")
สร้าง Table ใหม่ชื่อว่า mytable มีคำสั่งดังนี้
CREATE TABLE [dbo].[mytable](
	[id] [int] IDENTITY(1,1) NOT NULL,
	[name] [varchar](150) NULL,
	[email] [varchar](150) NULL,
 CONSTRAINT [PK_mytable] PRIMARY KEY CLUSTERED
(
	[id] ASC
));
คำสั่งสำหรับสร้าง Table
 Database")
Table ที่ได้
 Database")
ตัวอย่างจัดเก็บข้อมูล
SignalR Server ในส่วนของ Server ตั้งชื่อ Hub ว่า MyHub
MyHub.cs (C#)
using Microsoft.AspNet.SignalR;
using Microsoft.Owin.Cors;
using Microsoft.Owin.Hosting;
using System.Collections.Generic;
using Owin;
using System;
using System.Reflection;
using System.Threading.Tasks;
using System.Windows.Forms;
using System.Data;
using System.Data.SqlClient;
using Newtonsoft.Json;

namespace SignalRServer
{

    public class MyHub : Hub
    {
        public class mytable
        {
            public string name { get; set; }
            public string email { get; set; }
        }

        public void SaveData(string name, string email)
        {
            string json = string.Empty;

            SqlConnection objConn;
            SqlCommand objCmd;
            String strConnString, strSQL;
            SqlDataReader dtReader;

            strConnString = @"Server=localhost;UID=sa;PASSWORD=;database=mydatabase;Max Pool Size=400;Connect Timeout=600;";
            objConn = new System.Data.SqlClient.SqlConnection(strConnString);
            objConn.Open();

            // Insert New Data
            if (name != string.Empty && email != string.Empty)
            {
                strSQL = "INSERT INTO mytable (name, email) " +
                "VALUES ('" + name + "','" + email + "')";
                objCmd = new SqlCommand();
                objCmd.Connection = objConn;
                objCmd.CommandType = CommandType.Text;
                objCmd.CommandText = strSQL;
                objCmd.ExecuteNonQuery();
            }

            // Get Data
            strSQL = "SELECT * FROM mytable order by id asc";
            objCmd = new SqlCommand(strSQL, objConn);
            dtReader = objCmd.ExecuteReader();

            var ls = new List<mytable>();
            if(dtReader.HasRows)
            {
                while (dtReader.Read())
                {
                    ls.Add(new mytable { name = dtReader["name"].ToString(), email = dtReader["email"].ToString() });
                }
            }
            json = JsonConvert.SerializeObject(ls);

            dtReader.Close();
            objCmd = null;
            objConn.Close();
            objConn = null;


            Clients.All.displayData(json);
        }
        public override Task OnConnected()
        {
            Program.MainForm.WriteToConsole("Client connected: " + Context.ConnectionId);
            return base.OnConnected();
        }
        public override Task OnDisconnected(bool stopCalled)
        {
            Program.MainForm.WriteToConsole("Client disconnected: " + Context.ConnectionId);
            return base.OnDisconnected(true);
        }
    }

}
จาก Code จะเป็นคำสั่งง่ายๆ คือ รับค่า name และ email เพื่อ Insert ลงใน table จากนั้นส่งค่าทั้งหมดกลับไปทุก ๆ client ในรูปแบบของ JSON
SignalR Client ออกแบบ Form สำหรับ ส่ง-รับ ข้อมูล เพื่อแสดงผลบน DataGridView
 Database")
ออกแบบ Form โดยเพิ่ม DataGridView เข้ามาสำหรับแสดงผลข้อมูล
ClientStart.cs (C#)
using Microsoft.AspNet.SignalR.Client;
using System;
using System.Net.Http;
using System.Collections.Generic;
using System.Windows.Forms;
using Newtonsoft.Json;

namespace SignalRClient
{
    public partial class ClientStart : Form
    {
        public class mytable
        {
            public string name { get; set; }
            public string email { get; set; }
        }

        private IHubProxy HubProxy { get; set; }
        const string ServerURI = "http://localhost:8080/signalr";
        private HubConnection Connection { get; set; }

        public ClientStart()
        {
            InitializeComponent();
        }

        private void ButtonConnect_Click(object sender, EventArgs e)
        {
            StatusText.Visible = true;
            StatusText.Text = "Connecting to server...";
            ConnectAsync();
        }
        private void ButtonSave_Click(object sender, EventArgs e)
        {
            HubProxy.Invoke("SaveData", TextBoxName.Text, TextBoxEmail.Text);
            TextBoxName.Text = String.Empty;
            TextBoxEmail.Text = String.Empty;
        }

        private async void ConnectAsync()
        {
            Connection = new HubConnection(ServerURI);
            Connection.Closed += Connection_Closed;
            HubProxy = Connection.CreateHubProxy("MyHub");
            HubProxy.On<string>("DisplayData", (json) =>
                this.Invoke((Action)(() =>
                    SetDataGridView(json)
                ))
            );
            try
            {
                await Connection.Start();
            }
            catch (HttpRequestException)
            {
                StatusText.Text = "Unable to connect to server: Start server before connecting clients.";
                return;
            }

            //Activate UI
            ButtonSave.Enabled = true;
            TextBoxName.Enabled = true;
            TextBoxEmail.Enabled = true;
            ButtonConnect.Enabled = false;
            RichTextBoxConsole.AppendText("Connected to server at " + ServerURI + Environment.NewLine);
            FirstLoad();
        }

        public void FirstLoad()
        {
            HubProxy.Invoke("SaveData", string.Empty, string.Empty);
        }

        public void SetDataGridView(string json) {

            var ls = JsonConvert.DeserializeObject<List<mytable>>(json);
            this.myDataGridView.DataSource = ls;
        }

        private void Connection_Closed()
        {
            //Deactivate chat UI; show login UI.
            this.Invoke((Action)(() => ButtonSave.Enabled = false));
            this.Invoke((Action)(() => StatusText.Text = "You have been disconnected."));
        }

    }
}
จาก Code ของ Client มีรูปแบบการทำงานคือ รับค่า Name และ Email เพื่อส่งไปยัง Server และมีส่วนของ รับข้อมูลจาก Server
โดยรับจาก Server ในรุปแบบของ JSON และนำมา Parser ก่อนที่จะแสดงผลบน DataGridView
Result
 Database")
รัน SignalR Server
 Database")
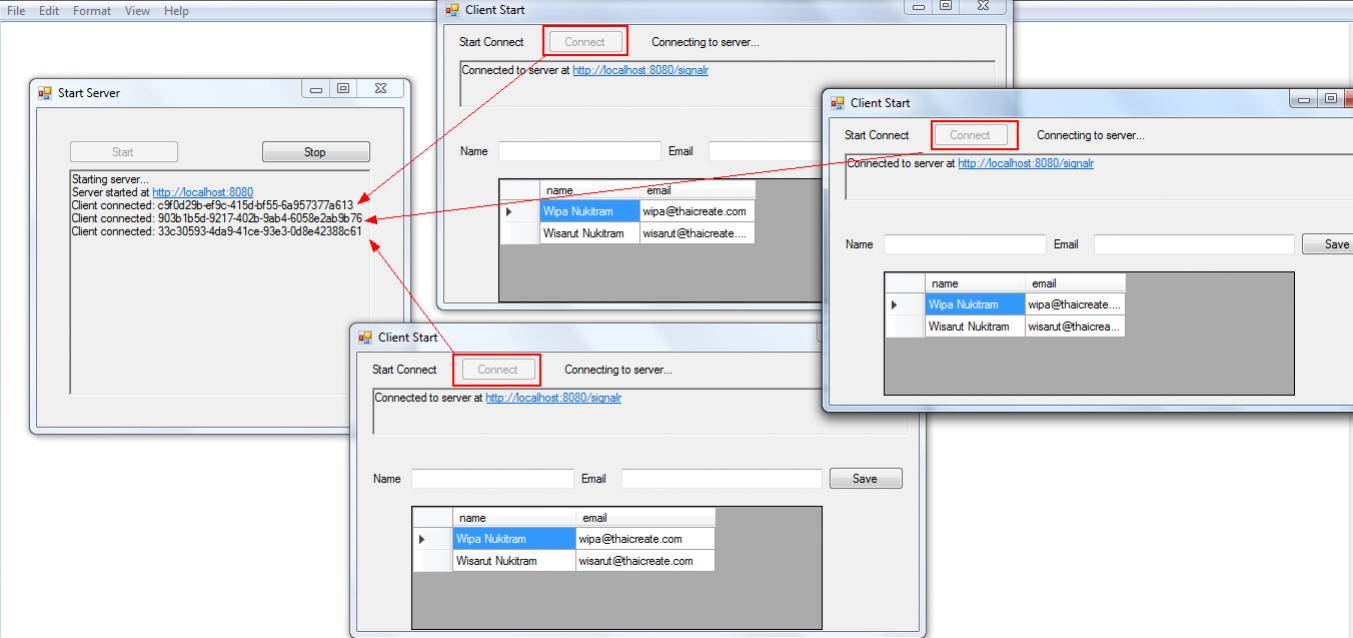
จากนั้นเปิดตัว Client ขึ้นมา แล้วทำการเชื่อมต่อผ่านปุ่ม Connect
 Database")
โดยแนะนำให้เปิดจากโฟเดอร์ Debug เพราะสามารถรันได้หลาย ๆ หน้าจอ
ทดสอบ Input ข้อมูลจาก Form ใด Form หนึ่ง
 Database")
ทดสอบการ Input ข้อมูลจาก Form
 Database")
จะเห็นว่าข้อมูลจะถูกแสดงบน DataGridView ของทุกๆ Form แบบ Real Time ในทันที
 Database")
เมื่อดูใน Database และ Table จะเห็นว่าข้อมูลถูก Insert เข้ามา
Download Code
Query ข้อมูลจาก SQL Server เป็น JSON และการ Deserialize (Decode) ข้อมูล (VB.Net,C#)
.
| |
|
|
|
|
 |
|
|
| |
By : |
TC Admin
|
| |
Article : |
บทความเป็นการเขียนโดยสมาชิก หากมีปัญหาเรื่องลิขสิทธิ์ กรุณาแจ้งให้ทาง webmaster ทราบด้วยครับ |
| |
Score Rating : |
 |
| |
Create Date : |
2017-01-19 |
| |
Download : |
No files |
|
|
|

|


