|
|
ออกรายงาน Crystal Report บน Web(ASP.NET) Step by Step |
|
|
| |
ออกรายงาน Crystal Report บน Web(ASP.NET) Step by Step บทความตัวอย่างการสร้างรายงานบน Crystal Report ด้วย Web(Asp.net) แบบ Step by Step พร้อมคำอธิบาย ที่สามารถปฏิบัติตามและใช้งานได้จริง เช่นการสร้าง Report การรับค่า Parameters จาก Form ของ ASP.NET และการโหลด Report มาแสดงผลหน้าเว็บ
เริ่มต้นด้วยการสร้าง Project เป็น ASP.NET Application หรือ ASP.NET WebSite
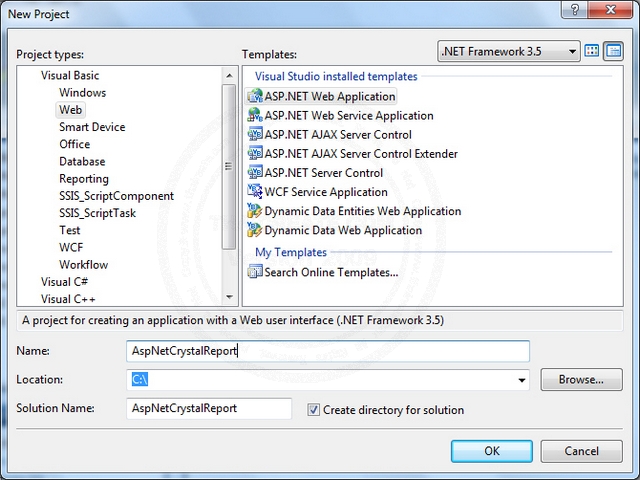
เลือกหน้าจอดังรูป
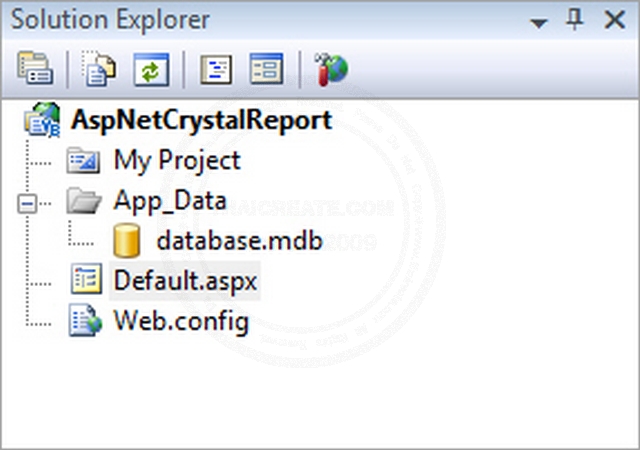
โครงสร้างไฟล์และ database.mdb ของ Access จัดเก็บไว้ใน App_Data
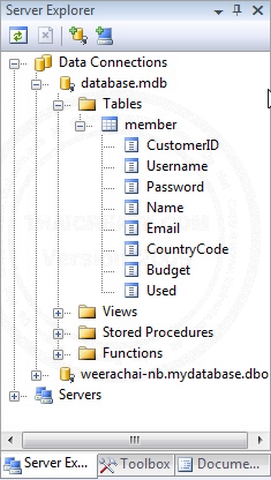
โครงสร้างฟิวด์และคอลัมบ์ของ ตาราง Table

ตัวอย่าง Data หรือข้อมูลที่อยู่ใน Table
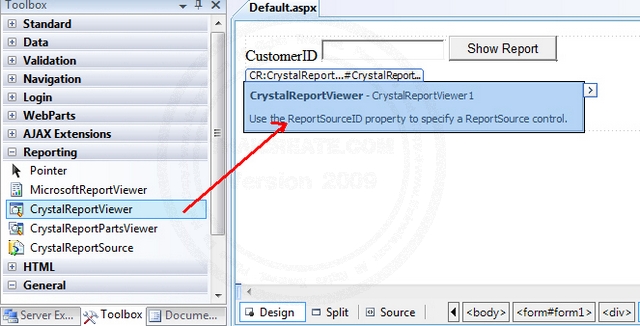
สร้าง Web Form ดังรูป ซึ่งประกอบด้วย Control ดังนี้ Textbox , Button และ Control ชื่อ CrystalReportViewer เพื่อใช้ในการโหลด Report เพื่อแสดงผลบน Web (asp.net)
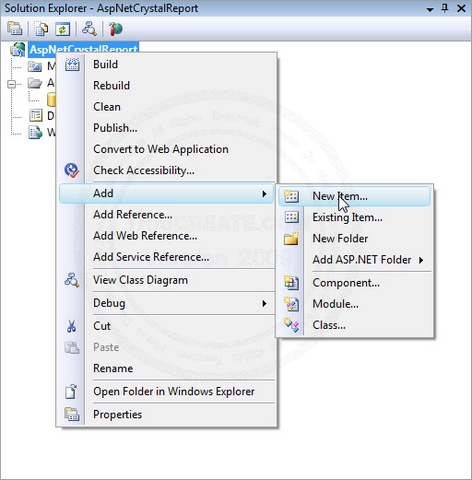
กลับมาที่ Project ให้คลิกขวาที่ Project -> Add -> New Item เพื่อสร้างรายการใหม่
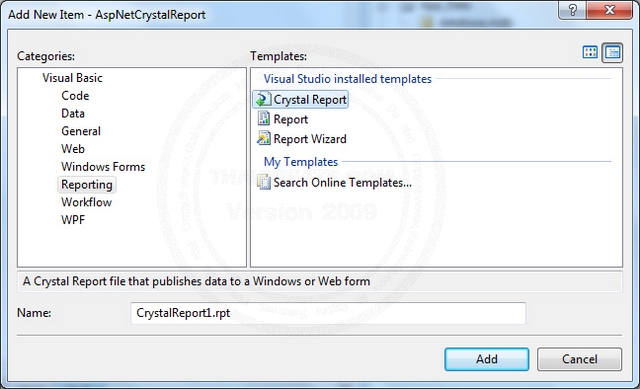
จะมี Popup โชว์ขึ้นมาให้เลือก Templates ประเภท Crystal Report ให้กำหนดชื่อให้เรียบร้อย และก็คลิก Add เพื่อเข้าสู่การออกแบบ Report แบบ Wizard
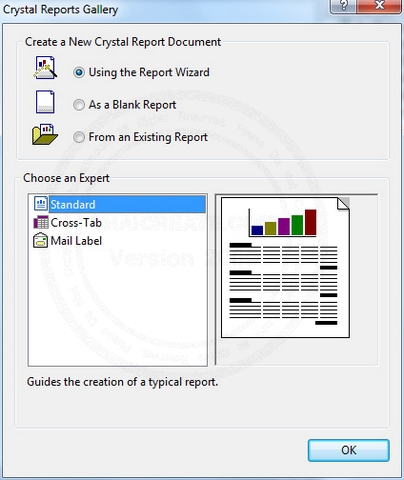
จะมีหน้าต่าง Pop ให้เลือกแบบ Wizard ของ Crystal Report และให้เลือก Using the Report Wizard และ OK เพื่อข้ามไปขั้นตอนถัดไป
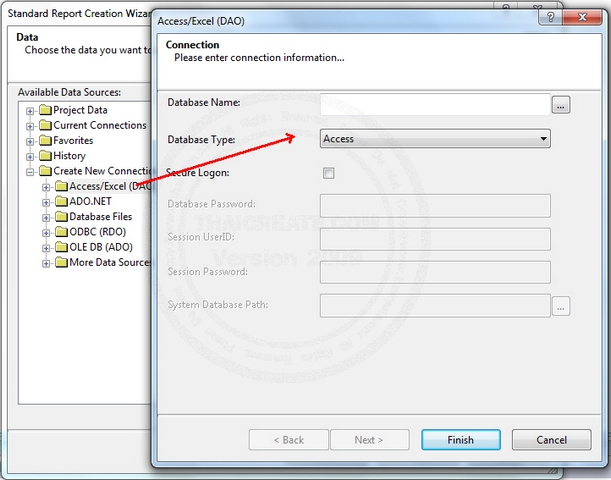
อันนี้เลือก Create New Connection ใหม่ ส่วน Database ไหนก็ขึ้นอยู่ว่าจะเรียก Report จาก Database อะไร ในที่นี้จะใช้ Access/Excel ให้เลือกเหมือนในรูป
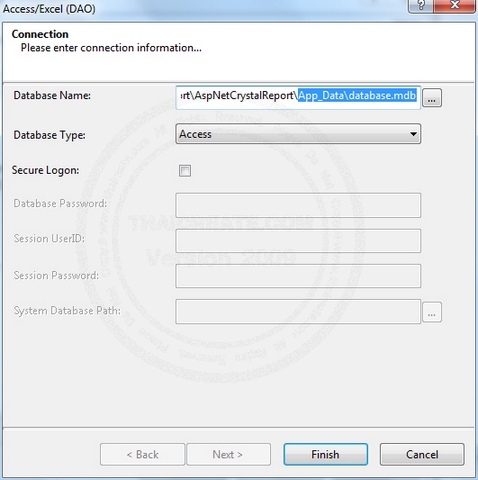
เลือก Path ที่จัดเก็บฐานข้อมูล database.mdb (Acess) ในที่นี้เราได้จัดเก็บไว้ในโฟเดอร์ App_Data\database.mdb
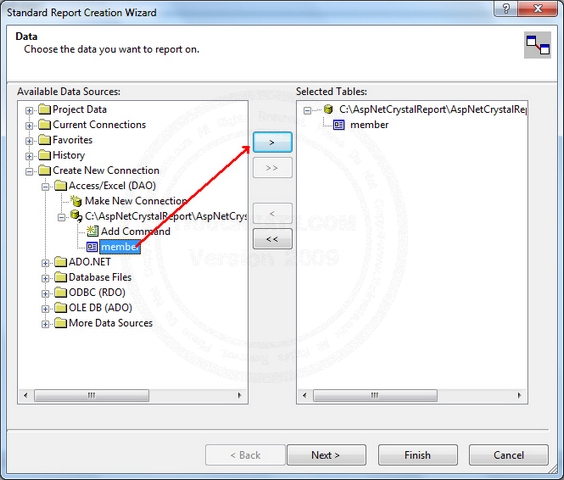
เลือก Table หรือ View ที่ได้จากการดึงจาก Database Access
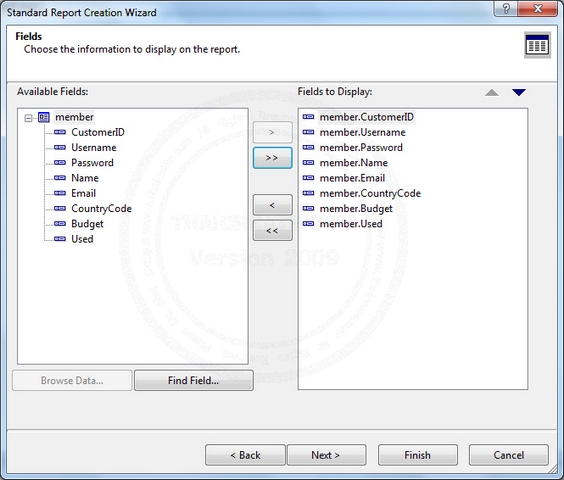
เลือกฟิวด์ Fields หรือ Column ข้อมูลทีต้องการแสดงใน Report
และคลิกที่ Finish เพื่อเสร็จสิ้นการออกแบบ แต่ถ้าหากต้องการกำหนดค่าอื่น ๆ ของ Report ลองคลิกที่ Next เพื่อปรับแต่ง Report ในรูปแบบต่าง ๆ ในมุมมองของ Wizard
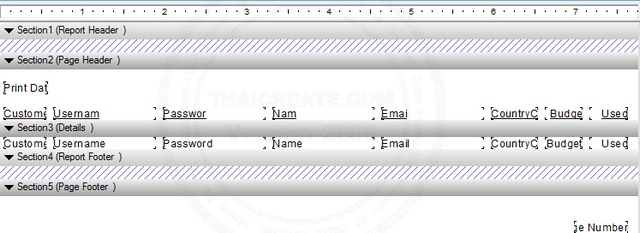
หน้าตา Design Report ที่สามารถปรับแต่งรายละเอียดอื่น ๆ ได้ตามความต้องการ
ในกรณีที่ไม่ต้องการสร้าง Parameter สามารถเรียก Report ได้เลย โดยใช้ Control ชื่อ CrystalReportViewer และกำหนด Event ในโหลดใน Code เพียงกำหนด Load Report ตามตัวอย่าง
Code VB.NET
    Protected Sub btnShowReport_Click(ByVal sender As Object, ByVal e As EventArgs) Handles btnShowReport.Click
        Dim rpt As New ReportDocument()
        rpt.Load(Server.MapPath("CrystalReport1.rpt"))
        Me.CrystalReportViewer1.ReportSource = rpt
    End Sub
Code C#
	protected void btnShowReport_Click(object sender, EventArgs e)
	{
		ReportDocument rpt = new ReportDocument();
		rpt.Load(Server.MapPath("CrystalReport1.rpt"));
		this.CrystalReportViewer1.ReportSource = rpt;
	}
การเพิ่ม Parameter Fields
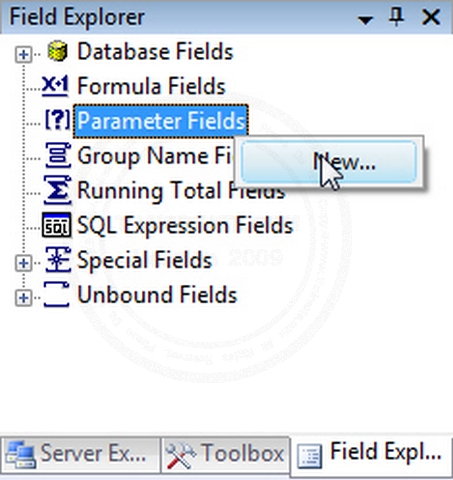
คลิกวาที่ Parameter Fields -> New
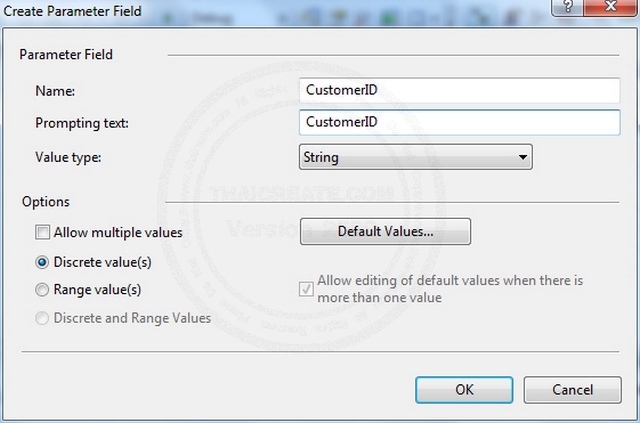
กำหนดค่า Name และ Prompting text: กรณีที่แสดง Popup สำหรับรับค่าจาก User หรือรับค่าจาก Visual Studio
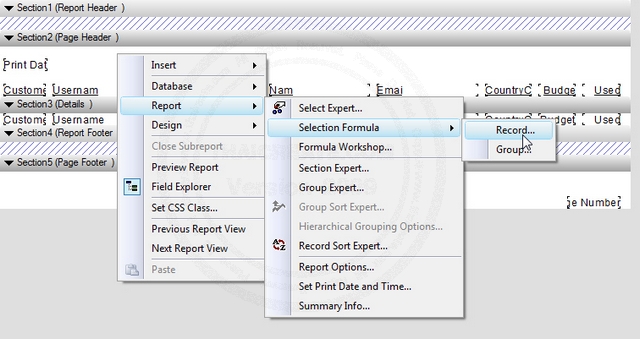
คลิกขวาที่พื้นที่ว่าง ๆ ของ Crystal Report เลือก Report -> Selection Formula -> Record....
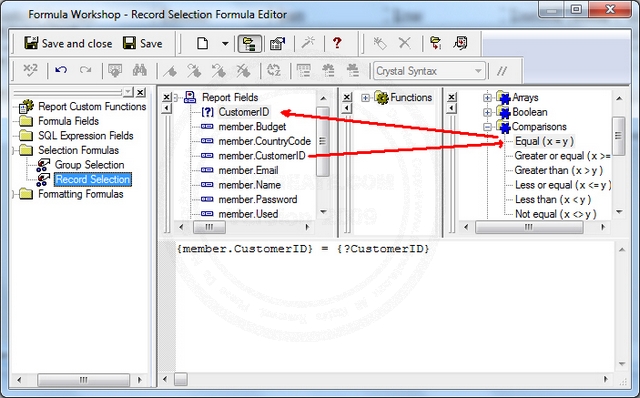
สร้าง Formula โดยคลิกตาม Step โดยเริ่มที่ member.CustomerID -> Comparisons Equal (x=y) -> CustomerID
วิธีนี้เปรียบเหมือนการ WHERE ใน SQL Statement เช่น SELECT * FROM member WHERE CustomerID = '?CustomerID'
โดย ?CustomerID คือค่าที่รับจาก Parameters
เมื่อเสร็จเรียบร้อยแล้วให้ Save และปิดหน้าจอนี้ไปได้เลย นอกจากนี้สามารถสร้าง Parameters อื่น ๆ หรือรูปแบบเงื่อนไขการดึงข้อมูลอื่น ๆ ได้ยากไม่ยากโดยใช้ผ่าน Wizard

กลับมาที่หน้า Web Form (.aspx) จากนั้นให้ Click ที่ Button เพื่อสร้าง Event ในการโหลด Report โดยใส่คำสั่งดังนี้
Code WebForm (.aspx)
<form id="form1" runat="server">
    <div>

        <asp:Label ID="lblCustomerID" runat="server" Text="CustomerID"></asp:Label>
		 <asp:TextBox ID="txtCustomerID" runat="server"></asp:TextBox>
		 <asp:Button ID="btnShowReport" runat="server" Text="Show Report" />
        <br />
        <br />
        <CR:CrystalReportViewer ID="CrystalReportViewer1" runat="server"
            AutoDataBind="true" />

    </div>
    </form>
Code VB.NET
Imports CrystalDecisions.CrystalReports.Engine
Partial Public Class _Default
    Inherits System.Web.UI.Page

    Protected Sub Page_Load(ByVal sender As Object, ByVal e As System.EventArgs) Handles Me.Load

    End Sub

    Protected Sub btnShowReport_Click(ByVal sender As Object, ByVal e As EventArgs) Handles btnShowReport.Click
        Dim rpt As New ReportDocument()
        rpt.Load(Server.MapPath("CrystalReport1.rpt"))
        rpt.SetParameterValue("CustomerID", Me.txtCustomerID.Text)
        Me.CrystalReportViewer1.ReportSource = rpt
    End Sub
End Class
Code C#
using Microsoft.VisualBasic;
using System;
using System.Collections;
using System.Collections.Generic;
using System.Data;
using System.Diagnostics;
using CrystalDecisions.CrystalReports.Engine;
public partial class _Default : System.Web.UI.Page
{
	protected void Page_Load(object sender, System.EventArgs e)
	{
	}

	protected void btnShowReport_Click(object sender, EventArgs e)
	{
		ReportDocument rpt = new ReportDocument();
		rpt.Load(Server.MapPath("CrystalReport1.rpt"));
		rpt.SetParameterValue("CustomerID", this.txtCustomerID.Text);
		this.CrystalReportViewer1.ReportSource = rpt;
	}
}
หลังจากวาง Code เรียบร้อยแล้ว ลองกดที่ Run เพื่อดูผลลัพธ์ของ Report

ทดสอบการรัน Report ผ่านหน้า Web จะได้ผลเหมือนในรูป
จากตัวอย่างจะเห็นว่ามีการใช้การส่ง Parameters ตรง rpt.SetParameterValue("CustomerID", this.txtCustomerID.Text); เพื่อส่งค่าให้กับ Crystal Report ทำงานตาม Formula ที่ได้เขียนไว้ ซึ่งเมื่อเปรียบเทียบใน Query แล้วก็จะได้ค่า
SELECT * FROM member WHERE CustomerID = '" + this.txtCustomerID.Text + "'
Download Code!!
สำหรับบทความอื่น ๆ อยากให้ลองอ่านดูเพราะมีประโยชน์มาก ๆ
Go to : สร้าง Parameter และ Formula Fields บน Crystal Reports (VB.NET,C#)
Go to : สร้าง Crystal Report บน Visual Studio (VB.NET , C#) Step by Step
Go to : การสร้าง Crystal Report กับ DataSet หรือ DataTable (VB.NET,C#)
Go to : ASP.NET ReportViewer - rsweb:ReportViewer
Go to : ASP.NET and CrystalReportViewer
Go to : ASP.NET แสดงรูปภาพ Image บน Crystal Report แบบ Step by Step (VB.NET / C#)
Go to : การสร้าง Sub Report (Subreport) บน Crystal Report แบบ Step by Step (VB.NET /C#)
| |
|
|
|
 |
|
|
|
| |
|
|
|
|
|
|
| |
By : |
TC Admin
|
| |
Score Rating : |
- |
| |
Create Date : |
2012-03-29 13:00:54 |
| |
Download : |
No files |
| |
|
|
|
|
|

|