|
|
(C#) .NET Windows Form Application เขียนโปรแกรมบน Windows Form Application ด้วย .NET Framework |
|
|
| |
.NET Windows Form Application เขียนโปรแกรมบน Windows Form Application ด้วย .NET Framework ใน Application บน Visual Studio นั้น Windows Form ถือเป็น Project พื้นฐานที่สามารถพัฒนาโปรแกรมที่ทำงานบน Windows ได้ง่ายและรวดเร็วที่สุดก็ว่าได้ เพราะเป็นการออกแบบรูปแบบ GUI การใส่ Control หรือกำหนด Event ต่าง ๆ ก็สามารถสร้างเหตุการณ์ต่าง ๆ ได้จาก Properties ของ Control และเค้าโครงการเขียนนั้นก็มีพื้นฐานมาจากภาษา Visual Basic 6.0 ซึ่งจุดนี้เอง นักโปรแกรมเมอร์ที่พัฒนาโปรแกรมด้วย VB6 มาก่อนหน้านี้ก็สามารถต่อยอดการเขียนได้อย่างง่ายดาย รวมทั้งรูปแบบคำสั่งที่เป็นภาษา (VB.NET) ก็ไม่ได้ยากอะไรมากมาย ซึ่งใน .NET Framework นี้เราสามารถพัฒนาโปรแกรมให้มีความสามารถและการทำงานได้หลากหลาย และยังสามารถเขียนเพื่อใช้งานร่วมกับ Application อื่น ๆ ที่พัฒนาด้วย .NET Framework ได้เช่นเดียวกัน
สำหรับบทความนี้มีทั้งที่เป็นภาษา VB.NET และ C# ครับ สามารถเลือกอ่านได้ตามความถนัดได้เลย
Framework : 1,2,3,4
Language Code : VB.NET ||  C# C#
ในตัวอย่างนี้ผมได้ใช้ Tool ของ Visual Studio 2008 บน .NET Framework 3.5
ให้เปิด Tool ขึ้นมาพร้อมกับ New Project
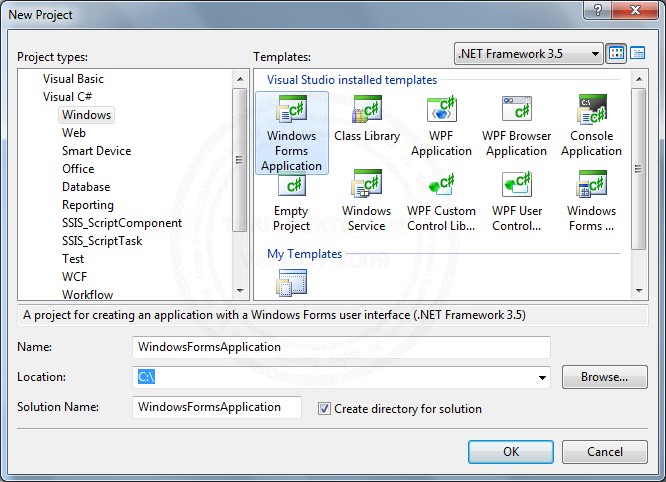
เลือกภาษาที่ใช้พัฒนา และเลือก Windows Form Application พร้อมกับตั้งชื่อ Project
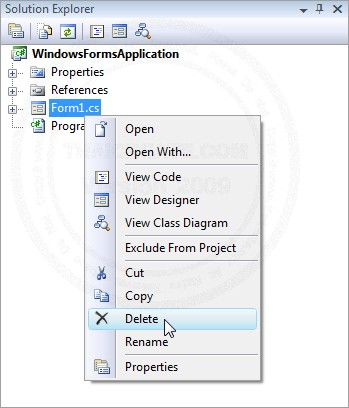
ไฟล์ Default จะถูกสร้างให้อัตโนมัติ ประมาณ 2-3 ไฟล์ ทั้งนี้หากไม่ต้องการ Form ที่เป็น Default ก็สามารถลบทิ้งได้เช่นเดียวกัน
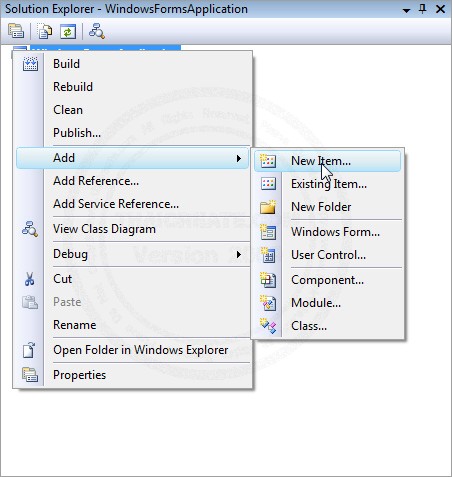
การเพิ่ม Form ใหม่สามารถเพิ่มได้จากการคลิกขวาที่ Project -> Add -> New Item...
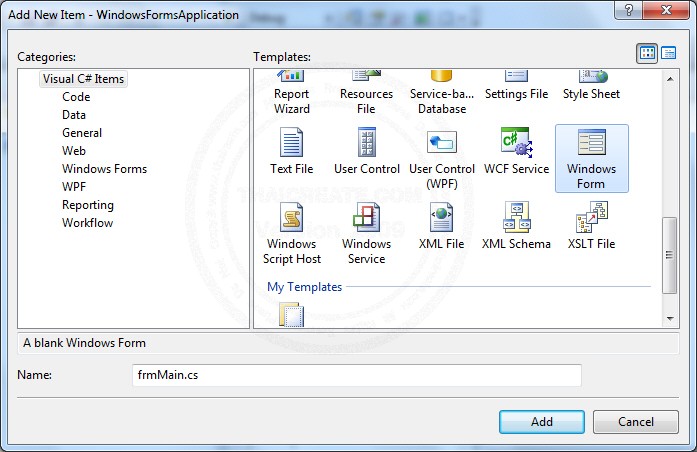
เลือก Windows Form
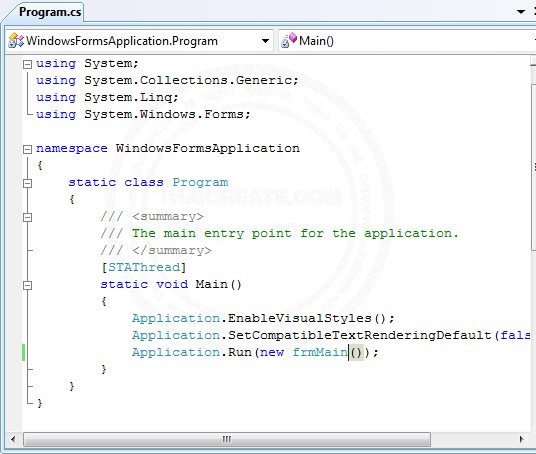
กรณีที่เป็น C# สามารถกำหนด Startup ของ Program ได้ที่ Program.cs
ในตัวอย่างนี้มีการเรียกใช้งาน Database ของ SqlServerCe ด้วย
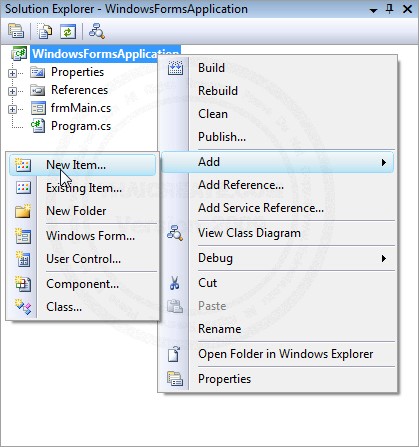
ให้คลิกขวที่ Project -> Add -> New Item...
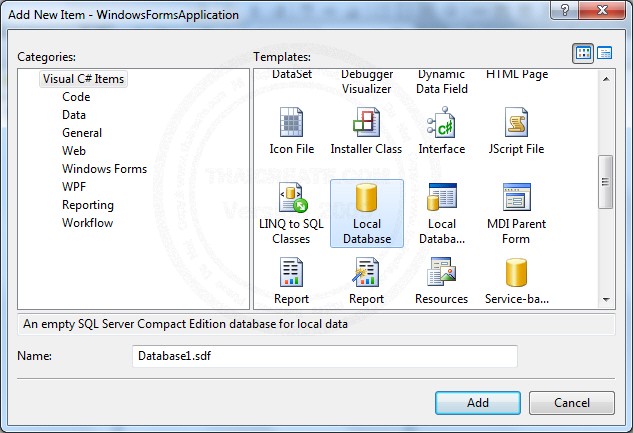
เลือก Database File จาก Local Database พร้อมกับกำหนดชื่อ Database ด้วย
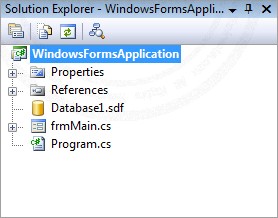
Database ถุกสร้างขึ้นมาแล้ว
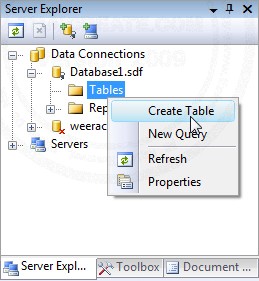
ทดสอบการสร้าง Table โดยไปที่ Server Explorer (อยู่ด้านซ้าย) คลิกที่ Database ที่เราสร้างขึ้นมา
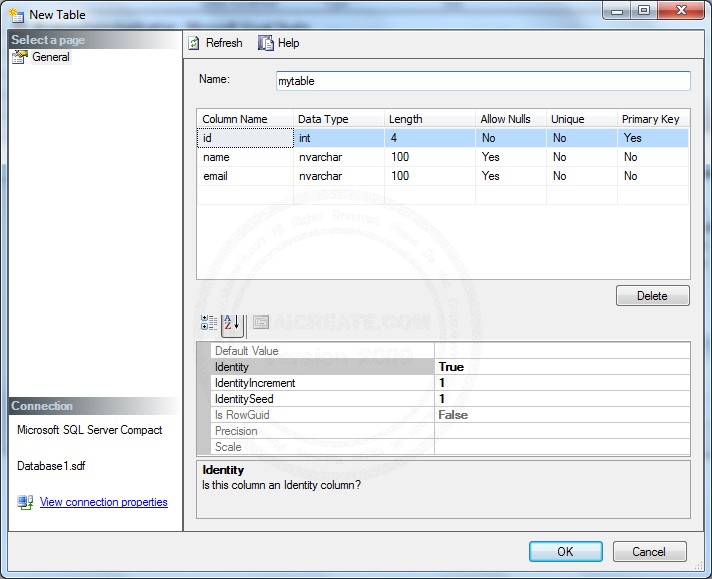
และภายใต้ Table ให้คลิกขวาเลือก Create Table ให้สร้างตารางชื่อ mytable โดยมีฟิว์ id,name,email (id เป็น primary key และ IdentityIncrement) และ save ถือเป็นเสร็จสิ้นการสร้าง Table
กรณีใช้ Database อื่น ๆ สามารถอ่านได้ที่
- System.Data.OleDb สำหรับ Ms Access หรืออื่น ๆ ที่ผ่าน OleDb
- System.Data.SqlClient สำหรับ Microsoft SQL Server
- System.Data.OracleClient สำหรับ Oracle Database
- MySql.Data.MySqlClient สำหรับ MySQL Database
- System.Data.Odbc ใช้สำหรับ Database เกือบทุกประเภทที่ใช้งานบน Platform Windows
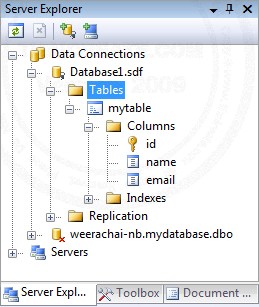
ตารางชื่อ mytable ถูกสร้างขึ้นมาแล้ว
ในตัวอย่างนี้จะประกอบด้วย 4 Form คือ
1. frmMain เป็นหน้าแรกของ Application
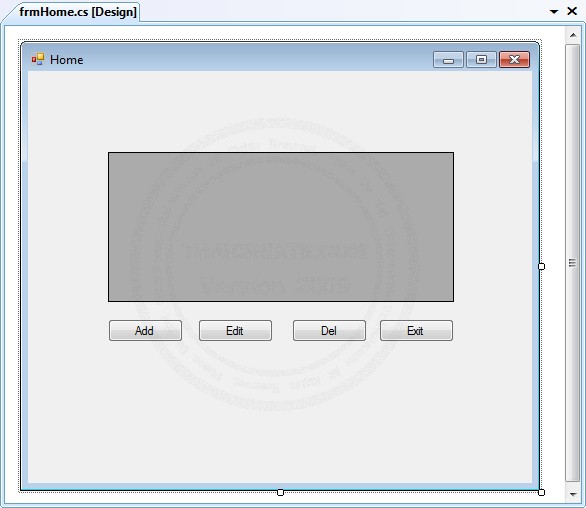
2. frmHome เป็นหน้าหลักของโปรแกรมใช้ DataGrid สำหรับเรียกข้อมูลมาแสดง (เพื่อลิงค์ไปยังการ เพิ่ม/แก้ไข/ลบ ข้อมูล)
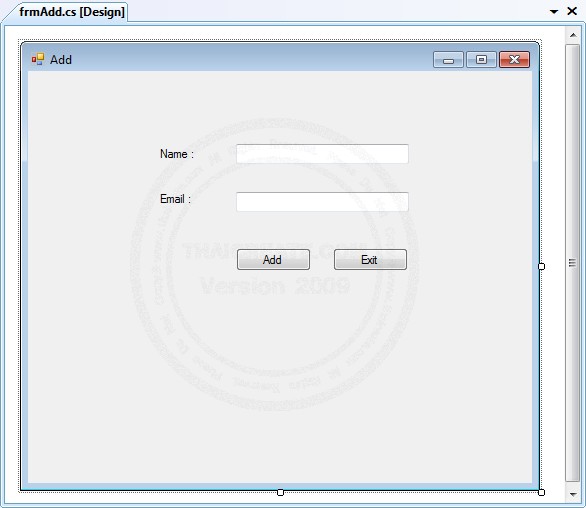
3. frmAdd เป็นหน้าสำหรับเพิ่มข้อมูล
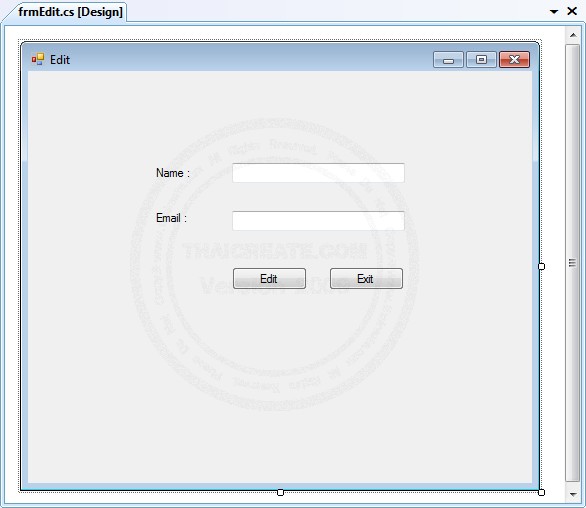
4. frmEdit เป็นหน้าสำหรับแก้ไขข้อมูล
frmMain
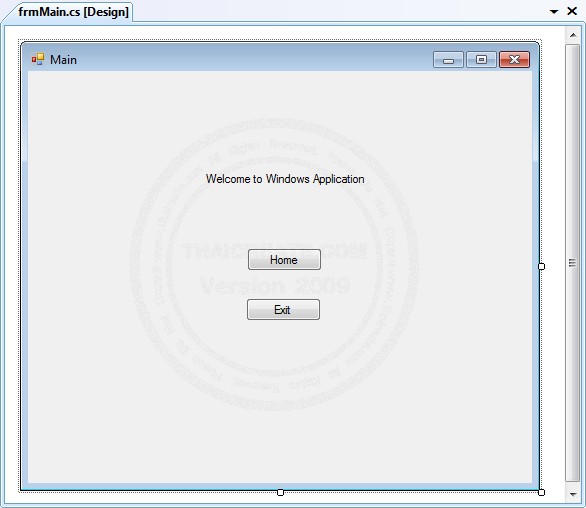
using System;
using System.Collections.Generic;
using System.ComponentModel;
using System.Data;
using System.Drawing;
using System.Linq;
using System.Text;
using System.Windows.Forms;

namespace WindowsFormsApplication
{
    public partial class frmMain : Form
    {
        // By https://www.thaicreate.com (mr.win)//

        public frmMain()
        {
            InitializeComponent();
        }

        private void btnHome_Click(object sender, EventArgs e)
        {
            this.Hide();
            frmHome f = new frmHome();
            f.Show();
        }

        private void btnExit_Click(object sender, EventArgs e)
        {
            if (MessageBox.Show("Are you sure to exit?", "Confirm.", MessageBoxButtons.YesNo, MessageBoxIcon.Question, MessageBoxDefaultButton.Button1) == DialogResult.Yes)
            {
                Application.Exit();
            }
        }
    }
}
frmHome
using System;
using System.Linq;
using System.Collections.Generic;
using System.ComponentModel;
using System.Data;
using System.Drawing;
using System.Text;
using System.Windows.Forms;
using System.Data.SqlServerCe;
using System.Data.SqlTypes;

namespace WindowsFormsApplication
{
    public partial class frmHome : Form
    {
        // By https://www.thaicreate.com (mr.win)//

        public frmHome()
        {
            InitializeComponent();
        }

        private void frmHome_Load(object sender, EventArgs e)
        {
            BindDataGrid();
        }

        private void BindDataGrid()
        {
            SqlCeConnection myConnection = default(SqlCeConnection);
            DataTable dt = new DataTable();
            SqlCeDataAdapter Adapter = default(SqlCeDataAdapter);
            //myConnection = new SqlCeConnection("Data Source =" + (System.IO.Path.GetDirectoryName( System.Reflection.Assembly.GetExecutingAssembly().GetName().CodeBase ) + "\\AppDatabase1.sdf;"));
            myConnection = new SqlCeConnection("Data Source =C:\\WindowsFormsApplication\\WindowsFormsApplication\\Database1.sdf;");
            myConnection.Open();
            SqlCeCommand myCommand = myConnection.CreateCommand();
            myCommand.CommandText = "SELECT [id], [name], [email] FROM [mytable]";
            myCommand.CommandType = CommandType.Text;

            Adapter = new SqlCeDataAdapter(myCommand);
            Adapter.Fill(dt);

            myConnection.Close();

            this.dgName.DataSource = dt;

            this.dgName.Columns.Clear();

            DataGridViewTextBoxColumn column;

            column = new DataGridViewTextBoxColumn();
            column.DataPropertyName = "id";
            column.HeaderText = "ID";
            column.Width = 50;
            this.dgName.Columns.Add(column);

            column = new DataGridViewTextBoxColumn();
            column.DataPropertyName = "name";
            column.HeaderText = "Name";
            column.Width = 100;
            this.dgName.Columns.Add(column);

            column = new DataGridViewTextBoxColumn();
            column.DataPropertyName = "email";
            column.HeaderText = "Email";
            column.Width = 150;
            this.dgName.Columns.Add(column);

            dt = null;
        }


        private void btnAdd_Click(object sender, EventArgs e)
        {
            this.Hide();
            frmAdd f = new frmAdd();
            f.Show();
        }

        private void btnEdit_Click(object sender, EventArgs e)
        {
            this.Hide();
            frmEdit f = new frmEdit();
            f._strID = this.dgName[0, this.dgName.CurrentCell.RowIndex].Value.ToString();
            f.Show();
        }

        private void btnExit_Click(object sender, EventArgs e)
        {
            this.Hide();
            frmMain f = new frmMain();
            f.Show();
        }

        private void btnDel_Click(object sender, EventArgs e)
        {
            if (MessageBox.Show("Are you sure to delete?", "Confirm.", MessageBoxButtons.YesNo, MessageBoxIcon.Question, MessageBoxDefaultButton.Button1) == DialogResult.Yes)
            {
                string strID = this.dgName[0, this.dgName.CurrentCell.RowIndex].Value.ToString();

                SqlCeConnection myConnection = default(SqlCeConnection);
                //myConnection = new SqlCeConnection("Data Source =" + (System.IO.Path.GetDirectoryName( System.Reflection.Assembly.GetExecutingAssembly().GetName().CodeBase ) + "\\AppDatabase1.sdf;"));
                myConnection = new SqlCeConnection("Data Source =C:\\WindowsFormsApplication\\WindowsFormsApplication\\Database1.sdf;");
                myConnection.Open();
                SqlCeCommand myCommand = myConnection.CreateCommand();
                myCommand.CommandText = "DELETE FROM [mytable] WHERE id = '" + strID + "'";
                myCommand.CommandType = CommandType.Text;
                myCommand.ExecuteNonQuery();
                myConnection.Close();
                MessageBox.Show("Delete Successfully");

                BindDataGrid();
            }
        }

    }
}
frmAdd
using System;
using System.Linq;
using System.Collections.Generic;
using System.ComponentModel;
using System.Data;
using System.Drawing;
using System.Text;
using System.Windows.Forms;
using System.Data.SqlServerCe;
using System.Data.SqlTypes;

namespace WindowsFormsApplication
{
    public partial class frmAdd : Form
    {
        // By https://www.thaicreate.com (mr.win)//

        public frmAdd()
        {
            InitializeComponent();
        }

        private void btnAdd_Click(object sender, EventArgs e)
        {
            if (string.IsNullOrEmpty(this.txtName.Text))
            {
                MessageBox.Show("Please input (Name)");
                this.txtName.Focus();
                return;
            }

            if (string.IsNullOrEmpty(this.txtEmail.Text))
            {
                MessageBox.Show("Please input (Email)");
                this.txtEmail.Focus();
                return;
            }

            SqlCeConnection myConnection = default(SqlCeConnection);
            //myConnection = new SqlCeConnection("Data Source =" + (System.IO.Path.GetDirectoryName( System.Reflection.Assembly.GetExecutingAssembly().GetName().CodeBase ) + "\\AppDatabase1.sdf;"));
            myConnection = new SqlCeConnection("Data Source =C:\\WindowsFormsApplication\\WindowsFormsApplication\\Database1.sdf;");
            myConnection.Open();
            SqlCeCommand myCommand = myConnection.CreateCommand();
            myCommand.CommandText = "INSERT INTO [mytable] ([name], [email]) VALUES  " + " ('" + this.txtName.Text + "','" + this.txtEmail.Text + "' ) ";
            myCommand.CommandType = CommandType.Text;
            myCommand.ExecuteNonQuery();
            myConnection.Close();

            MessageBox.Show("Save Successfully");

            this.Hide();
            frmHome f = new frmHome();
            f.Show();
        }

        private void btnExit_Click(object sender, EventArgs e)
        {
            this.Hide();
            frmHome f = new frmHome();
            f.Show();
        }

    }
}
frmEdit
using System;
using System.Linq;
using System.Collections.Generic;
using System.ComponentModel;
using System.Data;
using System.Drawing;
using System.Text;
using System.Windows.Forms;
using System.Data.SqlServerCe;
using System.Data.SqlTypes;

namespace WindowsFormsApplication
{
    public partial class frmEdit : Form
    {
        // By https://www.thaicreate.com (mr.win)//

        public frmEdit()
        {
            InitializeComponent();
        }

        string strID = "";
        public string _strID
        {
            get { return strID; }
            set { strID = value; }
        }

        private void frmEdit_Load(object sender, EventArgs e)
        {
            SqlCeConnection myConnection = default(SqlCeConnection);
            DataTable dt = new DataTable();
            SqlCeDataAdapter Adapter = default(SqlCeDataAdapter);
            //myConnection = new SqlCeConnection("Data Source =" + (System.IO.Path.GetDirectoryName( System.Reflection.Assembly.GetExecutingAssembly().GetName().CodeBase ) + "\\AppDatabase1.sdf;"));
            myConnection = new SqlCeConnection("Data Source =C:\\WindowsFormsApplication\\WindowsFormsApplication\\Database1.sdf;");
            myConnection.Open();
            SqlCeCommand myCommand = myConnection.CreateCommand();
            myCommand.CommandText = "SELECT [id], [name], [email] FROM [mytable] WHERE id = '" + strID + "' ";
            myCommand.CommandType = CommandType.Text;

            Adapter = new SqlCeDataAdapter(myCommand);
            Adapter.Fill(dt);

            myConnection.Close();

            if (dt.Rows.Count > 0)
            {
                this.txtName.Text = dt.Rows[0]["name"].ToString();
                this.txtEmail.Text = dt.Rows[0]["email"].ToString();
            }

            dt = null;
        }

        private void btnEdit_Click(object sender, EventArgs e)
        {
            if (string.IsNullOrEmpty(this.txtName.Text))
            {
                MessageBox.Show("Please input (Name)");
                this.txtName.Focus();
                return;
            }

            if (string.IsNullOrEmpty(this.txtEmail.Text))
            {
                MessageBox.Show("Please input (Email)");
                this.txtEmail.Focus();
                return;
            }

            SqlCeConnection myConnection = default(SqlCeConnection);
            //myConnection = new SqlCeConnection("Data Source =" + (System.IO.Path.GetDirectoryName( System.Reflection.Assembly.GetExecutingAssembly().GetName().CodeBase ) + "\\AppDatabase1.sdf;"));
            myConnection = new SqlCeConnection("Data Source =C:\\WindowsFormsApplication\\WindowsFormsApplication\\Database1.sdf;");
            myConnection.Open();
            SqlCeCommand myCommand = myConnection.CreateCommand();
            myCommand.CommandText = "UPDATE [mytable] SET " + " [name] = '" + this.txtName.Text + "', [email] = '" + this.txtEmail.Text + "'  " + " WHERE id = '" + strID + "' ";
            myCommand.CommandType = CommandType.Text;
            myCommand.ExecuteNonQuery();
            myConnection.Close();

            MessageBox.Show("Update Successfully");

            this.Hide();
            frmHome f = new frmHome();
            f.Show();
        }

        private void btnExit_Click(object sender, EventArgs e)
        {
            this.Hide();
            frmHome f = new frmHome();
            f.Show();
        }
    }
}
ทดสอบการรันโปรแกรม
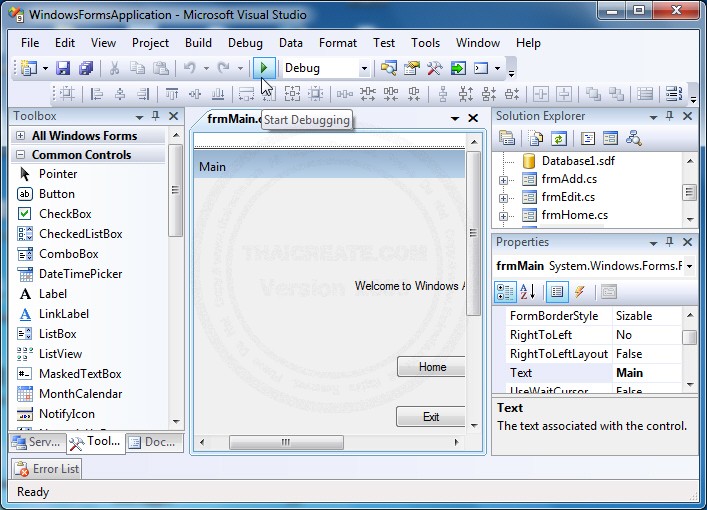
โดยคลิกที่ Startup Debugging
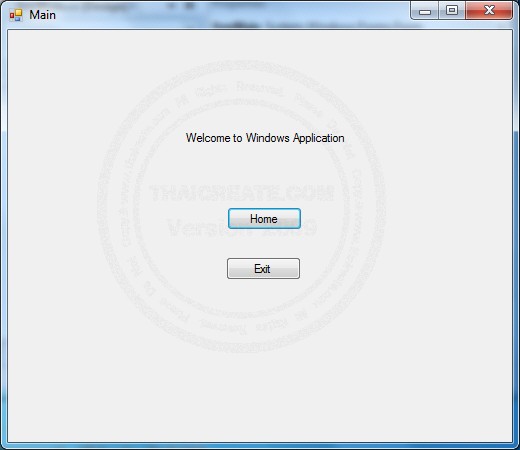
หน้าจอหลัก
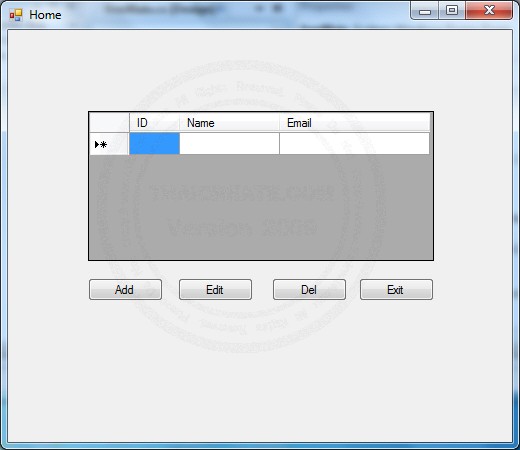
หน้า Home ซึ่งใช้ DataGridView เพื่อดึงข้อมูลออกมาแสดง
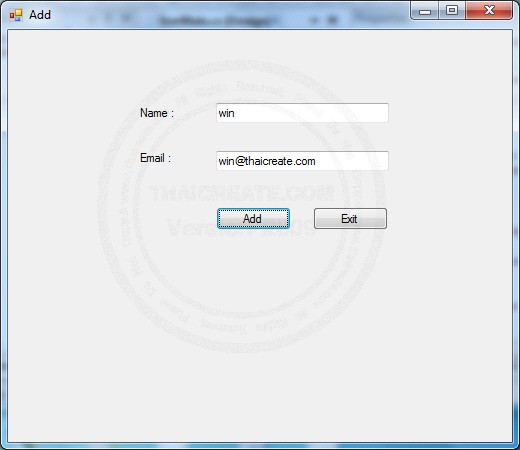
หน้าสำหรับเพิ่มข้อมูล
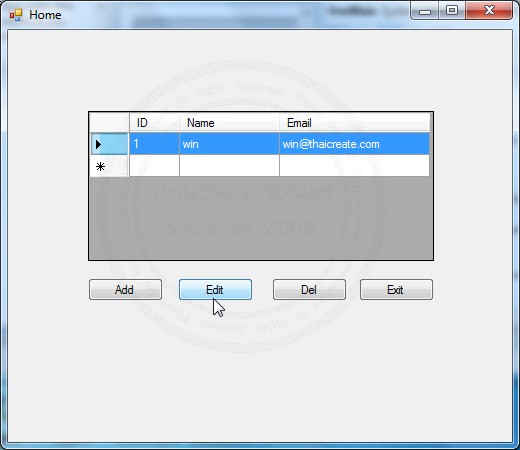
เลือก Record และ คลิก Edit เพื่อแก้ไข
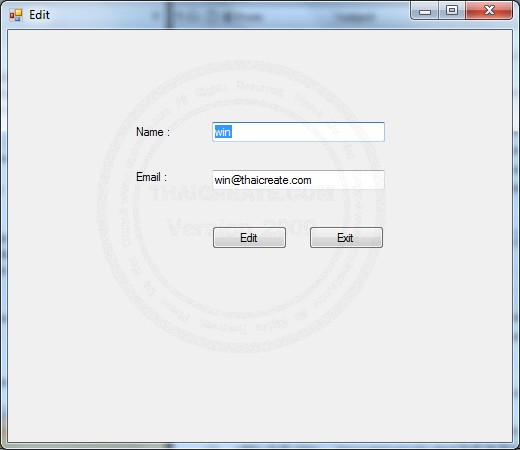
หน้าสำหรับแก้ไขข้อมูล
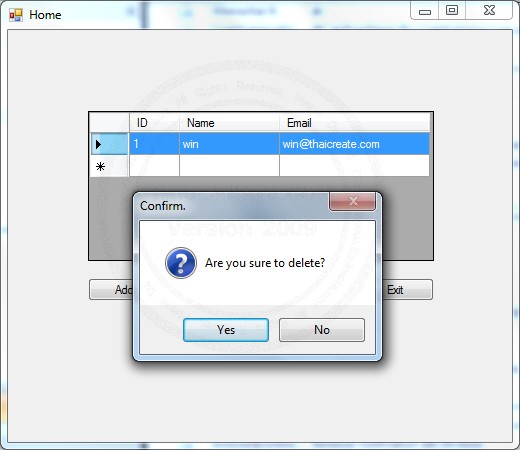
การลบข้อมูล
สำหรับตัวอย่างทั้งหมดนี้สามารถดาวน์โหลด Code ได้จากข้างล่าง โดยมีทั้งภาษา VB.NET และ C# และบทความนี้เป็นเพียงการสอนเบื้องต้นเท่านั้น เพื่อเป็นพื้นฐานในการต่อยอดในการพัฒนาโปรแกรมที่มีความซับซ้อนและการใช้งานที่หลากหลาย 
| |
|
|
|
 |
|
|
|
| |
|
|
|
|
|
|
| |
By : |
TC Admin
|
| |
Score Rating : |
- |
| |
Create Date : |
2010-09-02 21:19:54 |
| |
Download : |
 (1.70 MB)
 |
| |
|
|
|
|
|

|