|
|
C# .NET Generate Excel (Windows 7 and Office Excel 2003 , Excel 2007 , Excel 2010) |
|
|
| |
C# .NET Generate Excel (Windows 7 and Office Excel 2003 , Office Excel 2007, Office Excel 2010) ตัวอย่างการใช้ C# ในการสร้างเอกสาร Excel (.xls) โดยใช้ Class Library ของ Microsoft.Office.Interop.Excel สำหรับตัวอย่างนี้ได้ทำการทดสอบบน Windows 7 และ Office 2007 สามารถทำงานได้ปกติ
และสามารถใช้ได้ทั้ง Application ที่เป็น Windows Application (Win App) , Web Application (ASP.NET) และ Console App หรืออื่น ๆ
สำหรับบทความการใช้ ASP.NET กับ Excel และอื่น ๆ ตัวอย่างการใช้ สามารถอ่านได้จากหัวข้อ ASP.NET กับ Excel (VB.NET)
จากบทความลิ้งค์ก่อนหน้านี้จะเป็นภาษา VB.NET ซึ่งในตัวอย่างได้มีการเรียกใช้งาน Property หลายตัว ซึ่งสามารถนำมาดัดแปลงได้กับภาษา C# ได้อย่างไม่ยาก
C# กับ Excel
เริ่มต้นด้วยการ Add Reference ตัว Library ชื่อ Microsoft Excel 12.0 Object Library หรือ Version อื่น ๆ ที่ได้ติดตั้งลงในเครื่อง (Office Excel)
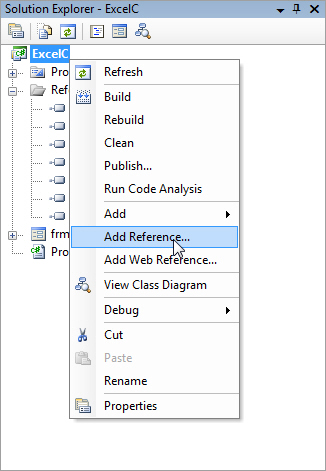
คลิกขวาที่ Project เลือก Add Reference
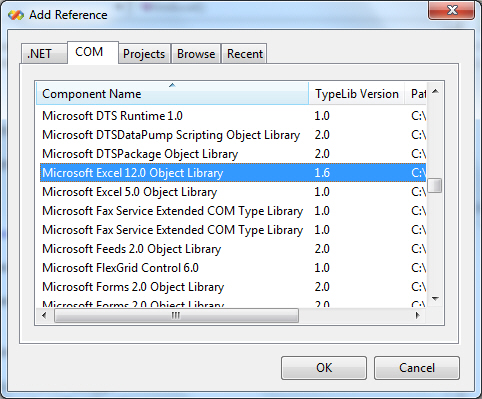
เลือก Microsoft Excel 12.0 Object Library เหมือนในรูป
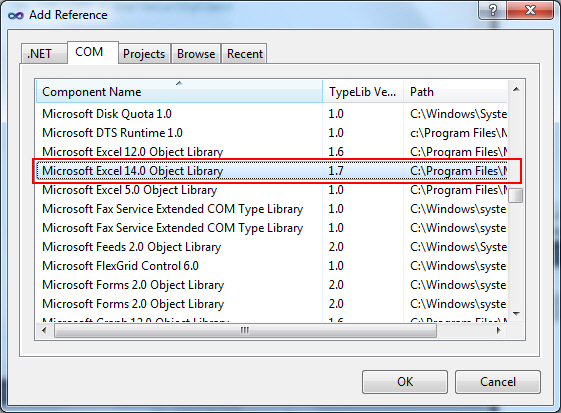
เพิ่มเติม สำหรับ Excel 2010 ให้ใช้ Microsoft Excel 14.0 Object Library
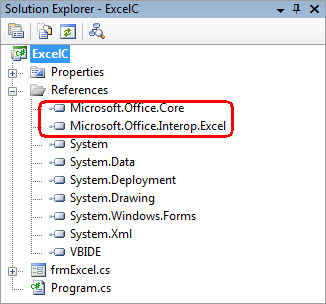
Library ถูก Add ลงเรียบร้อยแล้ว
ตัวอย่าง Code ของภาษา C#
frmExcel.cs
using System;
using System.Collections.Generic;
using System.ComponentModel;
using System.Data;
using System.Drawing;
using System.Text;
using System.Windows.Forms;
using System.IO;
using Excel = Microsoft.Office.Interop.Excel;

namespace ExcelC
{
    public partial class frmExcel : Form
    {
        public frmExcel()
        {
            InitializeComponent();
        }

        private void btnExcel_Click(object sender, EventArgs e)
        {
            Excel.Application xlApp;
            Excel.Workbook xlWorkBook;
            Excel.Worksheet xlWorkSheet;
            object mis = Type.Missing;

            string strFileName = "C:\\ExcelC\\Xls\\GenExcel.xls";

            xlApp = new Excel.ApplicationClass();
            //xlApp = new Excel.Application();
            xlWorkBook = xlApp.Workbooks.Add(mis);

            //xlWorkSheet = (Excel.Worksheet)xlWorkBook.Worksheets.Add(mis, mis, mis, mis); /*** for Add New Sheet ***/
            xlWorkSheet = (Excel.Worksheet)xlWorkBook.Worksheets.get_Item(1);
            xlWorkSheet.Name = "My Sheet";
            xlWorkSheet.Cells[1, 1] = "www.ThaiCreate.Com";
            xlWorkSheet.Cells[2, 1] = "Mr.Weerachai Nukitram";

            xlWorkBook.SaveAs(strFileName,
                mis, mis, mis, mis, mis, Excel.XlSaveAsAccessMode.xlExclusive, mis, mis, mis, mis, mis);
            xlWorkBook.Close(true, mis, mis);
            xlApp.Quit();

            System.Runtime.InteropServices.Marshal.ReleaseComObject(xlApp);
            System.Runtime.InteropServices.Marshal.ReleaseComObject(xlWorkBook);
            System.Runtime.InteropServices.Marshal.ReleaseComObject(xlWorkSheet);

            xlApp = null;
            xlWorkBook = null;
            xlWorkSheet = null;
            GC.Collect();

            MessageBox.Show("Generate Successfully");

        }

    }
}
Screenshot
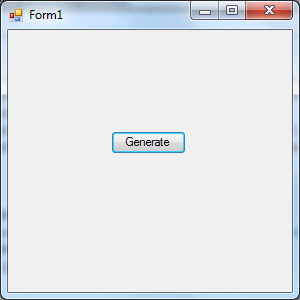
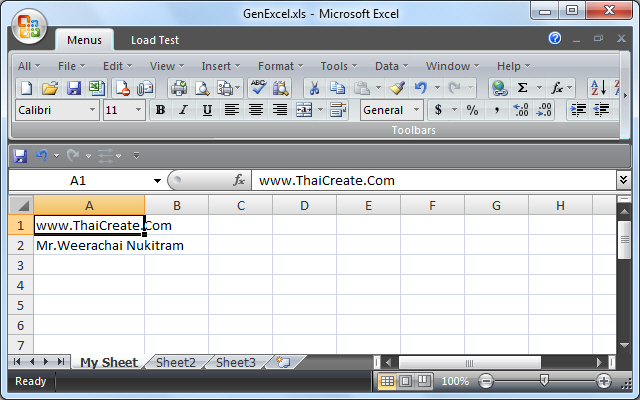
เพิ่มเติมเกี่ยวกับเรื่อง DCOM + Permission
กรณีที่ Error นี้
Retrieving the COM class factory for component with CLSID {00024500-0000-0000-C000-000000000046} failed due to the following error: 80070005.
ถ้าเป็น Windows XP + Office Excel 2003 อ่านได้ที่นี่
DCOM Config (Windows 7 + Office Excel 2007)
Control Panel
Control Panel\All Control Panel Items\Administrative Tools\Event Viewer
Event Viewer
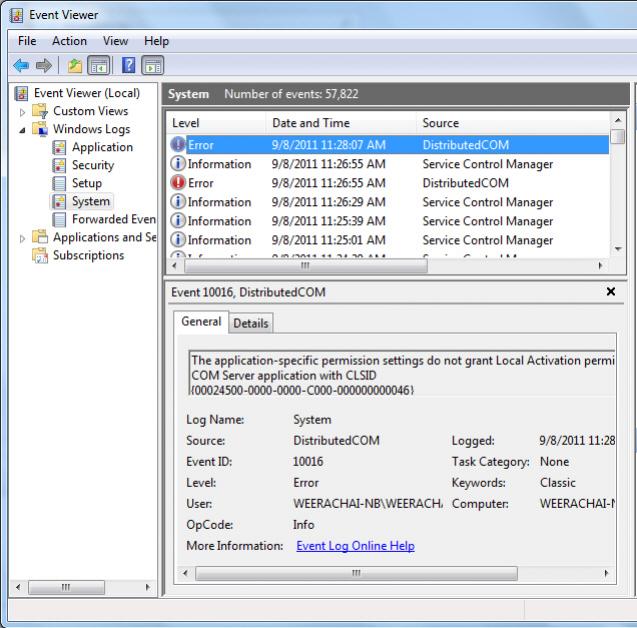
สังเกตุว่ามี Event Viewer มี Error Log ชื่อว่า DistributedCOM
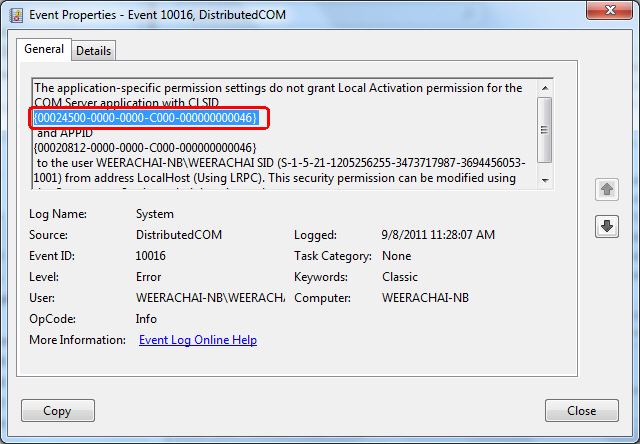
รายละเอียดของ Error
The application-specific permission settings do not grant Local Activation permission for the COM Server application with CLSID
{00024500-0000-0000-C000-000000000046}
and APPID
{00020812-0000-0000-C000-000000000046}
to the user WEERACHAI-NB\WEERACHAI SID (S-1-5-21-1205256255-3473717987-3694456053-1001) from address LocalHost (Using LRPC). This security permission can be modified using the Component Services administrative tool.
จะมี User ชื่อว่า WEERACHAI ติด Permission อยู่ เพราะเป็น Windows Form Application จึงใช้ User ที่เป็น Logon User ในการรัน แต่ถ้าเป็น ASP.NET ที่รันด้วย IIS จะใช้ User ว่า IUSR_WEERACHAI และ IWAM_WEERACHAI
การแก้ปัญหา
Component Services
Control Panel\All Control Panel Items\Administrative Tools\Component Services
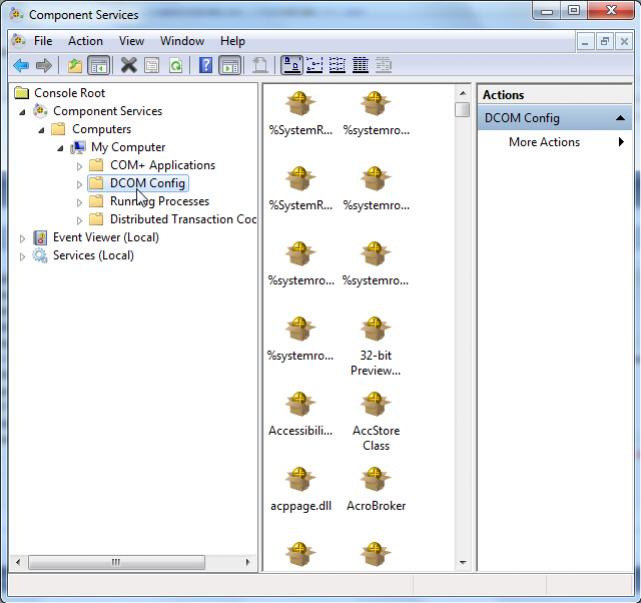
เปิดโปรแกรม Component Services และคลิกเลือกที่ DCOM Config
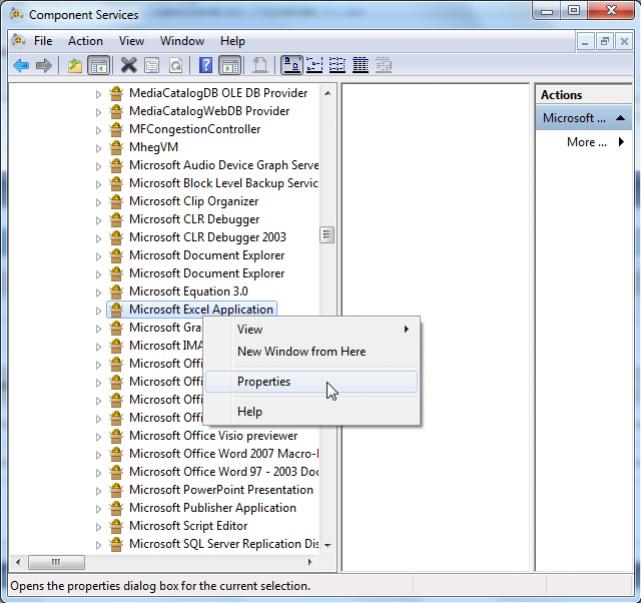
คลิกขวาที่ Microsoft Excel Application -> Properties
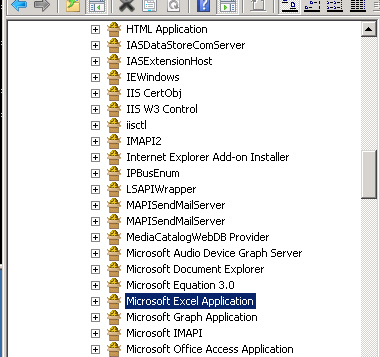
เพิ่มเติมสำหรับเเครื่อง 64-Bit

ให้รัยคำสั่ง C:\WINDOWS\SysWOW64>mmc comexp.msc /32
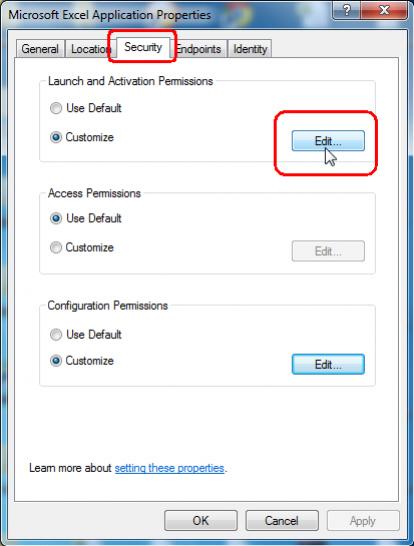
ตรง Tab Security และ Launch and Activation Permission ให้เลือก Customize -> Edit ตามรูป
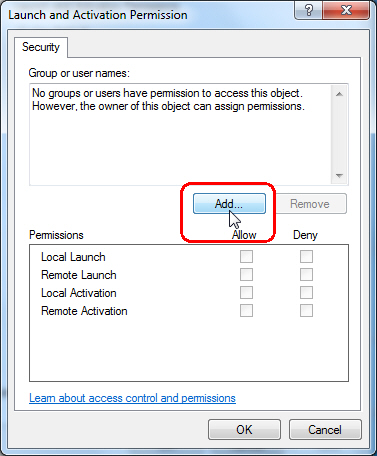
เลือกที่ Add
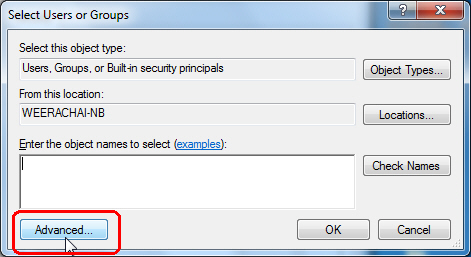
คลิกที่ Advanced
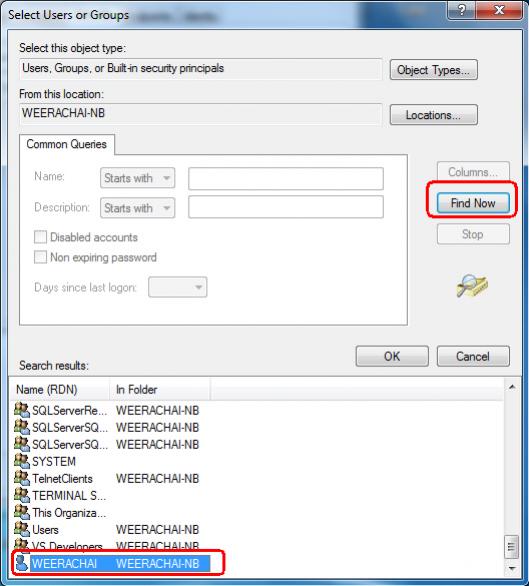
Find Now และเลือก User ที่ติด Permission ซึ่งในตอนแรกชื่อว่า WEERACHAI
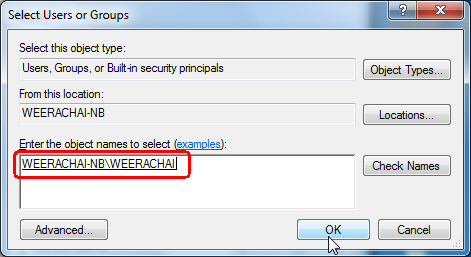
เลือก OK
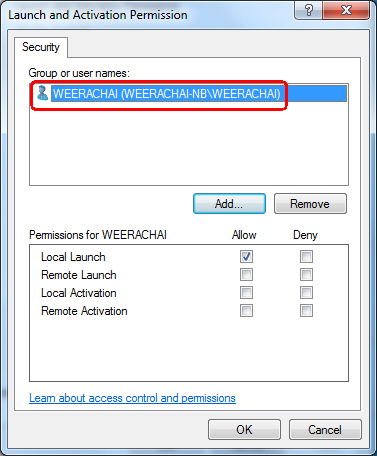
กำหนดค่าดังรูป
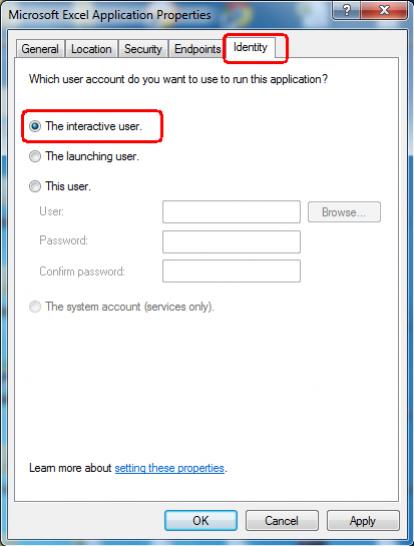
Tab Identity ให้เลือก The interactive user
หลังจากเรียบร้อยแล้ว ก็ให้ทำการทดสอบ Run โปรแกรมใหม่อีกครั้ง และถ้ายังไม่ได้ ให้ลองสังเกตุดูที่ Event Viewer ว่ามี Log แจ้ง Error หรือไม่
ตอนที่ 2 : C# Open Excel and Create Font,Border,Color,Style
| |
|
|
|
 |
|
|
|
| |
|
|
|
|
|
|
| |
By : |
TC Admin
|
| |
Score Rating : |
- |
| |
Create Date : |
2011-09-07 16:11:48 |
| |
Download : |
No files |
| |
|
|
|
|
Related Links |
|
|
|
|
.NET Smart Device เขียนโปรแกรมบน Smartphone, Pocket PC , Windows CE , Window Mobile 5-6, Hand Held,...
.NET Smart Device Project เขียนโปรแกรมบน Smartphone, Pocket PC , Windows CE , Window Mobile 5-6, Hand Held,...
Rating :     
Update :
2017-03-24 21:17:48 View :
42,993 |
|
|
|
|
|
|
|
|

|