Java GUI Add Insert data to Database |
Java GUI Add Insert data to Database บทความนี้จะเป็นการเขียน Java GUI เพื่อ Insert บันทึกข้อมูลลงใน Database โดยวิธีการคือ สร้าง Frame ขึ้นมาจากนั้นออกแบบ Form ด้วย Component Controls ของ Text Fields (JTextField) เพื่อไว้รับ Input ข้อมูลจากผู้ใช้ พร้อมกับมีปุ่ม Button ไว้สำหรับการรับทึกข้อมูลลงใน Database และหลังจากที่ Insert ข้อมูลผ่านก็จะมีการแสดงสถานะให้ผู้ใช้ทราบด้วยการใช้ OptionPane แสดง MessageBox
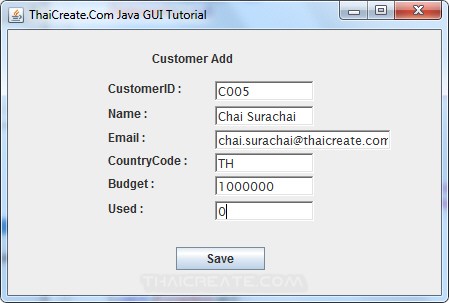 Java GUI Add Insert data to Database
ในตัวอย่างนี้จะเลือกใช้ Database ของ MySQL แต่ในกรณีที่จะใช้ร่วมกับ Database อื่น ๆ ก็สามารถทำได้ง่าย ๆ เพียงแค่เปลี่ยน Connector และ Connection String เท่านั้น และการแสดงข้อมูลจะใช้ JTable ของ Java Swing สามารถอ่านเพิ่มเติมได้ที่บทความนี้
Java Connect to MySQL Database (JDBC)
โครงสร้างของ MySQL และ Table

CREATE TABLE `customer` (
  `CustomerID` varchar(4) NOT NULL,
  `Name` varchar(50) NOT NULL,
  `Email` varchar(50) NOT NULL,
  `CountryCode` varchar(2) NOT NULL,
  `Budget` double NOT NULL,
  `Used` double NOT NULL,
  PRIMARY KEY  (`CustomerID`)
) ENGINE=MyISAM DEFAULT CHARSET=utf8;

--
-- dump ตาราง `customer`
--

INSERT INTO `customer` VALUES ('C001', 'Win Weerachai', '[email protected]', 'TH', 1000000, 600000);
INSERT INTO `customer` VALUES ('C002', 'John  Smith', '[email protected]', 'UK', 2000000, 800000);
INSERT INTO `customer` VALUES ('C003', 'Jame Born', '[email protected]', 'US', 3000000, 600000);
INSERT INTO `customer` VALUES ('C004', 'Chalee Angel', '[email protected]', 'US', 4000000, 100000);
คำสั่ง SQL ที่สามารถนำไปรันบน Query เพื่อสร้าง Table และ Data ได้ทันที
กลับมายัง Java Project ออกแบบหน้าตา GUI ดังนี้
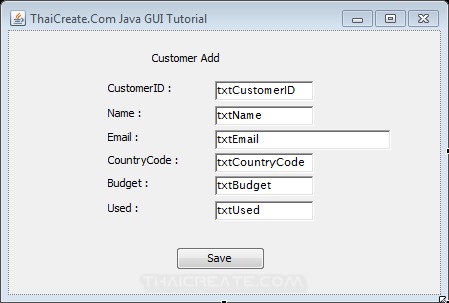
เป็น JTextField และชื่อต่าง ๆ ของ Text Field
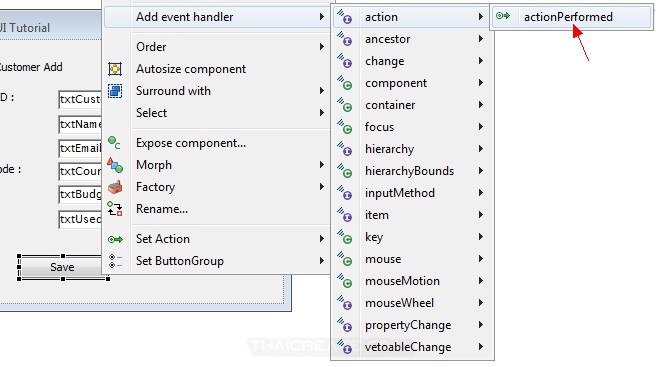
สร้าง Event ให้กับ Button สำหรับการ Insert ข้อมูล
Add event handler -> action -> actionPerformed
รูปแบบคำสั่งการ Insert ข้อมูลลงใน Database
// SQL Insert
String sql = "INSERT INTO customer "
		+ "(CustomerID,Name,Email,CountryCode,Budget,Used) "
		+ "VALUES ('" + txtCustomerID.getText() + "','"
		+ txtName.getText() + "','"
		+ txtEmail.getText() + "'" + ",'"
		+ txtCountryCode.getText() + "','"
		+ txtBudget.getText() + "','"
		+ txtUsed.getText() + "') ";
s.execute(sql);
เขียน Code ทั้งหมดได้ดังนี้
MyForm.java
package com.java.myapp;

import java.awt.EventQueue;
import java.sql.Connection;
import java.sql.DriverManager;
import java.sql.SQLException;
import java.sql.Statement;
import javax.swing.JFrame;
import javax.swing.JLabel;
import javax.swing.JOptionPane;
import javax.swing.JButton;
import javax.swing.JTextField;

import java.awt.event.ActionListener;
import java.awt.event.ActionEvent;

public class MyForm extends JFrame {

	/**
	 * Launch the application.
	 */
	public static void main(String[] args) {
		EventQueue.invokeLater(new Runnable() {
			public void run() {
				MyForm frame = new MyForm();
				frame.setVisible(true);
			}
		});
	}

	/**
	 * Create the frame.
	 */
	public MyForm() {
		setDefaultCloseOperation(JFrame.EXIT_ON_CLOSE);
		setBounds(100, 100, 449, 303);
		setTitle("ThaiCreate.Com Java GUI Tutorial");
		getContentPane().setLayout(null);

		// Header Customer Add
		JLabel hCustomerAdd = new JLabel("Customer Add");
		hCustomerAdd.setBounds(144, 21, 132, 14);
		getContentPane().add(hCustomerAdd);

		// *** Header ***//
		JLabel hCustomerID = new JLabel("CustomerID :");
		hCustomerID.setBounds(100, 51, 89, 14);
		getContentPane().add(hCustomerID);

		JLabel hName = new JLabel("Name :");
		hName.setBounds(100, 76, 89, 14);
		getContentPane().add(hName);

		JLabel hEmail = new JLabel("Email :");
		hEmail.setBounds(100, 100, 89, 14);
		getContentPane().add(hEmail);

		JLabel hCountryCode = new JLabel("CountryCode :");
		hCountryCode.setBounds(100, 123, 89, 14);
		getContentPane().add(hCountryCode);

		JLabel hBudget = new JLabel("Budget :");
		hBudget.setBounds(100, 146, 89, 14);
		getContentPane().add(hBudget);

		JLabel hUsed = new JLabel("Used :");
		hUsed.setBounds(100, 171, 89, 14);
		getContentPane().add(hUsed);

		// *** Add Form ***//
		// CustomerID
		final JTextField txtCustomerID = new JTextField("");
		txtCustomerID.setBounds(207, 51, 99, 20);
		getContentPane().add(txtCustomerID);

		// Name
		final JTextField txtName = new JTextField("");
		txtName.setBounds(207, 76, 99, 20);
		getContentPane().add(txtName);

		// Email
		final JTextField txtEmail = new JTextField("");
		txtEmail.setBounds(207, 100, 176, 20);
		getContentPane().add(txtEmail);

		// CountryCode
		final JTextField txtCountryCode = new JTextField("");
		txtCountryCode.setBounds(207, 123, 99, 20);
		getContentPane().add(txtCountryCode);

		// Budget
		final JTextField txtBudget = new JTextField("");
		txtBudget.setBounds(207, 146, 99, 20);
		getContentPane().add(txtBudget);

		// Used
		final JTextField txtUsed = new JTextField("");
		txtUsed.setBounds(207, 171, 99, 20);
		getContentPane().add(txtUsed);

		// Save Button
		JButton btnSave = new JButton("Save");
		btnSave.addActionListener(new ActionListener() {
			public void actionPerformed(ActionEvent arg0) {

				Connection connect = null;
				Statement s = null;

				try {
					Class.forName("com.mysql.jdbc.Driver");

					connect = DriverManager.getConnection(""
							+ "jdbc:mysql://localhost/mydatabase"
							+ "?user=root&password=root");

					s = connect.createStatement();

					// SQL Insert
					String sql = "INSERT INTO customer "
							+ "(CustomerID,Name,Email,CountryCode,Budget,Used) "
							+ "VALUES ('" + txtCustomerID.getText() + "','"
							+ txtName.getText() + "','"
							+ txtEmail.getText() + "'" + ",'"
							+ txtCountryCode.getText() + "','"
							+ txtBudget.getText() + "','"
							+ txtUsed.getText() + "') ";
					s.execute(sql);

					// Reset Text Fields
					txtCustomerID.setText("");
					txtName.setText("");
					txtEmail.setText("");
					txtCountryCode.setText("");
					txtBudget.setText("");
					txtUsed.setText("");

					JOptionPane.showMessageDialog(null,
							"Record Inserted Successfully");


				} catch (Exception e) {
					// TODO Auto-generated catch block
					JOptionPane.showMessageDialog(null, e.getMessage());
					e.printStackTrace();
				}

				try {
					if (s != null) {
						s.close();
						connect.close();
					}
				} catch (SQLException e) {
					// TODO Auto-generated catch block
					System.out.println(e.getMessage());
					e.printStackTrace();
				}

			}
		});
		btnSave.setBounds(168, 217, 89, 23);
		getContentPane().add(btnSave);

	}
}
Output
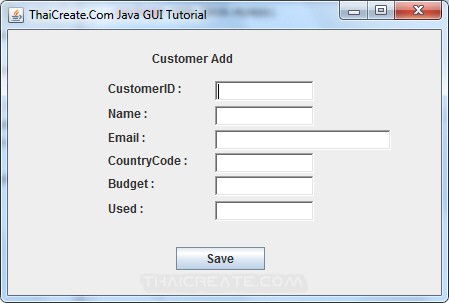
แสดง Form บนหน้าจอ Frame
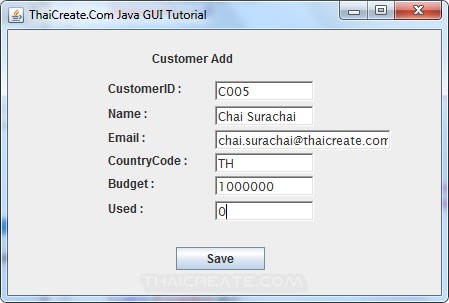
ทำการ Input ข้อมูล และเลือก Button คลิก Save
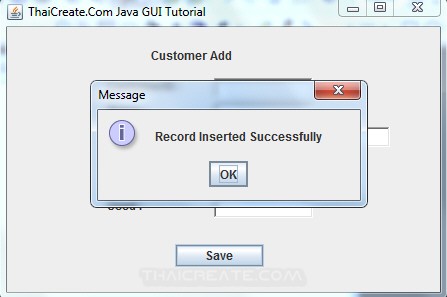
แสดง Message Box สถานะการ Insert ข้อมูล

เมื่อกลับไปดูใน Database ข้อมูลจะถูกเพิ่มเรียบร้อยแล้ว
กรณีที่ใช้ร่วมกับ Database อื่น ๆ สามารถดูวิธีการใช้ Connector และ Connection String ได้ที่นี่
| Property & Method (Others Related) |
|