GestureOverlayView - Android Widgets Example |
GestureOverlayView - Android Widgets สำหรับ GestureOverlayView เป็น Widget ใช้สำหรับ ในการออกแบบเหตุการณ์ที่เกิดขึ้นบนหน้าจอในรูปแบบต่าง ๆ เช่นการ Slide ไปยังหน้าจอ หรือการวาดสัญลักษณ์บนหน้าจอ โดยเราสามารถเขียนเงื่อนไขว่าถ้ามีการกระทำแบบนั้น ๆ จะให้เกิดเหตุการณ์อะไร และทำอะไร ซึ่งปกติแล้วใน Android จะมี Library ที่เกี่ยวกับ Gesture อยู่เช่น GestureDetector ซึ่งถ้าใช้ตัวนี้เราจะต้องทำการตรวจสอบเหตุการณ์ต่าง ๆ ขึ้นมาเองได้ เช่น onDown, onFling, onLongPress, onScroll, onShowPress และ onSingleTapUp
ตัวอย่างการใช้ GestureDetector
แต่ถ้าจะง่ายกว่านั้นเราสามารถใช้ GestureOverlayView โดย Widgets ตัวนี้จะอ่านรูปแบบจากรูปแบบ Gesture ที่มีอยู่แล้ว ว่าเหตุการณ์ที่เกิดขึ้นนั้นมีรูปแบบที่คล้ายคลึงกับเหตุการณ์ที่เราได้ออกแบบไว้หรือไม่ และเราจะต้องทำการออกแบบ Gesture Template ไว้ ซึ่งใน Android ก็มีฟีเจอร์นี้ไว้อยู่แล้วเช่นเดียวกัน

XML Syntax
    <GestureOverlayView
        android:id="@+id/gestureOverlayView1"
        android:layout_width="wrap_content"
        android:layout_height="wrap_content" />
Example 1 การสร้าง Gesture Template และการเรียกใช้และตรวจสอบรุปแบบ Gesture ด้วย GestureOverlayView
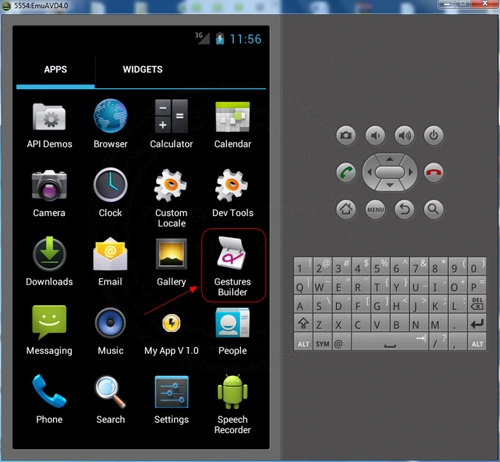
ไปที่ Show App บนหน้าจอของ Android ให้เลือก Gestures Building
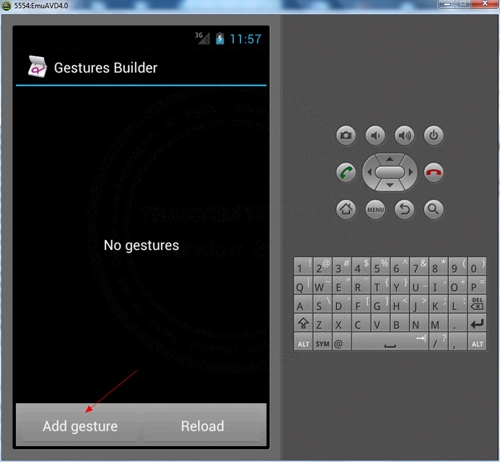
สังเกตุว่าตอนนี้ยังไม่มี Gestures ให้เลือก Add gesture
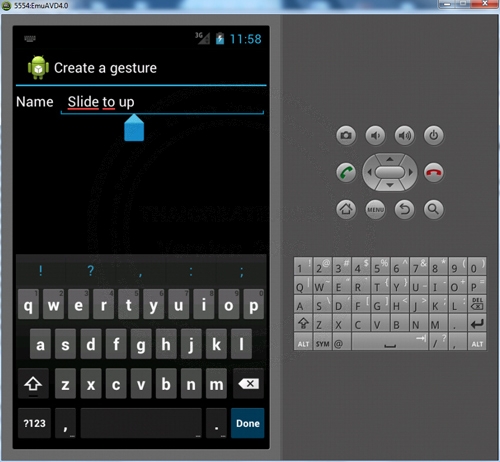
กำหนดชื่อ Guesture เช่น Slide to up (ไม่ควรตั้งยาวจนเกินไป เพราะจะต้องมีการอ้างอิงถึงชื่อ)
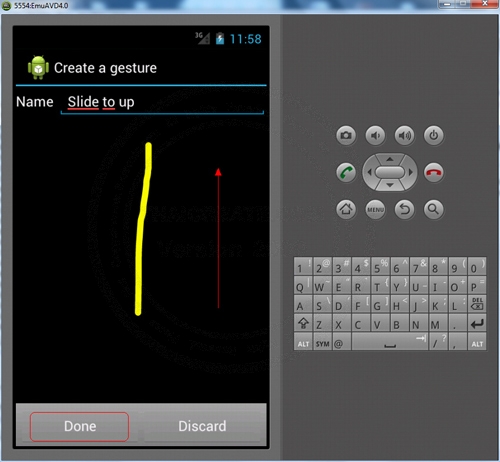
จากนั้นก็สร้างรูปแบบของ Gesture ซึ่งตัวแรกเรากำหนดว่า Slide to up ก็ให้ Slide ขึ้นข้างบน หลังจกาเสร็จแล้วก็ให้เลือก Done
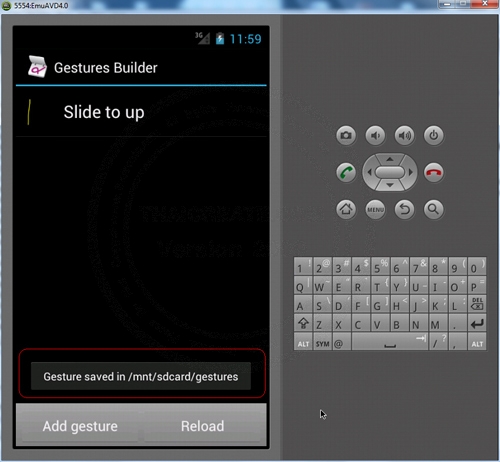
สังเกตุว่าไฟล์ของ Gesture จะถูกจัดเก็บไว้ที่ /mnt/sdcard/guesture บน SD Card
Android ทำการ Copy ไฟล์ไปยัง SD Card ของ Emulator การเรียกใช้งานไฟล์บน SD Card
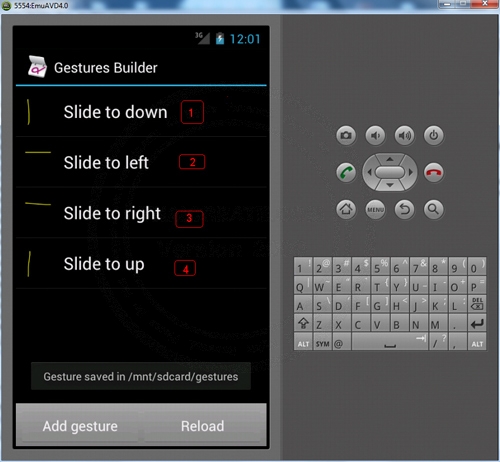
สร้าง Gesture อื่น ๆ ตามที่ต้องการ ในตัวอย่างจะมีอยู่ 4 รายการ คือ
- Slide to left
- Slide to right
- Slide to up
- Slide to down
การนำ Gesture มาใช้งานกับ App ของเรา
เปิด Eclipse และ App ของเรา
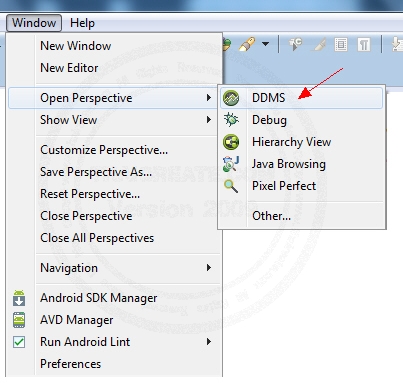
ไปที่เมนู
Window -> Open Perspective -> DDMS
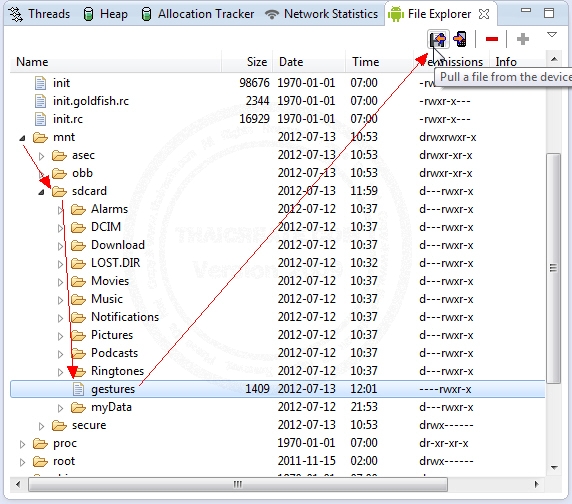
ไฟล์ของ Gesture ถูกเก็บไว้ที่ /mnt/sdcard/guesture ให้เลือก Pull a file from the device
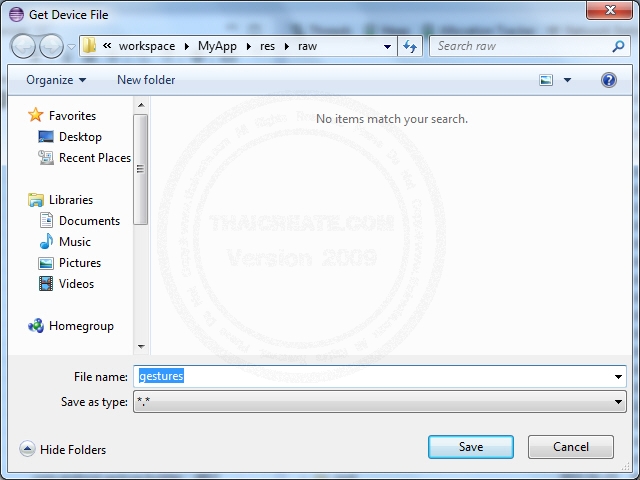
ให้จัดเก็บไฟว็ guesture ไว้ที่ /res/raw/ (กรณีที่ไม่มีโฟเดอร์ให้สร้างขึ้นมาใหม่)
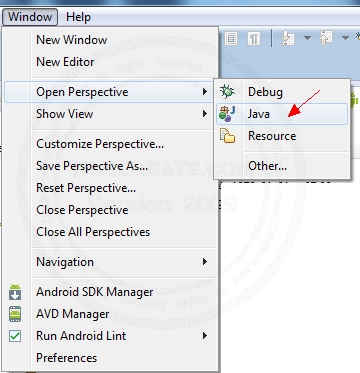
กลับไปยังหน่้าจอของ Java Android
Window -> Open Perspective -> Java
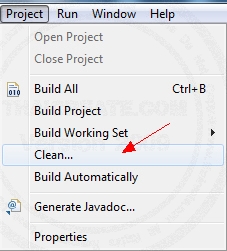
ให้เลือก Project -> Clean เพื่อ Refresh ครั้งหนึ่ง
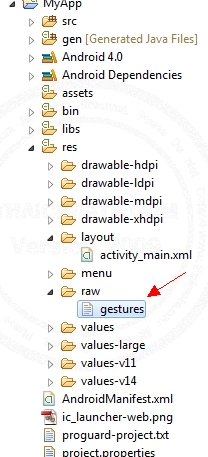
จะเห็นว่าในโฟเดอร์ /res/raw/ มีไฟล์ guesture ที่เรา Export มาจาก SD Card ของ Android
Code ที่เป็น XML และ Java
activity_main.xml (XML Layout)
<RelativeLayout xmlns:android="http://schemas.android.com/apk/res/android"
    xmlns:tools="http://schemas.android.com/tools"
    android:layout_width="match_parent"
    android:layout_height="match_parent" >

	<android.gesture.GestureOverlayView
	 android:id="@+id/gestures1"
	 android:layout_width="fill_parent"
	 android:layout_height="fill_parent"
	 android:gestureStrokeType="multiple"
	 android:eventsInterceptionEnabled="true"/>

</RelativeLayout>
MainActivity.java (Java Code)
package com.myapp;

import java.util.ArrayList;

import android.os.Bundle;
import android.app.Activity;
import android.gesture.Gesture;
import android.gesture.GestureLibraries;
import android.gesture.GestureLibrary;
import android.gesture.GestureOverlayView;
import android.gesture.GestureOverlayView.OnGesturePerformedListener;
import android.gesture.Prediction;
import android.view.Menu;
import android.widget.Toast;

public class MainActivity extends Activity {
	private GestureLibrary gestureLib;

	@Override
	public void onCreate(Bundle savedInstanceState) {
		super.onCreate(savedInstanceState);
		setContentView(R.layout.activity_main);

		GestureOverlayView gest1 = (GestureOverlayView) findViewById(R.id.gestures1);

		gestureLib = GestureLibraries.fromRawResource(this, R.raw.gestures);
		if (!gestureLib.load()) {
			finish();
		}

		gest1.addOnGesturePerformedListener(handleGestureListener);
	}

	private OnGesturePerformedListener handleGestureListener = new OnGesturePerformedListener() {
		public void onGesturePerformed(GestureOverlayView gestureView,
				Gesture gesture) {

			ArrayList<Prediction> predictions = gestureLib.recognize(gesture);

			if (predictions.size() > 0) {
				Prediction prediction = predictions.get(0);
				if (prediction.score > 1.0) {
					Toast.makeText(MainActivity.this, "Your Command : " +prediction.name,
							Toast.LENGTH_SHORT).show();
				}
			}

		}
	};

    @Override
    public boolean onCreateOptionsMenu(Menu menu) {
        getMenuInflater().inflate(R.menu.activity_main, menu);
        return true;
    }

}
Code ของ Java

จะสังเกตุเห็นว่า
gestureLib = GestureLibraries.fromRawResource(this, R.raw.gestures);
จะเห็นว่ามีการเรียกใช้ไฟล์ gestures ที่เป็น Template ที่มาจาก SD Card
			if (predictions.size() > 0) {
				Prediction prediction = predictions.get(0);
				if (prediction.score > 1.0) {
					Toast.makeText(MainActivity.this, "Your Command : " +prediction.name,
							Toast.LENGTH_SHORT).show();
				}
			}
ตรวจสอบเหตุการณ์ที่เกิดขึ้นว่าไปตรงกับรูปแบบ Gestures ที่ได้ออกแบบไว้ตัวไหน
Screenshot
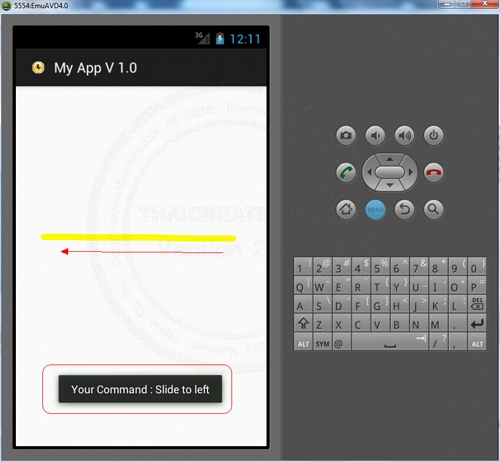
ถ้าตรงกับรูปแบบที่ออกแบบไว้ก็จะแสดงเหตุการณ์นั้น ๆ ให้เราทราบ
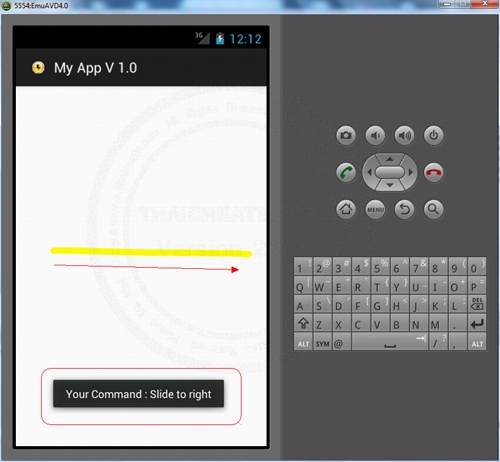
ถ้าตรงกับรูปแบบที่ออกแบบไว้ก็จะแสดงเหตุการณ์นั้น ๆ ให้เราทราบ
Example 2 ตัวอย่างการทำ GestureOverlayView ใช้ร่วมกับเหตุการณ์อื่น ๆ
ในตตัวอย่างนี้เราจะใช้ GestureOverlayView ทำงานร่วมกับ ViewFlipper เพื่อควบคุมการ Slide ซ้าย และ Slide ขวา เพื่อเปลี่ยนรูปภาพ
ViewFlipper - Android Widgets Example
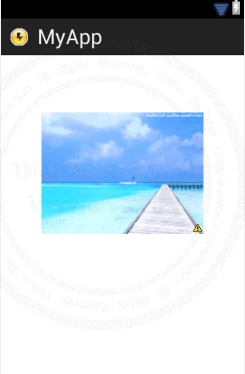
ออกแบบหน้าจอ GraphicalLayout ด้วย Widget ตามรูป
activity_main.xml (XML Layout)
<RelativeLayout xmlns:android="http://schemas.android.com/apk/res/android"
    xmlns:tools="http://schemas.android.com/tools"
    android:layout_width="match_parent"
    android:layout_height="match_parent" >

	<android.gesture.GestureOverlayView
	 android:id="@+id/gestures1"
	 android:layout_width="fill_parent"
	 android:layout_height="fill_parent"
	 android:gestureStrokeType="multiple"
	 android:eventsInterceptionEnabled="true"/>


	  <LinearLayout
	           android:id="@+id/LinearLayout1"
	           android:layout_width="wrap_content"
	           android:layout_height="wrap_content"
	           android:layout_centerHorizontal="true"
	           android:layout_marginTop="75dp" >

	           <ViewFlipper
	               android:id="@+id/ViewFlipper01"
	               android:layout_width="wrap_content"
	               android:layout_height="wrap_content" >

		            <ImageView
		            android:id="@+id/imageView1"
		            android:layout_width="wrap_content"
		            android:layout_height="wrap_content"
		            android:src="@drawable/pic_a" />
		            <ImageView
		            android:id="@+id/imageView2"
		            android:layout_width="wrap_content"
		            android:layout_height="wrap_content"
		            android:src="@drawable/pic_b" />
		            <ImageView
		            android:id="@+id/imageView3"
		            android:layout_width="wrap_content"
		            android:layout_height="wrap_content"
		            android:src="@drawable/pic_c" />
		            <ImageView
		            android:id="@+id/imageView4"
		            android:layout_width="wrap_content"
		            android:layout_height="wrap_content"
		            android:src="@drawable/pic_d" />

	           </ViewFlipper>

	       </LinearLayout>

</RelativeLayout>
MainActivity.java (Java Code)
package com.myapp;

import java.util.ArrayList;

import android.os.Bundle;
import android.app.Activity;
import android.gesture.Gesture;
import android.gesture.GestureLibraries;
import android.gesture.GestureLibrary;
import android.gesture.GestureOverlayView;
import android.gesture.GestureOverlayView.OnGesturePerformedListener;
import android.gesture.Prediction;
import android.util.Log;
import android.view.Menu;
import android.widget.Toast;
import android.widget.ViewFlipper;

public class MainActivity extends Activity {

	private GestureLibrary gestureLib;
	ViewFlipper vf;

	@Override
	public void onCreate(Bundle savedInstanceState) {
		super.onCreate(savedInstanceState);
		setContentView(R.layout.activity_main);

		// Gesture Event
		GestureOverlayView gest1 = (GestureOverlayView) findViewById(R.id.gestures1);
		gestureLib = GestureLibraries.fromRawResource(this, R.raw.gestures);
		if (!gestureLib.load()) {
			finish();
		}
		gest1.addOnGesturePerformedListener(handleGestureListener);

		// ViewFlipper Slide Show Images
        vf = (ViewFlipper) findViewById(R.id.ViewFlipper01);
        vf.setInAnimation(this,android.R.anim.fade_in);
        vf.setOutAnimation(this, android.R.anim.fade_out);
	}

	private OnGesturePerformedListener handleGestureListener = new OnGesturePerformedListener() {
		public void onGesturePerformed(GestureOverlayView gestureView,
				Gesture gesture) {

			ArrayList<Prediction> predictions = gestureLib.recognize(gesture);

			if (predictions.size() > 0) {
				Prediction prediction = predictions.get(0);
				if (prediction.score > 1.0) {

				     	String action = predictions.get(0).name;
				        if ("Slide to left".equals(action)) {
				        	vf.showPrevious();
							Toast.makeText(MainActivity.this, prediction.name + " : Show Next Picture" ,
									Toast.LENGTH_SHORT).show();
				        } else if ("Slide to right".equals(action)) {
				        	vf.showPrevious();
							vf.showPrevious();
							Toast.makeText(MainActivity.this, prediction.name + " : Show Previous Picture" ,
									Toast.LENGTH_SHORT).show();
				        }


				}
			}

		}
	};

    @Override
    public boolean onCreateOptionsMenu(Menu menu) {
        getMenuInflater().inflate(R.menu.activity_main, menu);
        return true;
    }

}
จาก Code ที่เป็น Java
			if (predictions.size() > 0) {
				Prediction prediction = predictions.get(0);
				if (prediction.score > 1.0) {

				     	String action = predictions.get(0).name;
				        if ("Slide to left".equals(action)) {
				        	vf.showPrevious();
							Toast.makeText(MainActivity.this, prediction.name + " : Show Next Picture" ,
									Toast.LENGTH_SHORT).show();
				        } else if ("Slide to right".equals(action)) {
				        	vf.showPrevious();
							vf.showPrevious();
							Toast.makeText(MainActivity.this, prediction.name + " : Show Previous Picture" ,
									Toast.LENGTH_SHORT).show();
				        }


				}
			}
จะเห็นว่ามีการเขียนเงื่อนไขว่า Slide to left ให้ vf.showPrevious(); และ Slide to right ให้ vf.showPrevious();
Screenshot
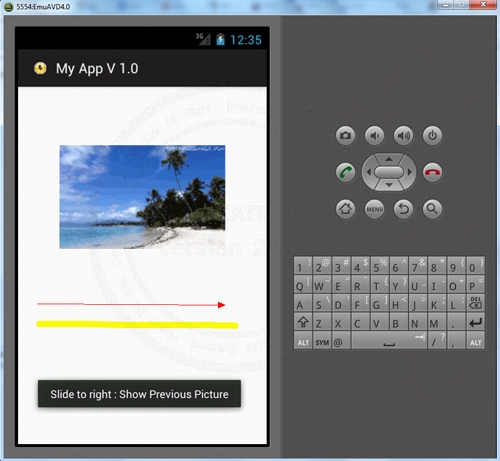
ผลลัพธ์ที่ได้เมื่อ Slide to right
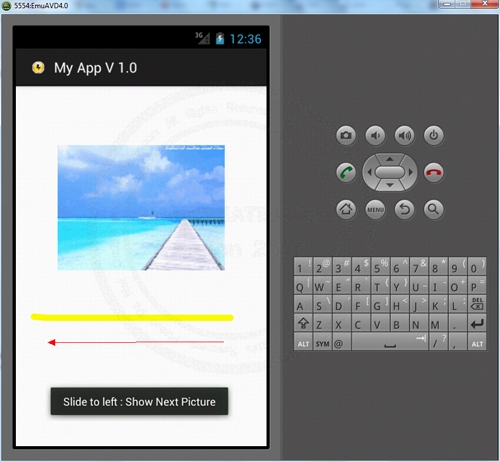
ผลลัพธ์ที่ได้เมื่อ Slide to left
| Property & Method (Others Related) |
|
 ช่วยกันสนับสนุนรักษาเว็บไซต์ความรู้แห่งนี้ไว้ด้วยการสนับสนุน Source Code 2.0 ของทีมงานไทยครีเอท ช่วยกันสนับสนุนรักษาเว็บไซต์ความรู้แห่งนี้ไว้ด้วยการสนับสนุน Source Code 2.0 ของทีมงานไทยครีเอท
|
|
| |
By : |
ThaiCreate.Com Team (บทความเป็นลิขสิทธิ์ของเว็บไทยครีเอทห้ามนำเผยแพร่ ณ เว็บไซต์อื่น ๆ) |
| |
Score Rating : |
   |
|
| |
Create/Update Date : |
2012-07-01 16:30:32 /
2012-07-15 07:49:03 |
| |
Download : |
No files |
|
|
Sponsored Links / Related |
|
|
|
|
|
|

|