Android กับ Intent ควบคุมการแสดงและซ่อน (Show/Hide) ของ Activity form ต่าง ๆ |
Android กับ Intent : ซ่อนแสดง (Show/Hide) Activity ในการเขียน Application บน Android นั้นการจัดรูปแบบและวาง Process ของ Layout สามารถควบคุมการแสดงผลในแต่ล่ะ Layout ได้หลายวิธี และสามารถทำได้ใน Activity (Form) เดียวกัน เช่น การใช้ ViewAnimator ที่สามารถควบคุมการแสดงผลได้ในแต่ล่ะ Layout หรือจะใช้ ViewFlipper และ ViewSwitcher ซึ่ง Widgets เหล่านี้สามารถควบคุมการแสดงผลได้ในแต่ล่ะ Layout เช่นเดียวกัน สามารถเข้าไปอ่านในตัวอย่างตามลิ้งค์นั้น ๆ
แต่ถ้าต้องการแยกการทำงานของแต่ล่ะ Activity Form ออกจากกัน เพื่อง่ายและอีสระต่อสะดวกในการเขียนโปรแกรมก็สามารถทำได้ง่าย ๆ เช่นเดียวกัน โดยใน Android มี class ที่ชื่อว่า Intent ที่จะเข้ามาจัดการในการแสดงผลของ Activity ต่าง ๆ
Flow การทำงาน
จากภาพประกิบจะเห็นว่ามี Activity อยู่ 3 Form ในที่นี้เรามองว่าเป็น MainActivity.class , ActivityForm2.class และ ActivityForm3.class ซึ่งในแต่ล่ะ Class ทำงานแยก Form และ เรียกใช้ XML คนล่ะตัวกัน ในกรณีที่ต้องการย้ายการทำงานระว่าง Activity นั้น สามารถใช้ startActivity() ได้ตามตัวอย่าง
Example 1. ย้ายจาก MainActivity.class ไปยัง ActivityForm2.class
            	Intent newActivity = new Intent(MainActivity.this,ActivityForm2.class);
            	startActivity(newActivity);
Example 2. ย้ายจาก ActivityForm2.this ไปยัง ActivityForm3.class
            	Intent newActivity = new Intent(ActivityForm2.this,ActivityForm3.class);
            	startActivity(newActivity);
และในกรณีเดียวกันก็สามารถย้ายกลับมายัง Activity หลักได้เช่นเดียวกัน
Example 3. ย้ายจาก ActivityForm3.this ไปยัง MainActivity.class
            	Intent newActivity = new Intent(ActivityForm3.this,MainActivity.class);
            	startActivity(newActivity);
การส่งค่าตัวแปร Parameters ระหว่าง Activity
นอกจากนี้ในการย้ายการทำงานระหว่าง Activity ก็สามารถส่งค่า Parameters หรือตัวแปรไปกับ Intent ได้เช่นเดียวกัน
	            	Intent newActivity = new Intent(MainActivity.this,ActivityForm2.class);
	            	newActivity.putExtra("MemID", "1234");
	            	startActivity(newActivity);
การอ่านค่าตัวแปรจาก Intent ใน Activity ที่เป็น Form รับ
		Intent intent= getIntent();
		final String MemID = intent.getStringExtra("MemID"); // for String
		int MemID = intent.getExtras().getInt("MemID"); // for Int
กรณีส่งมากกว่า 1 ค่า Parameters
	            	Intent newActivity = new Intent(MainActivity.this,ActivityForm2.class);
	            	newActivity.putExtra("MemID", "1234");
	            	newActivity.putExtra("Name", "Win");
	            	startActivity(newActivity);
การอ่านค่าตัวแปรจาก Intent ใน Activity ที่เป็น Form รับ
		Intent intent= getIntent();
		final String MemID = intent.getStringExtra("MemID");
		final String Name = intent.getStringExtra("Name");
จะเห็นว่าการย้ายการทำงานระหว่าง Activity นั้นสามารถทำได้อย่างไม่ยาก แต่ทั้งนี้การที่จะออกแบบหลาย Activity นั้นก็ควรแยกเฉพาะ Process ที่ทำงานแยกกันอย่างสิ้นเชิง เพราะใน Android มี Widgets ต่าง ๆ ที่สามารถควบคุมการทำงานของแต่ล่ะ Layout ได้อยู่แล้ว อาจจะใช้ TabHost เข้ามาจัดการก็ได้เช่นเดียวกัน
Example ตัวอย่างการใช้ Intent กับ Activity
หลังจากที่ได้รู้ว่า Intent มีหลักการทำงานในขั้นพื้นฐานแล้ว เรามาลองเขียนการ Intent Activity แบบง่าย ๆ ซะ 2-3 Form
โครงสร้างเริ่มต้น
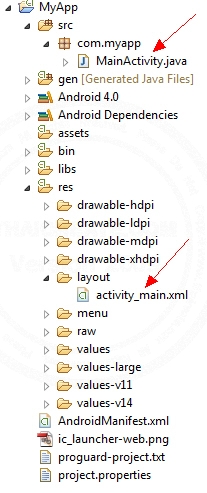
ในโครงสร้างเริ่มต้นเรามีไฟล์เพียง 2 ตัวคือ MainActivity.java กับ activity_main.xml เป็น Activity หลัก ซึ่งเป็นไฟล์ที่ทำงานคู่กัน
เราจะลองเพิ่ม Activity และ XML layout ขึ้นมาอีก 2 ตัวคือ
- ActivityForm2.java กับ activity_form2.xml
- ActivityForm3.java กับ activity_form3.xml
การเพิ่ม XML Layout
คลิกขวาในตำแหน่งของ Layout ที่ต้องการ
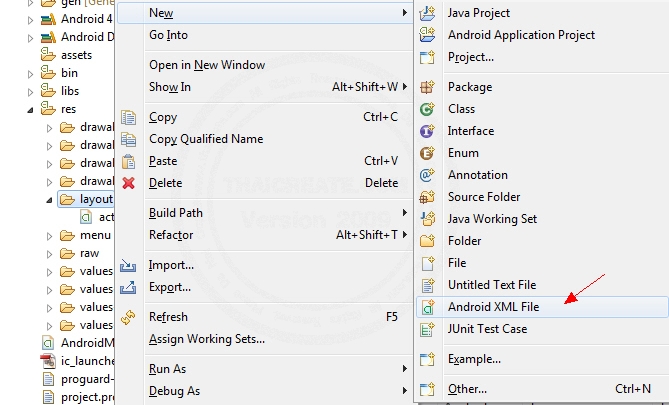
เลือก New -> Android XML Form
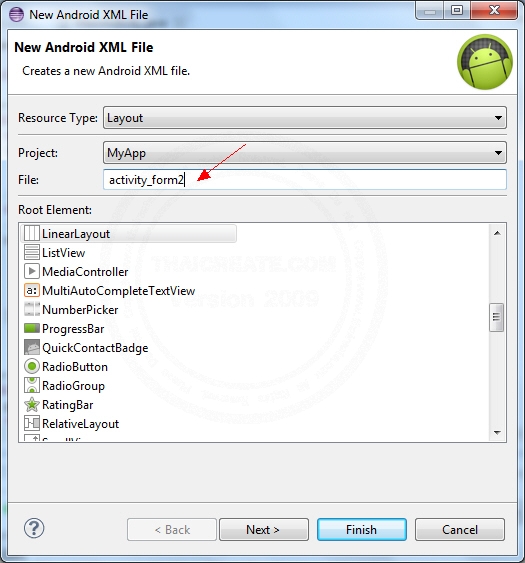
กรอกชื่อ XML Layout
การเพิ่ม Java Class
คลิกขวาในตำแหน่งของ package ที่ต้องการ
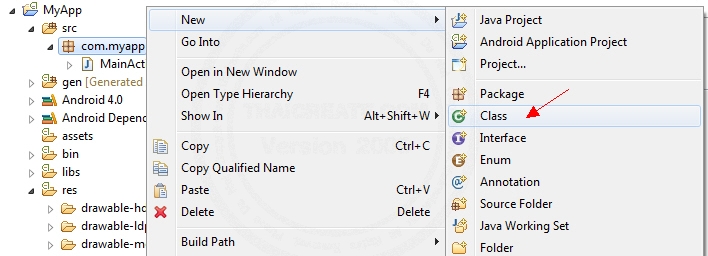
เลือก New -> Class
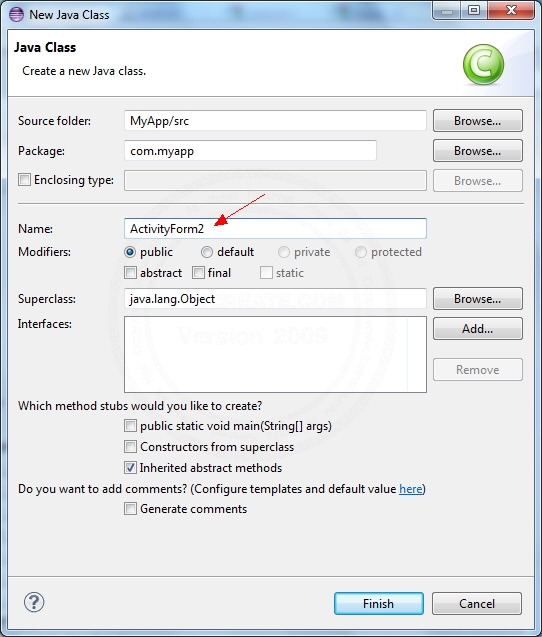
กรอกชื่อ Class
ทดสอบเพิ่มให้ครบทั้ง 3 ตัว
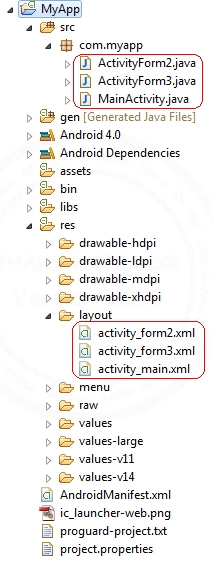
เราจะได้ไฟล์ทั้งหมด 3 คู่ด้วยกัน ดังภาพประกอบ
เพิ่มเติม
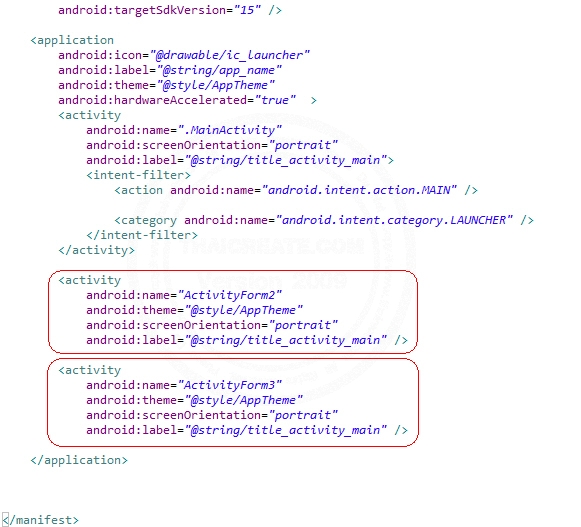
อย่าลืม !!! หลังจากที่เพิ่ม Class ทุกครั้งอย่าลืมประกาศค่าในไฟล์ AndroidManifest.xml ทุกครั้งไม่เช่นนั้นจะไม่สามารถรันโปรแกรมได้
รูปแบบ<activity
android:name="ActivityForm3" />
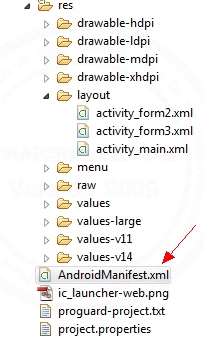
AndroidManifest.xml
        <activity
            android:name="ActivityForm2"
            android:theme="@style/AppTheme"
            android:screenOrientation="portrait"
            android:label="@string/title_activity_main" />

        <activity
            android:name="ActivityForm3"
            android:theme="@style/AppTheme"
            android:screenOrientation="portrait"
            android:label="@string/title_activity_main" />
เพิ่มในตำแหน่งนี้
รายละเอียดของไฟล์ทั้ง 3 คู่
- activity_main.xml กับ MainActivity.java
activity_main.xml
<RelativeLayout   xmlns:android="http://schemas.android.com/apk/res/android"
    xmlns:tools="http://schemas.android.com/tools"
    android:layout_width="match_parent"
    android:layout_height="match_parent" >

    <TextView
        android:id="@+id/textView1"
        android:layout_width="wrap_content"
        android:layout_height="wrap_content"
        android:layout_alignParentTop="true"
        android:layout_centerHorizontal="true"
        android:layout_marginTop="50dp"
        android:text="Current Show Form 1"
        android:textAppearance="?android:attr/textAppearanceLarge" />

    <Button
        android:id="@+id/button1"
        android:layout_width="wrap_content"
        android:layout_height="wrap_content"
        android:layout_below="@+id/textView1"
        android:layout_centerHorizontal="true"
        android:layout_marginTop="62dp"
        android:text="Show Form 2" />

</RelativeLayout>
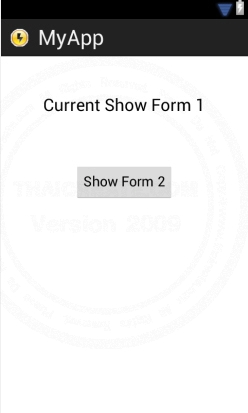
MainActivity.java
package com.myapp;

import android.os.Bundle;
import android.view.View;
import android.widget.Button;
import android.app.Activity;
import android.content.Intent;

public class MainActivity extends Activity {

	@Override
	public void onCreate(Bundle savedInstanceState) {
		super.onCreate(savedInstanceState);
		setContentView(R.layout.activity_main);


		// Button1
        final Button btn1 = (Button) findViewById(R.id.button1);
        // Perform action on click
        btn1.setOnClickListener(new View.OnClickListener() {
            public void onClick(View v) {

            	// Open Form 2
            	Intent newActivity = new Intent(MainActivity.this,ActivityForm2.class);
            	startActivity(newActivity);

            }
        });

	}

}
- activity_form2.xml กับ ActivityForm2.java
activity_form2.xml
<RelativeLayout xmlns:android="http://schemas.android.com/apk/res/android"
    android:layout_width="match_parent"
    android:layout_height="match_parent"
    android:orientation="vertical" >

    <TextView
        android:id="@+id/textView1"
        android:layout_width="wrap_content"
        android:layout_height="wrap_content"
        android:layout_alignParentTop="true"
        android:layout_centerHorizontal="true"
        android:layout_marginTop="50dp"
        android:text="Current Show Form 2"
        android:textAppearance="?android:attr/textAppearanceLarge" />

     <Button
        android:id="@+id/button1"
        android:layout_width="wrap_content"
        android:layout_height="wrap_content"
        android:layout_below="@+id/textView1"
        android:layout_centerHorizontal="true"
        android:layout_marginTop="62dp"
        android:text="Show Form 3" />

</RelativeLayout>
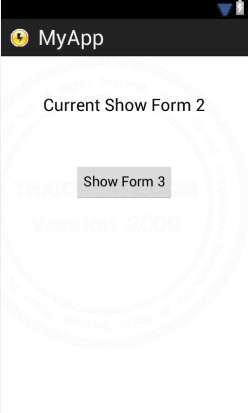
ActivityForm2.java
package com.myapp;

import android.app.Activity;
import android.content.Intent;
import android.os.Bundle;
import android.view.View;
import android.widget.Button;

public class ActivityForm2 extends Activity  {

	@Override
	public void onCreate(Bundle savedInstanceState) {
		super.onCreate(savedInstanceState);
		setContentView(R.layout.activity_form2);

		// Button1
        final Button btn1 = (Button) findViewById(R.id.button1);
        // Perform action on click
        btn1.setOnClickListener(new View.OnClickListener() {
            public void onClick(View v) {

            	// Open Form 3
            	Intent newActivity = new Intent(ActivityForm2.this,ActivityForm3.class);
            	startActivity(newActivity);

            }
        });

	}

}
- activity_form3.xml กับ ActivityForm3.java
activity_form3.xml
<RelativeLayout xmlns:android="http://schemas.android.com/apk/res/android"
    android:layout_width="match_parent"
    android:layout_height="match_parent"
    android:orientation="vertical" >

    <TextView
        android:id="@+id/textView1"
        android:layout_width="wrap_content"
        android:layout_height="wrap_content"
        android:layout_alignParentTop="true"
        android:layout_centerHorizontal="true"
        android:layout_marginTop="50dp"
        android:text="Current Show Form 3"
        android:textAppearance="?android:attr/textAppearanceLarge" />

   	<Button
        android:id="@+id/button1"
        android:layout_width="wrap_content"
        android:layout_height="wrap_content"
        android:layout_below="@+id/textView1"
        android:layout_centerHorizontal="true"
        android:layout_marginTop="62dp"
        android:text="Back to Form 1" />

</RelativeLayout>
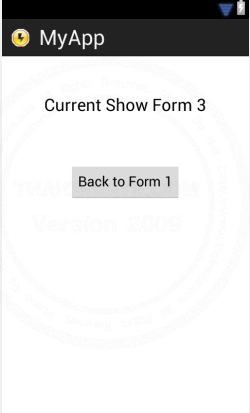
ActivityForm3.java
package com.myapp;

import android.app.Activity;
import android.content.Intent;
import android.os.Bundle;
import android.view.View;
import android.widget.Button;

public class ActivityForm3 extends Activity  {

	@Override
	public void onCreate(Bundle savedInstanceState) {
		super.onCreate(savedInstanceState);
		setContentView(R.layout.activity_form3);

		// Button1
        final Button btn1 = (Button) findViewById(R.id.button1);
        // Perform action on click
        btn1.setOnClickListener(new View.OnClickListener() {
            public void onClick(View v) {

            	// Back to Form 1
            	Intent newActivity = new Intent(ActivityForm3.this,MainActivity.class);
            	startActivity(newActivity);

            }
        });

	}

}
Screenshot
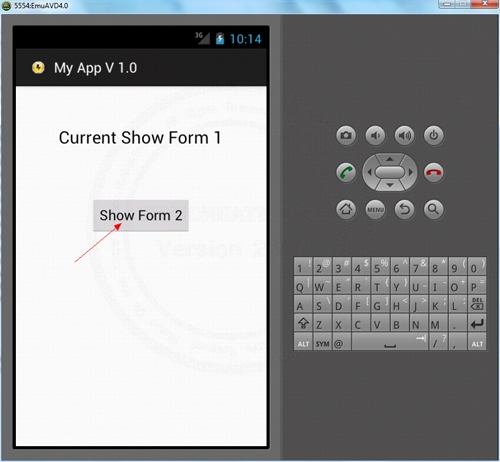
จาก Main Activity จะ Intent ไปยัง Activity Form 2
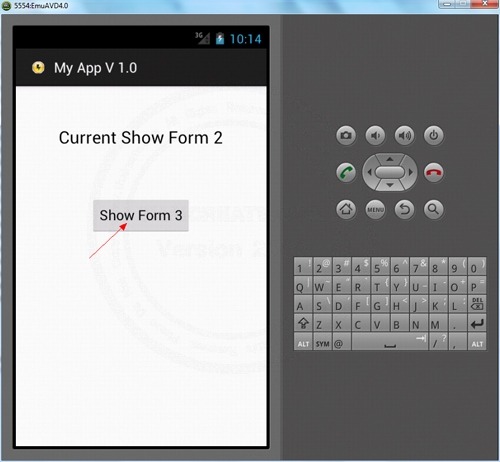
จาก Activity Form 2 จะ Intent ไปยัง Activity Form 3
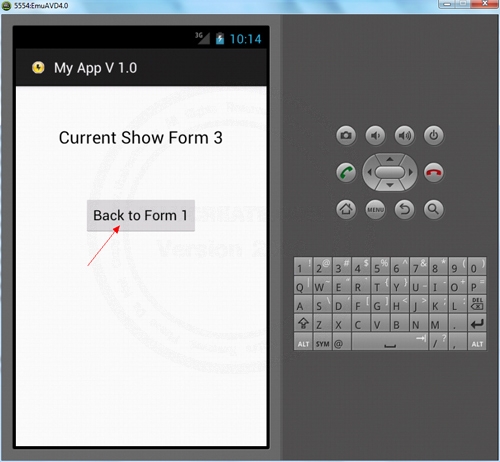
จาก Activity Form 3 จะ Intent ไปยัง Main Activity
สำหรับการใช้งาน Intent Activity ร่วมกับ From และการส่งค่าจากการใช้จริง สามารถดูได้จากตัวอย่างนี้
|
 ช่วยกันสนับสนุนรักษาเว็บไซต์ความรู้แห่งนี้ไว้ด้วยการสนับสนุน Source Code 2.0 ของทีมงานไทยครีเอท ช่วยกันสนับสนุนรักษาเว็บไซต์ความรู้แห่งนี้ไว้ด้วยการสนับสนุน Source Code 2.0 ของทีมงานไทยครีเอท
|
|
| |
By : |
ThaiCreate.Com Team (บทความเป็นลิขสิทธิ์ของเว็บไทยครีเอทห้ามนำเผยแพร่ ณ เว็บไซต์อื่น ๆ) |
| |
Score Rating : |
    |
|
| |
Create/Update Date : |
2012-07-22 07:20:22 /
2017-03-26 20:26:36 |
| |
Download : |
No files |
|
|
Sponsored Links / Related |
|
|
|
|
|
|

|