Android and Ion (HTTP LIB:Library) |
Android and Ion (HTTP LIB:Library) การเชื่อมต่อกับแหล่งข้อมูลจาก Http (URL) จาก Android App ก่อนหน้านี้เราจะใช้ Class ในกลุ่มของ HttpPost และ HttpGet ในการอ่านและรับ-ส่งข้อมูลผ่าน get หรือ post แต่มักจะมีปัญหาในด้านการใช้งาน เช่น การเขียนจะยาวมาก และเมื่อตอนที่โปรแกรมกำลังทำงานจะพบปัญหา การตรวจสอบการเชื่อมต่อ ว่าสถานะการเชื่อมต่อเป็นอย่างไร สามารถติดตามตรวจสอบได้ตลอดได้แต่ล่ะ Process หรือไม่ รวมทั้งการตรวจสอบข้อผิดพลาดต่าง ๆ เราก็จำเป็นจะต้องมาเขียนเองทั้งหมด ยังไม่รวมการส่งข้อมูลประเภท files ที่ทำได้ค่อนข้างจะลำบากมาก เมื่อส่งพวก String ไปพร้อม ๆ ด้วย และการนำค่า String กลับมาใช้ในรูปแบบของ JSON ก็จะต้องมาทำการแปลงกลับไปกลับมา
 Android and Ion
ในการเขียน Android App ช่วงหลัง ๆ ผมจึงแนะนำให้ใช้ Library มาเข้าจัดการกับเรื่องเหล่านี้แทน ซึ่งในปัจจุบันมี Library หลายตัวมาก และในหัวข้อนี้จะแนะนำ Library ชื่อว่า Ion ซึ่งเป็น Library ที่เข้ามาจัดการกับ Http โดยเฉพาะ รองรับการทำงานเกือบทุกรูปแบบ ไม่ว่าจะเป็น get, post การรับส่ง string , files หรือแม้แต่ json ก็ยังถูกนำมารวมใช้งานกับ library นี้ด้วย โดยที่เราไม่จำเป็นจะต้องใช้การ parser ค่ามันอีก เพราะมันจะแปลงมาเป็น json ให้เลย ทั้ง ไป-กลับ และ function ต่าง ๆ ที่อยู่ใน Library เราจะมั่นใจได้ว่ามันจะไม่ถูก deprecated แน่นอน เพราะถ้ามีการ deprecated เราก็จะสามารถอัพเดดเวอร์ชั่นใหม่ ๆ ได้ตลอด โดยที่ไม่จำเป็นจะต้องมาแก้ไข Code ใหม่
สำหรับตัวอย่างและ Code นี้รองรับการเขียนทั้งบนโปรแกรม Eclipse และ Android Studio
Download Glide
Features
- Asynchronously (Images, JSON, Strings, Files)
- HTTP POST/PUT (text/plain, application/json , application/x-www-form-urlencoded, multipart/form-data)
- Transparent usage of HTTP( SPDY and HTTP/2, Caching, Gzip/Deflate Compression, Cookies)
- View received headers
- Grouping and cancellation of requests
- Download progress callbacks

การติดตั้งสามารถดาวน์โหลดไฟล์ .JAR แล้วนำไป Import ลงใน Eclipse หรือ Android Studio

ในการใช้งาน Ion จะต้องใช้ Library ของ AndroidAsync.jar ด้วย
กรณีใช้บน Android Studio เพิ่ม build.gradle
compile 'com.koushikdutta.ion:ion:2.+'
ใน AndroidManifest.xml เพิ่ม Permission สำหรับการเชื่อมต่อกับ Internet ดังนี้
<uses-permission android:name="android.permission.INTERNET" />
ขั้นตอนการเรียกใช้
Example 1 : การเรียก URL ผ่าน get
Syntax
	Ion.with(this)
	.load("http://domain.com/url.php")
	.asString()
	.withResponse()
	.setCallback(new FutureCallback<Response<String>>() {
	    @Override
	    public void onCompleted(Exception e, Response<String> result) {
		// print the String that was downloaded
		result.getResult();
	    }
	});
getString.php : ตัวอย่างไฟล์ PHP ที่อยู่บน Server (www.thaicreate.com/android/getString.php)
<?php
	echo date("Y-m-d H:i:s");
?>

activity_main.xml
<RelativeLayout xmlns:android="http://schemas.android.com/apk/res/android"
    xmlns:tools="http://schemas.android.com/tools"
    android:layout_width="match_parent"
    android:layout_height="match_parent" >

    <TextView
        android:id="@+id/txtResult"
        android:layout_width="wrap_content"
        android:layout_height="wrap_content"
        android:layout_alignParentTop="true"
        android:layout_centerHorizontal="true"
        android:layout_marginTop="107dp"
        android:text="Result" />

</RelativeLayout>
MainActivity.java
package com.myapp;

import android.os.Bundle;
import com.koushikdutta.async.future.FutureCallback;
import com.koushikdutta.ion.Ion;
import com.koushikdutta.ion.Response;

import android.app.Activity;
import android.widget.TextView;

public class MainActivity extends Activity {

	@Override
	public void onCreate(Bundle savedInstanceState) {
		super.onCreate(savedInstanceState);
		setContentView(R.layout.activity_main);

		final TextView txtResult = (TextView) findViewById(R.id.txtResult);

		Ion.with(this)
		.load("https://www.thaicreate.com/android/getString.php")
		.asString()
		.withResponse()
		.setCallback(new FutureCallback<Response<String>>() {
		    @Override
		    public void onCompleted(Exception e, Response<String> result) {
		        // print the String that was downloaded
		        System.out.println(result.getResult());
		        txtResult.setText(result.getResult());
		    }
		});


	}

}

Example 2 : การเรียก URL และส่งค่า Parameters ผ่าน post
Syntax
	Ion.with(this)
	.oad("http://domain.com/url.php")
	.setBodyParameter("sName", "Weerachai")
	.setBodyParameter("sLastName", "Nukitram")
	.asString()
	.withResponse()
	.setCallback(new FutureCallback<Response<String>>() {
	    @Override
	    public void onCompleted(Exception e, Response<String> result) {
		// print the String that was downloaded
		result.getResult();
	    }
	});
postString.php : ตัวอย่างไฟล์ PHP ที่อยู่บน Server (www.thaicreate.com/android/postString.php)
<?php
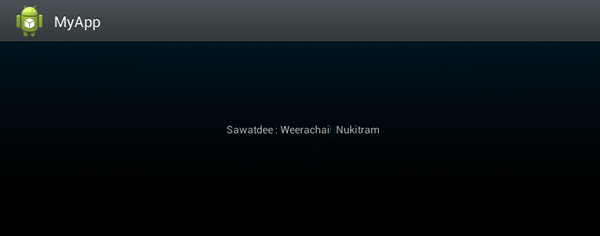
	echo "Sawatdee : ".$_POST["sName"]." ".$_POST["sLastName"];
?>
activity_main.xml
<RelativeLayout xmlns:android="http://schemas.android.com/apk/res/android"
    xmlns:tools="http://schemas.android.com/tools"
    android:layout_width="match_parent"
    android:layout_height="match_parent" >

    <TextView
        android:id="@+id/txtResult"
        android:layout_width="wrap_content"
        android:layout_height="wrap_content"
        android:layout_alignParentTop="true"
        android:layout_centerHorizontal="true"
        android:layout_marginTop="107dp"
        android:text="Result" />

</RelativeLayout>
MainActivity.java
package com.myapp;

import android.os.Bundle;
import com.koushikdutta.async.future.FutureCallback;
import com.koushikdutta.ion.Ion;
import com.koushikdutta.ion.Response;

import android.app.Activity;
import android.widget.TextView;

public class MainActivity extends Activity {

	@Override
	public void onCreate(Bundle savedInstanceState) {
		super.onCreate(savedInstanceState);
		setContentView(R.layout.activity_main);

		final TextView txtResult = (TextView) findViewById(R.id.txtResult);

		Ion.with(this)
		.load("https://www.thaicreate.com/android/postString.php")
		.setBodyParameter("sName", "Weerachai")
		.setBodyParameter("sLastName", "Nukitram")
		.asString()
		.withResponse()
		.setCallback(new FutureCallback<Response<String>>() {
		    @Override
		    public void onCompleted(Exception e, Response<String> result) {
		        // print the String that was downloaded
		        System.out.println(result.getResult());
		        txtResult.setText(result.getResult());
		    }
		});


	}

}

Example 3 : การเรียก URL และรับค่า JSON (สำหรับการใช้ JSON จะใช้ Library ของ GSON)

ใช้ Library ของ GSON ในการรับ-ส่งข้อมูลในรูปแบบของ JSON
Syntax
Ion.with(context)
.load("http://example.com/thing.json")
.asJsonObject()
.setCallback(new FutureCallback<JsonObject>() {
   @Override
    public void onCompleted(Exception e, JsonObject result) {
        // do stuff with the result or error
    }
});
Ex1 : การรับข้อมูลแบบ JsonObject (Array แบบชุดเดียว)
json1.json : ตัวอย่างไฟล์ JSON ที่อยู่บน Server (www.thaicreate.com/android/json1.json)
		/**
		 * {"sName":"Sawatdee : Weerachai Nukitram","sEmail":"Sawatdee : [email protected]"}
		 */

		Ion.with(this)
		.load("https://www.thaicreate.com/android/json1.json")
		.asJsonObject()
		.setCallback(new FutureCallback<JsonObject>() {
		   @Override
		    public void onCompleted(Exception e, JsonObject result) {
		        // do stuff with the result or error
			   final String strName = result.get("sName").getAsString();
			   final String strEmail = result.get("sEmail").getAsString();
		    }
		});
Ex2 : การรับข้อมูลแบบ JsonArray (Array แบบหลายมิติ)
json2.json : ตัวอย่างไฟล์ JSON ที่อยู่บน Server (www.thaicreate.com/android/json2.json)
[{
"MemberID":"1",
"Name":"Weerachai",
"Tel":"0819876107"
},
{
"MemberID":"2",
"Name":"Win",
"Tel":"021978032"
},
{
"MemberID":"3",
"Name":"Eak",
"Tel":"087654321"
}]
		/**
		  [{
			"MemberID":"1",
			"Name":"Weerachai",
			"Tel":"0819876107"
			},
			{
			"MemberID":"2",
			"Name":"Win",
			"Tel":"021978032"
			},
			{
			"MemberID":"3",
			"Name":"Eak",
			"Tel":"087654321"
			}]
		 */

		final ArrayList<HashMap<String, String>> MyArrList = new ArrayList<HashMap<String, String>>();

		Ion.with(this)
		.load("https://www.thaicreate.com/android/json2.json")
		.asJsonArray()
		.setCallback(new FutureCallback<JsonArray>() {
			@Override
			public void onCompleted(Exception e, JsonArray result) {

				// do stuff with the result or error
				for (int i = 0; i < result.size(); i++) {
					JsonElement elem = result.get(i);
					JsonObject obj = elem.getAsJsonObject();

					HashMap<String, String> map = new HashMap<String, String>();
					map.put("MemberID", obj.get("MemberID").getAsString());
					map.put("Name", obj.get("Name").getAsString());
					map.put("Tel", obj.get("Tel").getAsString());
					MyArrList.add(map);
				}

			}
		});
Ex3 : การรับข้อมูลแบบ JsonArray (Array แบบหลายมิติ) ด้วยการใช้ List<T>
json2.json : ตัวอย่างไฟล์ JSON ที่อยู่บน Server (www.thaicreate.com/android/json2.json)
[{
"MemberID":"1",
"Name":"Weerachai",
"Tel":"0819876107"
},
{
"MemberID":"2",
"Name":"Win",
"Tel":"021978032"
},
{
"MemberID":"3",
"Name":"Eak",
"Tel":"087654321"
}]
	public static class MyMebmer {
	    public String MemberID;
	    public String Name;
	    public String Tel;
	}
			Ion.with(this)
			.load("https://www.thaicreate.com/android/json2.json")
			.as(new TypeToken<List<MyMebmer>>(){})
			.setCallback(new FutureCallback<List<MyMebmer>>() {
				@Override
				public void onCompleted(Exception e, List<MyMebmer> ls) {

					// Loop for Display
			        for(MyMebmer val : ls){
			        	System.out.println(val.MemberID);
			        	System.out.println(val.Name);
			        	System.out.println(val.Tel);
			         }

				}
			});
Example 4 : Post JSON and read JSON : การส่งค่า Post ไปยัง Web Server ในรูปแบบของ JSON และส่งกลับมาเป็น JSON
JsonObject json = new JsonObject();
json.addProperty("foo", "bar");

Ion.with(context)
.load("http://example.com/post")
.setJsonObjectBody(json)
.asJsonObject()
.setCallback(new FutureCallback<JsonObject>() {
   @Override
    public void onCompleted(Exception e, JsonObject result) {
        // do stuff with the result or error
    }
});
Example 5 : การส่งค่า Post ไปยัง Web Server พร้อมกับ multipart/form-data (อัพโหลดไฟล์) และส่งกลับมาเป็น JSON
Ion.with(getContext())
.load("https://koush.clockworkmod.com/test/echo")
.uploadProgressBar(uploadProgressBar)
.setMultipartParameter("goop", "noop")
.setMultipartFile("archive", "application/zip", new File("/sdcard/filename.zip"))
.asJsonObject()
.setCallback(...)
โดย uploadProgressBar คือ Control หรือ widget ของ ProgressBar
ในส่วนของ Upload ไฟล์ไฟล์ php สามารถรับได้โดยใช้
<?php
$_POST["goop"]; // อ่านค่า Post
move_uploaded_file($_FILES["archive"]["tmp_name"],"myfile/".$_FILES["archive"]["name"]); // และ เมื่ออัพโหลดไฟล์
?>
หรือจะใช้สั้น ๆ .setMultipartFile("archive", new File("/sdcard/filename.zip"))
Example 6 : Download a File with a progress bar การดาวน์โหลดไฟล์
Ion.with(context)
.load("http://example.com/really-big-file.zip")
// have a ProgressBar get updated automatically with the percent
.progressBar(progressBar)
// and a ProgressDialog
.progressDialog(progressDialog)
// can also use a custom callback
.progress(new ProgressCallback() {@Override
   public void onProgress(int downloaded, int total) {
       System.out.println("" + downloaded + " / " + total);
   }
})
.write(new File("/sdcard/really-big-file.zip"))
.setCallback(new FutureCallback<File>() {
   @Override
    public void onCompleted(Exception e, File file) {
        // download done...
        // do stuff with the File or error
    }
});
โดย
progressBar คือ Control หรือ Widget ของ Progressbar
progressDialog คือ Control หรือ Widget ของ ProgressDialog
ส่วนอื่น ๆ เป็นการ ก็ดูแล้วเข้าใจได้เลย เช่น
.write(new File("/sdcard/really-big-file.zip")) เป็นการ Save ไฟล์ onCompleted เมื่อทำงานเสน็จสิ้น
Example 7 : Load an image into an ImageView : กาาแสดงผลรุปภาพแบบง่าย ๆ
// This is the "long" way to do build an ImageView request... it allows you to set headers, etc.
Ion.with(context)
.load("http://example.com/image.png")
.withBitmap()
.placeholder(R.drawable.placeholder_image)
.error(R.drawable.error_image)
.animateLoad(spinAnimation)
.animateIn(fadeInAnimation)
.intoImageView(imageView);

// but for brevity, use the ImageView specific builder...
Ion.with(imageView)
.placeholder(R.drawable.placeholder_image)
.error(R.drawable.error_image)
.animateLoad(spinAnimation)
.animateIn(fadeInAnimation)
.load("http://example.com/image.png");
จาก Code นี้จะเป็นการโหลดรูปภาพแสดงบน ImageView โดย imageView คือ Widget ของ ImageView
ตัวอย่างการใช้งานต่าง ๆ
|
 ช่วยกันสนับสนุนรักษาเว็บไซต์ความรู้แห่งนี้ไว้ด้วยการสนับสนุน Source Code 2.0 ของทีมงานไทยครีเอท ช่วยกันสนับสนุนรักษาเว็บไซต์ความรู้แห่งนี้ไว้ด้วยการสนับสนุน Source Code 2.0 ของทีมงานไทยครีเอท
|
|
| |
By : |
ThaiCreate.Com Team (บทความเป็นลิขสิทธิ์ของเว็บไทยครีเอทห้ามนำเผยแพร่ ณ เว็บไซต์อื่น ๆ) |
| |
Score Rating : |
    |
|
| |
Create/Update Date : |
2015-11-22 13:02:44 /
2017-03-26 21:28:44 |
| |
Download : |
No files |
|
|
Sponsored Links / Related |
|
|
|
|
|
|

|