Android Send Email (Intent.ACTION_SEND) |
Android Send Email (Intent.ACTION_SEND) ในการเขียนโปรแกรมสำหรับส่งอีเมล์บน Android นั้นจะสามารถทำได้ง่ายดาย แต่รูปแบบการทำงานจะเป็นการ Intent ไปยัง Account ที่อยู่ภายใต้ Email Account ที่ได้ทำการ Set ไว้ในเครื่องของ Android และใช้ความสามารถของโปรแกรมที่ไว้สำหรับจัดการ Email ที่อยู่ใน Android ทำหน้าที่ส่งอีเมล์ฉบับนั้น ๆ ออกไป โดยเรามีหน้าที่แค่กำหนดรายละเอียดขั้นพื้นฐาน จากนั้นก็ Intent ตัว Form ที่เป็นหน้าจอสำหรับส่งอีเมล์ได้ในทันที
รูปแบบการใช้งานจะเรียกใช้ผ่าน Intent Activity ว่า Intent.ACTION_SEND โดยเมื่อโปรแกรมไปยัง Form ที่สำหรับส่งอีเมล์ เราสามารถกำหนดค่าพื้นฐานที่เป็น Default เช่น EMAIL,SUBJECT และ TEXT ดูได้ในตัวอย่าง
            	Intent newActivity = new Intent(Intent.ACTION_SEND);
            	newActivity.putExtra(Intent.EXTRA_EMAIL, new String[]{"[email protected]"});
            	newActivity.putExtra(Intent.EXTRA_SUBJECT, "Your Default Subject");
            	newActivity.putExtra(Intent.EXTRA_TEXT, "Your Default Body");
            	newActivity.setType("plain/text");
            	startActivity(Intent.createChooser(newActivity, "Email Sending Option :"));
ในตัวอย่างนี้จะเป็นการใช้ความสามารถของ Email Account ที่อยู่บน Android เป็นหลัก ซึ่งจะช่วยให้เราสามารถเขียนโปรแกรมสำหรับส่งอีเมล์นั้นได้ง่ายขึ้น และข้อความต่าง ๆ ก็จะถูกจัดเก็บภายใต้ Account ที่อยู่ใน Android ซึ่งกรณีที่มี Email มี Account อยู่หลายตัว โปรแกรมก็จะแสดง Popup Dialog เพื่อจะเลือก Account ที่ทำหน้าที่ส่ง
แต่ในกรณีที่ต้องการเขียนโปรแกรมให้ส่งออกไปเองโดยไม่ต้องอาศัย Email Account ที่อยู่บน Android แต่จะเรียกใช้ SMTP Account ที่อยู่ภายนอกก็สามารถทำได้เช่นเดียว ไว้มีโอกาสจะได้ Review ไว้ในบทความถัด ๆ ไป หรือจะให้ง่ายก็สามารถสร้าง Application ไว้บน Web Service หรือ WWW โดยอาจจะสร้างไว้ด้วย PHP จากนั้นก็ให้ Android ส่งข้อมูลผ่าน Web Service หรือ WWW (HttpGet หรือ HttpPost) และส่งให้ PHP ที่เปิด Service ไว้อยู่นั้นทำหน้าที่ส่งอีเมล์แทน ซึ่งวิธีนี้จะทำได้ง่ายมาก
Android HttpGet and HttpPost
Example 1 ทำ Intent ไปยัง Intent.ACTION_SEND บนโปรแกรม Email แบบง่าย ๆ
โครงสร้างของไฟล์ประกอบด้วย 2 ไฟล์คือ MainActivity.java, activity_main.xml
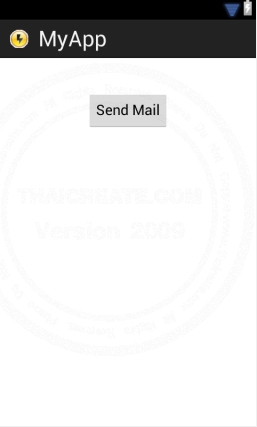
activity_main.xml
<RelativeLayout xmlns:android="http://schemas.android.com/apk/res/android"
    xmlns:tools="http://schemas.android.com/tools"
    android:layout_width="match_parent"
    android:layout_height="match_parent" >

    <Button
        android:id="@+id/btnSend"
        android:layout_width="wrap_content"
        android:layout_height="wrap_content"
        android:layout_alignParentTop="true"
        android:layout_centerHorizontal="true"
        android:layout_marginTop="42dp"
        android:text="Send Mail" />

</RelativeLayout>
MainActivity.java
package com.myapp;

import android.os.Bundle;
import android.app.Activity;
import android.view.Menu;
import android.view.View;
import android.widget.Button;
import android.content.Intent;


public class MainActivity extends Activity {


    @Override
    public void onCreate(Bundle savedInstanceState) {
        super.onCreate(savedInstanceState);
        setContentView(R.layout.activity_main);

        Button btnSend = (Button) findViewById(R.id.btnSend);
        btnSend.setOnClickListener(new View.OnClickListener() {
            public void onClick(View v) {

            	Intent newActivity = new Intent(Intent.ACTION_SEND);
            	newActivity.putExtra(Intent.EXTRA_EMAIL, new String[]{"[email protected]"});
            	newActivity.putExtra(Intent.EXTRA_SUBJECT, "Your Default Subject");
            	newActivity.putExtra(Intent.EXTRA_TEXT, "Your Default Body");
            	newActivity.setType("plain/text");
            	startActivity(Intent.createChooser(newActivity, "Email Sending Option :"));

            }
        });

    }

	@Override
    public boolean onCreateOptionsMenu(Menu menu) {
        getMenuInflater().inflate(R.menu.activity_main, menu);
        return true;
    }

}
Screenshot
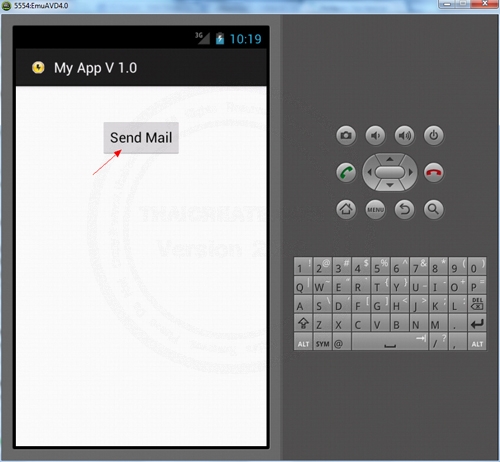
คลิกที่ Send Mail
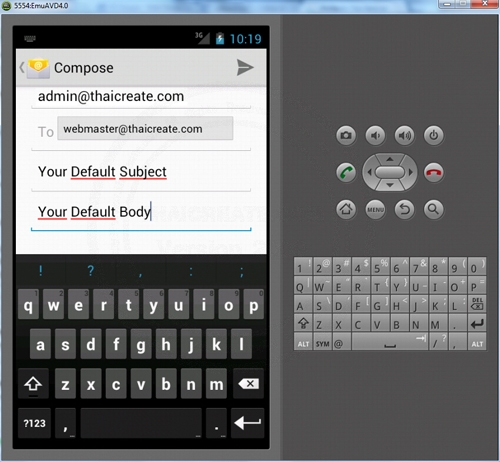
โปรแกรมจะ Intent ไปยัง Form ของโปรแกรม Email ที่มีอยู่บน Android
Example 2 สร้าง Form สำหรับ Input ข้อมูล แจะส่งข้อมูลเหล่านั้นไปยัง Email Form ที่ทำหน้าที่ส่ง
โครงสร้างของไฟล์ประกอบด้วย 2 ไฟล์คือ MainActivity.java, activity_main.xml
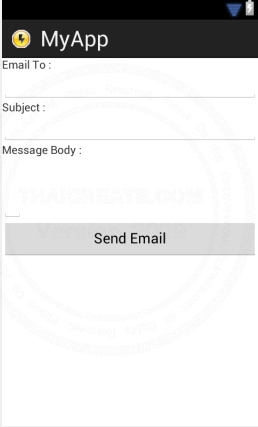
activity_main.xml
<LinearLayout xmlns:android="http://schemas.android.com/apk/res/android"
    android:layout_width="fill_parent"
    android:layout_height="fill_parent"
    android:orientation="vertical" >

    <TextView
        android:layout_width="wrap_content"
        android:layout_height="wrap_content"
        android:text="Email To : "/>

    <EditText
        android:id="@+id/txtEmailTo"
        android:layout_width="fill_parent"
        android:layout_height="wrap_content"
        android:inputType="textEmailAddress" >
    </EditText>

    <TextView
        android:layout_width="wrap_content"
        android:layout_height="wrap_content"
        android:text="Subject : "/>

    <EditText
        android:id="@+id/txtSubject"
        android:layout_width="fill_parent"
        android:layout_height="wrap_content" >
    </EditText>

    <TextView
        android:layout_width="wrap_content"
        android:layout_height="wrap_content"
        android:text="Message Body : " />

    <EditText
        android:id="@+id/txtMessage"
        android:layout_width="wrap_content"
        android:layout_height="wrap_content"
        android:inputType="textMultiLine"
        android:lines="3"
        android:gravity="top" />

    <Button
        android:id="@+id/btnSend"
        android:layout_width="fill_parent"
        android:layout_height="wrap_content"
        android:text="Send Email" />

</LinearLayout>
MainActivity.java
package com.myapp;

import android.os.Bundle;
import android.app.Activity;
import android.view.Menu;
import android.view.View;
import android.widget.Button;
import android.widget.EditText;
import android.content.Intent;


public class MainActivity extends Activity {


    @Override
    public void onCreate(Bundle savedInstanceState) {
        super.onCreate(savedInstanceState);
        setContentView(R.layout.activity_main);

        final EditText tEmailTo = (EditText) findViewById(R.id.txtEmailTo);
        final EditText tSubject = (EditText) findViewById(R.id.txtSubject);
        final EditText tMessage = (EditText) findViewById(R.id.txtMessage);

        Button btnSend = (Button) findViewById(R.id.btnSend);
        btnSend.setOnClickListener(new View.OnClickListener() {
            public void onClick(View v) {

            	Intent newActivity = new Intent(Intent.ACTION_SEND);
            	newActivity.putExtra(Intent.EXTRA_EMAIL, new String[]{ tEmailTo.getText().toString() });
            	newActivity.putExtra(Intent.EXTRA_SUBJECT, tSubject.getText().toString());
            	newActivity.putExtra(Intent.EXTRA_TEXT, tMessage.getText().toString());
            	newActivity.setType("plain/text");
            	startActivity(Intent.createChooser(newActivity, "Email Sending Option :"));

            }
        });

    }

	@Override
    public boolean onCreateOptionsMenu(Menu menu) {
        getMenuInflater().inflate(R.menu.activity_main, menu);
        return true;
    }

}
Screenshot
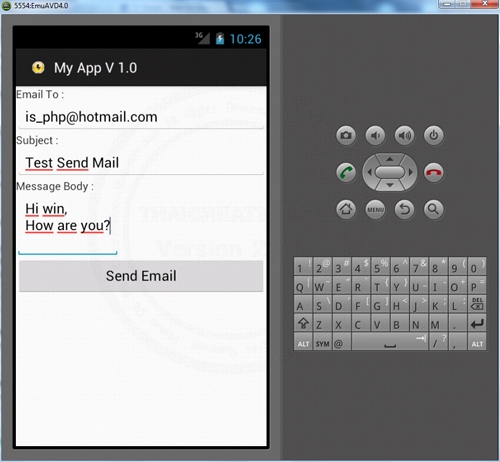
กรอกข้อมูลลงใน Activity ของ Form ที่ได้ออกแบบไว้จากนั้นให้คลิกที่ Send Email
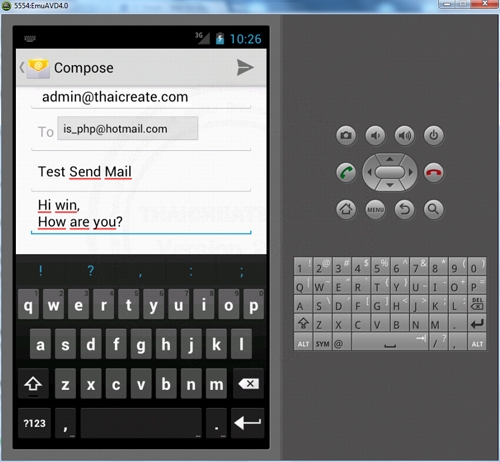
ข้อมูลจะถูกส่งมายัง Form บนโปรแกรม Email ที่อยู่ใน Android
|
 ช่วยกันสนับสนุนรักษาเว็บไซต์ความรู้แห่งนี้ไว้ด้วยการสนับสนุน Source Code 2.0 ของทีมงานไทยครีเอท ช่วยกันสนับสนุนรักษาเว็บไซต์ความรู้แห่งนี้ไว้ด้วยการสนับสนุน Source Code 2.0 ของทีมงานไทยครีเอท
|
|
| |
By : |
ThaiCreate.Com Team (บทความเป็นลิขสิทธิ์ของเว็บไทยครีเอทห้ามนำเผยแพร่ ณ เว็บไซต์อื่น ๆ) |
| |
Score Rating : |
    |
|
| |
Create/Update Date : |
2012-07-22 08:04:36 /
2017-03-26 21:41:41 |
| |
Download : |
No files |
|
|
Sponsored Links / Related |
|
|
|
|
|
|

|