Android AutoCompleteTextView and SQLite Database (Android SQLite) |
Android AutoCompleteTextView SQLite Database (Android SQLite) การเขียน Android กับ Widgets ของ AutoCompleteTextView เพื่อติดต่อกับฐานข้อมูลของ SQLite Database เพื่อนำข้อมูลของ SQLite Databaseที่ได้แสดงข้อมูลใน AutoCompleteTextView
พื้นฐานของ SQLite Database กับ Android สามารถศึกษาได้จากบทความนี้
AutoCompleteTextView - Android Widgets Example
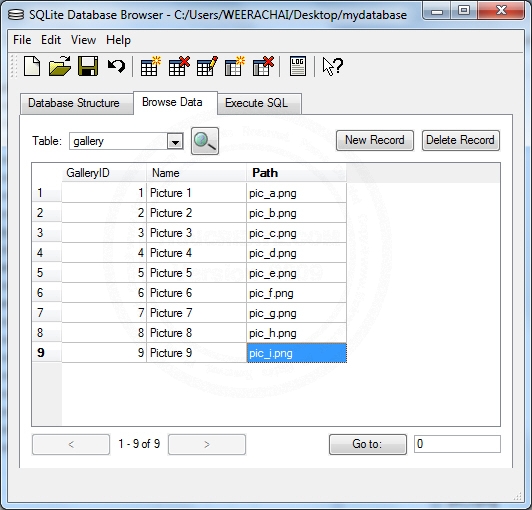
โครงสร้างตารางและข้อมูล

ชื่อตารางว่า gallery ประกอบด้วยฟิวด์ GalleryID, Name, Path

มีข้อมูลทั้งหมดอยู่ 9 รายการ สิ่งที่เราจะนำมาแสดงใน AutoComplete คือ Column ที่มีชื่อว่า Name

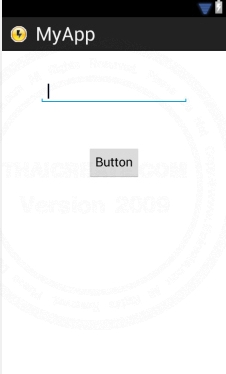
ออกแบบหน้าจอ GraphicalLayout ด้วย Widget AutoCompleteTextView ตามรูป
activity_main.xml (XML Layout)
<RelativeLayout xmlns:android="http://schemas.android.com/apk/res/android"
    xmlns:tools="http://schemas.android.com/tools"
    android:layout_width="match_parent"
    android:layout_height="match_parent" >

    <Button
        android:id="@+id/button1"
        android:layout_width="wrap_content"
        android:layout_height="wrap_content"
        android:layout_alignParentTop="true"
        android:layout_centerHorizontal="true"
        android:layout_marginTop="135dp"
        android:text="Button" />

    <AutoCompleteTextView
        android:id="@+id/autoCompleteTextView1"
        android:layout_width="wrap_content"
        android:layout_height="wrap_content"
        android:layout_alignParentTop="true"
        android:layout_centerHorizontal="true"
        android:layout_marginTop="40dp"
        android:ems="10"
        android:completionThreshold="1"
        android:text="" >

        <requestFocus />
    </AutoCompleteTextView>

</RelativeLayout>
XML Layout ของ Activity
myDBClass.java
package com.myapp;


import android.content.ContentValues;
import android.content.Context;
import android.database.Cursor;
import android.database.sqlite.SQLiteDatabase;
import android.database.sqlite.SQLiteOpenHelper;
import android.util.Log;

public class myDBClass extends SQLiteOpenHelper {


    // Database Version
    private static final int DATABASE_VERSION = 1;

    // Database Name
    private static final String DATABASE_NAME = "mydatabase";

    // Table Name
    private static final String TABLE_GALLERY = "gallery";

	public myDBClass(Context context) {
		super(context, DATABASE_NAME, null, DATABASE_VERSION);
		// TODO Auto-generated constructor stub
	}

	@Override
	public void onCreate(SQLiteDatabase db) {
		// TODO Auto-generated method stub
		// Create Table Name
	    db.execSQL("CREATE TABLE " + TABLE_GALLERY +
		          "(GalleryID INTEGER PRIMARY KEY AUTOINCREMENT," +
		          " Name TEXT(100)," +
		          " Path TEXT(100));");

	    Log.d("CREATE TABLE","Create Table Successfully.");
	}


	// Insert Data
	public long InsertData(String strGalleryID, String strName, String strPath) {
		// TODO Auto-generated method stub

		 try {
			SQLiteDatabase db;
     		db = this.getWritableDatabase(); // Write Data

     		/**
     		 *  for API 11 and above
			SQLiteStatement insertCmd;
			String strSQL = "INSERT INTO " + TABLE_GALLERY
					+ "(GalleryID,Name,Path) VALUES (?,?,?)";

			insertCmd = db.compileStatement(strSQL);
			insertCmd.bindString(1, strGalleryID);
			insertCmd.bindString(2, strName);
			insertCmd.bindString(3, strPath);
			return insertCmd.executeInsert();
			*/

     	   ContentValues Val = new ContentValues();
     	   Val.put("GalleryID", strGalleryID);
     	   Val.put("Name", strName);
     	   Val.put("Path", strPath);

			long rows = db.insert(TABLE_GALLERY, null, Val);

			db.close();
			return rows; // return rows inserted.

		 } catch (Exception e) {
		    return -1;
		 }

	}

	// Select All Data
	public String[] SelectAllData() {
		// TODO Auto-generated method stub

		 try {
			String arrData[] = null;
			 SQLiteDatabase db;
			 db = this.getReadableDatabase(); // Read Data

			 String strSQL = "SELECT  NAME FROM " + TABLE_GALLERY;
			 Cursor cursor = db.rawQuery(strSQL, null);

			 	if(cursor != null)
			 	{
					if (cursor.moveToFirst()) {
						arrData = new String[cursor.getCount()];
						/***
						 *  [x] = Name
						 */
						int i= 0;
						do {
							arrData[i] = cursor.getString(0);
							i++;
						} while (cursor.moveToNext());

					}
			 	}
			 	cursor.close();

				return arrData;

		 } catch (Exception e) {
		    return null;
		 }

	}


	@Override
	public void onUpgrade(SQLiteDatabase db, int oldVersion, int newVersion) {
		// TODO Auto-generated method stub
        db.execSQL("DROP TABLE IF EXISTS " + TABLE_GALLERY);

        // Re Create on method  onCreate
        onCreate(db);
	}

}
class ของ myDBClass ใช้สำหรับการติดต่อกับฐานข้อมูล
MainActivity.java
package com.myapp;

import android.os.Bundle;
import android.view.Menu;
import android.view.View;
import android.widget.ArrayAdapter;
import android.widget.AutoCompleteTextView;
import android.widget.Button;
import android.widget.Toast;
import android.app.Activity;


public class MainActivity extends Activity {


    @Override
    public void onCreate(Bundle savedInstanceState) {
        super.onCreate(savedInstanceState);
        setContentView(R.layout.activity_main);

		// get Data from SQLite
		final myDBClass myDb = new myDBClass(this);
		/*
		 * for insert statement
		myDb.InsertData("1","Picture 1", "pic_a.png");
		myDb.InsertData("2","Picture 2", "pic_b.png");
		myDb.InsertData("3","Picture 3", "pic_c.png");
		myDb.InsertData("4","Picture 4", "pic_d.png");
		myDb.InsertData("5","Picture 5", "pic_e.png");
		myDb.InsertData("6","Picture 6", "pic_f.png");
		myDb.InsertData("7","Picture 7", "pic_g.png");
		myDb.InsertData("8","Picture 8", "pic_h.png");
		myDb.InsertData("9","Picture 9", "pic_i.png");
		*/
		final String [] myData = myDb.SelectAllData();

        // autoCompleteTextView1
        final AutoCompleteTextView autoCom = (AutoCompleteTextView)findViewById(R.id.autoCompleteTextView1);

        ArrayAdapter<String> adapter = new ArrayAdapter<String>(this,
                android.R.layout.simple_dropdown_item_1line, myData);

        autoCom.setAdapter(adapter);

        // button1
        final Button btn1 = (Button)findViewById(R.id.button1);
        btn1.setOnClickListener(new View.OnClickListener() {
            public void onClick(View v) {
    			Toast.makeText(MainActivity.this,
        				String.valueOf("Your Input : " + autoCom.getText().toString()),
        					Toast.LENGTH_SHORT).show();
            }
        });


    }


    @Override
    public boolean onCreateOptionsMenu(Menu menu) {
        getMenuInflater().inflate(R.menu.activity_main, menu);
        return true;
    }

}
จาก Code จะใช้การอ่านข้อมูลทั้งหมดมาเก็บไว้ใน Array ก่อน จากนั้นค่อยนำค่า Array ที่ได้ แปลงเป็น ArrayAdapter แล้วค่อยทำการ setAdapter ให้กับ AutoCompleteTextView อีกที
        // autoCompleteTextView1
        final AutoCompleteTextView autoCom = (AutoCompleteTextView)findViewById(R.id.autoCompleteTextView1);

        ArrayAdapter<String> adapter = new ArrayAdapter<String>(this,
                android.R.layout.simple_dropdown_item_1line, myData);

        autoCom.setAdapter(adapter);
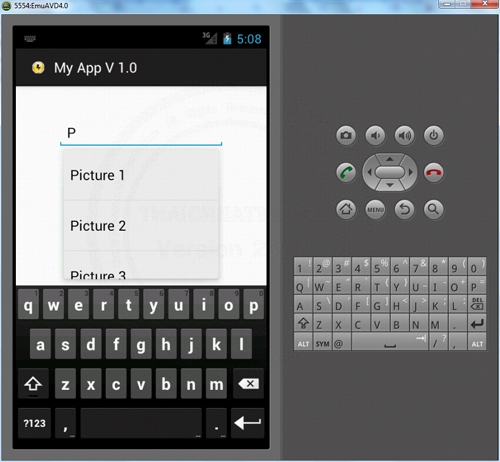
Screenshot

| Property & Method (Others Related) |
|
 ช่วยกันสนับสนุนรักษาเว็บไซต์ความรู้แห่งนี้ไว้ด้วยการสนับสนุน Source Code 2.0 ของทีมงานไทยครีเอท ช่วยกันสนับสนุนรักษาเว็บไซต์ความรู้แห่งนี้ไว้ด้วยการสนับสนุน Source Code 2.0 ของทีมงานไทยครีเอท
|
|
| |
By : |
ThaiCreate.Com Team (บทความเป็นลิขสิทธิ์ของเว็บไทยครีเอทห้ามนำเผยแพร่ ณ เว็บไซต์อื่น ๆ) |
| |
Score Rating : |
    |
|
| |
Create/Update Date : |
2012-07-17 17:40:36 /
2012-07-22 07:16:38 |
| |
Download : |
No files |
|
|
Sponsored Links / Related |
|
|
|
|
|
|

|