Android GridView and SQLite Database (Android SQLite) |
Android GridView and SQLite Database (Android SQLite) การเขียน Android กับ Widgets ของ GridView เพื่อติดต่อกับฐานข้อมูลของ SQLite Database เพื่อนำข้อมูลของ SQLite Databaseที่ได้แสดงข้อมูลใน GridView โดยจะมีการอ่านข้อมูลจาก SQL Database และแสดงข้อมูลเป็นแบบ Column ในรูปแบบของ GridView
พื้นฐานของ SQLite Database กับ Android สามารถศึกษาได้จากบทความนี้
GridView - Android Widgets Example
โครงสร้างตารางและข้อมูล

ชื่อตารางว่า gallery ประกอบด้วยฟิวด์ GalleryID, Name, Path
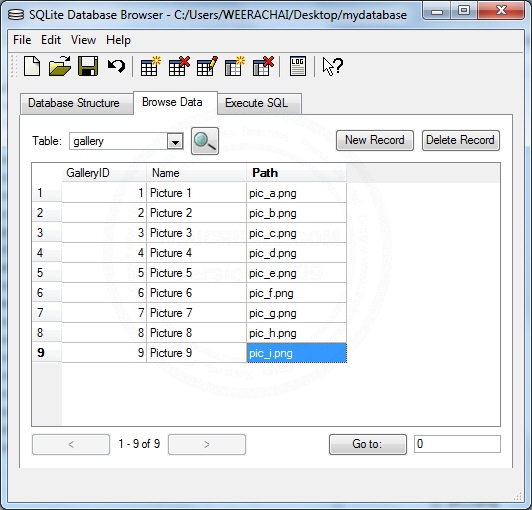
มีข้อมูลทั้งหมดอยู่ 9 รายการ
Example 1 อ่านข้อมูลจาก SQLite Database แบบง่าย ๆ มาแสดงที่ GridView
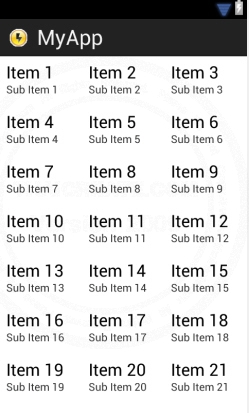
ออกแบบหน้าจอ GraphicalLayout ตาม Layout ดังนี้
activity_main.xml (XML Layout)
<TableLayout xmlns:android="http://schemas.android.com/apk/res/android"
    android:id="@+id/tableLayout1"
    android:layout_width="fill_parent"
    android:layout_height="fill_parent" >

    <GridView
        android:id="@+id/gridView1"
        android:layout_width="match_parent"
        android:layout_height="wrap_content"
        android:numColumns="3" >


    </GridView>

</TableLayout>
XML Layout ของ Activity
myDBClass.java
package com.myapp;


import android.content.ContentValues;
import android.content.Context;
import android.database.Cursor;
import android.database.sqlite.SQLiteDatabase;
import android.database.sqlite.SQLiteOpenHelper;
import android.util.Log;

public class myDBClass extends SQLiteOpenHelper {


    // Database Version
    private static final int DATABASE_VERSION = 1;

    // Database Name
    private static final String DATABASE_NAME = "mydatabase";

    // Table Name
    private static final String TABLE_GALLERY = "gallery";

	public myDBClass(Context context) {
		super(context, DATABASE_NAME, null, DATABASE_VERSION);
		// TODO Auto-generated constructor stub
	}

	@Override
	public void onCreate(SQLiteDatabase db) {
		// TODO Auto-generated method stub
		// Create Table Name
	    db.execSQL("CREATE TABLE " + TABLE_GALLERY +
		          "(GalleryID INTEGER PRIMARY KEY AUTOINCREMENT," +
		          " Name TEXT(100)," +
		          " Path TEXT(100));");

	    Log.d("CREATE TABLE","Create Table Successfully.");
	}


	// Insert Data
	public long InsertData(String strGalleryID, String strName, String strPath) {
		// TODO Auto-generated method stub

		 try {
			SQLiteDatabase db;
     		db = this.getWritableDatabase(); // Write Data

     		/**
     		 *  for API 11 and above
			SQLiteStatement insertCmd;
			String strSQL = "INSERT INTO " + TABLE_GALLERY
					+ "(GalleryID,Name,Path) VALUES (?,?,?)";

			insertCmd = db.compileStatement(strSQL);
			insertCmd.bindString(1, strGalleryID);
			insertCmd.bindString(2, strName);
			insertCmd.bindString(3, strPath);
			return insertCmd.executeInsert();
			*/

     	   ContentValues Val = new ContentValues();
     	   Val.put("GalleryID", strGalleryID);
     	   Val.put("Name", strName);
     	   Val.put("Path", strPath);

			long rows = db.insert(TABLE_GALLERY, null, Val);

			db.close();
			return rows; // return rows inserted.

		 } catch (Exception e) {
		    return -1;
		 }

	}

	// Select All Data
	public Cursor SelectAllData() {
		// TODO Auto-generated method stub

		 try {
			 SQLiteDatabase db;
			 db = this.getReadableDatabase(); // Read Data

			 String strSQL = "SELECT  GalleryID As _id , * FROM " + TABLE_GALLERY;
			 Cursor cursor = db.rawQuery(strSQL, null);

			 return cursor;

		 } catch (Exception e) {
		    return null;
		 }

	}


	@Override
	public void onUpgrade(SQLiteDatabase db, int oldVersion, int newVersion) {
		// TODO Auto-generated method stub
        db.execSQL("DROP TABLE IF EXISTS " + TABLE_GALLERY);

        // Re Create on method  onCreate
        onCreate(db);
	}

}
class ของ myDBClass ใช้สำหรับการติดต่อกับฐานข้อมูล
MainActivity.java
package com.myapp;

import android.os.Bundle;
import android.view.Menu;
import android.widget.GridView;
import android.widget.SimpleCursorAdapter;
import android.app.Activity;
import android.database.Cursor;


public class MainActivity extends Activity {


    @Override
    public void onCreate(Bundle savedInstanceState) {
        super.onCreate(savedInstanceState);
        setContentView(R.layout.activity_main);

		// get Data from SQLite
		final myDBClass myDb = new myDBClass(this);
		/*
		 * for insert statement
		myDb.InsertData("1","Picture 1", "pic_a.png");
		myDb.InsertData("2","Picture 2", "pic_b.png");
		myDb.InsertData("3","Picture 3", "pic_c.png");
		myDb.InsertData("4","Picture 4", "pic_d.png");
		myDb.InsertData("5","Picture 5", "pic_e.png");
		myDb.InsertData("6","Picture 6", "pic_f.png");
		myDb.InsertData("7","Picture 7", "pic_g.png");
		myDb.InsertData("8","Picture 8", "pic_h.png");
		myDb.InsertData("9","Picture 9", "pic_i.png");
		*/
		final Cursor myData = myDb.SelectAllData();
		startManagingCursor(myData);

        // gridView1
        final GridView gView1 = (GridView)findViewById(R.id.gridView1);

        String[] cols = new String[]{"Name"};
        int[] names = new int[]{android.R.id.text1};

        SimpleCursorAdapter adapter = new SimpleCursorAdapter(this, android.R.layout.simple_list_item_1 , myData ,cols,names);

        gView1.setAdapter(adapter);

    }


    @Override
    public boolean onCreateOptionsMenu(Menu menu) {
        getMenuInflater().inflate(R.menu.activity_main, menu);
        return true;
    }

}
Screenshot
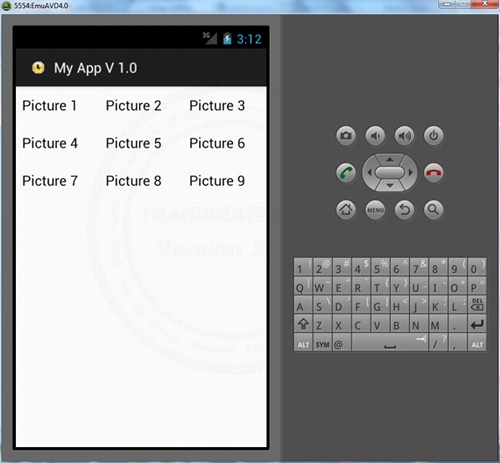
แสดง GridView กับ SQLite Database
Example 1.1 การทำ Custom Layout บน GridView กับ SQLite Database
จาก Table จะเห็นว่ามีข้อมูลอยู่หลาย Column เฉพาะฉะนั้นเราจะทำการแสดงข้อมูลใน Column ทั้งหมดด้วยการสร้าง Custom Layot ด้วยไฟล์ showinfo.xml
เพิ่มไฟล์ showinfo.xml เพิ่มจาก Example 1

showinfo.xml (XML Layout)
<?xml version="1.0" encoding="utf-8"?>
<LinearLayout xmlns:android="http://schemas.android.com/apk/res/android"
    android:layout_width="match_parent"
    android:layout_height="match_parent"
    android:orientation="vertical" >

    <TextView
        android:id="@+id/textView1"
        android:layout_width="wrap_content"
        android:layout_height="wrap_content"
        android:text="TextView" />

    <TextView
        android:id="@+id/textView2"
        android:layout_width="wrap_content"
        android:layout_height="wrap_content"
        android:text="TextView" />

    <TextView
        android:id="@+id/textView3"
        android:layout_width="wrap_content"
        android:layout_height="wrap_content"
        android:text="TextView" />

</LinearLayout>
มี textView1 , textView2 และ textView3
MainActivity.java
package com.myapp;

import android.os.Bundle;
import android.view.Menu;
import android.widget.GridView;
import android.widget.SimpleCursorAdapter;
import android.app.Activity;
import android.database.Cursor;


public class MainActivity extends Activity {


    @Override
    public void onCreate(Bundle savedInstanceState) {
        super.onCreate(savedInstanceState);
        setContentView(R.layout.activity_main);

		// get Data from SQLite
		final myDBClass myDb = new myDBClass(this);
		/*
		 * for insert statement
		myDb.InsertData("1","Picture 1", "pic_a.png");
		myDb.InsertData("2","Picture 2", "pic_b.png");
		myDb.InsertData("3","Picture 3", "pic_c.png");
		myDb.InsertData("4","Picture 4", "pic_d.png");
		myDb.InsertData("5","Picture 5", "pic_e.png");
		myDb.InsertData("6","Picture 6", "pic_f.png");
		myDb.InsertData("7","Picture 7", "pic_g.png");
		myDb.InsertData("8","Picture 8", "pic_h.png");
		myDb.InsertData("9","Picture 9", "pic_i.png");
		*/
		final Cursor myData = myDb.SelectAllData();
		startManagingCursor(myData);

        // gridView1
        final GridView gView1 = (GridView)findViewById(R.id.gridView1);

        String[] cols = new String[]{"GalleryID","Name","Path"};
        int[] names = new int[]{R.id.textView1,R.id.textView2,R.id.textView3};

        SimpleCursorAdapter adapter = new SimpleCursorAdapter(this, R.layout.showinfo , myData ,cols,names);

        gView1.setAdapter(adapter);

    }


    @Override
    public boolean onCreateOptionsMenu(Menu menu) {
        getMenuInflater().inflate(R.menu.activity_main, menu);
        return true;
    }

}
Screenshot
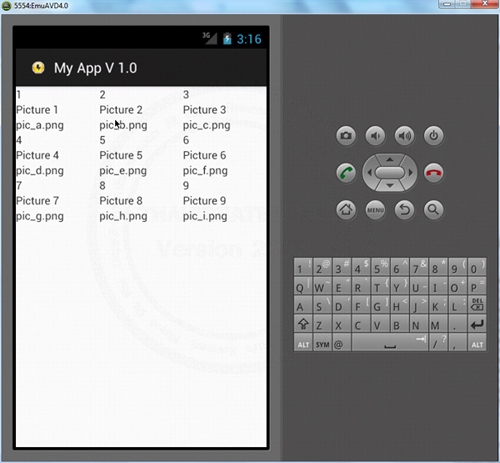
แสดง GridView กับ SQLite Database และข้อมูลทุก Column ที่อยู่ใน Table
Example 2 อ่านข้อมูลจาก SQLite Database และแสดงรูปภาพที่อยู่ใน SD Card
โครงสร้าง Database และ รูปภาพที่จัดเก็บ
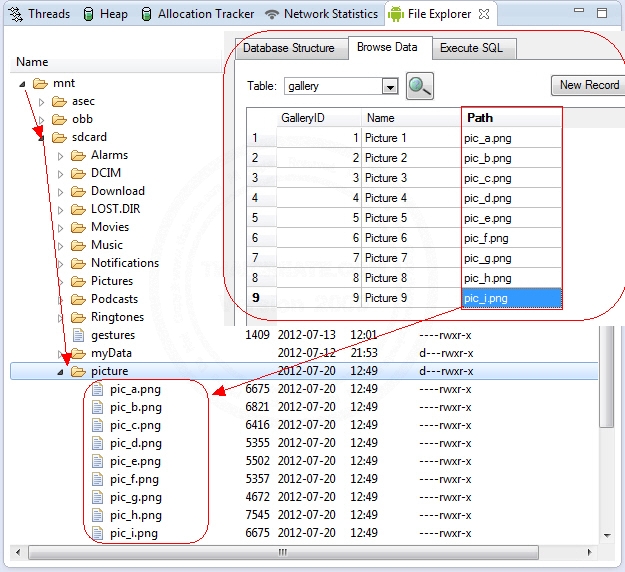
โดยรูปภาพเก็บไว้ที่ /mnt/sdcard/picture
Android อ่านข้อมูลรูปภาพแสดงใน ImageView จาก SD Card สดงแบบ Column บน GridView
ออกแบบหน้าจอ GraphicalLayout ตาม Layout ดังนี้
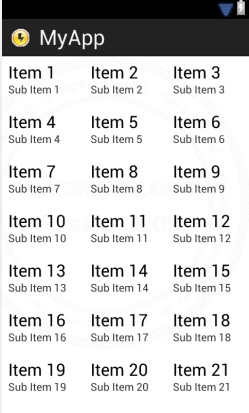
activity_main.xml (XML Layout)
<TableLayout xmlns:android="http://schemas.android.com/apk/res/android"
    android:id="@+id/tableLayout1"
    android:layout_width="fill_parent"
    android:layout_height="fill_parent" >

    <GridView
        android:id="@+id/gridView1"
        android:layout_width="match_parent"
        android:layout_height="wrap_content"
        android:numColumns="3" >


    </GridView>

</TableLayout>
XML Layout ของ Activity
showimage.xml (XML Layout)
<?xml version="1.0" encoding="utf-8"?>
<LinearLayout xmlns:android="http://schemas.android.com/apk/res/android"
    android:layout_width="wrap_content"
    android:layout_height="wrap_content"
    android:padding="5dp" >

    <ImageView
        android:id="@+id/imageView1"
        android:layout_width="50px"
        android:layout_height="50px"
        android:layout_marginRight="10px" >
    </ImageView>

    <TextView
        android:id="@+id/textView1"
        android:layout_width="wrap_content"
        android:layout_height="wrap_content"
        android:layout_marginTop="5px"
        android:textSize="15px" >
    </TextView>

</LinearLayout>
เป็นไฟล์ XML Layout ที่เป็น Custom Layout
myDBClass.java
package com.myapp;


import android.content.ContentValues;
import android.content.Context;
import android.database.Cursor;
import android.database.sqlite.SQLiteDatabase;
import android.database.sqlite.SQLiteOpenHelper;
import android.util.Log;

public class myDBClass extends SQLiteOpenHelper {


    // Database Version
    private static final int DATABASE_VERSION = 1;

    // Database Name
    private static final String DATABASE_NAME = "mydatabase";

    // Table Name
    private static final String TABLE_GALLERY = "gallery";

	public myDBClass(Context context) {
		super(context, DATABASE_NAME, null, DATABASE_VERSION);
		// TODO Auto-generated constructor stub
	}

	@Override
	public void onCreate(SQLiteDatabase db) {
		// TODO Auto-generated method stub
		// Create Table Name
	    db.execSQL("CREATE TABLE " + TABLE_GALLERY +
		          "(GalleryID INTEGER PRIMARY KEY AUTOINCREMENT," +
		          " Name TEXT(100)," +
		          " Path TEXT(100));");

	    Log.d("CREATE TABLE","Create Table Successfully.");
	}


	// Insert Data
	public long InsertData(String strGalleryID, String strName, String strPath) {
		// TODO Auto-generated method stub

		 try {
			SQLiteDatabase db;
     		db = this.getWritableDatabase(); // Write Data

     		/**
     		 *  for API 11 and above
			SQLiteStatement insertCmd;
			String strSQL = "INSERT INTO " + TABLE_GALLERY
					+ "(GalleryID,Name,Path) VALUES (?,?,?)";

			insertCmd = db.compileStatement(strSQL);
			insertCmd.bindString(1, strGalleryID);
			insertCmd.bindString(2, strName);
			insertCmd.bindString(3, strPath);
			return insertCmd.executeInsert();
			*/

     	   ContentValues Val = new ContentValues();
     	   Val.put("GalleryID", strGalleryID);
     	   Val.put("Name", strName);
     	   Val.put("Path", strPath);

			long rows = db.insert(TABLE_GALLERY, null, Val);

			db.close();
			return rows; // return rows inserted.

		 } catch (Exception e) {
		    return -1;
		 }

	}

	// Select All Data
	public String[][] SelectAllData() {
		// TODO Auto-generated method stub

		 try {
			String arrData[][] = null;
			 SQLiteDatabase db;
			 db = this.getReadableDatabase(); // Read Data

			 String strSQL = "SELECT  * FROM " + TABLE_GALLERY;
			 Cursor cursor = db.rawQuery(strSQL, null);

			 	if(cursor != null)
			 	{
					if (cursor.moveToFirst()) {
						arrData = new String[cursor.getCount()][cursor.getColumnCount()];
						/***
						 *  [x][0] = GalleryID
						 *  [x][1] = Name
						 *  [x][2] = Path
						 */
						int i= 0;
						do {
							arrData[i][0] = cursor.getString(0);
							arrData[i][1] = cursor.getString(1);
							arrData[i][2] = cursor.getString(2);
							i++;
						} while (cursor.moveToNext());

					}
			 	}
			 	cursor.close();

				return arrData;

		 } catch (Exception e) {
		    return null;
		 }

	}


	@Override
	public void onUpgrade(SQLiteDatabase db, int oldVersion, int newVersion) {
		// TODO Auto-generated method stub
        db.execSQL("DROP TABLE IF EXISTS " + TABLE_GALLERY);

        // Re Create on method  onCreate
        onCreate(db);
	}

}
class ของ myDBClass ใช้สำหรับการติดต่อกับฐานข้อมูล
MainActivity.java
package com.myapp;

import android.os.Bundle;
import android.view.LayoutInflater;
import android.view.Menu;
import android.view.View;
import android.view.ViewGroup;
import android.widget.AdapterView;
import android.widget.AdapterView.OnItemClickListener;
import android.widget.BaseAdapter;
import android.widget.GridView;
import android.widget.ImageView;
import android.widget.TextView;
import android.widget.Toast;
import android.app.Activity;
import android.content.Context;
import android.graphics.Bitmap;
import android.graphics.BitmapFactory;

public class MainActivity extends Activity {

    //List <String> ImageList;
    String arrData[][];

    @Override
    public void onCreate(Bundle savedInstanceState) {
        super.onCreate(savedInstanceState);
        setContentView(R.layout.activity_main);

		// get Data from SQLite
		final myDBClass myDb = new myDBClass(this);
		/*
		 * for insert statement
		myDb.InsertData("1","Picture 1", "pic_a.png");
		myDb.InsertData("2","Picture 2", "pic_b.png");
		myDb.InsertData("3","Picture 3", "pic_c.png");
		myDb.InsertData("4","Picture 4", "pic_d.png");
		myDb.InsertData("5","Picture 5", "pic_e.png");
		myDb.InsertData("6","Picture 6", "pic_f.png");
		myDb.InsertData("7","Picture 7", "pic_g.png");
		myDb.InsertData("8","Picture 8", "pic_h.png");
		myDb.InsertData("9","Picture 9", "pic_i.png");
		*/
		arrData = myDb.SelectAllData();
		/***
		 *  [x][0] = GalleryID
		 *  [x][1] = Name
		 *  [x][2] = Path
		 */

        // gridView1
        final GridView gView1 = (GridView)findViewById(R.id.gridView1);

        gView1.setAdapter(new ImageAdapter(this,arrData));

        // OnClick
        gView1.setOnItemClickListener(new OnItemClickListener() {
			public void onItemClick(AdapterView<?> parent, View v,
				int position, long id) {

				   Toast.makeText(getApplicationContext(),
					"Your selected : " + arrData[position][1].toString(), Toast.LENGTH_SHORT).show();

			}
		});

    }

    public class ImageAdapter extends BaseAdapter
    {
        private Context context;
        private String[][] lis;

        public ImageAdapter(Context c, String[][] li)
        {
        	// TODO Auto-generated method stub
            context = c;
            lis = li;
        }

        public int getCount() {
        	// TODO Auto-generated method stub
            return lis.length;
        }

        public Object getItem(int position) {
        	// TODO Auto-generated method stub
            return position;
        }

        public long getItemId(int position) {
        	// TODO Auto-generated method stub
            return position;
        }

		public View getView(int position, View convertView, ViewGroup parent) {
			// TODO Auto-generated method stub

			LayoutInflater inflater = (LayoutInflater) context
					.getSystemService(Context.LAYOUT_INFLATER_SERVICE);


				if (convertView == null) {
					convertView = inflater.inflate(R.layout.showimage, null);
				}

				TextView textView = (TextView) convertView.findViewById(R.id.textView1);
				String strPath = "/mnt/sdcard/picture/"+lis[position][2].toString();

				textView.setText(lis[position][1].toString());

				// Image Resource
				ImageView imageView = (ImageView) convertView.findViewById(R.id.imageView1);
				Bitmap bm = BitmapFactory.decodeFile(strPath);
				imageView.setImageBitmap(bm);


				return convertView;

		}
    }


    @Override
    public boolean onCreateOptionsMenu(Menu menu) {
        getMenuInflater().inflate(R.menu.activity_main, menu);
        return true;
    }

}
Screenshot
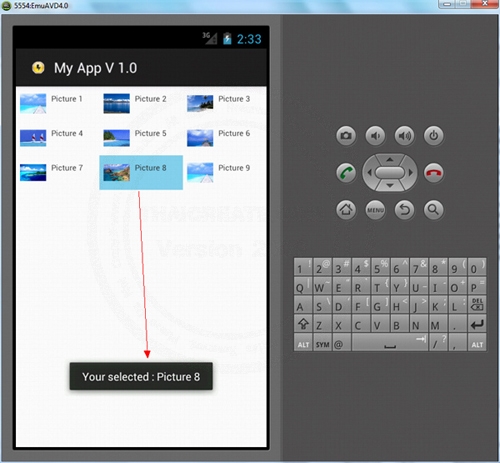
แสดง GridView กับ SQLite Database และแสดงรุปภาพด้วย ImageView กับรูปภาพที่อยู่ใน SD Card
Example 2.1 การทำ Custom Layout บน GridView กับ SQLite Database อ่านรูปภาพจาก SD Card และการ Preview รูปภาพบน Popup
ในตัวอย่าง 2.1 จะเพิ่ม Popup หลังจากที่คลิกในรูปภาพแต่ล่ะตัว จะแสดง Full Image
เพิ่มไฟล์ custom_fullimage_dialog.xml เพิ่มจาก Example 2
custom_fullimage_dialog.xml (XML Layout)
<LinearLayout xmlns:android="http://schemas.android.com/apk/res/android"
    android:id="@+id/layout_root"
    android:layout_width="fill_parent"
    android:layout_height="fill_parent"
    android:orientation="horizontal"
    android:padding="10dp" >

    <ImageView android:id="@+id/fullimage" android:layout_width="fill_parent"
        android:layout_height="fill_parent">
    </ImageView>

    <TextView android:id="@+id/custom_fullimage_placename"
        android:layout_width="wrap_content" android:layout_height="fill_parent"
        android:textColor="#FFF">
    </TextView>
</LinearLayout>
เป็น Layout สำหรับแสดง Full Image
MainActivity.java
package com.myapp;

import android.os.Bundle;
import android.view.LayoutInflater;
import android.view.Menu;
import android.view.View;
import android.view.ViewGroup;
import android.widget.AdapterView;
import android.widget.AdapterView.OnItemClickListener;
import android.widget.BaseAdapter;
import android.widget.GridView;
import android.widget.ImageView;
import android.widget.TextView;
import android.app.Activity;
import android.app.AlertDialog;
import android.content.Context;
import android.content.DialogInterface;
import android.graphics.Bitmap;
import android.graphics.BitmapFactory;

public class MainActivity extends Activity {

    //List <String> ImageList;
    String arrData[][];

    @Override
    public void onCreate(Bundle savedInstanceState) {
        super.onCreate(savedInstanceState);
        setContentView(R.layout.activity_main);

		// get Data from SQLite
		final myDBClass myDb = new myDBClass(this);
		/*
		 * for insert statement
		myDb.InsertData("1","Picture 1", "pic_a.png");
		myDb.InsertData("2","Picture 2", "pic_b.png");
		myDb.InsertData("3","Picture 3", "pic_c.png");
		myDb.InsertData("4","Picture 4", "pic_d.png");
		myDb.InsertData("5","Picture 5", "pic_e.png");
		myDb.InsertData("6","Picture 6", "pic_f.png");
		myDb.InsertData("7","Picture 7", "pic_g.png");
		myDb.InsertData("8","Picture 8", "pic_h.png");
		myDb.InsertData("9","Picture 9", "pic_i.png");
		*/
		arrData = myDb.SelectAllData();
		/***
		 *  [x][0] = GalleryID
		 *  [x][1] = Name
		 *  [x][2] = Path
		 */

        // gridView1
        final GridView gView1 = (GridView)findViewById(R.id.gridView1);

        gView1.setAdapter(new ImageAdapter(this,arrData));

        final AlertDialog.Builder imageDialog = new AlertDialog.Builder(this);
        final LayoutInflater inflater = (LayoutInflater) this.getSystemService(LAYOUT_INFLATER_SERVICE);

        // OnClick
        gView1.setOnItemClickListener(new OnItemClickListener() {
			public void onItemClick(AdapterView<?> parent, View v,
				int position, long id) {

                View layout = inflater.inflate(R.layout.custom_fullimage_dialog,
                        (ViewGroup) findViewById(R.id.layout_root));
                ImageView image = (ImageView) layout.findViewById(R.id.fullimage);

                String strPath = "/mnt/sdcard/picture/"+arrData[position][2].toString();
				Bitmap bm = BitmapFactory.decodeFile(strPath);
				int width=200;
			    int height=200;
			    Bitmap resizedbitmap = Bitmap.createScaledBitmap(bm, width, height, true);
				image.setImageBitmap(resizedbitmap);

                imageDialog.setIcon(android.R.drawable.btn_star_big_on);
        		imageDialog.setTitle("View : " + arrData[position][1].toString());
                imageDialog.setView(layout);
                imageDialog.setPositiveButton(android.R.string.ok, new DialogInterface.OnClickListener(){

                    public void onClick(DialogInterface dialog, int which) {
                        dialog.dismiss();
                    }

                });


                imageDialog.create();
                imageDialog.show();

			}
		});

    }

    public class ImageAdapter extends BaseAdapter
    {
        private Context context;
        private String[][] lis;

        public ImageAdapter(Context c, String[][] li)
        {
        	// TODO Auto-generated method stub
            context = c;
            lis = li;
        }

        public int getCount() {
        	// TODO Auto-generated method stub
            return lis.length;
        }

        public Object getItem(int position) {
        	// TODO Auto-generated method stub
            return position;
        }

        public long getItemId(int position) {
        	// TODO Auto-generated method stub
            return position;
        }

		public View getView(int position, View convertView, ViewGroup parent) {
			// TODO Auto-generated method stub

			LayoutInflater inflater = (LayoutInflater) context
					.getSystemService(Context.LAYOUT_INFLATER_SERVICE);


				if (convertView == null) {
					convertView = inflater.inflate(R.layout.showimage, null);
				}

				TextView textView = (TextView) convertView.findViewById(R.id.textView1);
				String strPath = "/mnt/sdcard/picture/"+lis[position][2].toString();

				textView.setText(lis[position][1].toString());

				// Image Resource
				ImageView imageView = (ImageView) convertView.findViewById(R.id.imageView1);
				Bitmap bm = BitmapFactory.decodeFile(strPath);
				imageView.setImageBitmap(bm);


				return convertView;

		}
    }


    @Override
    public boolean onCreateOptionsMenu(Menu menu) {
        getMenuInflater().inflate(R.menu.activity_main, menu);
        return true;
    }

}
Screenshot
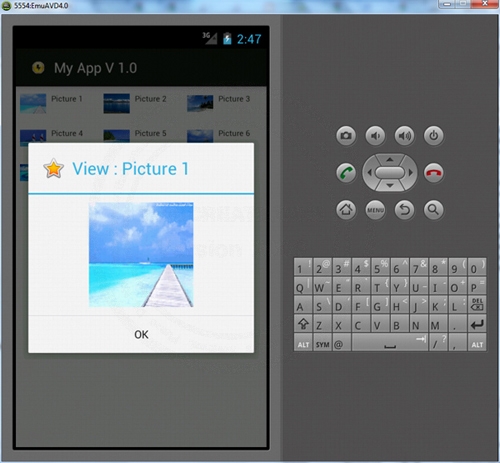
เมื่อคลิกที่รูปภาพใน GridView ก็จะแสดง Popup เพื่อแสดงรูปขนาดใหญ่
| Property & Method (Others Related) |
|
 ช่วยกันสนับสนุนรักษาเว็บไซต์ความรู้แห่งนี้ไว้ด้วยการสนับสนุน Source Code 2.0 ของทีมงานไทยครีเอท ช่วยกันสนับสนุนรักษาเว็บไซต์ความรู้แห่งนี้ไว้ด้วยการสนับสนุน Source Code 2.0 ของทีมงานไทยครีเอท
|
|
| |
By : |
ThaiCreate.Com Team (บทความเป็นลิขสิทธิ์ของเว็บไทยครีเอทห้ามนำเผยแพร่ ณ เว็บไซต์อื่น ๆ) |
| |
Score Rating : |
   |
|
| |
Create/Update Date : |
2012-07-17 17:39:30 /
2012-07-22 07:14:55 |
| |
Download : |
No files |
|
|
Sponsored Links / Related |
|
|
|
|
|
|

|