ViewFlipper - Android Widgets Example |
ViewFlipper - Android Widgets สำหรับ ViewFlipper เป็น Widget ใช้สำหรับ กำหนดทิศทางเลื่อนไหวของ Animation ระหว่างมุมมอง (View) ของ Widgets จำนวน 2 ตัว หรือมากกว่า 2 ตัว โดย ViewFlipper สามารถกำหนดรูปแบบที่จะมาแทนที่กับ Widgets หรือ Layout เดิมแบบ Flipper และสามารถกำหนดพวก AutoPlay , Play หริอ Stop

XML Syntax
    <ViewFlipper
        android:id="@+id/viewFlipper1"
        android:layout_width="wrap_content"
        android:layout_height="wrap_content" />
Example 1 ใช้ ViewFlipper กำหนดการเลื่อนไหวของ ImageView หลายรายการ
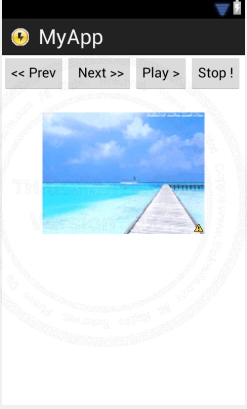
ออกแบบหน้าจอ GraphicalLayout ด้วย Widget ตามรูป
activity_main.xml (XML Layout)
<RelativeLayout xmlns:android="http://schemas.android.com/apk/res/android"
xmlns:tools="http://schemas.android.com/tools"
android:layout_width="match_parent"
android:layout_height="match_parent" >
<LinearLayout xmlns:android="http://schemas.android.com/apk/res/android"
xmlns:tools="http://schemas.android.com/tools"
android:layout_width="match_parent"
android:layout_height="match_parent" >
<Button
android:id="@+id/Button01"
android:layout_width="wrap_content"
android:layout_height="wrap_content"
android:text="<< Prev" />
<Button
android:id="@+id/Button02"
android:layout_width="wrap_content"
android:layout_height="wrap_content"
android:text=" Next >>" />
<Button
android:id="@+id/Button03"
android:layout_width="wrap_content"
android:layout_height="wrap_content"
android:text="Play >" />
<Button
android:id="@+id/Button04"
android:layout_width="wrap_content"
android:layout_height="wrap_content"
android:text="Stop !" />
</LinearLayout>
<LinearLayout
android:id="@+id/LinearLayout1"
android:layout_width="wrap_content"
android:layout_height="wrap_content"
android:layout_centerHorizontal="true"
android:layout_marginTop="75dp" >
<ViewFlipper
android:id="@+id/ViewFlipper01"
android:layout_width="wrap_content"
android:layout_height="wrap_content" >
<ImageView
android:id="@+id/imageView1"
android:layout_width="wrap_content"
android:layout_height="wrap_content"
android:src="@drawable/pic_a" />
<ImageView
android:id="@+id/imageView2"
android:layout_width="wrap_content"
android:layout_height="wrap_content"
android:src="@drawable/pic_b" />
<ImageView
android:id="@+id/imageView3"
android:layout_width="wrap_content"
android:layout_height="wrap_content"
android:src="@drawable/pic_c" />
<ImageView
android:id="@+id/imageView4"
android:layout_width="wrap_content"
android:layout_height="wrap_content"
android:src="@drawable/pic_d" />
</ViewFlipper>
</LinearLayout>
</RelativeLayout>
XML Layout ที่ได้ออกแบบไว้
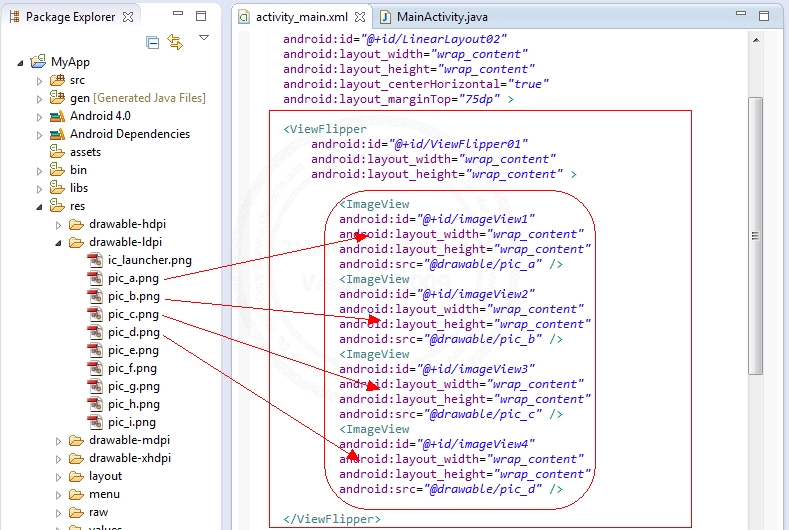
จากรูปจะเห็นว่า ViewFlipper ประกอบด้วย imageView1, imageView2, imageView3, imageView4
MainActivity.java (Java Code)
package com.myapp;

import android.os.Bundle;
import android.app.Activity;
import android.view.Menu;
import android.view.View;
import android.widget.Button;
import android.widget.ViewFlipper;

public class MainActivity extends Activity {

	Button btnNext;
    Button btnPrev;
    Button btnPlay;
    Button btnStop;
    ViewFlipper vf;

    @Override
    public void onCreate(Bundle savedInstanceState) {
        super.onCreate(savedInstanceState);
        setContentView(R.layout.activity_main);

        vf = (ViewFlipper) findViewById(R.id.ViewFlipper01);
        vf.setInAnimation(this,android.R.anim.fade_in);
        vf.setOutAnimation(this, android.R.anim.fade_out);

        // Next
        btnNext = (Button) findViewById(R.id.Button01);
        btnNext.setOnClickListener(new View.OnClickListener() {
            public void onClick(View v) {
                // Perform action on click
            	vf.showNext();
            }
        });

        btnPrev = (Button) findViewById(R.id.Button02);
        btnPrev.setOnClickListener(new View.OnClickListener() {
            public void onClick(View v) {
                // Perform action on click
            	vf.showPrevious();
            }
        });

        // Play
        btnPlay = (Button) findViewById(R.id.Button03);
        btnPlay.setOnClickListener(new View.OnClickListener() {
            public void onClick(View v) {
                // Perform action on click
            	vf.setFlipInterval(2000);
            	vf.startFlipping();
            }
        });

        // Stop
        btnStop = (Button) findViewById(R.id.Button04);
        btnStop.setOnClickListener(new View.OnClickListener() {
            public void onClick(View v) {
                // Perform action on click
            	vf.stopFlipping();
            }
        });

    }

	@Override
    public boolean onCreateOptionsMenu(Menu menu) {
        getMenuInflater().inflate(R.menu.activity_main, menu);
        return true;
    }

}
Screenshot
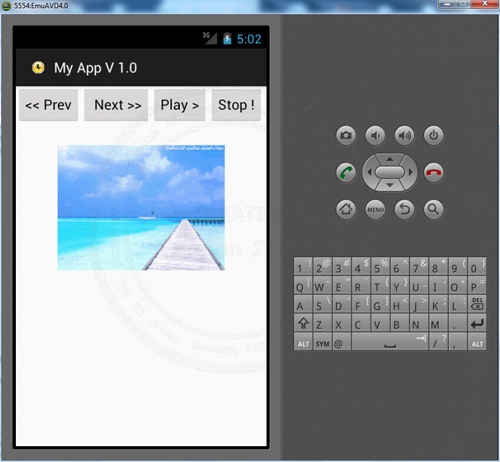
ผลลัพธ์ทีได้ สามารถคลิกเพื่อดูรูภาพ ในรูปแบบต่าง ๆ เช่น
Code
<< Pre (ดูย้อนหลับ)
Next >> (ดูถัดไป)
Play > (กดเล่น โดยจะเล่นไปเรื่อย ๆ)
Step! (กดหยุดการทำงาน)
เพิ่มเติม
กรณีที่ต้องการกำหนด autoStart และ flipInterval (หน่วงเวลา)
<ViewFlipper
android:id="@+id/ViewFlipper01"
android:layout_width="wrap_content"
android:layout_height="wrap_content"
android:flipInterval="1000"
android:autoStart="true" >
XML Layout ทั้งหมด
            <ViewFlipper
                android:id="@+id/ViewFlipper01"
                android:layout_width="wrap_content"
                android:layout_height="wrap_content"
                android:flipInterval="1000"
                android:autoStart="true" >

		            <ImageView
		            android:id="@+id/imageView1"
		            android:layout_width="wrap_content"
		            android:layout_height="wrap_content"
		            android:src="@drawable/pic_a" />
		            <ImageView
		            android:id="@+id/imageView2"
		            android:layout_width="wrap_content"
		            android:layout_height="wrap_content"
		            android:src="@drawable/pic_b" />
		            <ImageView
		            android:id="@+id/imageView3"
		            android:layout_width="wrap_content"
		            android:layout_height="wrap_content"
		            android:src="@drawable/pic_c" />
		            <ImageView
		            android:id="@+id/imageView4"
		            android:layout_width="wrap_content"
		            android:layout_height="wrap_content"
		            android:src="@drawable/pic_d" />

            </ViewFlipper>
Example 2 การใช้ ViewFlipper และ GestureDetector เพื่อควบคุมการ Slide ในรูปแบบต่าง ๆ
GestureOverlayView - Android Widgets Example
เช่นการ Slide ไปทางซ้าย หรือ ขวา เพื่อเลื่อนดูข้อมูลอื่น ๆ
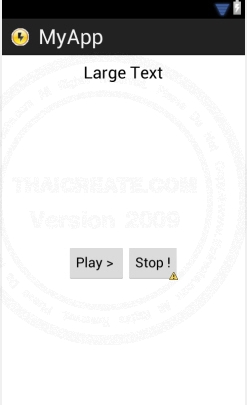
ออกแบบหน้าจอ GraphicalLayout ด้วย Widget ตามรูป
activity_main.xml (XML Layout)
<RelativeLayout xmlns:android="http://schemas.android.com/apk/res/android"
    xmlns:tools="http://schemas.android.com/tools"
    android:layout_width="match_parent"
    android:layout_height="match_parent" >

       <LinearLayout
            android:id="@+id/LinearLayout2"
            android:layout_width="wrap_content"
            android:layout_height="wrap_content"
            android:layout_centerHorizontal="true"
            android:layout_marginTop="10dp" >
                <TextView
                    android:id="@+id/textView1"
                    android:layout_width="wrap_content"
                    android:layout_height="wrap_content"
                    android:text="Large Text"
                    android:textAppearance="?android:attr/textAppearanceLarge" />

        </LinearLayout>


        <LinearLayout
            android:id="@+id/LinearLayout1"
            android:layout_width="wrap_content"
            android:layout_height="wrap_content"
            android:layout_centerHorizontal="true"
            android:layout_marginTop="75dp" >

            <ViewFlipper
                android:id="@+id/ViewFlipper01"
                android:layout_width="wrap_content"
                android:layout_height="wrap_content" >

            </ViewFlipper>

        </LinearLayout>

        <LinearLayout
            android:id="@+id/LinearLayout2"
            android:layout_width="wrap_content"
            android:layout_height="wrap_content"
            android:layout_centerHorizontal="true"
            android:layout_marginTop="250dp" >
		        <Button
		            android:id="@+id/Button1"
		            android:layout_width="wrap_content"
		            android:layout_height="wrap_content"
		            android:text="Play > " />
		        <Button
		            android:id="@+id/Button2"
		            android:layout_width="wrap_content"
		            android:layout_height="wrap_content"
		            android:text="Stop !" />

        </LinearLayout>

</RelativeLayout>
โดยในตัวอย่างนี้จะใช้ ViewFlipper กับ GestureDetector ควบคุมรูปภาพที่อยู่ในรูปภาพแบบของ Array
    private Integer[] mImageIds = {
            R.drawable.pic_a,
            R.drawable.pic_b,
            R.drawable.pic_c,
            R.drawable.pic_d,
            R.drawable.pic_e,
            R.drawable.pic_f,
            R.drawable.pic_g,
            R.drawable.pic_h,
            R.drawable.pic_i
    };
Code ทั้งหมด
MainActivity.java (Java Code)
package com.myapp;

import android.app.ActionBar.LayoutParams;
import android.app.Activity;
import android.os.Bundle;
import android.view.GestureDetector;
import android.view.GestureDetector.OnGestureListener;
import android.view.MotionEvent;
import android.view.View;
import android.view.animation.AlphaAnimation;
import android.view.animation.Animation;
import android.widget.Button;
import android.widget.ImageSwitcher;
import android.widget.ImageView;
import android.widget.TextView;
import android.widget.ViewFlipper;
import android.widget.ViewSwitcher.ViewFactory;
import android.widget.Toast;

public class MainActivity extends Activity implements OnGestureListener {

	Button btnPlay;
    Button btnStop;
    ViewFlipper vf;
    GestureDetector gd;
    ImageView ImgV;
    TextView txtView1;
    int i = 0;


    private Integer[] mImageIds = {
            R.drawable.pic_a,
            R.drawable.pic_b,
            R.drawable.pic_c,
            R.drawable.pic_d,
            R.drawable.pic_e,
            R.drawable.pic_f,
            R.drawable.pic_g,
            R.drawable.pic_h,
            R.drawable.pic_i
    };

	private static final int SWIPE_MIN_DISTANCE = 120;
	private static final int SWIPE_MAX_OFF_PATH = 250;
	private static final int SWIPE_THRESHOLD_VELOCITY = 100;

	@Override
	public void onCreate(Bundle savedInstanceState) {
		super.onCreate(savedInstanceState);
		setContentView(R.layout.activity_main);

		// textView1
		txtView1 = (TextView) findViewById(R.id.textView1);
		txtView1.setText("Status is Stop!");

		// ViewFlipper01
        vf = (ViewFlipper) findViewById(R.id.ViewFlipper01);
        vf.setInAnimation(this,android.R.anim.fade_in);
        vf.setOutAnimation(this, android.R.anim.fade_out);

		for(i=0;i<mImageIds.length-1;i++)
		{
			ImgV = new ImageView(this);
			ImgV.setImageResource(mImageIds[i]);
			vf.addView(ImgV, 0);
		}

    	Animation inAnim = new AlphaAnimation(0, 1);
    	inAnim.setDuration(1000);
    	Animation outAnim = new AlphaAnimation(1, 0);
    	outAnim.setDuration(1000);
    	vf.setInAnimation(inAnim);
    	vf.setOutAnimation(outAnim);

		gd = new GestureDetector(this, this);

        // Play
        btnPlay = (Button) findViewById(R.id.Button1);
        btnPlay.setOnClickListener(new View.OnClickListener() {
            public void onClick(View v) {
                // Perform action on click
            	txtView1.setText("Status is Play >>");
            	vf.setFlipInterval(2000);
            	vf.startFlipping();
            }
        });

        // Stop
        btnStop = (Button) findViewById(R.id.Button2);
        btnStop.setOnClickListener(new View.OnClickListener() {
            public void onClick(View v) {
                // Perform action on click
            	txtView1.setText("Status is Stop!");
            	vf.stopFlipping();
            }
        });
	}

	@Override
	public boolean onTouchEvent(MotionEvent event) {
		if (gd.onTouchEvent(event))
			return true;
		else
			return false;
	}

	public boolean onFling(MotionEvent e1, MotionEvent e2, float velocityX,
            float velocityY) {

	       try {
	            if (Math.abs(e1.getY() - e2.getY()) > SWIPE_MAX_OFF_PATH)
	                return false;
	            // right to left swipe
	            if (e1.getX() - e2.getX() > SWIPE_MIN_DISTANCE
	                    && Math.abs(velocityX) > SWIPE_THRESHOLD_VELOCITY) {
	            	txtView1.setText("Status is show Next..");
	            	vf.showNext();

	            } else if (e2.getX() - e1.getX() > SWIPE_MIN_DISTANCE
	                    && Math.abs(velocityX) > SWIPE_THRESHOLD_VELOCITY) {
	                //left to right flip
	            	txtView1.setText("Status is show Previous..");
	               	vf.showPrevious();
	           }
	        } catch (Exception e) {
	            // nothing
	        	return true;
	        }

		return true;
	}


	public boolean onDown(MotionEvent arg0) {
		// TODO Auto-generated method stub
		return false;
	}

	public void onLongPress(MotionEvent arg0) {
		// TODO Auto-generated method stub

	}

	public boolean onScroll(MotionEvent arg0, MotionEvent arg1, float arg2,
			float arg3) {
		// TODO Auto-generated method stub
		return false;
	}

	public void onShowPress(MotionEvent arg0) {
		// TODO Auto-generated method stub

	}

	public boolean onSingleTapUp(MotionEvent arg0) {
		// TODO Auto-generated method stub
		return false;
	}

}
Screenshot
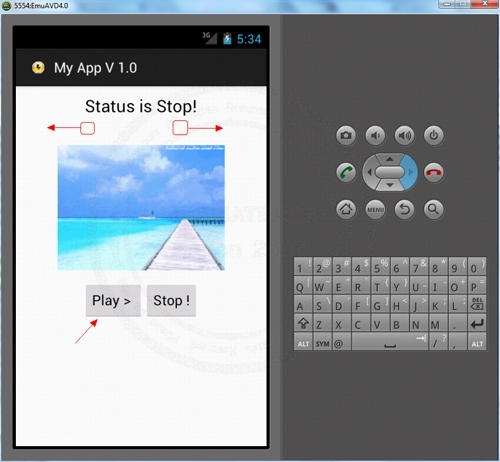
Slide ไปทางซ้่าย-ขวา หรือปุ่ม Play , Stop (สุงเกตุว่าระหว่างการทำงานจะมี Status บอกข้างบน)
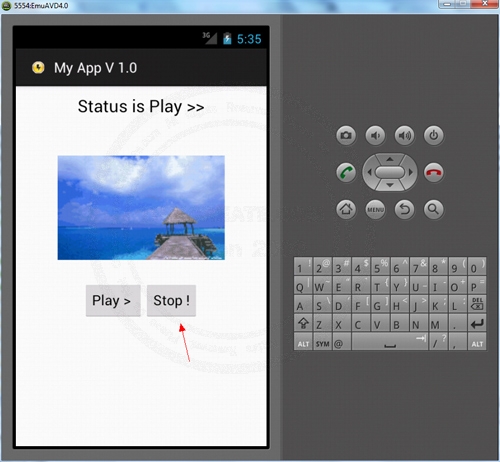
กด Stop
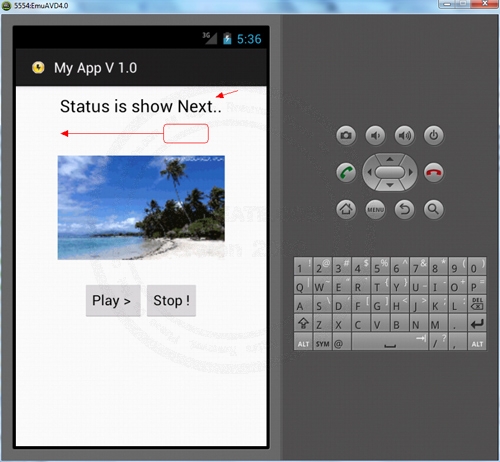
ทดสอบการ Slide
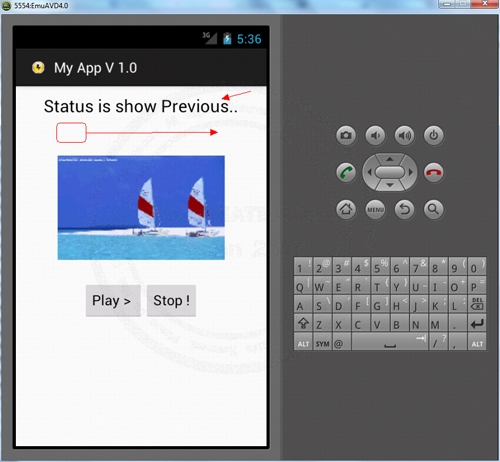
แสดงข้อความในทิศทางต่าง ๆ
| Property & Method (Others Related) |
|
 ช่วยกันสนับสนุนรักษาเว็บไซต์ความรู้แห่งนี้ไว้ด้วยการสนับสนุน Source Code 2.0 ของทีมงานไทยครีเอท ช่วยกันสนับสนุนรักษาเว็บไซต์ความรู้แห่งนี้ไว้ด้วยการสนับสนุน Source Code 2.0 ของทีมงานไทยครีเอท
|
|
| |
By : |
ThaiCreate.Com Team (บทความเป็นลิขสิทธิ์ของเว็บไทยครีเอทห้ามนำเผยแพร่ ณ เว็บไซต์อื่น ๆ) |
| |
Score Rating : |
    |
|
| |
Create/Update Date : |
2012-07-01 16:23:51 /
2012-07-15 15:03:52 |
| |
Download : |
No files |
|
|
Sponsored Links / Related |
|
|
|
|
|
|

|