RadioGroup - Android Widgets Example |
RadioGroup - Android Widgets เครื่องมือ RadioGroup Widget สำหรับควบคุมการทำงานของ RadioButton โดยจะกำหนดคุณสมบัติของ RadioButton ให้เลือกอย่างใดอย่างหนึ่ง

XML Syntax
    <RadioGroup
        android:id="@+id/radioGroup1"
        android:layout_width="wrap_content"
        android:layout_height="wrap_content" >

        <RadioButton
            android:id="@+id/radio1"
            android:layout_width="wrap_content"
            android:layout_height="wrap_content"
            android:checked="true"
            android:text="RadioButton 1" />

        <RadioButton
            android:id="@+id/radio2"
            android:layout_width="wrap_content"
            android:layout_height="wrap_content"
            android:text="RadioButton 2" />

    </RadioGroup>
Example 1

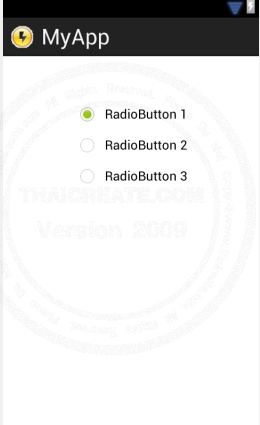
ออกแบบหน้าจอ GraphicalLayout ด้วย Widget ตามรูป
activity_main.xml (XML Layout)
<RelativeLayout xmlns:android="http://schemas.android.com/apk/res/android"
    xmlns:tools="http://schemas.android.com/tools"
    android:layout_width="match_parent"
    android:layout_height="match_parent" >

    <RadioGroup
        android:id="@+id/radioGroup1"
        android:layout_width="wrap_content"
        android:layout_height="wrap_content"
        android:layout_alignParentTop="true"
        android:layout_centerHorizontal="true"
        android:layout_marginTop="53dp" >

        <RadioButton
            android:id="@+id/radio1"
            android:layout_width="wrap_content"
            android:layout_height="wrap_content"
            android:checked="true"
            android:text="RadioButton 1" />

        <RadioButton
            android:id="@+id/radio2"
            android:layout_width="wrap_content"
            android:layout_height="wrap_content"
            android:text="RadioButton 2" />

        <RadioButton
            android:id="@+id/radio3"
            android:layout_width="wrap_content"
            android:layout_height="wrap_content"
            android:text="RadioButton 3" />
    </RadioGroup>

</RelativeLayout>
MainActivity.java (Java Code)
package com.myapp;

import android.os.Bundle;
import android.app.Activity;
import android.view.Menu;
import android.view.View;
import android.widget.RadioButton;
import android.widget.Toast;

public class MainActivity extends Activity {

	RadioButton myOption1, myOption2, myOption3;

    @Override
    public void onCreate(Bundle savedInstanceState) {
        super.onCreate(savedInstanceState);
        setContentView(R.layout.activity_main);

        myOption1 = (RadioButton)findViewById(R.id.radio1);
        myOption2 = (RadioButton)findViewById(R.id.radio2);
        myOption3 = (RadioButton)findViewById(R.id.radio3);
        myOption1.setOnClickListener(myOptionOnClickListener);
        myOption2.setOnClickListener(myOptionOnClickListener);
        myOption3.setOnClickListener(myOptionOnClickListener);
    }

    RadioButton.OnClickListener myOptionOnClickListener =
 		   new RadioButton.OnClickListener()
 		  {

	 		  public void onClick(View v) {
	 		   // TODO Auto-generated method stub
	 		   Toast.makeText(MainActivity.this,
	 		     "RadioButton 1 : " + myOption1.isChecked() + "\n"+
	 		     "RadioButton 2 : " + myOption2.isChecked() + "\n" +
	 		     "RadioButton 3 : " + myOption3.isChecked(),
	 		     Toast.LENGTH_LONG).show();

	 		  }
	 		};


    @Override
    public boolean onCreateOptionsMenu(Menu menu) {
        getMenuInflater().inflate(R.menu.activity_main, menu);
        return true;
    }

}
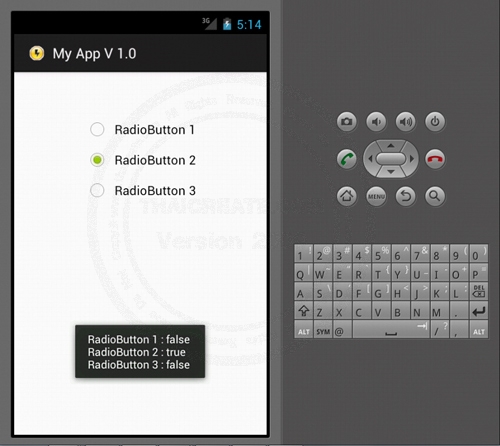
Screenshot

แสดง RadioGroup ซึ่งควบคุฒการทำงานของ RadioButton บน Form โดยสามารถเลือกได้อย่างใดอย่างหนึ่ง
Example 2 ทำงานร่วมกับ Button ในการอ่านค่า

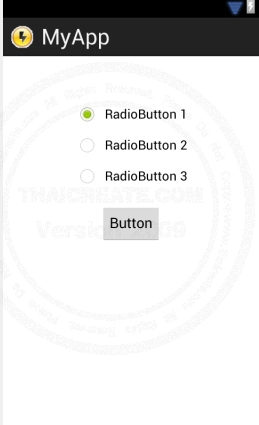
ออกแบบหน้าจอ GraphicalLayout ด้วย Widget ตามรูป โดยเพื่มปุ่ม Button เข้ามาด้วย
activity_main.xml (XML Layout)
<RelativeLayout xmlns:android="http://schemas.android.com/apk/res/android"
    xmlns:tools="http://schemas.android.com/tools"
    android:layout_width="match_parent"
    android:layout_height="match_parent" >

    <RadioGroup
        android:id="@+id/radioGroup1"
        android:layout_width="wrap_content"
        android:layout_height="wrap_content"
        android:layout_alignParentTop="true"
        android:layout_centerHorizontal="true"
        android:layout_marginTop="53dp" >

        <RadioButton
            android:id="@+id/radio1"
            android:layout_width="wrap_content"
            android:layout_height="wrap_content"
            android:checked="true"
            android:text="RadioButton 1" />

        <RadioButton
            android:id="@+id/radio2"
            android:layout_width="wrap_content"
            android:layout_height="wrap_content"
            android:text="RadioButton 2" />

        <RadioButton
            android:id="@+id/radio3"
            android:layout_width="wrap_content"
            android:layout_height="wrap_content"
            android:text="RadioButton 3" />
    </RadioGroup>

    <Button
        android:id="@+id/button1"
        android:layout_width="wrap_content"
        android:layout_height="wrap_content"
        android:layout_below="@+id/radioGroup1"
        android:layout_centerHorizontal="true"
        android:layout_marginTop="16dp"
        android:text="Button" />

</RelativeLayout>
MainActivity.java (Java Code)
package com.myapp;

import android.os.Bundle;
import android.app.Activity;
import android.view.Menu;
import android.view.View;
import android.widget.RadioButton;
import android.widget.Toast;
import android.widget.Button;

public class MainActivity extends Activity {

	RadioButton myOption1, myOption2, myOption3;
	Button btn1;

    @Override
    public void onCreate(Bundle savedInstanceState) {
        super.onCreate(savedInstanceState);
        setContentView(R.layout.activity_main);

        myOption1 = (RadioButton)findViewById(R.id.radio1);
        myOption2 = (RadioButton)findViewById(R.id.radio2);
        myOption3 = (RadioButton)findViewById(R.id.radio3);

        btn1 = (Button) findViewById(R.id.button1);
	    btn1.setOnClickListener(new View.OnClickListener() {
			  public void onClick(View v) {
		 		   // TODO Auto-generated method stub
		 		   Toast.makeText(MainActivity.this,
		 		     "RadioButton 1 : " + myOption1.isChecked() + "\n"+
		 		     "RadioButton 2 : " + myOption2.isChecked() + "\n" +
		 		     "RadioButton 3 : " + myOption3.isChecked(),
		 		     Toast.LENGTH_LONG).show();
			  }
		});

	};

    @Override
    public boolean onCreateOptionsMenu(Menu menu) {
        getMenuInflater().inflate(R.menu.activity_main, menu);
        return true;
    }

}
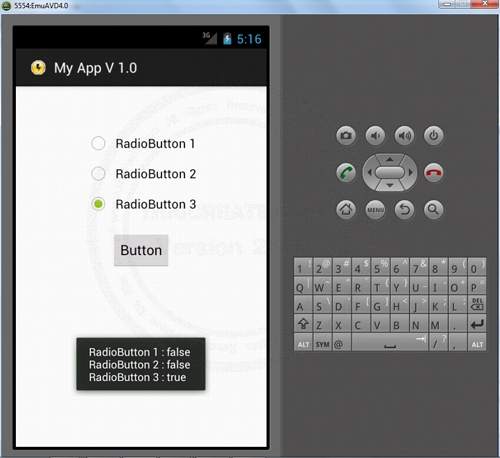
เขียน Event เพื่อควบคุมการคลิกที่ปุ่ม Button

ผลลัพธ์ที่ได้ หลังจากที่กดปุ่ม Button
| Property & Method (Others Related) |
|
 ช่วยกันสนับสนุนรักษาเว็บไซต์ความรู้แห่งนี้ไว้ด้วยการสนับสนุน Source Code 2.0 ของทีมงานไทยครีเอท ช่วยกันสนับสนุนรักษาเว็บไซต์ความรู้แห่งนี้ไว้ด้วยการสนับสนุน Source Code 2.0 ของทีมงานไทยครีเอท
|
|
| |
By : |
ThaiCreate.Com Team (บทความเป็นลิขสิทธิ์ของเว็บไทยครีเอทห้ามนำเผยแพร่ ณ เว็บไซต์อื่น ๆ) |
| |
Score Rating : |
   |
|
| |
Create/Update Date : |
2012-07-01 15:58:05 /
2012-07-14 09:18:48 |
| |
Download : |
No files |
|
|
Sponsored Links / Related |
|
|
|
|
|
|

|