ตอนที่ 7 : Xamarin กับ Android สร้าง Activity เชื่อมโยง Intent ส่งค่า Pass ตัวแปรระหว่าง Activity(C#) |
ตอนที่ 7 : Xamarin กับ Android สร้าง Activity เชื่อมโยง Intent ส่งค่า Pass ตัวแปรระหว่าง Activity(C#) ใน Application บน Smartphone หรือ Tablets ทั่ว ๆ ไป ย่อมประกอบด้วย App ที่มีจำนวนหน้าหลาย ๆ หน้าซึ่งใแต่ล่ะหน้าก็มีหน้าที่แตกต่างกันไป และการใช้งาน App เหล่านี้เราก็สามารถคลิกเพื่อไปยังหน้าต่าง ๆ ได้ตามความสามาารถที่ App ได้ออกแบบไว้ ซึ่งรูปแบบการทำงานก็จะคล้ายกับ Website คือคลิกในตำแหน่งหรือ Link เชื่อมโยงแล้วเรียกหน้าใหม่มาแสดงผล ซึ่งรูปแบบการทำงานบน App ที่เขียนด้วย Android ก็จะมีลักษณะที่คล้าย ๆ กัน คือจะต้องสร้างทำงานหน้า หรือที่เราเรียกว่า Activity ขึ้นมาหลาย ๆ Activity เพื่อแบ่งการทำงานให้ตรงกับวัตถุประสงค์ที่ต้องการ ในบทความนี้จะเป็นตัวอย่างการสร้างหน้า App หรือที่เราเรียกว่าการเพิ่ม Activity ใหม่บน App และการใส่ลิงค์เชื่อมโยงระหว่าง Activity ซึ่งในการเขียน Android จะเรียกว่าการ Intent Activity และรูปแบบการส่งค่าตัวแปร Pass ระหว่าง Activity ซึ่งจะมีรูปแบบคล้าย ๆ กับการส่งค่า Parameters ผ่าน Activity พร้อมกับตัวอย่างการรับหรืออ่านค่า Parameter
รูปแบบการ Intent Activity
                var activity2 = new Intent(this, typeof(Activity2));
                StartActivity(activity2);
รูปแบบการ Intent Activity และการส่งค่า Parameter
                var activity2 = new Intent(this, typeof(Activity2));
                activity2.PutExtra("MyData", txtInput.Text);
                StartActivity(activity2);
การรับค่า Parameter
string result = Intent.GetStringExtra("MyData")
ลองมาดูตัวอย่างเพื่อความเข้าใจมากขึ้น
Example 1 การเชื่องโยงระหว่าง Activity หรือ Intent Activity
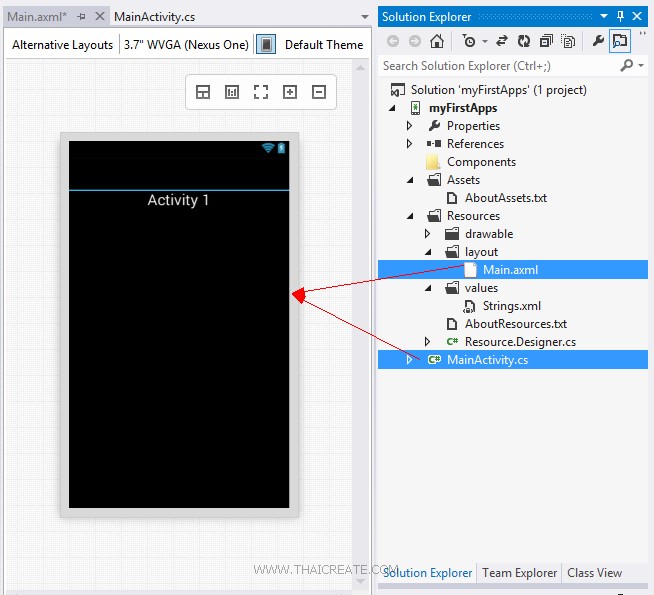
ใน Project ที่เป็น Default ที่จะมีไฟล์ที่เป็น Layout กับ C# (Activity) ที่ทำงานคู่กัน 1 ชุด โดยในชุดแรกใส่ TextView เพื่อให้รู้ว่าเป็น Activity 1
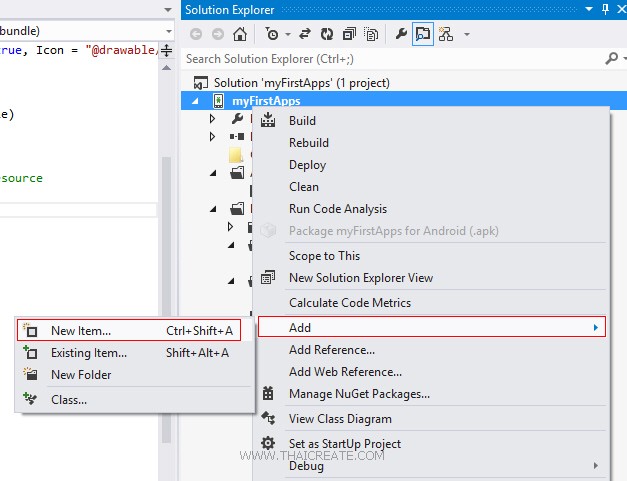
เราจะสร้างไฟล์ Activity C# ใหม่ให้คลิกเลือก Add -> New Item...
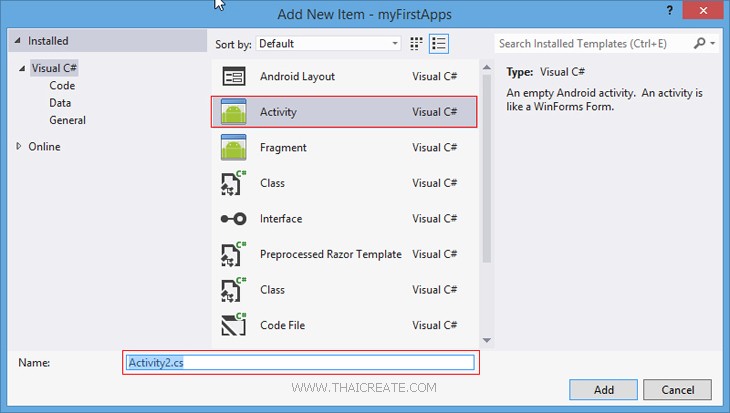
เลือก Activity และตั้งชื่อว่า Activity2.cs
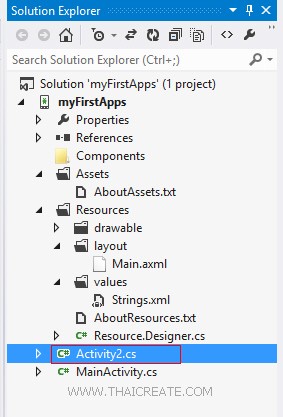
ได้ไฟล์ Activity2.cs
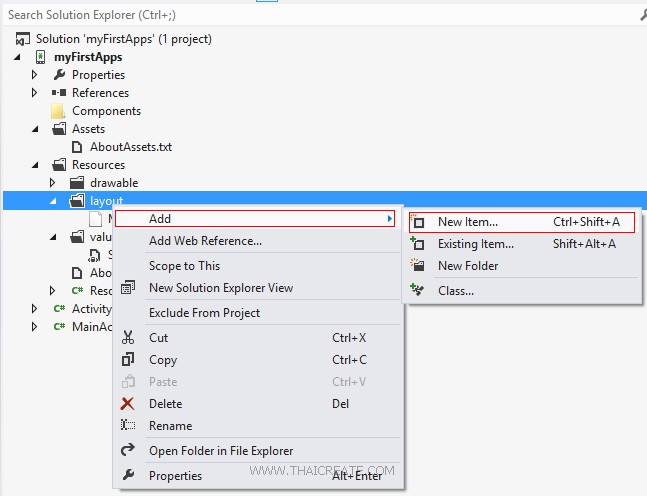
เราจะสร้าง Layout ขึ้นมาใหม่ให้คลิกขวาที่โฟเดอร์ layout เลือก Add -> New Item...
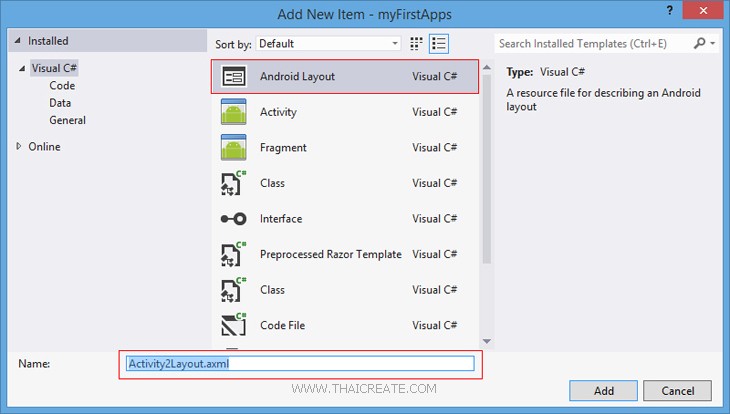
เลือก Android Layout ตั้งชื่อเป็น Activity2Layout.axml
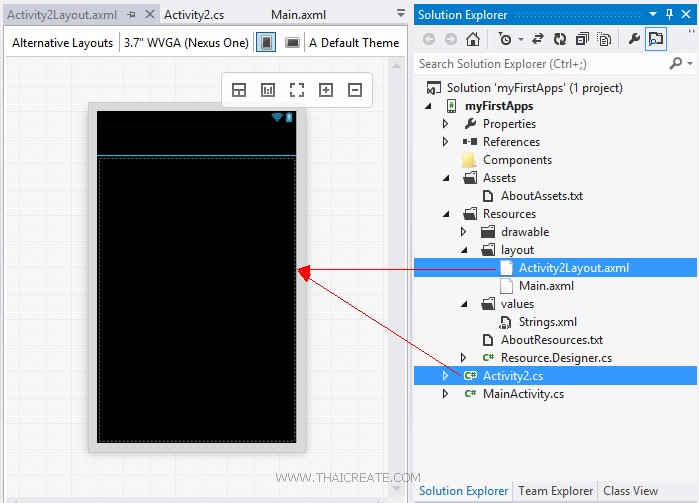
ตอนนี้เราจะได้ไฟล์ขึ้นมาอีก 1 ชุด ชื่อว่า Activity2.cs และ Activity2Layout.axml
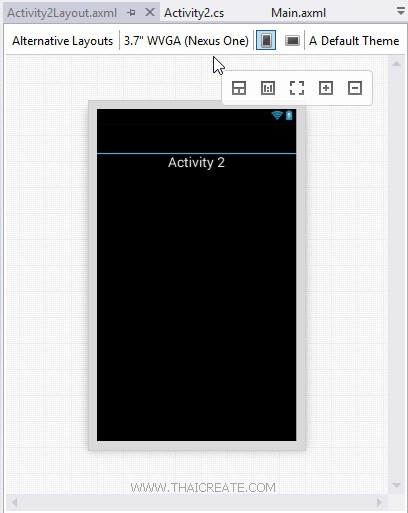
ใส่ TextView เพื่อให้รู้ว่าเป็น Activity 2
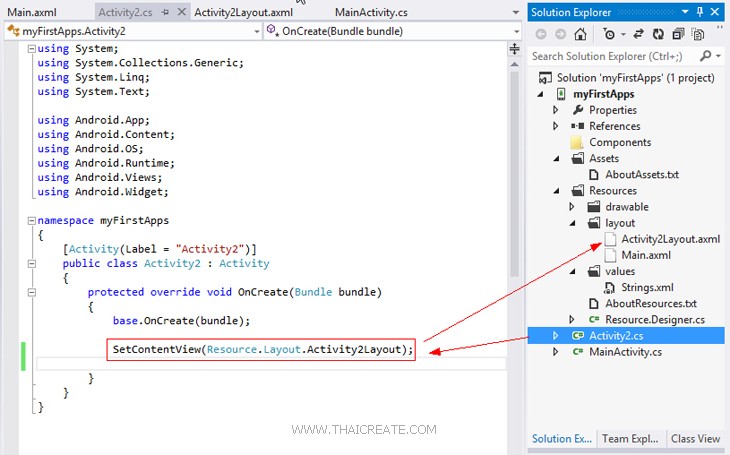
ใน Activity2.cs ให้อ้างถึง SetContentView(Resource.Layout.Activity2Layout); เพื่อเป็นการระบุว่าจะดึง Layout ของ Activity2Layout.axml มาแสดงผล
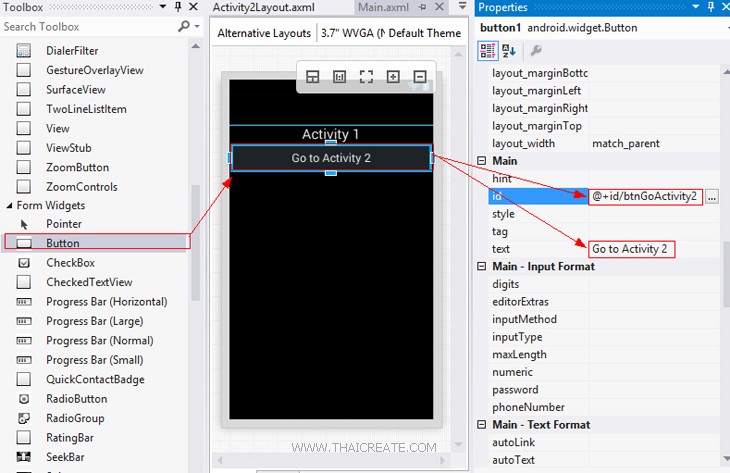
กลับมายัง Layout ของ Activity 1 ให้สร้าง Button โดยกำหนด id และ Text ดังรูป
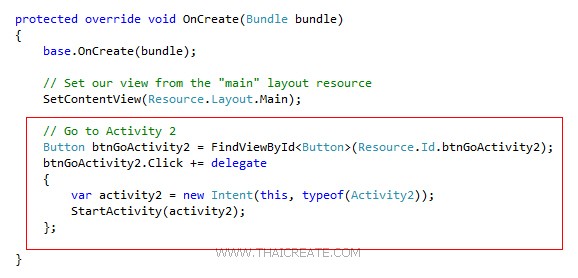
จากนั้นเพิ่มคำสั่งสำหรับการ Intent ไปยัง Activity 2
Main.axml
<?xml version="1.0" encoding="utf-8"?>
<LinearLayout xmlns:android="http://schemas.android.com/apk/res/android"
    android:orientation="vertical"
    android:layout_width="fill_parent"
    android:layout_height="fill_parent">
    <TextView
        android:text="Activity 1"
        android:textAppearance="?android:attr/textAppearanceLarge"
        android:layout_width="match_parent"
        android:layout_height="wrap_content"
        android:id="@+id/textView1"
        android:gravity="center" />
    <Button
        android:text="Go to Activity 2"
        android:layout_width="match_parent"
        android:layout_height="wrap_content"
        android:id="@+id/btnGoActivity2" />
</LinearLayout>
MainActivity.cs
using System;
using Android.App;
using Android.Content;
using Android.Runtime;
using Android.Views;
using Android.Widget;
using Android.OS;

namespace myFirstApps
{
    [Activity(Label = "myFirstApps", MainLauncher = true, Icon = "@drawable/icon")]
    public class MainActivity : Activity
    {

        protected override void OnCreate(Bundle bundle)
        {
            base.OnCreate(bundle);

            // Set our view from the "main" layout resource
            SetContentView(Resource.Layout.Main);

            // Go to Activity 2
            Button btnGoActivity2 = FindViewById<Button>(Resource.Id.btnGoActivity2);
            btnGoActivity2.Click += delegate
            {
                var activity2 = new Intent(this, typeof(Activity2));
                StartActivity(activity2);
            };

        }


    }
}
Activity2Layout.axml
<?xml version="1.0" encoding="utf-8"?>
<LinearLayout xmlns:android="http://schemas.android.com/apk/res/android"
    android:orientation="vertical"
    android:layout_width="fill_parent"
    android:layout_height="fill_parent">

    <TextView
        android:text="Activity 2"
        android:textAppearance="?android:attr/textAppearanceLarge"
        android:layout_width="match_parent"
        android:layout_height="wrap_content"
        android:id="@+id/textView2"
        android:gravity="center" />

</LinearLayout>
Activity2.cs
using System;
using System.Collections.Generic;
using System.Linq;
using System.Text;

using Android.App;
using Android.Content;
using Android.OS;
using Android.Runtime;
using Android.Views;
using Android.Widget;

namespace myFirstApps
{
    [Activity(Label = "Activity2")]
    public class Activity2 : Activity
    {
        protected override void OnCreate(Bundle bundle)
        {
            base.OnCreate(bundle);

            SetContentView(Resource.Layout.Activity2Layout);

        }
    }
}
ทดสอบการทำงาน
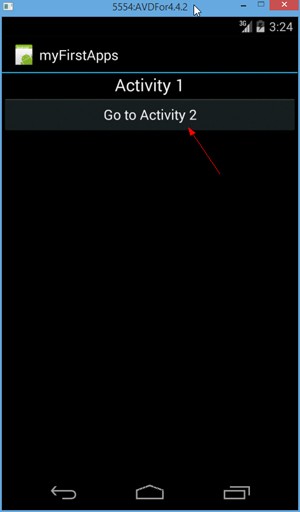
แสดงหน่าจอ App ให้คลิกที่ Button เพื่อไปยัง Activity 2
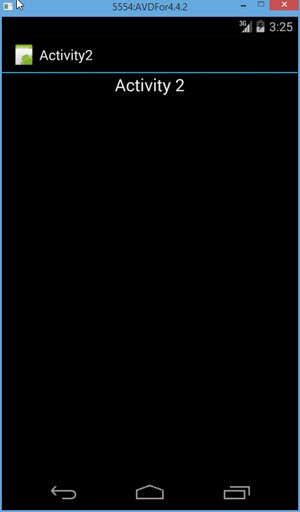
แสดง Activity 2
Example 2 การส่งค่าตัวแปร Pass parameters และ Intent ระหว่าง Activity
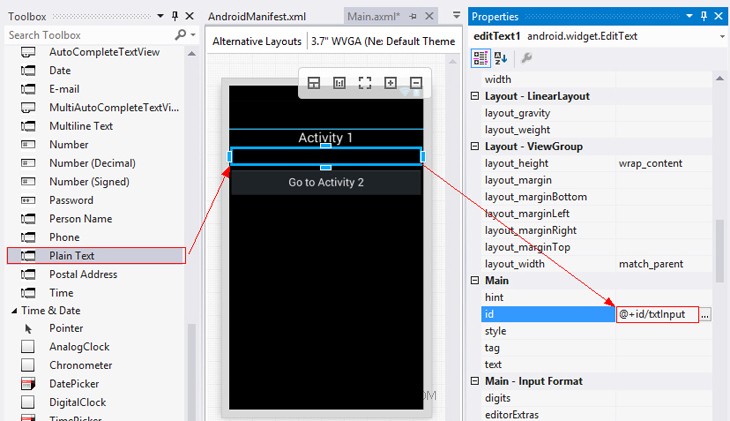
ใน Activity 1 ให้เพิ่ม EditText เพื่อรับค่า โดยตั้งชื่อเป็น txtInput
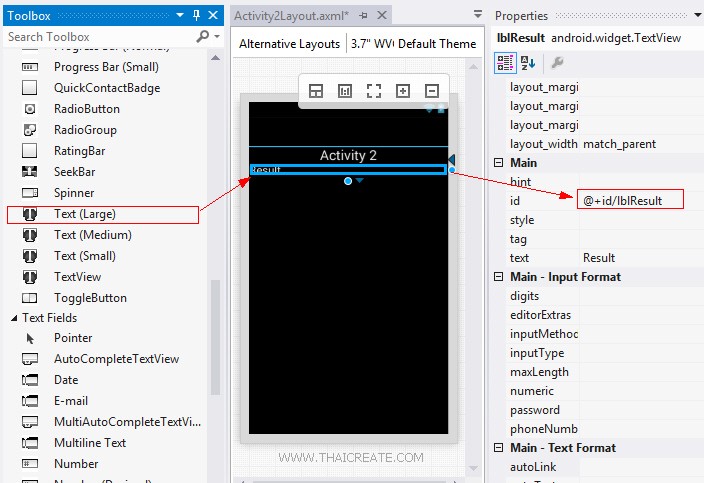
ใน Activity 2 ให้เพิ่ม TextView สำหรับแสดงค่า โดยตั้งชื่อเป็น lblResult

ใน Activity1.cs ให้เพิ่มคำสั่งเพื่อรับค่าจาก Input และส่งไปยัง Activity 2
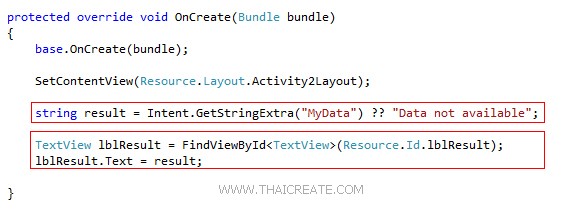
ใน Activity2.cs ให้เพิ่มคำสั่งอ่านค่า Parameters ที่ถูกส่งมาจาก Activity1.cs และแสดงผลออกทางหน้าจอ Layout ของ Activity2Layout.axml
Main.axml
<?xml version="1.0" encoding="utf-8"?>
<LinearLayout xmlns:android="http://schemas.android.com/apk/res/android"
    android:orientation="vertical"
    android:layout_width="fill_parent"
    android:layout_height="fill_parent">
    <TextView
        android:text="Activity 1"
        android:textAppearance="?android:attr/textAppearanceLarge"
        android:layout_width="match_parent"
        android:layout_height="wrap_content"
        android:id="@+id/textView1"
        android:gravity="center" />
    <EditText
        android:layout_width="match_parent"
        android:layout_height="wrap_content"
        android:id="@+id/txtInput" />
    <Button
        android:text="Go to Activity 2"
        android:layout_width="match_parent"
        android:layout_height="wrap_content"
        android:id="@+id/btnGoActivity2" />
</LinearLayout>
MainActivity.cs
using System;
using Android.App;
using Android.Content;
using Android.Runtime;
using Android.Views;
using Android.Widget;
using Android.OS;

namespace myFirstApps
{
    [Activity(Label = "myFirstApps", MainLauncher = true, Icon = "@drawable/icon")]
    public class MainActivity : Activity
    {

        protected override void OnCreate(Bundle bundle)
        {
            base.OnCreate(bundle);

            // Set our view from the "main" layout resource
            SetContentView(Resource.Layout.Main);

            // Go to Activity 2
            Button btnGoActivity2 = FindViewById<Button>(Resource.Id.btnGoActivity2);
            EditText txtInput = FindViewById<EditText>(Resource.Id.txtInput);
            btnGoActivity2.Click += delegate
            {
                var activity2 = new Intent(this, typeof(Activity2));
                activity2.PutExtra("MyData", txtInput.Text);
                StartActivity(activity2);
            };

        }


    }
}
Activity2Layout.axml
<?xml version="1.0" encoding="utf-8"?>
<LinearLayout xmlns:android="http://schemas.android.com/apk/res/android"
    android:orientation="vertical"
    android:layout_width="fill_parent"
    android:layout_height="fill_parent">
    <TextView
        android:text="Activity 2"
        android:textAppearance="?android:attr/textAppearanceLarge"
        android:layout_width="match_parent"
        android:layout_height="wrap_content"
        android:id="@+id/textView2"
        android:gravity="center" />
    <TextView
        android:text="Result"
        android:textAppearance="?android:attr/textAppearanceMedium"
        android:layout_width="match_parent"
        android:layout_height="wrap_content"
        android:id="@+id/lblResult" />
</LinearLayout>
Activity2.cs
using System;
using System.Collections.Generic;
using System.Linq;
using System.Text;

using Android.App;
using Android.Content;
using Android.OS;
using Android.Runtime;
using Android.Views;
using Android.Widget;

namespace myFirstApps
{
    [Activity(Label = "Activity2")]
    public class Activity2 : Activity
    {
        protected override void OnCreate(Bundle bundle)
        {
            base.OnCreate(bundle);

            SetContentView(Resource.Layout.Activity2Layout);

            string result = Intent.GetStringExtra("MyData") ?? "Data not available";

            TextView lblResult = FindViewById<TextView>(Resource.Id.lblResult);
            lblResult.Text = result;

        }
    }
}
ทดสอบการทำงาน
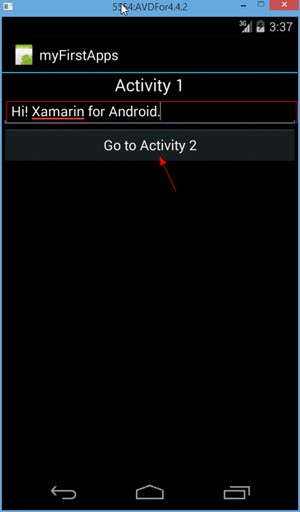
ทดสอบรับค่าผ่าน EditText จาก Activity 1 และส่งไปยัง Activity 2
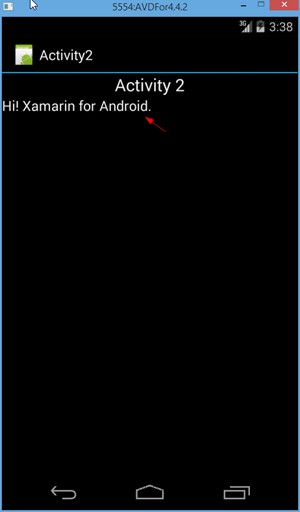
ค่าจะถูกส่งมายัง Activity 2 และแสดงผลออกทางหน้าจอ App
|
 ช่วยกันสนับสนุนรักษาเว็บไซต์ความรู้แห่งนี้ไว้ด้วยการสนับสนุน Source Code 2.0 ของทีมงานไทยครีเอท ช่วยกันสนับสนุนรักษาเว็บไซต์ความรู้แห่งนี้ไว้ด้วยการสนับสนุน Source Code 2.0 ของทีมงานไทยครีเอท
|
|
| |
By : |
ThaiCreate.Com Team (บทความเป็นลิขสิทธิ์ของเว็บไทยครีเอทห้ามนำเผยแพร่ ณ เว็บไซต์อื่น ๆ) |
| |
Score Rating : |
    |
|
| |
Create/Update Date : |
2014-09-15 12:37:30 /
2017-03-26 20:54:52 |
| |
Download : |
No files |
|
|
Sponsored Links / Related |
|
|
|
|
|
|

|