iOS/iPhone Storyboard and Custom Class in View (Objective-C, iPhone, iPad) |
iOS/iPhone Storyboard and Custom Class in View (Objective-C, iPhone, iPad) จากบทความก่อนหน้านี้เราได้รู้วิธีการสร้าง View บน Storyboard ด้วยวิธีอันแสนง่าย ภายในไม่กี่นาทีเราก็สามารถสร้างสรร Application ที่ประกอบด้วยหลาย View ได้อย่างง่ายดายและรวดเร็ว และผมเองก็ยอมรับว่าเป็น Tools ที่สุดยอดจริง ๆ และจากบทความที่แล้วได้พูดถึงเรื่องการสร้าง Class (Objective-C)ที่เป็น .h และ .m แล้วทำการเชื่อมโยงให้กับแต่ล่ View
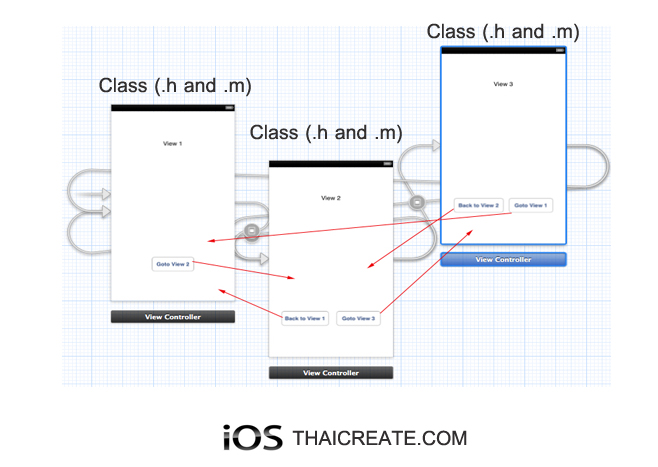 iOS Storyboard View and Class
จากขั้นตอนการสร้าง Storyboard ที่เราสร้าง View ขึ้นมาต่าง ๆ บน Storyboard แต่ View เหล่านั้นจะทำการเชื่อมโยงไปยัง Class ที่เป็น .h และ .m ได้อย่างไร และเหตุผลที่จะต้องเชื่อมโยงระหว่าง View กับ Class ก็คือ ในการเขียน Application ที่มีความซับซ้อน ที่ไม่ใช่แค่แสดงข้อความบน Label ที่เป็น Static View แต่เราต้องการให้มันฉลาดขึ้นและโต้ตอบกับผู้ใช้ เราไม่สามารถจัดการส่วนต่าง ๆ ผ่าน Interface Builder ได้ทั้งหมด เหตุผลนี่เองเราจึงจำเป็นจะต้องสร้าง Class ให้กับ View แต่ล่ะตัว และ Class นั้นเราจะใช้ภาษา Objective-C ในการที่จะเขียน Code และเงื่อนไขต่าง ๆ ให้ View ในหน้านั้น ๆ ทำงานตามที่ต้องการ
iOS/iPhone Storyboard and View , Multiple View (Objective-C, iPhone, iPad)
เพื่อไม่ให้เกิดความสสับสนจะขอเริ่มต้นตั้งแต่ขั้นตอนการเริ่มสร้าง App
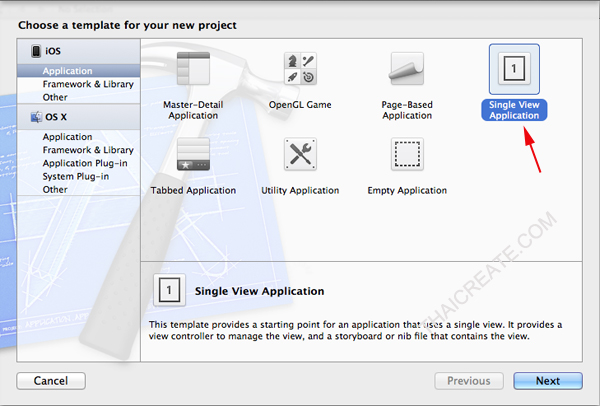
เลือก Proejct เป็นแบบ Single View Application
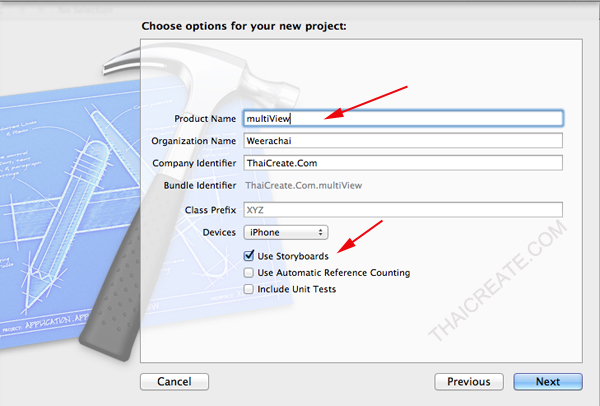
ขั้นตอนนี้อย่าลืมว่าจะต้องเลือก Use Storyboards ด้วย
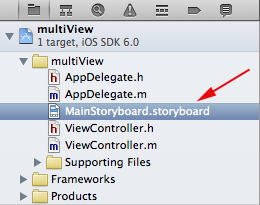
หลัก ๆ แล้วหลัวจากที่ Project ถุกสร้างไฟล์ที่ใช้จริง ๆ จะมีอยู่แค่ 3 ไฟล์คือ AppDelegate.h , AppDelegate.m และ MainStoryboard.storyboard ส่วนไฟล์ที่เป็น ViewController.h , ViewController.m เราสามารถทำการลบมันทิ้งได้
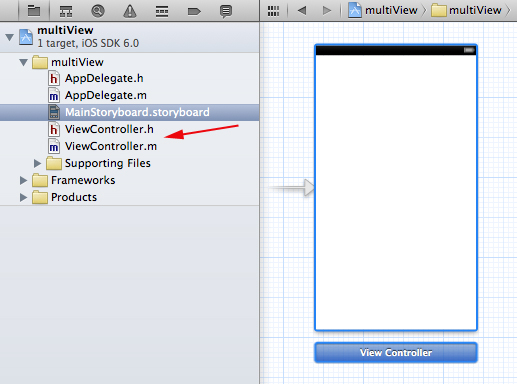
ลบไฟล์ ViewController.h และ ViewController.m ทิ้ง
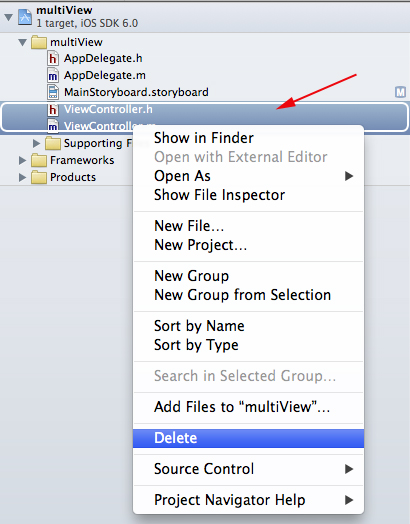
คลิกขวาเลือก Delete ไฟล์ทั้ง 2 ทิ้ง

เลือก Remove References (ลบออกจาก Project แต่ยังอยู่ในโฟเดอร์ App เพียงแต่ไม่ถูก Include เข้ามา หรือมองไม่เห็น) หรือ Move to Trash (ลบทิ้งทั้งใน Project และ App)
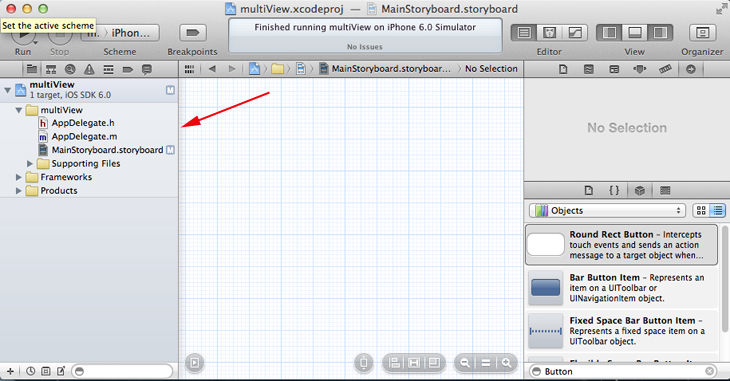
ไฟลืได้ถูกลบไปเรียบร้อยแล้ว และเลือกหลัก ๆ แค่ 3 ไฟล์ AppDelegate.h , AppDelegate.m และ MainStoryboard.storyboard
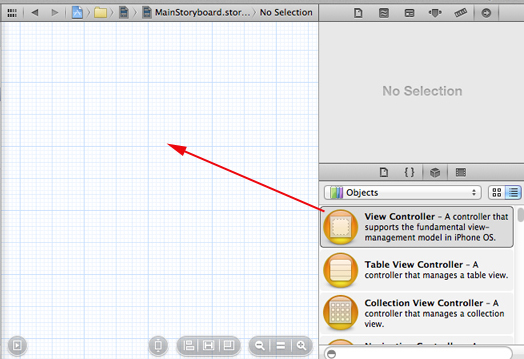
กลับมายังหน้า Storyboard เราจะทดสอบสร้าง View ขึ้นมา 3 ตัวบน Storyboard
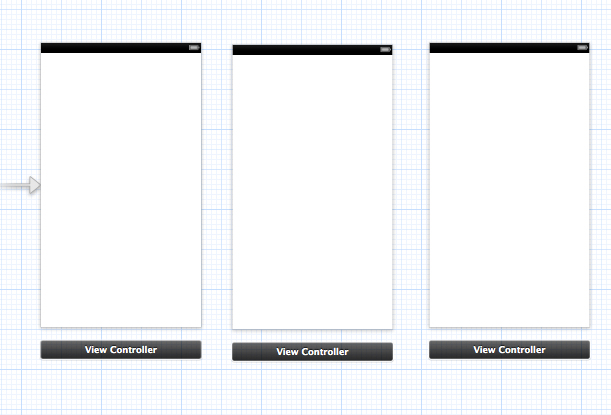
ได้ View ทั้ง 3 ตัวอยู่บน Storyboard
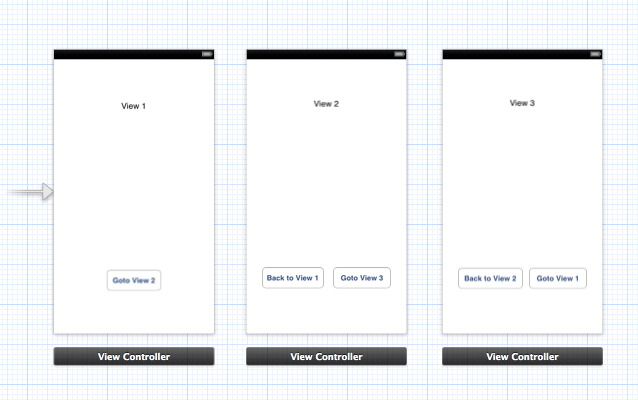
ถ้าต้องการสร้าง Object ต่าง ๆ ด้วย Interface Builder ลงในแต่ล่ะ View ก็สามารถหาอ่านได้จากบทความก่อน ๆ ที่ได้เขียนไว้
ขั้นตอนการสร้าง Class (.h และ .m)
ใน Stroyboard เรามี View อยู่ 3 ตัว เฉพาะฉะนั้นเราจะสร้าง Class Class (.h และ .m) ขึ้นมา 3 ชุด ซึ่งปกติการสร้าง Objective-C Class ขึ้นมาแต่ล่ะครั้งจะได้ไฟล์ .h และ .m ขึ้นมาพร้อมกันในทันที
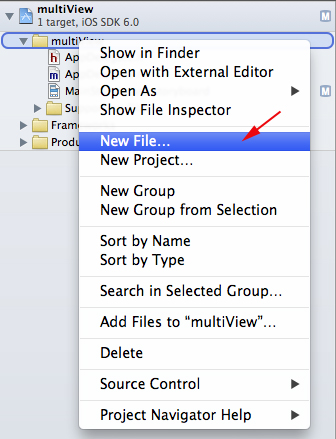
คลิกขวาที่ Folder App เลือก New File...
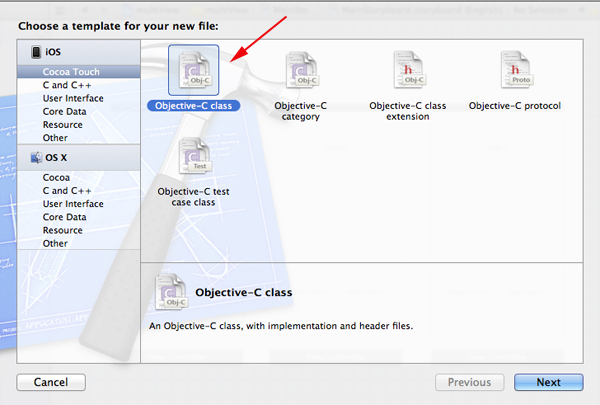
ภายใต้ iOS -> Cocoa Touch ให้เลือก Objective-C Class และเลือก Next
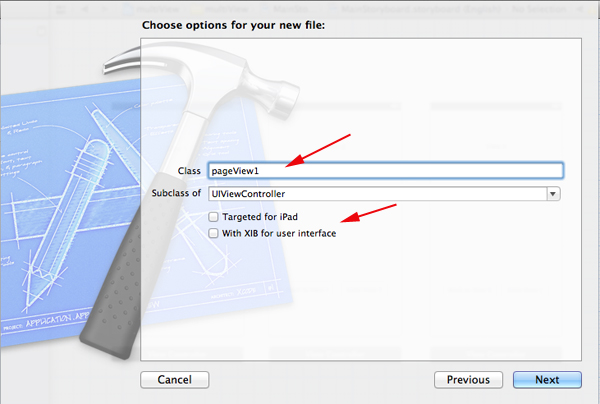
ให้ใส่ชื่อ Class และเลือก Subclass เป็น UIViewController อย่าลืมว่า Checkbox จะต้องไม่เลือกตั้งสองรายการ
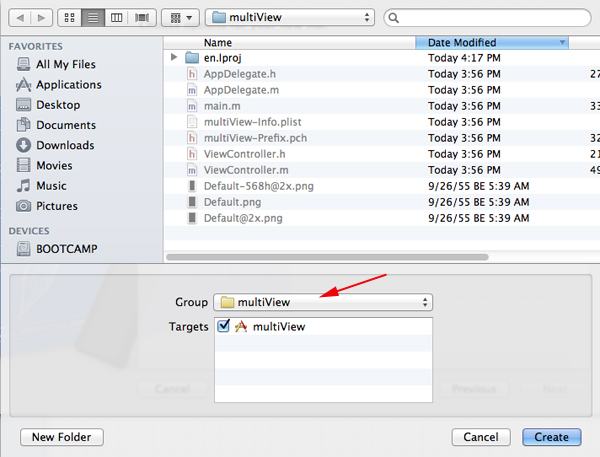
เลือก Path ที่จัดเก็บ
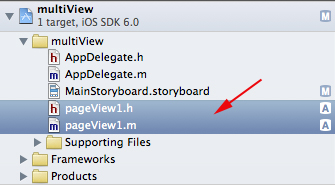
เราจะได้ไฟล์ .h และ .m ขึ้นมา 1 ชุด
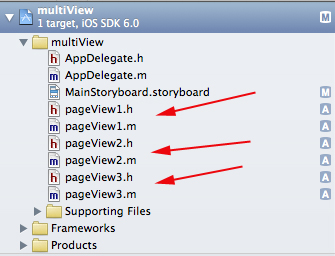
จากนั้นให้สร้างขึ้นมาอีก 2 ชุด ซึ่งตอนนี้เราได้ไฟล์ Class ทั้งหมด 3 ชุด สำหรับ View 3 ตัว เป็นที่เรียบร้อยแล้ว
ขั้นตอนการเชื่อมโยง View ใน Storybord กับ Class
หลังจากที่ได้ Class ขึ้นมา 3 ชุด พราก็พร้อมที่จะเชื่อมโยง View ที่อยู่บน Storyboard กับ Class ทั้ง 3 ตัว
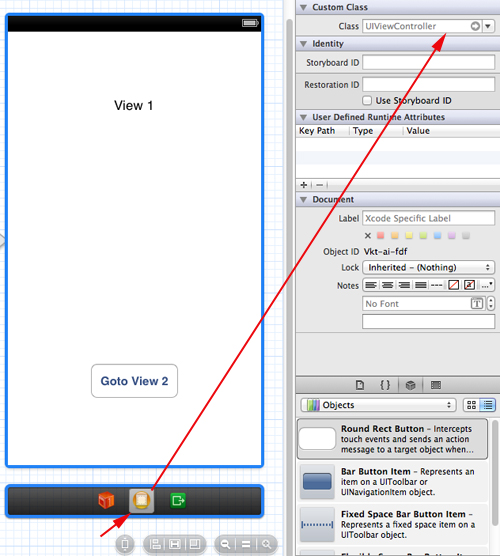
ให้เลือก View ที่ต้องการและคลิกที่ File's Owner (Icons สีแดง) จากนั้นให้ไปที่ Inspector ที่อยู่มุมขวาบน ในรูป
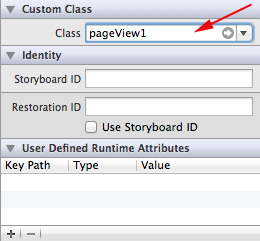
ตรง Custom Class ให้เลือกทำการ Map เชื่อม View กับ Class ที่ต้องการ และให้ทำจนครบทั้ง 3 View หลังจากเรียบร้อยแล้ว เราก็ได้ View บน Storyboard ที่เชื่อมโยงกับ Class ต่าง ๆ แล้ว
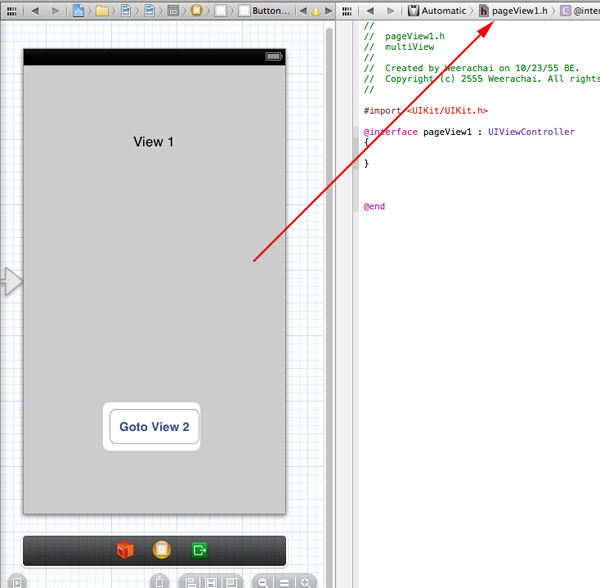
สังเกตุว่าต่อไปนี้ถ้าเราเลือกมุมมองของ UI และ Coding บน Class จะมีการเชื่อมโยงกับไฟล์ Class ที่เป็น .h และ .m ให้ทันที
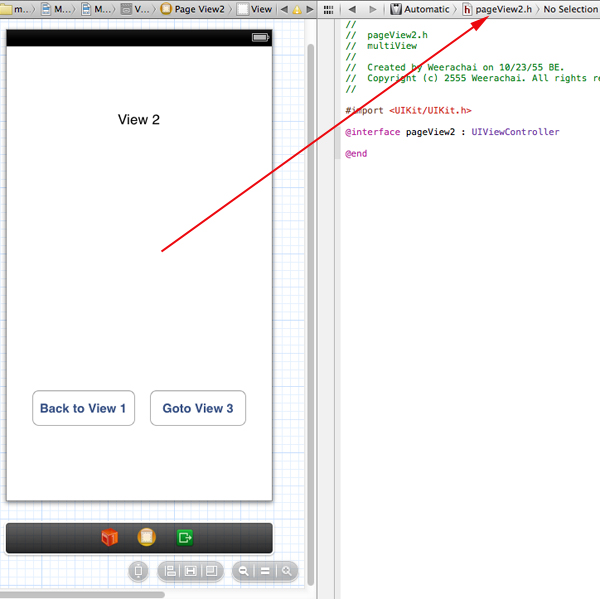
มุมมอง UI กับ Class
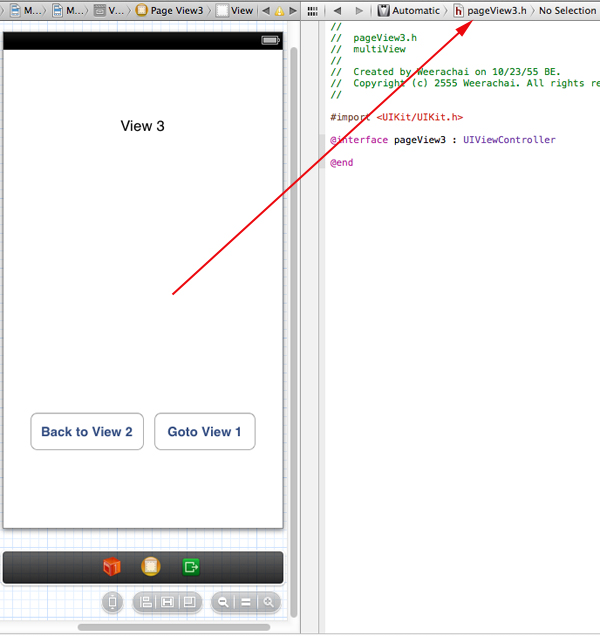
มุมมอง UI กับ Class
วิธีข้างต้นเป็นเพียงการเชื่อมโยง View ที่อยู่บน Storyboard กับ Class ที่สร้างขึ้นมาใหม่ ด้วยวิธีง่าย ๆส่วนการเขียน Code ต่าง ๆ ให้ Class ควบคุมการทำงานของ View ก็สามารถเขียนได้เช่นเดียวกับ Class ควบคุมการทำงานของ .xib ไฟล์ ซึ่งรูปแบบและวิธีการนั้น ทั้งการออกแบบ UI ด้วย Interface Builder และการเขียน Code ต่าง ๆ ด้วยภาษา Objectve-C ก็เหมือนกันทุกประการ
|
 ช่วยกันสนับสนุนรักษาเว็บไซต์ความรู้แห่งนี้ไว้ด้วยการสนับสนุน Source Code 2.0 ของทีมงานไทยครีเอท ช่วยกันสนับสนุนรักษาเว็บไซต์ความรู้แห่งนี้ไว้ด้วยการสนับสนุน Source Code 2.0 ของทีมงานไทยครีเอท
|
|
| |
By : |
ThaiCreate.Com Team (บทความเป็นลิขสิทธิ์ของเว็บไทยครีเอทห้ามนำเผยแพร่ ณ เว็บไซต์อื่น ๆ) |
| |
Score Rating : |
    |
|
| |
Create/Update Date : |
2012-10-23 21:55:03 /
2017-03-25 23:51:53 |
| |
Download : |

|
|
|
Sponsored Links / Related |
|
|
|
|
|
|

|