iOS/iPhone Table View and Table View Cell - Custom Cell Column (iPhone, iPad) |
iOS/iPhone Table View and Table View Cell - Custom Cell Column (iPhone, iPad) ในการสร้างข้อมูลรายการข้อมูลบน Table View ที่แสดงออกเป็นหลาย ๆ แถวนั้น บางครั้งเรา เราจะสังเกตุว่า Style ที่เป็นค่า Default ของ Cell จะมีอยู่ไม่กี่รูปแบบ เช่น Title , Label และ Image แต่ในกรณีที่เราต้องการสร้าง Custom Cell ขึ้นมาเอง และจัดรูปแบบ Cell และ รายละเอียดใน Cell ให้อยู่ในรูปแบบต่าง ๆ ที่ต้องการ เราจะใช้การสร้าง Custom Cell ด้วย Object ของ Interface Builder ที่มีชื่อว่า Table View Cell สำหรับการสร้างนั้นอาจจะมีความซับซ้อนนิดหนึ่ง แต่จะพยายามอธิบายและ Capture รูปภาพให้ละเอียดที่สุด
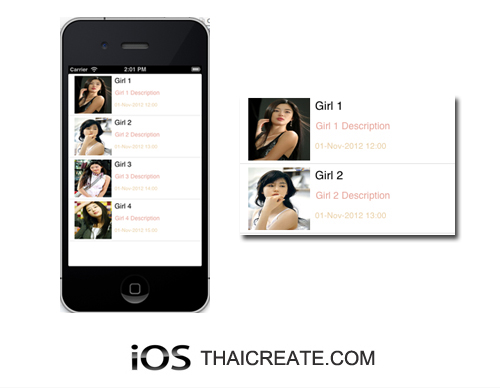 iOS/iPhone Table View and Table View Cell - Custom Cell Column
ในการสร้าง Table Custom Cell นั้น เราจะใช้การสร้างไฟล์ .xib ขึ้นมา พร้อมกับ Class .h และ .m ขึ้นมา 1 ชุด และเราจะออกแบบ Layout ต่าง ๆ บนไฟล์ .xib นั้น ๆ พร้อม ๆ กับการสร้าง property ต่าง ๆ ที่จะรับค่าจาก Table View ซึ่งใน Table View จะใช้การเรียก Layout ของ Custom Cell ที่เราได้สร้างขึ้นมา พร้อม ๆ กับการส่งค่าต่าง ๆ ผ่าน property เพื่อแสดงค่าใน Cell ที่ต้องการ สำหรับหลักการนั้แล้วไม่ยาก แต่วิธีการและการเขียน Code อาจจะมีความซับซ้อนอยู่บ้าง แต่ก็ไม่ถึงกับยากจนเกินไป
เริ่มต้นการสร้าาง Table View Cell - Custom Cell Column บน Xcode
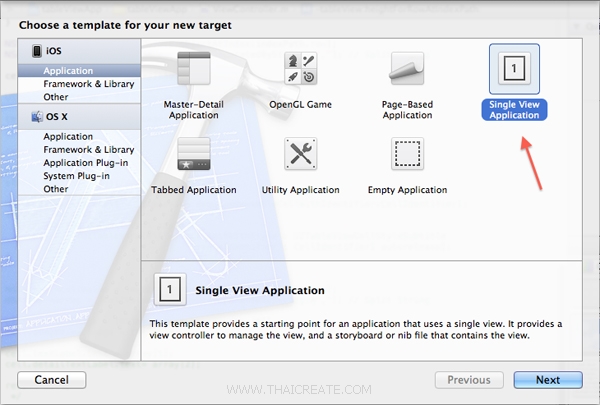
สร้าง Application แบบง่าย ๆ ด้วย Single View Application
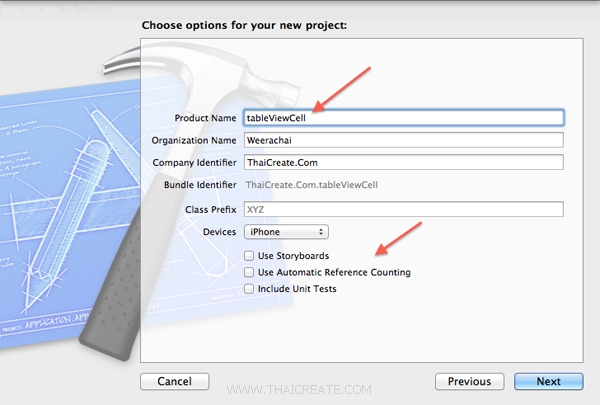
เลือกและไม่เลือกรายการดังรูป
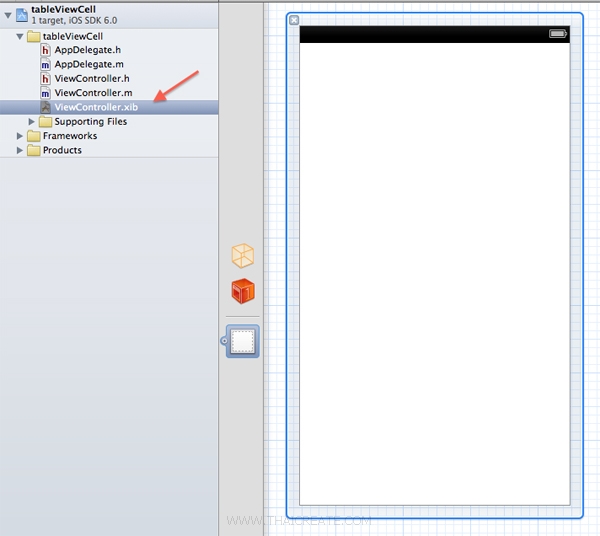
ตอนนี้ View ของเรายังเป็นแค่หน้าจอว่าง ๆ
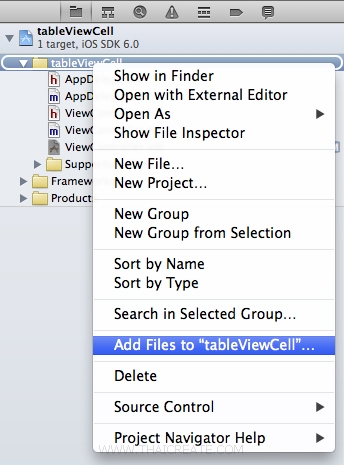
เนื่องจากใน Column เราจะแสดงรูปด้วย ขั้นแรกให้ Copy รูปเข้าไปไว้ใน Project และ Add เข้ามาใน Project ด้วย
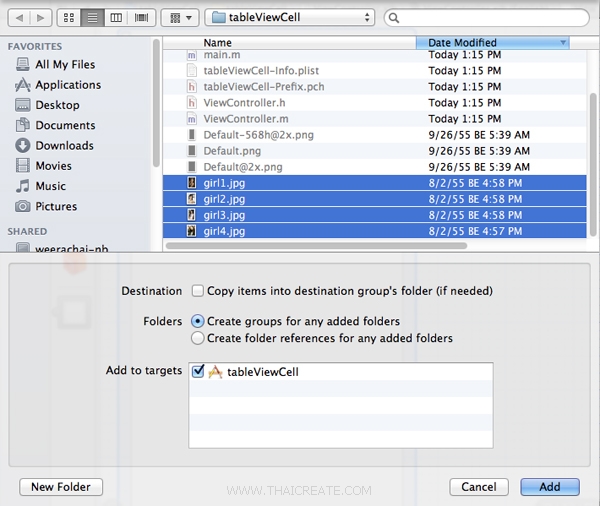
เลือกรูปที่ต้องการ
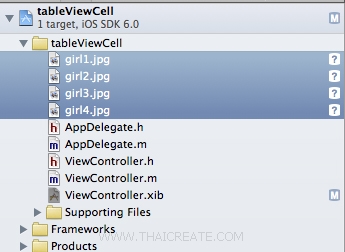
ได้รูปเข้ามาใน Project เรียบร้อยแล้ว
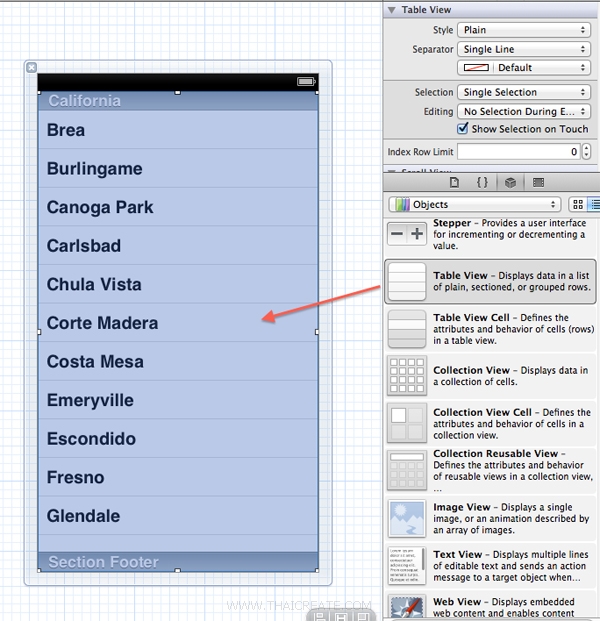
กลับมาที่ View หลักให้ลาก Table View ไปยังหน้าจอของ View
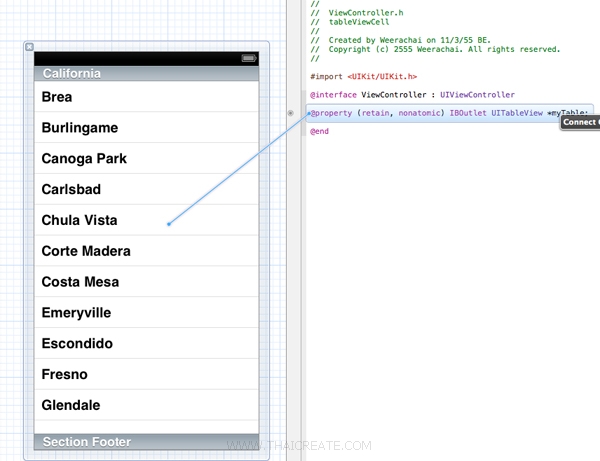
ทำการเชื่อม IBOutlet ให้เรียบร้อย
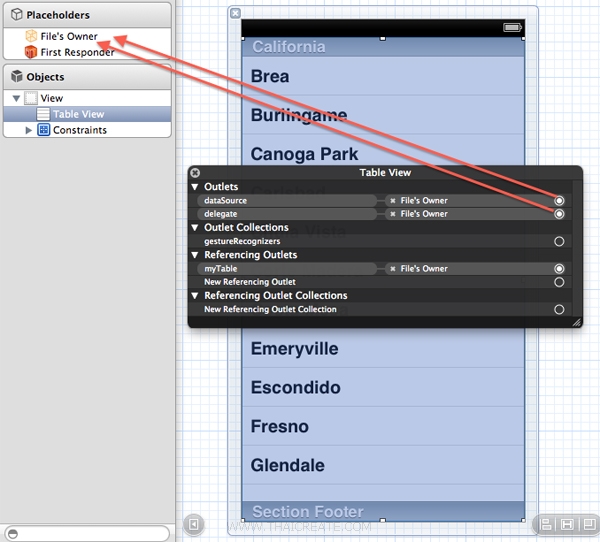
คลิกขวาที่ Table View ให้เชื่อม dataSource และ delegate ให้เรียบร้อยเช่นเดียวกัน หลังจากเสร็จสิ้นขั้นตอนนี้แล้ว ใน Table View หลักก็ไม่ต้องทำอะไรเพิ่ม เหลือแค่การเขียน Code อย่างเดียว
ขั้นตอนถัดไปจะเป็นการสร้าง Table View Cell แบบ Custom Cell
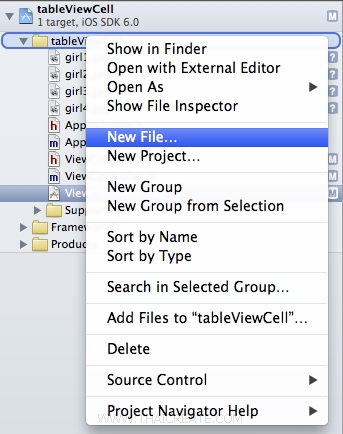
ทำการ New File ขึ้นมาใหม่
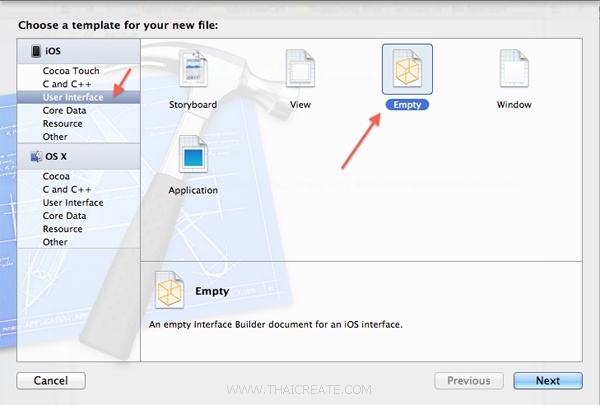
เลือก User Interface -> Empty ตามลำดับ
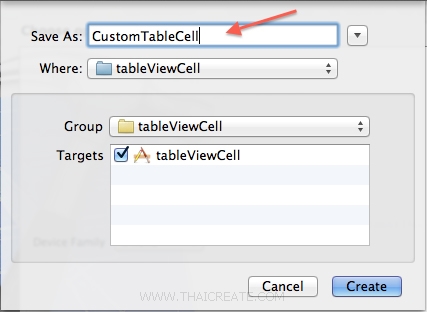
ตั้งชื่อไฟล์เป็น CustomTableCell
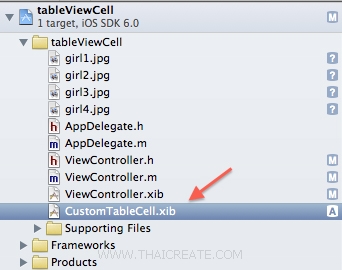
ได้ไฟล์ Interface เปล่า ๆ ที่ยังไม่มี Class มาควบคุมการทำงาน
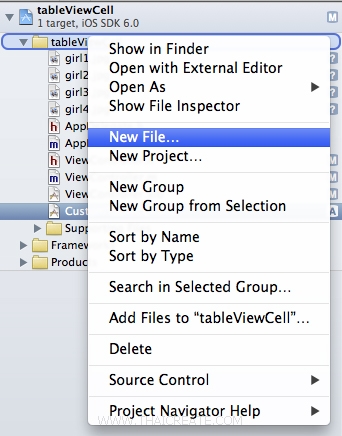
ต่อไปให้ New File เพื่อสร้าง Class .h และ .m
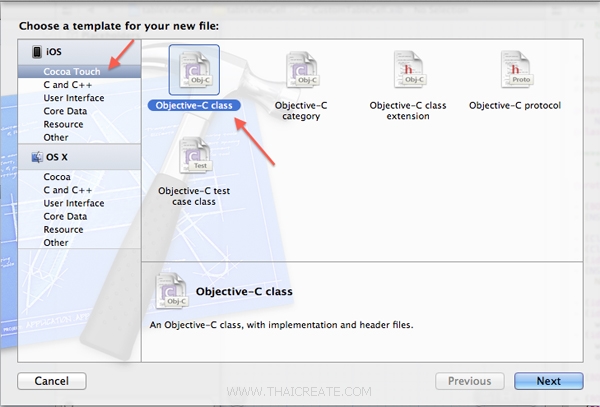
เลือก Cocoa Touch และเลือก Objective-C class
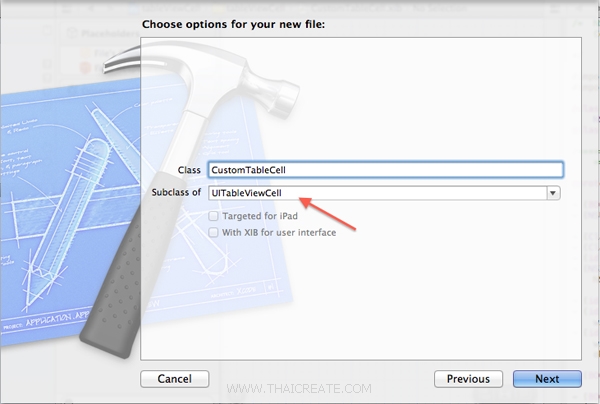
ตั้งชื่อให้เหมือนกับ Interface โดยตั้งเป็น CustomTableCell ส่วน Subclass เลือกให้ถูกด้วย UITableViewCell และไม่เลือกดังรูป
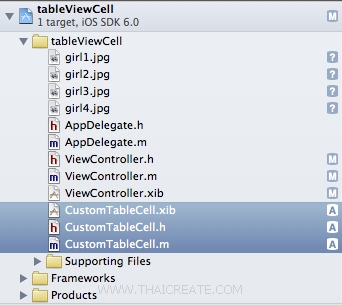
ได้ไฟล์ Class ขึ้นมาอีก 2 ไฟล์ ซึ่งตอนนี้ได้ครบชุดแล้ว
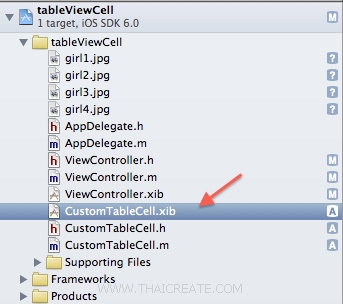
คลิกที่ไฟล์ CustomTableCell.xib ซึ่งตอนนี้ยังเป็นหน้าจอว่าง ๆ
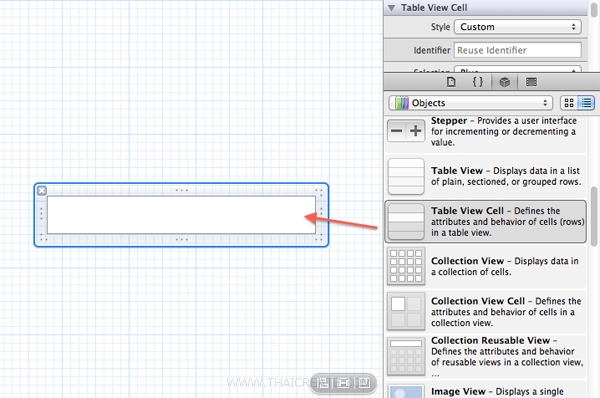
ให้ลาก Table View Cell ไปวางไว้ตำแหน่งของหน้าจอ
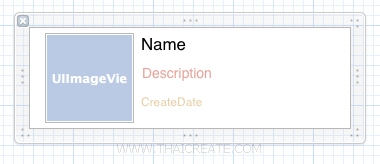
จากนั้นให้ออกแบบ Object ต่าง ๆ ตามต้องการ บน Cell นี้ โดยอาจจะประกอบด้วย ImageView และ Label ตามข้อมูลที่มีอยู่
จากนั้นในไฟล์ CustomTableCell.h และ CustomTableCell.m ให้สร้าง Code ต่าง ๆ ดังนี้
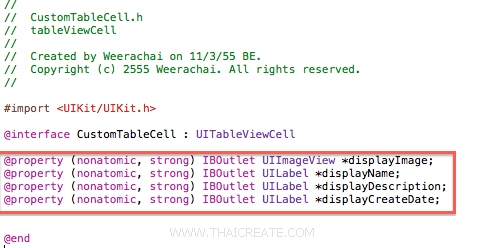
CustomTableCell.h
//
//  CustomTableCell.h
//
//  Created by Weerachai on 11/3/55 BE.
//  Copyright (c) 2555 Weerachai. All rights reserved.
//

#import <UIKit/UIKit.h>

@interface CustomTableCell : UITableViewCell

@property (nonatomic, strong) IBOutlet UIImageView *displayImage;
@property (nonatomic, strong) IBOutlet UILabel *displayName;
@property (nonatomic, strong) IBOutlet UILabel *displayDescription;
@property (nonatomic, strong) IBOutlet UILabel *displayCreateDate;


@end
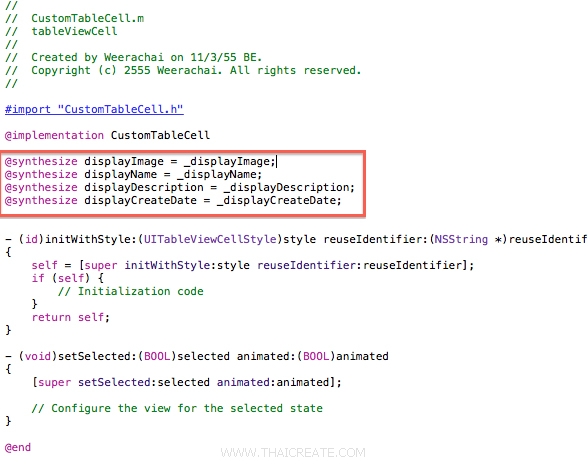
CustomTableCell.m
//
//  CustomTableCell.m
//
//  Created by Weerachai on 11/3/55 BE.
//  Copyright (c) 2555 Weerachai. All rights reserved.
//

#import "CustomTableCell.h"

@implementation CustomTableCell

@synthesize displayImage = _displayImage;
@synthesize displayName = _displayName;
@synthesize displayDescription = _displayDescription;
@synthesize displayCreateDate = _displayCreateDate;


- (id)initWithStyle:(UITableViewCellStyle)style reuseIdentifier:(NSString *)reuseIdentifier
{
    self = [super initWithStyle:style reuseIdentifier:reuseIdentifier];
    if (self) {
        // Initialization code
    }
    return self;
}

- (void)setSelected:(BOOL)selected animated:(BOOL)animated
{
    [super setSelected:selected animated:animated];

    // Configure the view for the selected state
}

@end
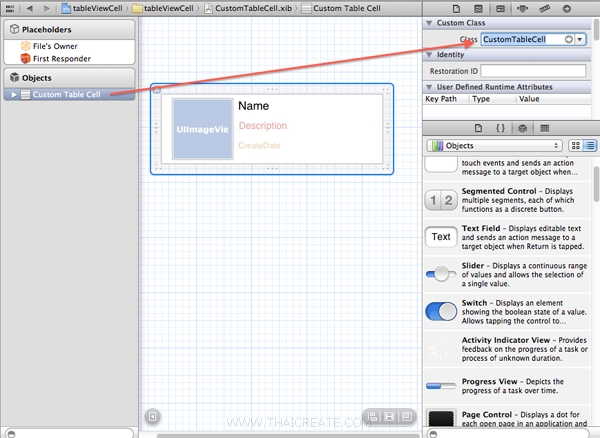
จากนั้นให้กลับมาที่หน้าจอ Interface ให้คลิกที่ Custom Table Cell ดังรูป แล้วทำการ เลือก Custom Class ที่เราได้สร้างขึ้นมาที่ชื่อว่า CustomTableCell ถ้าไม่มีใน List ให้พิมพ์เพิ่มเข้าไป
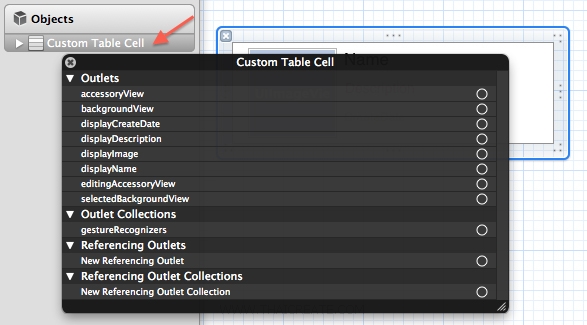
เสร็จแล้วให้คลิกขวาที่ Custom Table Cell ดังรูป จะมีรายการขึ้นตามรูป
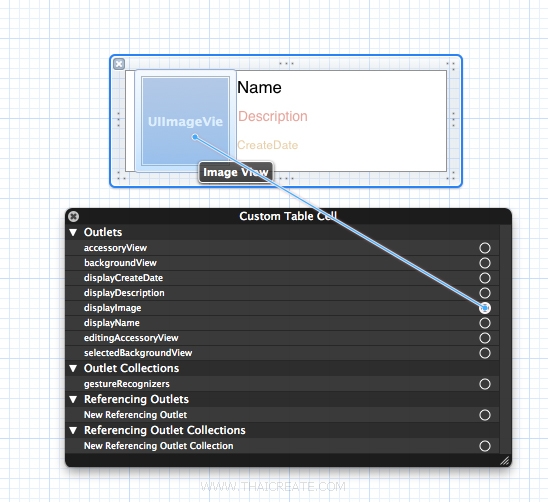
ให้เชื่อมรายการ property กับหน้าจอ User Interface ตามชนิดของข้อมูลที่ได้สร้างขึ้น
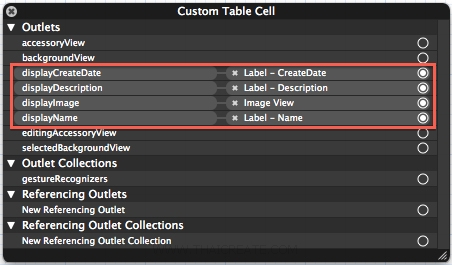
เชื่อมเสร็จแล้วจะได้หน้าจอดังรูป ซึ่งประกอบด้วย Object ทั้งหมด 4 ตัว
หลังจากเสร็จสิ้นขั้นตอนการสร้าง Table View Cell แล้ว ต่อไปเราจะมาเรียกใช้จาก Table View หลัก ซึ่งเราจะต้องเขียน Code บนภาษา Objective-C
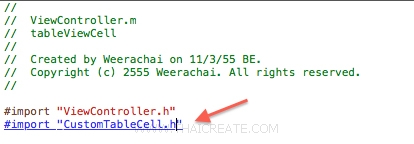
จะต้องทำการ import ไฟล์ CustomTableCell.h เข้ามาด้วย ส่วน Code ต่าง ๆ ทั้งหมดจะเป็นตามนี้
ViewController.h
//
//  ViewController.h
//
//  Created by Weerachai on 11/3/55 BE.
//  Copyright (c) 2555 Weerachai. All rights reserved.
//

#import <UIKit/UIKit.h>

@interface ViewController : UIViewController

@property (retain, nonatomic) IBOutlet UITableView *myTable;

@end
ViewController.m
//
//  ViewController.m
//
//  Created by Weerachai on 11/3/55 BE.
//  Copyright (c) 2555 Weerachai. All rights reserved.
//

#import "ViewController.h"
#import "CustomTableCell.h"

@interface ViewController ()
{
    NSMutableArray *myObject;

    // A dictionary object
    NSDictionary *dict;

    // Define keys
    NSString *images;
    NSString *name;
    NSString *description;
    NSString *createdate;
}

@end

@implementation ViewController

- (void)viewDidLoad
{
    [super viewDidLoad];
	// Do any additional setup after loading the view, typically from a nib.


    // Define keys
    images = @"Images";
    name = @"Name";
    description = @"Description";
    createdate = @"CreateDate";


    // Create array to hold dictionaries
    myObject = [[NSMutableArray alloc] init];

    dict = [NSDictionary dictionaryWithObjectsAndKeys:
            @"girl1.jpg", images,
            @"Girl 1", name,
            @"Girl 1 Description", description,
            @"01-Nov-2012 12:00", createdate,
            nil];
    [myObject addObject:dict];


    dict = [NSDictionary dictionaryWithObjectsAndKeys:
            @"girl2.jpg", images,
            @"Girl 2", name,
            @"Girl 2 Description", description,
            @"01-Nov-2012 13:00", createdate,
            nil];
    [myObject addObject:dict];


    dict = [NSDictionary dictionaryWithObjectsAndKeys:
            @"girl3.jpg", images,
            @"Girl 3", name,
            @"Girl 3 Description", description,
            @"01-Nov-2012 14:00", createdate,
            nil];
    [myObject addObject:dict];

    dict = [NSDictionary dictionaryWithObjectsAndKeys:
            @"girl4.jpg", images,
            @"Girl 4", name,
            @"Girl 4 Description", description,
            @"01-Nov-2012 15:00", createdate,
            nil];
    [myObject addObject:dict];
}

- (NSInteger)tableView:(UITableView *)tableView numberOfRowsInSection:(NSInteger)section
{
    return myObject.count;
}


- (UITableViewCell *)tableView:(UITableView *)tableView cellForRowAtIndexPath:(NSIndexPath *)indexPath
{

    static NSString *CellIdentifier = @"Cell";

    CustomTableCell *cell = (CustomTableCell *) [tableView dequeueReusableCellWithIdentifier : CellIdentifier];

    if (cell == nil)
    {
        NSArray *nib = [[NSBundle mainBundle] loadNibNamed:@"CustomTableCell" owner:self options:nil];
        cell = [nib objectAtIndex:0];
    }


    NSDictionary *tmpDict = [myObject objectAtIndex:indexPath.row];

    UIImage* theImage = [UIImage imageNamed:[tmpDict objectForKey:images]];

    cell.displayImage.image = theImage;
    cell.displayName.text = [tmpDict objectForKey:name];
    cell.displayDescription.text = [tmpDict objectForKey:description];
    cell.displayCreateDate.text = [tmpDict objectForKey:createdate];


    return cell;
}

- (CGFloat)tableView:(UITableView *)tableView heightForRowAtIndexPath:(NSIndexPath *)indexPath
{
    return 100;
}

- (void)didReceiveMemoryWarning
{
    [super didReceiveMemoryWarning];
    // Dispose of any resources that can be recreated.
}

- (void)dealloc {
    [_myTable release];
    [super dealloc];
}
@end
คำอธิบาย
if (cell == nil)
{ // เรียก Custom Cell จากไฟล์ CustomTableCell.xib
NSArray *nib = [[NSBundle mainBundle] loadNibNamed:@"CustomTableCell" owner:self options:nil];
cell = [nib objectAtIndex:0];
}
NSDictionary *tmpDict = [myObject objectAtIndex:indexPath.row];
UIImage* theImage = [UIImage imageNamed:[tmpDict objectForKey:images]];
// ส่งค่า property ต่าง ๆ ไปยัง Object ของไฟล์ CustomTableCell.xib
cell.displayImage.image = theImage;
cell.displayName.text = [tmpDict objectForKey:name];
cell.displayDescription.text = [tmpDict objectForKey:description];
cell.displayCreateDate.text = [tmpDict objectForKey:createdate];
สำหรับ Code อื่น ๆ ก็ไม่ได้ยากอะไรมากมาย สามารถไล่ดูแล้วเข้าใจได้
Screenshot
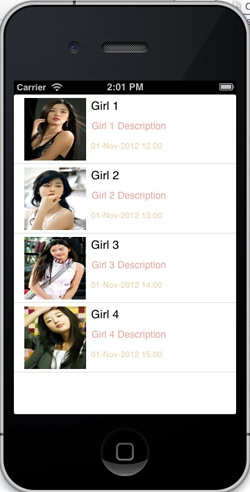
จะได้ Table View ตาม Cell และ Column ที่เราได้ออกแบบและสร้างขึ้น
ในตัวอย่างนี้อาจจะมีความซับซ้อนอยู่นิดหนึ่ง แต่ถ้าเราเข้าใจ Concept มันแล้ว จะช่วยให้เราทำความเข้าใจได้ง่าย ๆ ขึ้น และตัวอย่างนี้ก็พยายามอธิบายโดยละเอียด ด้วยการ Capture รูปภาพใน Step และขั้นตอนต่าง ๆ อย่างละเอียด ส่วนถ้าได้หรือไม่ได้ยังไงลองโพสถามในกระทู้ได้ครับ 
|
 ช่วยกันสนับสนุนรักษาเว็บไซต์ความรู้แห่งนี้ไว้ด้วยการสนับสนุน Source Code 2.0 ของทีมงานไทยครีเอท ช่วยกันสนับสนุนรักษาเว็บไซต์ความรู้แห่งนี้ไว้ด้วยการสนับสนุน Source Code 2.0 ของทีมงานไทยครีเอท
|
|
| |
By : |
ThaiCreate.Com Team (บทความเป็นลิขสิทธิ์ของเว็บไทยครีเอทห้ามนำเผยแพร่ ณ เว็บไซต์อื่น ๆ) |
| |
Score Rating : |
    |
|
| |
Create/Update Date : |
2012-11-07 10:36:45 /
2017-03-26 09:12:29 |
| |
Download : |

|
|
|
Sponsored Links / Related |
|
|
|
|
|
|

|