iOS/iPhone Table View from NSDictionary - UITableview and NSMutableDictionary |
iOS/iPhone Table View from NSDictionary - UITableview and NSMutableDictionary จากบทความก่อนหน้านี้เราได้เรียนรู้การสร้าง Table View และการนำข้อมูลจาก Array ด้วย NSMutableArray แสดงบน TableView แต่สิ่งที่เราเห็นก็คือ Array ทั่ว ๆ ไปจะประกอบด้วย Key และ Value อย่างล่ะหนึ่งชุดเท่านั้น แต่ในการใช้งานจริง ๆ แล้วภายใน Table View ที่เป็น 1 Rows จะประกอบด้วยหลาย ๆ Column ซึ่ง Array ทั่ว ๆ ไปจะไม่สามารถจัดเก็บ Value ได้หลายตำแหน่ง เพราะฉะนั้นเราจำเป็นจะต้องใช้ NSDictionary ซึ่งเป็น Subclass ของ NSMutableDictionary โดย NSDictionary ในโครงสร้างจะประกอบด้วย Key และ Value หลาย ๆ ตัวในชุดเดียวกัน แต่ข้อจำกัดของ NSDictionary ก็มีเช่นเดียวกัน คือสามารถเก็บข้อมูลได้เพียงชุดเดียวเท่านั้น เพราะฉะนั้นเราจะเป็นจะต้องใช้ NSMutableArray เข้ามาจัดเก็บข้อมูลของ NSDictionary ในแต่ล่ะชุดให้อยู่ในรุปแบบของ Array ด้วย ดูตัวอย่างเพื่อความเข้าใจ
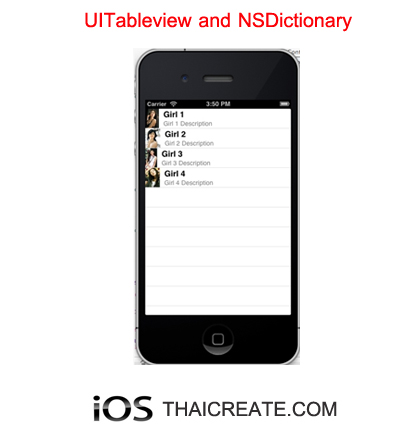 iOS/iPhone Table View from NSDictionary - UITableview and NSMutableDictionary
และเพื่อความเข้าในเกี่ยวกับการสร้าง Table View แนะนำให้อ่านพื้นฐานเกี่ยวกับ Table View และการนำข้อมูลจาก Array มาแสดงบน TableView จากบทความนี้เสียก่อน
การสร้าง NSDictionary การสร้างชุดข้อมูลให้อยู่ในรูปแบบของ NSDictionary
    NSDictionary *dict;
    dict = [NSDictionary dictionaryWithObjectsAndKeys:
            @"girl1.jpg", "Key-Images",
            @"Girl 1", "Key-Name",
            @"Girl 1 Description", "Key-Description",
            nil];
จากตัวอย่างเป็นการสร้าง NSDictionary ขึ้นมา 1 ชุด โดยตัวแรกจะเป็น Value และที่สองจำเป็น Key
และเมื่อเราใช้กับ NSMutableArray รวมหลาย ๆ ชุดเข้าด้วยกัน จะได้ดังนี้
NSMutableArray *myObject;
NSDictionary *dict;

dict = [NSDictionary dictionaryWithObjectsAndKeys:
    @"girl1.jpg", "Key-Images",
    @"Girl 1", "Key-Name",
    @"Girl 1 Description", "Key-Description",
    nil];
[myObject addObject:dict];

dict = [NSDictionary dictionaryWithObjectsAndKeys:
    @"girl2.jpg", "Key-Images",
    @"Girl 2", "Key-Name",
    @"Girl 2 Description", "Key-Description",
    nil];
[myObject addObject:dict];

dict = [NSDictionary dictionaryWithObjectsAndKeys:
    @"girl2.jpg", "Key-Images",
    @"Girl 2", "Key-Name",
    @"Girl 2 Description", "Key-Description",
    nil];
[myObject addObject:dict];
จากตัวอย่าง NSMutableArray ที่ประกอบด้วย NSDictionary หลาย ๆ ชุด ซึ่งเราได้ข้อมูลที่จะนำไปแสดงบน Table View เรียบร้อย ข้อมูลในรุปแบบนี้ถ้าจะมองให้เป็นในรูปแบบของตารางข้อมูลก็จะมองในรูปแบบของ Data Table ที่มีหลายแถว และ หลายคอลัมบ์
เริ่มต้นการสร้างบน Xcode กับ iPhone ตามที่ได้แจ้งไว้บทความนี้เป็นการพัฒนาต่อจาก บทความที่ได้แจ้งไว้ก่อนหน้านี้แล้ว
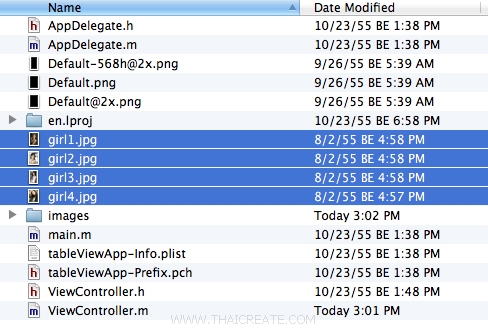
เนื่องจากราจะแสดงข้อมูลรูปภาพ ให้ copy ไฟล์ไปไว้ใน Project
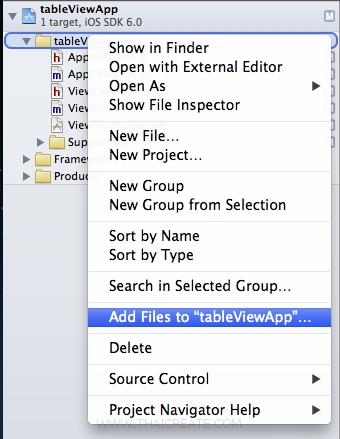
ให้ทำการ เพิ่ม รูปภาพเข้ามาใน Project ของเรา ด้วยการคลิกขวาที่ Project เลือก Add File to...
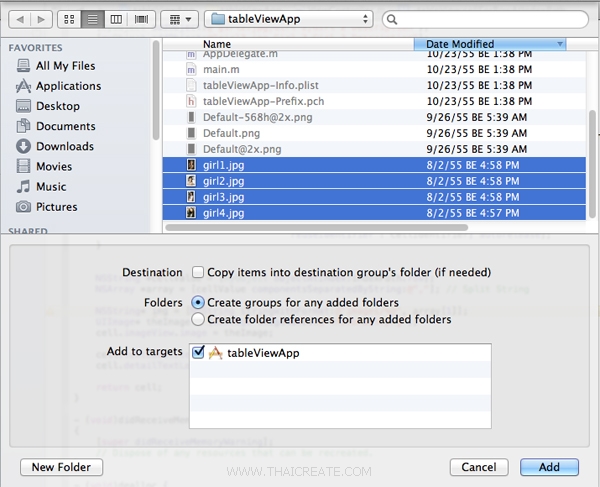
เลือกไฟล์รูปภาพ
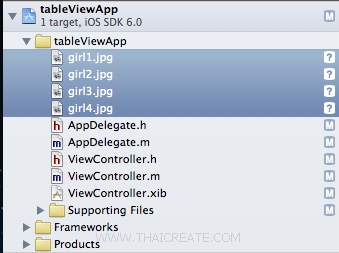
รูปภาพถูกเพิ่มเข้ามาใน Project เรียบร้อยแล้ว ขั้นตอนถัดไปคือการสร้าง Code ด้วยภาษา Objective-C
ViewController.h
//
//  ViewController.h
//
//  Created by Weerachai on 10/23/55 BE.
//  Copyright (c) 2555 Weerachai. All rights reserved.
//

#import <UIKit/UIKit.h>

@interface ViewController : UIViewController
{

    IBOutlet UITableView *myTable;
}

@end
ViewController.m
//
//  ViewController.m
//
//  Created by Weerachai on 10/23/55 BE.
//  Copyright (c) 2555 Weerachai. All rights reserved.
//

#import "ViewController.h"

@interface ViewController ()
{
    NSMutableArray *myObject;

    // A dictionary object
    NSDictionary *dict;

    // Define keys
    NSString *images;
    NSString *name;
    NSString *description;
}

@end

@implementation ViewController


- (void)viewDidLoad
{
    [super viewDidLoad];
	// Do any additional setup after loading the view, typically from a nib.

    // Define keys
    images = @"Images";
    name = @"Name";
    description = @"Description";


    // Create array to hold dictionaries
    myObject = [[NSMutableArray alloc] init];

    dict = [NSDictionary dictionaryWithObjectsAndKeys:
            @"girl1.jpg", images,
            @"Girl 1", name,
            @"Girl 1 Description", description,
            nil];
    [myObject addObject:dict];


    dict = [NSDictionary dictionaryWithObjectsAndKeys:
            @"girl2.jpg", images,
            @"Girl 2", name,
            @"Girl 2 Description", description,
            nil];
    [myObject addObject:dict];


    dict = [NSDictionary dictionaryWithObjectsAndKeys:
            @"girl3.jpg", images,
            @"Girl 3", name,
            @"Girl 3 Description", description,
            nil];
    [myObject addObject:dict];

    dict = [NSDictionary dictionaryWithObjectsAndKeys:
            @"girl4.jpg", images,
            @"Girl 4", name,
            @"Girl 4 Description", description,
            nil];
    [myObject addObject:dict];

}

- (NSInteger)tableView:(UITableView *)tableView numberOfRowsInSection:(NSInteger)section
{
    return myObject.count;
}

- (UITableViewCell *)tableView:(UITableView *)tableView cellForRowAtIndexPath:(NSIndexPath *)indexPath
{

    static NSString *CellIdentifier = @"Cell";

    UITableViewCell *cell = [tableView dequeueReusableCellWithIdentifier:CellIdentifier];
    if (cell == nil) {
        // Use the default cell style.
        cell = [[[UITableViewCell alloc] initWithStyle : UITableViewCellStyleSubtitle
                                       reuseIdentifier : CellIdentifier] autorelease];
    }


    NSDictionary *tmpDict = [myObject objectAtIndex:indexPath.row];

    UIImage* theImage = [UIImage imageNamed:[tmpDict objectForKey:images]];
    cell.imageView.image = theImage;

    cell.textLabel.text = [tmpDict objectForKey:name];
    cell.detailTextLabel.text= [tmpDict objectForKey:description];

    return cell;
}

- (void)didReceiveMemoryWarning
{
    [super didReceiveMemoryWarning];
    // Dispose of any resources that can be recreated.
}

- (void)dealloc {
    [myTable release];
    [super dealloc];
}
@end
Screenshot
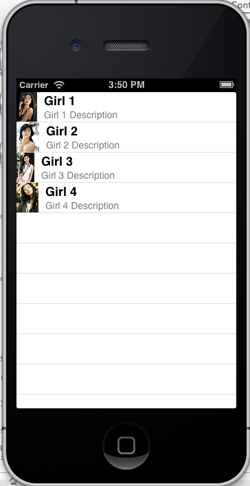
แสดงข้อมูลจาก NSDictionary บน Table View ที่ประกอบด้วยหลาย Key, Value และหลาย Index
.
|
 ช่วยกันสนับสนุนรักษาเว็บไซต์ความรู้แห่งนี้ไว้ด้วยการสนับสนุน Source Code 2.0 ของทีมงานไทยครีเอท ช่วยกันสนับสนุนรักษาเว็บไซต์ความรู้แห่งนี้ไว้ด้วยการสนับสนุน Source Code 2.0 ของทีมงานไทยครีเอท
|
|
| |
By : |
ThaiCreate.Com Team (บทความเป็นลิขสิทธิ์ของเว็บไทยครีเอทห้ามนำเผยแพร่ ณ เว็บไซต์อื่น ๆ) |
| |
Score Rating : |
    |
|
| |
Create/Update Date : |
2012-10-29 15:17:41 /
2017-03-26 09:10:01 |
| |
Download : |

|
|
|
Sponsored Links / Related |
|
|
|
|
|
|

|