iOS/iPhone and Thread (NSThread, Objective-C) |
iOS/iPhone and Thread (NSThread, Objective-C) ในการเขียนโปรแกรม iOS ขึ้นสูง และมีการทำงานที่ซับซ้อนเกี่ยวกับ Process การใช้ Thread (NSThread) เข้ามาจัดการ Process นั้น เป็นสิ่งที่จำเป็นอย่างยิ่ง เหตุผลก็เพราะ Thread จะช่วยให้เราสามารถจัดการกับ Process และ Result ต่าง ๆ ที่เกิดขึ้นในระหว่าง App ทำงานอย่างมีประสิทธิภาพ เช่น ตัวอย่างการเขียน App ที่ติดต่อกับ Web Server ตลอดเวลา และในทุก ๆ ครั้งที่ App การ Request ข้อมูลไปยัง Server เราก็ควรที่จะใช้ Thread มาควบคุม Process นั้นและจัดการกับ Result ทีได้ให้แสดงผลตามที่ต้องการ หรือจะยกตัวอย่าง ระบบ Chat ที่มีการติดต่อหลาย Interface กับหลาย User ก็ล้วนใช้ Thread เข้ามาจัดการกับแต่ล่ะ Interface ทั้งสิ้น
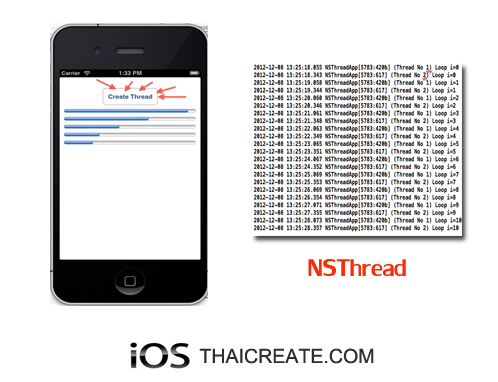 iOS/iPhone and Thread (NSThread, Objective-C)
บทความนี้จะยกตัวอย่างการใช้ Thread (NSThread) แบบง่าย ๆ แต่สามารถดูแล้วเข้าใจและสามารถนำไป Apply ใช้ได้ในทันที โดยมี 2 ตัวอย่าง คือตัวอย่างแรกเป็นการ Loop แสดงค่าในแต่ล่ะ Thread และตัวอย่างที่สอง จะเป็นการใช้ Progress View กับ NSThread
Thread (NSThread) / Objective-C Syntax
[NSThread detachNewThreadSelector:@selector(CrateThread) toTarget:self withObject:nil];

- (void) CrateThread
{

}
สร้าง Thread โดยเรียก method ที่มีชื่อว่า CrateThread
- (void) CrateThread
{
            dispatch_async(dispatch_get_main_queue(), ^{
                lblText.text = result;
            });
}
ในกรณีที่ต้องการแสดงผลการทำงานของ Thread ไปขัง หน้าจอ View สามรรถใช้ dispatch_async() เหมือนในตัวอย่าง
Example 1 การใช้งาน Thread (NSThread) แบบง่าย ๆ โดยแสดงค่าการทำงานของแค่ล่ะ Thread
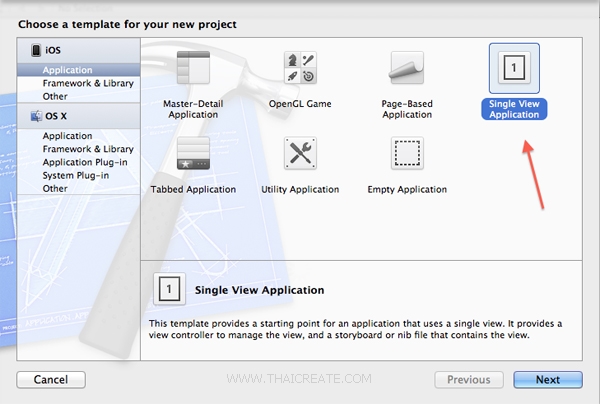
เริ่มต้นการสร้าง Application แบบง่าย ๆ ด้วย Single View Application
ตอนนี้หน้าจอ View จะยังว่าง ๆ
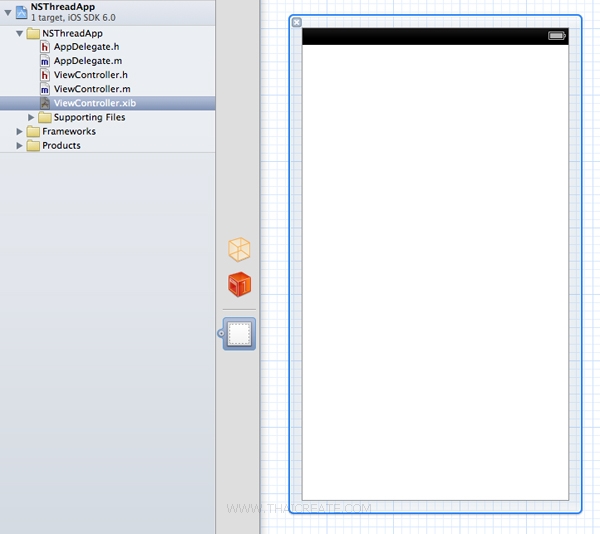
ตอนนี้หน้าจอ View จะยังว่าง ๆ
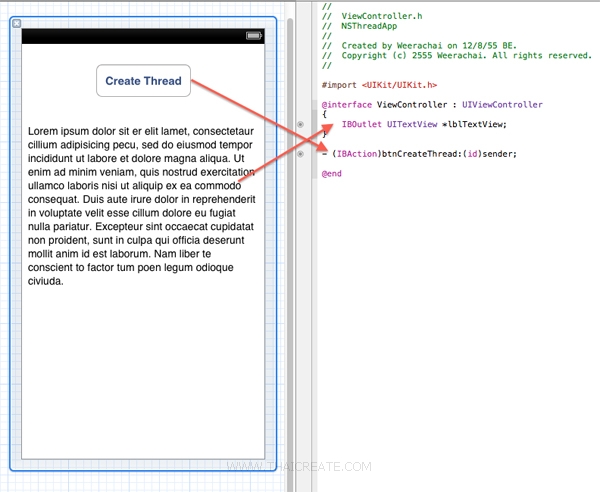
ออกแบบหน้าจอ View ดังรูป โดยใช้ TextView และ Label และให้เชื่อม IBOutlet และ IBAction ให้เรียบร้อย
ViewController.h
//
//  ViewController.h
//  NSThreadApp
//
//  Created by Weerachai on 12/8/55 BE.
//  Copyright (c) 2555 Weerachai. All rights reserved.
//

#import <UIKit/UIKit.h>

@interface ViewController : UIViewController
{
    IBOutlet UITextView *lblTextView;
}

- (IBAction)btnCreateThread:(id)sender;

@end
ViewController.m
//
//  ViewController.m
//  NSThreadApp
//
//  Created by Weerachai on 12/8/55 BE.
//  Copyright (c) 2555 Weerachai. All rights reserved.
//

#import "ViewController.h"

@interface ViewController ()
{
    int threadNo;
}

@end

@implementation ViewController


- (void)viewDidLoad
{
    [super viewDidLoad];
	// Do any additional setup after loading the view, typically from a nib.
}

- (IBAction)btnCreateThread:(id)sender {
    if(threadNo==0)
        threadNo = 1;

    NSMutableString *threadName = [NSString stringWithFormat:@"Thread No %d",threadNo];

    [NSThread detachNewThreadSelector:@selector(CrateThread:) toTarget:self withObject:threadName];
    //[NSThread sleepForTimeInterval:5];
    threadNo++;
}

- (void) CrateThread:(NSString *) threadName
{

    for(int i = 0; i <= 10; i++)
    {
        NSMutableString *str = [NSString stringWithFormat:@"(%@) Loop i=%d",threadName,i];
            dispatch_async(dispatch_get_main_queue(), ^{
                lblTextView.text = str;
            });
        sleep(1);
        NSLog(@"%@",str);
    }

}

- (void)didReceiveMemoryWarning
{
    [super didReceiveMemoryWarning];
    // Dispose of any resources that can be recreated.
}


- (void)dealloc {
    [lblTextView release];
    [super dealloc];
}
@end
ในตัวอย่างนี้จะสร้าง Thread โดยการให้แต่ล่ะ Thread แสดงค่าจาก 0 ถึง 10 โดยแสดงผลใน NSLog และหยุดการทำงานเมื่อถึง Loop สุดท้าย
Screenshot
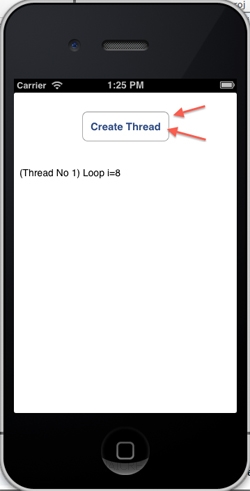
บนหน้าจอ App ให้คลิก 2 ครั้งเพื่อสร้าง Thread 2 ตัว
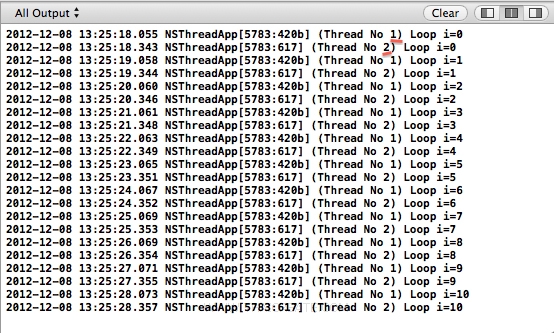
จกาตัวอย่าง Result บน NSLog จะเห็นว่าเกิด Thread ขึ้นมา 2 ตัว และแต่ล่ะ Thread ก็จะทำงานของตัวเองจนเสร็จสิ้น โดยค่าตัวแปรจะไม่ซ้ำซ้อนกัน
Example 2 ทดสอบการสร้าง Progress View (UIProgressView) และการแสถงสถานะของแต่ล่ะ Thread
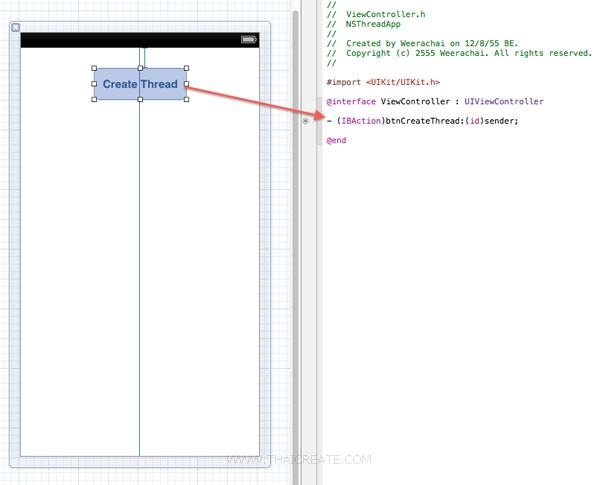
สร้าง Button ดังรูป และทำการเชื่อม IBAction จากนั้นเขียน Code ดังนี้
ViewController.h
//
//  ViewController.h
//  NSThreadApp
//
//  Created by Weerachai on 12/8/55 BE.
//  Copyright (c) 2555 Weerachai. All rights reserved.
//

#import <UIKit/UIKit.h>

@interface ViewController : UIViewController

- (IBAction)btnCreateThread:(id)sender;

@end
ViewController.m
//
//  ViewController.m
//  NSThreadApp
//
//  Created by Weerachai on 12/8/55 BE.
//  Copyright (c) 2555 Weerachai. All rights reserved.
//

#import "ViewController.h"

@interface ViewController ()
{
    int positionX;
}

@end

@implementation ViewController

- (void)viewDidLoad
{
    [super viewDidLoad];
	// Do any additional setup after loading the view, typically from a nib.
}

- (IBAction)btnCreateThread:(id)sender {

    if(positionX == 0)
        positionX = 80;
    else
        positionX = positionX + 20;

    UIProgressView *progress = [[UIProgressView alloc] initWithFrame:CGRectMake(10,positionX,300,30)];
    [[self view] addSubview:progress];
    [progress release];

    [NSThread detachNewThreadSelector:@selector(CrateThread:) toTarget:self withObject:progress];
    //[NSThread sleepForTimeInterval:5];

}

- (void) CrateThread:(UIProgressView *) progress
{

        [progress setProgress:0.0];

        while(progress.progress < 1.0)
        {
            //NSLog(@"%.2f",progress.progress);
            dispatch_async(dispatch_get_main_queue(), ^{
                progress.progress = progress.progress + 0.01;
            });
            sleep(1);
        }

}

- (void)didReceiveMemoryWarning
{
    [super didReceiveMemoryWarning];
    // Dispose of any resources that can be recreated.
}


@end
Screenshot
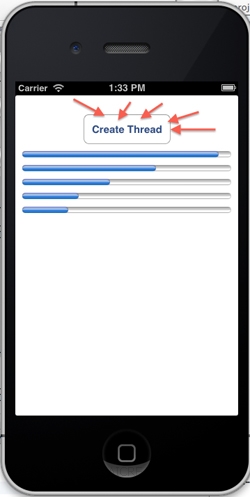
เมื่อคลิกที่ Create Thread ในการทำงานจะมีการสร้าง Progress View ขึ้นมา 1 ตัว และแต่ล่ะ Thread มีการสั่งให้ Update สถานะของตัวเองจนถึง 1.0
.
|
 ช่วยกันสนับสนุนรักษาเว็บไซต์ความรู้แห่งนี้ไว้ด้วยการสนับสนุน Source Code 2.0 ของทีมงานไทยครีเอท ช่วยกันสนับสนุนรักษาเว็บไซต์ความรู้แห่งนี้ไว้ด้วยการสนับสนุน Source Code 2.0 ของทีมงานไทยครีเอท
|
|
| |
By : |
ThaiCreate.Com Team (บทความเป็นลิขสิทธิ์ของเว็บไทยครีเอทห้ามนำเผยแพร่ ณ เว็บไซต์อื่น ๆ) |
| |
Score Rating : |
   |
|
| |
Create/Update Date : |
2012-12-13 09:20:16 /
2017-03-26 09:00:12 |
| |
Download : |

|
|
|
Sponsored Links / Related |
|
|
|
|
|
|

|