Objective-C and Class Object (OOP) การเรียกใช้งาน Class (iOS,iPhone,iPad) |
Objective-C and Class Object (OOP) การเรียกใช้งาน Class (iOS,iPhone,iPad) ในภาษา Objective-C สิ่งที่เราได้พบเห็นแรก ๆ ก็คือมี Syntax ที่ค่อนข้างจะแปลกกว่าภาษาอื่น ๆ ที่เราเคยคุ้นเคย เนื่องจาก Objective-C เป็น Object ค่อนข้างสมบูรณ์ การเขียนรูปแบบและคำสั่งต่าง ๆ ก็เป็นในรูปแบบของ Object เกือบทั้งหมด เช่นใน .NET สามารถอ้างอิง Property หรือ Method ของ Object ได้เช่น Object.Property (เช่น Textbox.text) แต่ในภาษา Objective-C เราจะใช้ [Textbox text] ซึ่งถ้าเราเคยเขียนพวก Java หรือ .NET มาก่อนแล้วนั้นอาจจะต้องใช้การปรับตัวเล็กน้อย เพื่อให้คุ้นเคยกับ Syntax ของ Objective-C และบทความนี้ซึ่งเป็นเบื้องต้นเกี่ยวกับ Objective-C ซึ่งผมเข้าใจว่าจะเป็นการยากที่จะอธิบายให้เข้าใจได้ จึงได้ยกตัวอย่าง Class ของ .NET มาเปรียบเทียบกับ Class ในภาษาของ Objective-C เพื่อความเข้าใจง่ายขึ้น และคิดว่าถ้าเราเข้าใจมันแล้ว มันจะกลายเป็นเรื่องง่าย ๆ ของเราได้ในไม่ช้า
โดยจะทำการทดสอบสร้าง Class ด้วยภาษา .NET Framework ที่เป็น C# และ VB.NET มาเปรียบเทียบเพื่อความเข้าใจ ส่วน Java นั้นสามารถดูของ C# และเข้าใจได้เช่นเดียวกัน
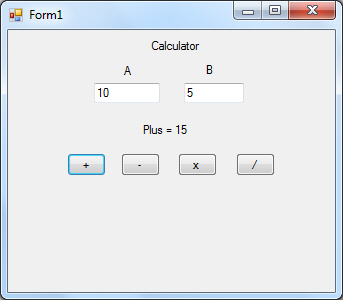
ในตัวอย่างจะสร้าง Application ขึ้นมาดังรูป โดยรับค่า Input 2 ช่องคือ InputA และ InputB โดบมีปุ่ม บวก(btnPlus) , ลบ(btnMinus), คูณ(btnMultiply) และ หาร(btnDivide)
และมีสร้าง Class ชื่อว่า Calculate มี Method สำหรับการคำนวณค่าต่าง ๆ ดังนี้
สำหรับภาษา C# หรือ Java
Calculate.cs (C#) เป็น Form สำหรับสร้าง Class หรือ Object ซึ่งมีรูปแบบง่าย ๆ
    class Calculate
    {
        private int _numberA;
        private int _numberB;

        public void setNumberA(int valueA)
        {
            _numberA = valueA;
        }
        public void setNumberB(int valueB)
        {
            _numberB = valueB;
        }

        public int getCalPlus()
        {
            return (int)_numberA + (int)_numberB;
        }
        public int getCalMinus()
        {
            return _numberA - _numberB;
        }
        public int getCalMultiply()
        {
            return _numberA * _numberB;
        }
        public int getCalDivide()
        {
            return _numberA / _numberB;
        }
    }
Form.cs (C#) เป็น Form สำหรับเรียกใช้งาน Class
    public partial class Form1 : Form
    {
        public Form1()
        {
            InitializeComponent();
        }

        private void btnPlus_Click(object sender, EventArgs e)
        {
            Calculate cal;
            cal = new Calculate();

            cal.setNumberA(Convert.ToInt32(inputA.Text));
            cal.setNumberB(Convert.ToInt32(inputB.Text));

            int value = cal.getCalPlus();

            String text = "Plus = " + value;

            lblResponse.Text = text;

            cal = null;
        }

        private void btnMinus_Click(object sender, EventArgs e)
        {
            Calculate cal = null;
            cal = new Calculate();

            cal.setNumberA(Convert.ToInt32(inputA.Text));
            cal.setNumberB(Convert.ToInt32(inputB.Text));

            int value = cal.getCalMinus();

            String text = "Minus = " + value;

            lblResponse.Text = text;

            cal = null;
        }

        private void btnMultiply_Click(object sender, EventArgs e)
        {
            Calculate cal = new Calculate();

            int a = Convert.ToInt32(inputA.Text);
            int b = Convert.ToInt32(inputB.Text);

            cal.setNumberA(a);
            cal.setNumberB(b);

            int value = cal.getCalMultiply();

            String text = "Multiply (" + a + " x " + b + ") = " + value;

            lblResponse.Text = text;

            cal = null;
        }

        private void btnDivide_Click(object sender, EventArgs e)
        {
            Calculate cal = new Calculate();

            cal.setNumberA(Convert.ToInt32(inputA.Text));
            cal.setNumberB(Convert.ToInt32(inputB.Text));

            int value = cal.getCalDivide();

            String text = "Divide (" + inputA.Text + " / " + inputB.Text + ") = " + value;

            lblResponse.Text = text;

            cal = null;
        }

    }
สำหรับภาษา VB.NET
Calculate.vb (VB.NET) เป็น Form สำหรับสร้าง Class หรือ Object ซึ่งมีรูปแบบง่าย ๆ
Class Calculate
    Private _numberA As Integer
    Private _numberB As Integer

    Public Sub setNumberA(ByVal valueA As Integer)
        _numberA = valueA
    End Sub
    Public Sub setNumberB(ByVal valueB As Integer)
        _numberB = valueB
    End Sub

    Public Function getCalPlus() As Integer
        Return _numberA + _numberB
    End Function
    Public Function getCalMinus() As Integer
        Return _numberA - _numberB
    End Function
    Public Function getCalMultiply() As Integer
        Return _numberA * _numberB
    End Function
    Public Function getCalDivide() As Integer
        Return _numberA / _numberB
    End Function
End Class
Form.vb (VB.NET) เป็น Form สำหรับเรียกใช้งาน Class
Public Class Form1

    Private Sub btnPlus_Click(ByVal sender As System.Object, ByVal e As System.EventArgs) Handles btnPlus.Click
        Dim cal As Calculate
        cal = New Calculate()

        cal.setNumberA(Convert.ToInt32(inputA.Text))
        cal.setNumberB(Convert.ToInt32(inputB.Text))

        Dim value As Integer = cal.getCalPlus()

        Dim text As [String] = "Plus = " & value

        lblResponse.Text = text

        cal = Nothing
    End Sub

    Private Sub btnMinus_Click(ByVal sender As System.Object, ByVal e As System.EventArgs) Handles btnMinus.Click
        Dim cal As Calculate = Nothing
        cal = New Calculate()

        cal.setNumberA(Convert.ToInt32(inputA.Text))
        cal.setNumberB(Convert.ToInt32(inputB.Text))

        Dim value As Integer = cal.getCalMinus()

        Dim text As [String] = "Minus = " & value

        lblResponse.Text = text

        cal = Nothing
    End Sub

    Private Sub btnMultiply_Click(ByVal sender As System.Object, ByVal e As System.EventArgs) Handles btnMultiply.Click
        Dim cal As New Calculate()

        Dim a As Integer = Convert.ToInt32(inputA.Text)
        Dim b As Integer = Convert.ToInt32(inputB.Text)

        cal.setNumberA(a)
        cal.setNumberB(b)

        Dim value As Integer = cal.getCalMultiply()

        Dim text As [String] = "Multiply (" & a & " x " & b & ") = " & value

        lblResponse.Text = text

        cal = Nothing
    End Sub

    Private Sub btnDivide_Click(ByVal sender As System.Object, ByVal e As System.EventArgs) Handles btnDivide.Click
        Dim cal As New Calculate()

        cal.setNumberA(Convert.ToInt32(inputA.Text))
        cal.setNumberB(Convert.ToInt32(inputB.Text))

        Dim value As Integer = cal.getCalDivide()

        Dim text As [String] = ("Divide (" + inputA.Text & " / ") + inputB.Text & ") = " & value

        lblResponse.Text = text

        cal = Nothing
    End Sub
End Class
สำหรับตัวอย่างทั้ง 2 ภาษาที่เป็น VB.NET ผมจะอธิบายคร่าว ๆ ก็คือ
- Class ชื่อว่า Calculate
- มี Property อยู่ 2 ตัวแปรคือ _numberA และ _numberB
- มี Method หรือ Function สำหรับ Set ค่าอยู่ 2 ตัวคือ setNumberA และ setNumberB
- มี Method หรือ Function สำหรับคำนวณและ get ค่า อยู่ 4 ตัว getCalPlus, getCalMinus, getCalMultiply และ getCalDivide
ซึ่งการทำงานของ Button แคต่ล่ะตัวก็ไม่มีอะไรซับซ้อน แค่ทำการส่งค่า Property และเรียกใช้งาน Method ต่าง ๆ ตามที่กำหนด
และเราจะแปลงทั้งหมดนี้มาเป็น Class ทีเป็น OOP ในภาษา Objective-C
เริ่มต้นด้วยการออกแบบหน้าจอ User Interface ดังรูป
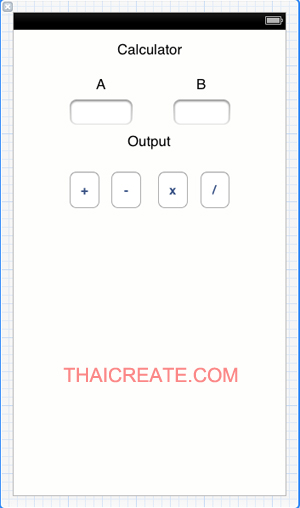
สำหรับการสร้าง IBOutlet กับ IBAction สามารถสร้างดูตัวอย่างได้ที่บทความนี้
ในไฟล์ ViewController.h
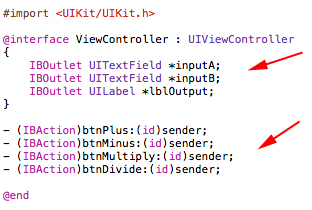
หลังจากสร้าง IBOutlet กับ IBAction ในไฟล์ ViewController.h เราจะได้คำสั่งดังรูป
#import <UIKit/UIKit.h>

@interface ViewController : UIViewController
{
    IBOutlet UITextField *inputA;
    IBOutlet UITextField *inputB;
    IBOutlet UILabel *lblOutput;
}

- (IBAction)btnPlus:(id)sender;
- (IBAction)btnMinus:(id)sender;
- (IBAction)btnMultiply:(id)sender;
- (IBAction)btnDivide:(id)sender;

@end
และในไฟล์ ViewController.m
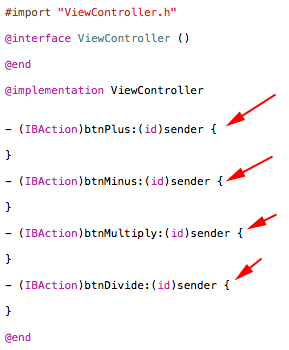
หลังจากสร้าง IBOutlet กับ IBAction ในไฟล์ ViewController.m เราจะได้คำสั่งดังรูป
#import "ViewController.h"

@interface ViewController ()

@end

@implementation ViewController


- (IBAction)btnPlus:(id)sender {

}

- (IBAction)btnMinus:(id)sender {

}

- (IBAction)btnMultiply:(id)sender {

}

- (IBAction)btnDivide:(id)sender {

}

@end
ขั้นตอนถัดไป เราจะสร้าง Class ขึ้นมา 1 ตัว
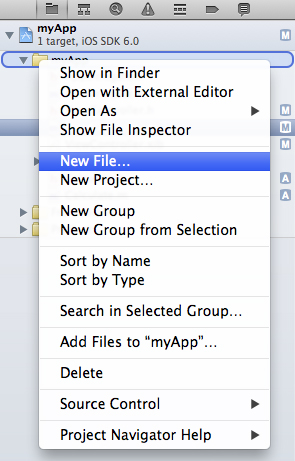
คลิกขวาที่ Project เลือก New File...
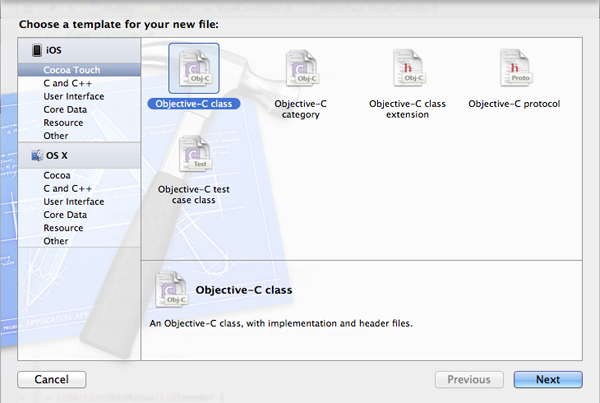
ภายใต้ Cocoa Touch เลือก Objective-C class
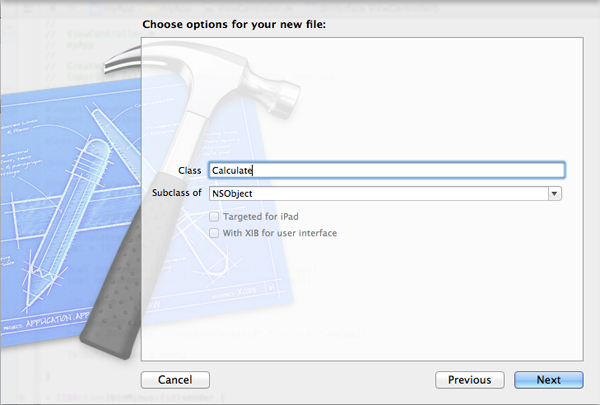
ตั้งชื่อ Class ว่า Calculate และเลือก Subclass of แบบ NSObject
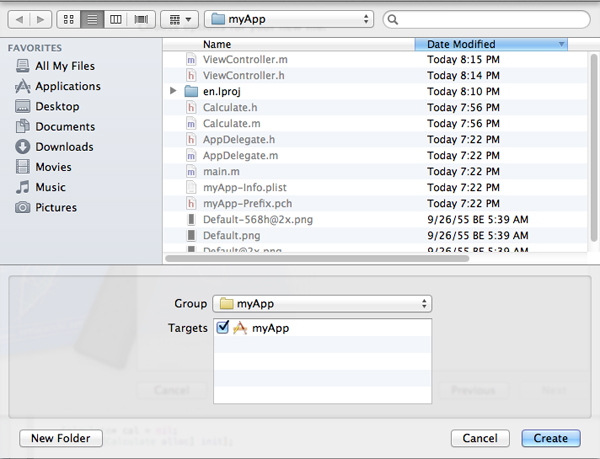
กำหนด Group ในที่นี้ให้เลือกภายใต้ App ของเรา และให้เลือก Create ตามลำดับ
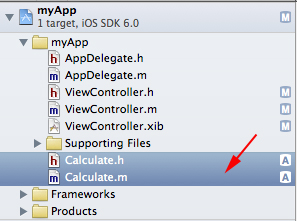
หลังจากนั้นเราจะพบกับไฟล์ Calculate.h และ Calculate.m
Calculate.h

ในตอนนี้ไฟล์ Calculate.h ยังเป็นไฟล์ที่ว่างปล่าว มีแต่ที่เป็นค่า Default ให้มา ซึ่งจะเป็นการ import ตัว Foundation Framework เข้ามา
Calculate.m
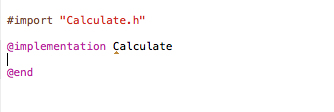
ไฟล์ Calculate.m เช่นเดียวกัน ยังไม่มีคำสั่งใด ๆ ทั้งสิ้น
จากนั้นให้เขียน Code ทั้งหมดดังนี้ (ส่วนคำอธิบายจะอธิบายส่วนท้ายของบทความ)
- ไฟล์ Class ของ Calculate
Calculate.h
#import <Foundation/Foundation.h>

@interface Calculate : NSObject
{
    int _numberA;
    int _numberB;
}
-(void) setNumberA:(int) valueB;
-(void) setNumberB:(int) valueA;

-(int)  getCalPlus;
-(int)  getCalMinus;
-(int)  getCalMultiply;
-(int)  getCalDivide;

@end
Calculate.m
#import "Calculate.h"

@implementation Calculate

-(void) setNumberA:(int)valueA
{
    _numberA = valueA;
}
-(void) setNumberB:(int)valueB
{
    _numberB = valueB;
}


-(int) getCalPlus
{
    return _numberA + _numberB;
}
-(int) getCalMinus
{
    return _numberA - _numberB;
}
-(int) getCalMultiply
{
    return _numberA * _numberB;
}
-(int) getCalDivide
{
    return _numberA / _numberB;
}

@end
- ไฟล์สำหรับเรียกใช้งาน Class ของ Calculate
ViewController.h
#import <UIKit/UIKit.h>

@interface ViewController : UIViewController
{
    IBOutlet UITextField *inputA;
    IBOutlet UITextField *inputB;
    IBOutlet UILabel *lblOutput;
}

- (IBAction)btnPlus:(id)sender;
- (IBAction)btnMinus:(id)sender;
- (IBAction)btnMultiply:(id)sender;
- (IBAction)btnDivide:(id)sender;

@end
ViewController.m
#import "ViewController.h"
#import "Calculate.h"

@interface ViewController ()

@end

@implementation ViewController


- (IBAction)btnPlus:(id)sender {

    Calculate* cal;
    cal = [[Calculate alloc] init];

    [cal setNumberA:(int)[[inputA text] intValue]];
    [cal setNumberB:(int)[inputB.text intValue]];

    int value = [cal getCalPlus];

    NSMutableString *text;
    text = [NSString stringWithFormat:@" Plus = %i",value];

    lblOutput.text = text;

    cal = NULL;

}

- (IBAction)btnMinus:(id)sender {

    Calculate* cal = nil;
    cal = [[Calculate alloc] init];

    [cal setNumberA:(int)[[inputA text] intValue]];
    [cal setNumberB:(int)[inputB.text intValue]];

    int value = [cal getCalMinus];

    NSMutableString *text;
    text = [NSString stringWithFormat:@" Minus = %i",value];

    lblOutput.text = text;

    cal = NULL;

}

- (IBAction)btnMultiply:(id)sender {

    Calculate* cal = [[Calculate alloc] init];

    int a = (int)[[inputA text] intValue];
    int b = (int)[inputB.text intValue];

    [cal setNumberA:a];
    [cal setNumberB:b];

    int value = [cal getCalMultiply];

    NSMutableString *text;
    text = [NSString stringWithFormat:@" Multiply (%i x %i ) = %i",a,b,value];

    lblOutput.text = text;

    cal = NULL;

}

- (IBAction)btnDivide:(id)sender {

    Calculate* cal = [[Calculate alloc] init];

    [cal setNumberA:(int)[[inputA text] intValue]];
    [cal setNumberB:(int)[inputB.text intValue]];

    int value = [cal getCalDivide];

    NSMutableString *text;
    text = [NSString stringWithFormat:@" Divide (%i / %i) = %i",
            (int)[[inputA text] intValue],
            (int)[inputB.text intValue],
            value];

    lblOutput.text = text;

    cal = NULL;

}

@end
Screenshot ทดสอบการทำงาน
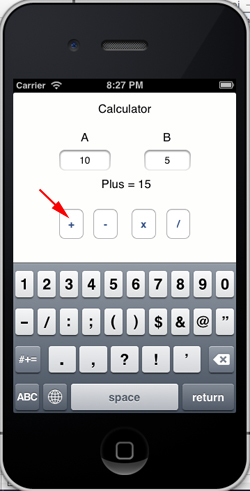
เมื่อคลิกที่ปุ่มบวก หรือ btnPlus
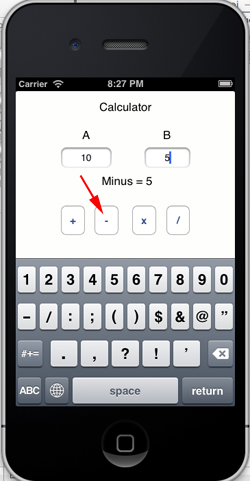
เมื่อคลิกที่ปุ่มลบ หรือ btnMinus
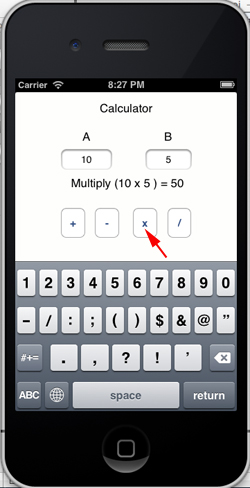
เมื่อคลิกที่ปุ่มคูณ หรือ btnMultiply
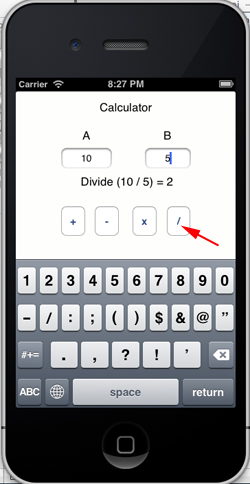
เมื่อคลิกที่ปุ่มหาร หรือ btnDivide
คำอธิบายเกี่ยวกับ Class ใน Objective-C จากตัวอย่างการสร้าง Class ชื่อว่า Calculate จะอธิบายคร่าว ๆ ดังนี้
- Calculate.h และ Calculate.m
Calculate.h
#import <Foundation/Foundation.h>

@interface Calculate : NSObject
{
    int _numberA;
    int _numberB;
}
-(void) setNumberA:(int) valueB;
-(void) setNumberB:(int) valueA;

-(int)  getCalPlus;
-(int)  getCalMinus;
-(int)  getCalMultiply;
-(int)  getCalDivide;

@end
คำอธิบาย
@interface Calculate : NSObject
{
    int _numberA;
    int _numberB;
}
// ในการประกาศ Class จะเริ่มต้วยด้วย @interface ตามด้วยชื่อ Class และ NSObject นี้เป็น parent Class
ชื่อว่า NSObject ซึ่งเป็น Object พื้นฐานทั่ว ๆ ไป ( Class ที่สร้างขึ้นมีคุณสมบัติพื้นฐานเดียวกับ NSObject)
ส่วน _numberA และ _numberB เป็น Property หรือตัวแปรในคลาสนี้

-(void) setNumberA:(int) valueB;
-(void) setNumberB:(int) valueA;
// เป็น Method หรือ Function สำหรับ Set ค่า ที่มี Argument อย่างล่ะ 1 ตัว
เป็นชนิด int ถ้าดูไม่เข้าใจลองดูตัวอย่าง VB.NET และ C#

-(int)  getCalPlus;
-(int)  getCalMinus;
-(int)  getCalMultiply;
-(int)  getCalDivide;
// เป็น Method หรือ Function สำหรับ Get ค่าต่าง ๆ
Calculate.m
#import "Calculate.h"

@implementation Calculate

-(void) setNumberA:(int)valueA
{
    _numberA = valueA;
}
-(void) setNumberB:(int)valueB
{
    _numberB = valueB;
}


-(int) getCalPlus
{
    return _numberA + _numberB;
}
-(int) getCalMinus
{
    return _numberA - _numberB;
}
-(int) getCalMultiply
{
    return _numberA * _numberB;
}
-(int) getCalDivide
{
    return _numberA / _numberB;
}

@end
คำอธิบาย
-(void) setNumberA:(int)valueA
{
    _numberA = valueA;
}
-(void) setNumberB:(int)valueB
{
    _numberB = valueB;
}

// เป็น Method หรือ Function สำหรับ Set ค่า เมื่อมีการเรียก Method พร้อมกับโยนค่า Argument
ก็จะทำการ Set ค่า ให้ตัวแปร _numberA  และ _numberB ที่อยู่ใน .h (header)

-(int) getCalPlus
{
    return _numberA + _numberB;
}
-(int) getCalMinus
{
    return _numberA - _numberB;
}
-(int) getCalMultiply
{
    return _numberA * _numberB;
}
-(int) getCalDivide
{
    return _numberA / _numberB;
}
// เป็น Method ที่ใช้สำหรับการ คำนวณค่าตามต้องการ โดยจะทำการ Return ค่า int กลับไป
จากคำอธิบายจะเห็นว่าการสร้าง Class ด้วย Objective-C นั้นไม่มีอะไรซับซ้อนและยากอย่างที่คิดไว้ในตอนแรก เพียงแต่เราจะต้องปรับทำความเข้าใจกับรูปแบบ Syntax ของ Object ในภาษา Objective-C มันจะทำให้เราเริ่มเข้าใจรูปแบบการเขียน และการใช้งานได้ไม่ยาก
การเรียกใช้งาน Class
ViewController.m
#import "ViewController.h"
#import "Calculate.h"

@interface ViewController ()

@end

@implementation ViewController


- (IBAction)btnPlus:(id)sender {

    Calculate* cal;
    cal = [[Calculate alloc] init];

    [cal setNumberA:(int)[[inputA text] intValue]];
    [cal setNumberB:(int)[inputB.text intValue]];

    int value = [cal getCalPlus];

    NSMutableString *text;
    text = [NSString stringWithFormat:@" Plus = %i",value];

    lblOutput.text = text;

    cal = NULL;

}
จะยกตัวอย่างเพียงการเรียกใช้งาน Method เดียว ส่วนอื่น ๆ สามารถดูและเข้าใจได้โดยไม่ยาก
คำอธิบาย
#import "Calculate.h" // ขั้นแรกจะต้อง Import Class ขึ้นมาก่อน


// การเรียกใช้งาน Class จะเริ่มด้วยด้วย

Calculate* cal; // เรียกใช้งาน Class

cal = [[Calculate alloc] init]; // เป็นการสั่งให้ Calculate  alloc เตรียมความพร้อมสำหรับการใช้งาน

[cal setNumberA:(int)[[inputA text] intValue]]; // เรียกใช้ setNumberA พร้อมกับส่ง Argument
[cal setNumberB:(int)[inputB.text intValue]]; //  เรียกใช้ setNumberB พร้อมกับส่ง Argument

int value = [cal getCalPlus]; // ทำการ Get ค่าที่ได้จาก Method และเก็บไว้ที่ตัวแปร value

NSMutableString *text;
text = [NSString stringWithFormat:@" Plus = %i",value];

lblOutput.text = text; // แสดงค่าใน Label
|
 ช่วยกันสนับสนุนรักษาเว็บไซต์ความรู้แห่งนี้ไว้ด้วยการสนับสนุน Source Code 2.0 ของทีมงานไทยครีเอท ช่วยกันสนับสนุนรักษาเว็บไซต์ความรู้แห่งนี้ไว้ด้วยการสนับสนุน Source Code 2.0 ของทีมงานไทยครีเอท
|
|
| |
By : |
ThaiCreate.Com Team (บทความเป็นลิขสิทธิ์ของเว็บไทยครีเอทห้ามนำเผยแพร่ ณ เว็บไซต์อื่น ๆ) |
| |
Score Rating : |
   |
|
| |
Create/Update Date : |
2012-10-21 06:33:36 /
2017-03-25 22:48:43 |
| |
Download : |

|
|
|
Sponsored Links / Related |
|
|
|
|
|
|

|