Windows Phone 8 and Isolated Storage (Settings , Files and folders) |
Windows Phone 8 and Isolated Storage (Settings , Files and folders) ในการเขียนโปรแกรมบน Windows Phone 8 เพื่อติดต่อกับ Data Storage ที่อยู่ใน Isolated Storage ซึ่งเป็น Storage ที่ถูกสร้างขึ้นสำหรับแต่ล่ะ Application เราสามารถเรียกใช้งานความสามารถในการจัดเก็บข้อมูลได้ 3 รูปแบบคือ Settings (เป็นเหมือนพวกค่าตัวแปร) , Files and folders (จัดเก็บพวกไฟล์ต่าง ๆ เช่น text , media) และ Relational data (จัดเก็บในรูปแบบ Database) โดยทั้ง 3 ประเภทนี้ค่อนข้างครบครันสำหรับการเขียนโปรแกรม และแต่ล่ะแบบหน้าที่ประประโยชน์การใช้งานแตกต่างกันไป
ในการเรียกใช้งาน Isolated Storage นั้นเราสามารถเรียกใช้งานมันได้ทันที โดยไม่จำเป็นจะต้องมีการเรียกใช้งาน Class หรือ Library อื่น ๆ ภายนอก และการใช้งานก็ค่อนข้างง่าย มีความปลอดภัยต่อข้อมูลที่จะถูกสร้างขึ้น และในบทความนี้จะยกตัวอย่างการใช้งานเกี่ยวกับ Settings และ Files and folders แบบง่าย ๆ พอที่จะเป็นตัวอย่างในการนำไปใช้
อ่านเพิ่มเติม : Windows Phone 8 and Isolated Storage Tools
Example 1 การใช้งาน Isolated Storage Settings เพื่อจัดเก็บค่าตัวแปร Settings
เรียกใช้งาน Class ของ IsolatedStorage
using System.IO.IsolatedStorage;
Syntax การสร้าง (Create) ตัวแปร Settings
    IsolatedStorageSettings settings = IsolatedStorageSettings.ApplicationSettings;
    if (!settings.Contains("userData"))
    {
        settings.Add("userData", txtInput.Text);
    }
    else
    {
        settings["userData"] = txtInput.Text;
    }
    settings.Save();
Syntax การอ่าน (Read) ตัวแปร Settings
    if (IsolatedStorageSettings.ApplicationSettings.Contains("userData"))
    {
        txtDisplay.Text =  IsolatedStorageSettings.ApplicationSettings["userData"] as string;
    }
Syntax การลบ (Remove) ตัวแปร Settings
    if (IsolatedStorageSettings.ApplicationSettings.Contains("userData"))
    {
        IsolatedStorageSettings.ApplicationSettings.Remove("userData");
    }
ตัวอย่าง
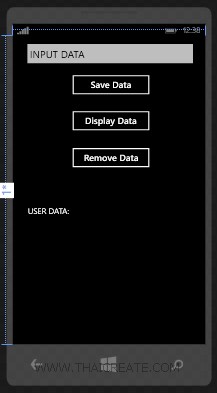
ออกแบบหน้าจอเพื่อทดสอบการจัดเก็บค่าตัวแปร Settings
MainPage.xaml
        <Grid x:Name="ContentPanel" Grid.Row="1" Margin="12,0,12,0">

            <TextBox Height="72" HorizontalAlignment="Left" Margin="12,6,0,0" Name="txtInput"
                Text="INPUT DATA" VerticalAlignment="Top" Width="438" />

            <Button Content="Save Data" Height="72" HorizontalAlignment="Left" Margin="125,84,0,0"
                Name="btnSave" VerticalAlignment="Top" Width="216" Click="btnSave_Click" />

            <Button Content="Display Data" Height="72" HorizontalAlignment="Left" Margin="125,174,0,0"
                Name="btnDisplay" VerticalAlignment="Top" Width="216" Click="btnDisplay_Click" />

            <Button Content="Remove Data" Height="72" HorizontalAlignment="Left" Margin="125,266,0,0"
                Name="btnRemove" VerticalAlignment="Top" Width="216" Click="btnRemove_Click" />

            <TextBlock Height="60" HorizontalAlignment="Left" Margin="25,422,0,0" Name="txtDisplay"
                Text="USER DATA:" VerticalAlignment="Top" Width="395" />
        </Grid>
MainPage.xaml.cs
using System.IO.IsolatedStorage;


namespace myPhoneApp
{

    public partial class MainPage : PhoneApplicationPage
    {
        // Constructor
        public MainPage()
        {
            InitializeComponent();
        }


        private void btnSave_Click(object sender, RoutedEventArgs e)
        {
            IsolatedStorageSettings settings = IsolatedStorageSettings.ApplicationSettings;
            // txtInput is a TextBox defined in XAML.
            if (!settings.Contains("userData"))
            {
                settings.Add("userData", txtInput.Text);
            }
            else
            {
                settings["userData"] = txtInput.Text;
            }
            settings.Save();
        }


        private void btnDisplay_Click(object sender, RoutedEventArgs e)
        {
            // txtDisplay is a TextBlock defined in XAML.
            txtDisplay.Text = "USER DATA: ";
            if (IsolatedStorageSettings.ApplicationSettings.Contains("userData"))
            {
                txtDisplay.Text +=
                IsolatedStorageSettings.ApplicationSettings["userData"] as string;
            }
        }

        private void btnRemove_Click(object sender, RoutedEventArgs e)
        {
            if (IsolatedStorageSettings.ApplicationSettings.Contains("userData"))
            {
                IsolatedStorageSettings.ApplicationSettings.Remove("userData");
            }
        }

    }
}
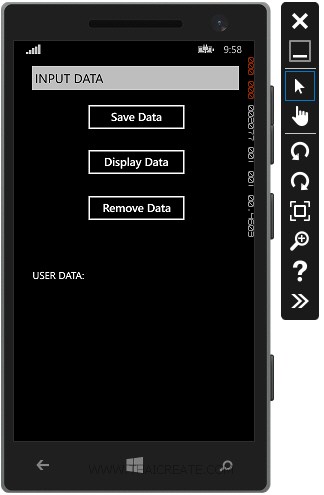
ทดสอบการทำงาน
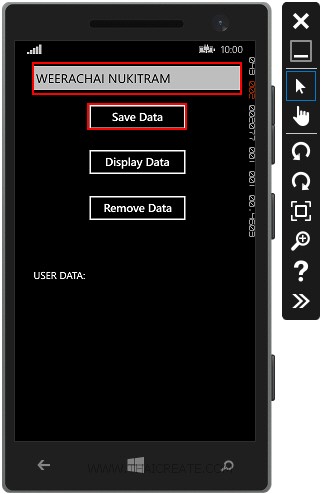
กรอกค่าลงใน Input และคลิกเลือก Save Data
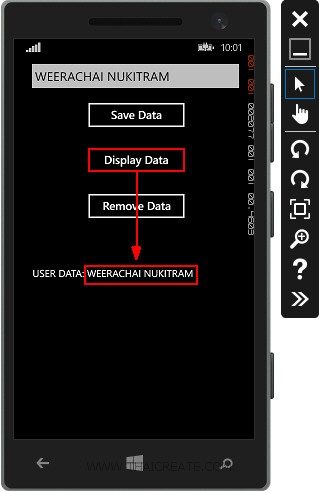
ทดสอบการ Display Data
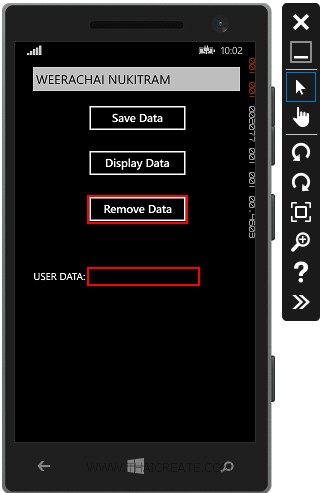
ทดสอบการ Remove Data
Example 2 การใช้งาน Isolated Storage เพื่อจัดเก็บ File และ Folder
เรียกใช้งาน Class ของ IsolatedStorage
using System.IO.IsolatedStorage;
Syntax การสร้าง (Create) ไฟล์และเขียนข้อมูลลงไฟล์ และจัดเก็บลงใน Isolated Storage
            private string strFileName = "thaicreate.txt";

            // Create Isolated StorageFile
            IsolatedStorageFile isoStore = IsolatedStorageFile.GetUserStoreForApplication();

            // Create File Name
            if (!isoStore.FileExists(strFileName))
            {
                IsolatedStorageFileStream dataFile = isoStore.CreateFile(strFileName);
            }

            // Write text file
            StreamWriter sw = new StreamWriter(new IsolatedStorageFileStream(strFileName, FileMode.Append, isoStore));
            sw.WriteLine(this.textBox1.Text);
            sw.Close();
Syntax การอ่าน (Read) ไฟล์ที่อยู่ใน Isolated Storage
            private string strFileName = "thaicreate.txt";

            // Create Isolated StorageFile
            IsolatedStorageFile isoStore = IsolatedStorageFile.GetUserStoreForApplication();

            // Read text file
            StreamReader reader = new StreamReader(new IsolatedStorageFileStream(strFileName, FileMode.Open, isoStore));
            string rawData = reader.ReadToEnd();
            reader.Close();
ตัวอย่าง
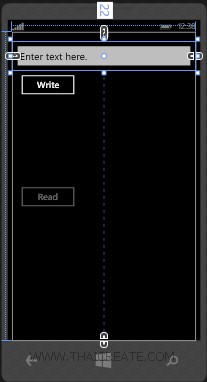
ออกแบบหน้าจอเพื่อทดสอบการรับค่าและเขียนลงใน Text file พร้อมกับการจัดเก็บลงใน Isolated Storage
MainPage.xaml
        <Grid x:Name="ContentPanel" Grid.Row="1" Margin="12,0">
            <TextBox
                Name="textBox1"
                HorizontalAlignment="Left"
                Height="72"
                Margin="0,22,0,0"
                TextWrapping="Wrap"
                Text="Enter text here."
                VerticalAlignment="Top" Width="456"/>
            <Button
                Name='btnWrite'
                Content="Write"
                HorizontalAlignment="Left"
                Margin="10,94,0,0"
                VerticalAlignment="Top"
                Width="156"
                Click="btnWrite_Click"/>
            <TextBlock
                Name="textBlock1"
                HorizontalAlignment="Left"
                Margin="10,293,0,0"
                TextWrapping="Wrap" Text=""
                VerticalAlignment="Top"
                Height="61"
                Width="436"/>
            <Button
                Name="btnRead"
                Content="Read"
                HorizontalAlignment="Left"
                Margin="10,374,0,0"
                VerticalAlignment="Top"
                Width="156"
                IsEnabled="False"
                Click="btnRead_Click"/>
        </Grid>
MainPage.xaml.cs
using System.IO;
using System.Threading.Tasks;
using System.IO.IsolatedStorage;


namespace myPhoneApp
{

    public partial class MainPage : PhoneApplicationPage
    {
        // Constructor
        public MainPage()
        {
            InitializeComponent();
        }

        private string strFileName = "thaicreate.txt";

        private void btnWrite_Click(object sender, RoutedEventArgs e)
        {
            WriteToFile();

            // Update UI.
            this.btnWrite.IsEnabled = false;
            this.btnRead.IsEnabled = true;
        }

        private void WriteToFile()
        {

            // Create Isolated StorageFile
            IsolatedStorageFile isoStore = IsolatedStorageFile.GetUserStoreForApplication();

            // Create File Name
            if (!isoStore.FileExists(strFileName))
            {
                IsolatedStorageFileStream dataFile = isoStore.CreateFile(strFileName);
            }

            // Write text file
            StreamWriter sw = new StreamWriter(new IsolatedStorageFileStream(strFileName, FileMode.Append, isoStore));
            sw.WriteLine(this.textBox1.Text);
            sw.Close();

        }


        private void btnRead_Click(object sender, RoutedEventArgs e)
        {
            ReadFile();

            // Update UI.
            this.btnWrite.IsEnabled = true;
            this.btnRead.IsEnabled = false;
        }

        private void ReadFile()
        {

            // Create Isolated StorageFile
            IsolatedStorageFile isoStore = IsolatedStorageFile.GetUserStoreForApplication();

            // Read text file
            StreamReader reader = new StreamReader(new IsolatedStorageFileStream(strFileName, FileMode.Open, isoStore));
            string rawData = reader.ReadToEnd();
            reader.Close();

            // Display text
            this.textBlock1.Text = rawData;
        }


    }
}
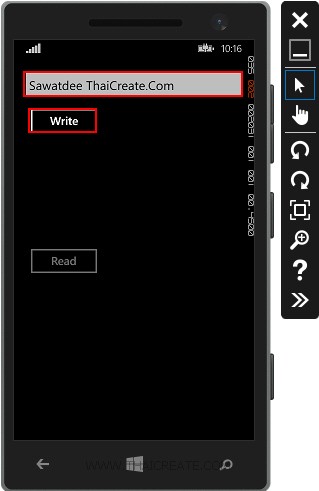
กรอกข้อมูล Input แล้วทดสอบการ Write ข้อมูล
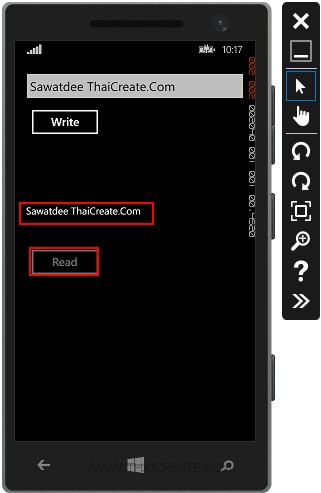
ทดสอบการอ่าน Read ข้อมูล
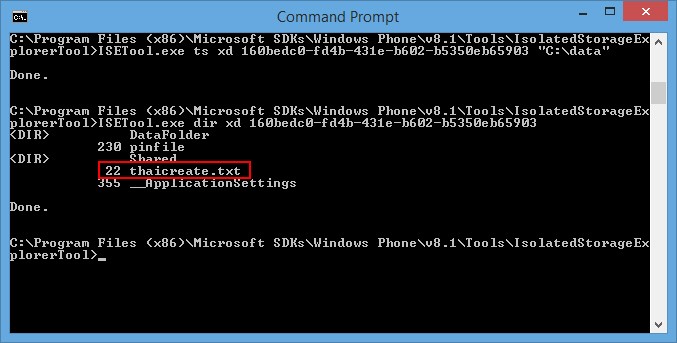
เมื่อใช้ Isolated Storage Tools เพื่อเข้าไปดูใน Isolated Storage จะเห็นไฟล์ที่ถูกสร้างขึ้น
อ่านเพิ่มเติม Isolated Storage
|
 ช่วยกันสนับสนุนรักษาเว็บไซต์ความรู้แห่งนี้ไว้ด้วยการสนับสนุน Source Code 2.0 ของทีมงานไทยครีเอท ช่วยกันสนับสนุนรักษาเว็บไซต์ความรู้แห่งนี้ไว้ด้วยการสนับสนุน Source Code 2.0 ของทีมงานไทยครีเอท
|
|
| |
By : |
ThaiCreate.Com Team (บทความเป็นลิขสิทธิ์ของเว็บไทยครีเอทห้ามนำเผยแพร่ ณ เว็บไซต์อื่น ๆ) |
| |
Score Rating : |
    |
|
| |
Create/Update Date : |
2014-07-27 19:03:00 /
2017-03-25 22:32:39 |
| |
Download : |
No files |
|
|
Sponsored Links / Related |
|
|
|
|
|
|

|