Orientations Landscape มุมมอง Layout ในแนวตั้งและแนวนอนบน Windows Phone |
Orientations Landscape มุมมอง Layout ในแนวตั้งและแนวนอนบน Windows Phone ในการออกแบบหน้าจอของ Windows Phone ให้รองรับในแนวนอนหรือ Orientations Landscape สามารถกำหนดค่าได้ง่าย ๆ จากส่วนของ XAML ภายใต้ phone:PhoneApplicationPage โดยกำหนดคุณสมบัติของ SupportedOrientations="PortraitOrLandscape" เพียงแค่นี้ก็สามารถแสดงผลข้อมูลได้ทั้งแนวตั้งและแนวนอน แต่เนื่องจากขนาดของหน้าจอในแนวตั้ง และแนวนอนจะมีความกว้างและความสูงไม่เท่ากัน ดังนั้นเมื่อมีการเปลี่ยนมุมมอง จะต้องมีการย้ายตำแหน่งของ Control บางตัวไปไว้ยังตำแน่งอื่น เพื่อให้การแสดงผลนั้นพอดี กับขนาดของหน้าจอที่แสดงผลอยู่ ซึ่งวิธีที่จะควบคุมตำแหน่งต่าง ๆ ก็สามารถใช้ Grid มากำหนดตำแหน่งต่าง ๆ เหล่านี้ได้ ลองดูตัวอย่างเพื่อความเข้าใจ
พื้นฐาน Grid และ Layout ควรอ่านจากบทความนี้ก่อน
Example 1 การใช้ PortraitOrLandscape เพื่อควบคุมมุมมองในแนวตั้งและแนวนอน
MainPage.xaml
<phone:PhoneApplicationPage
    x:Class="PhoneApp.MainPage"
    xmlns="http://schemas.microsoft.com/winfx/2006/xaml/presentation"
    xmlns:x="http://schemas.microsoft.com/winfx/2006/xaml"
    xmlns:phone="clr-namespace:Microsoft.Phone.Controls;assembly=Microsoft.Phone"
    xmlns:shell="clr-namespace:Microsoft.Phone.Shell;assembly=Microsoft.Phone"
    xmlns:d="http://schemas.microsoft.com/expression/blend/2008"
    xmlns:mc="http://schemas.openxmlformats.org/markup-compatibility/2006"
    mc:Ignorable="d" d:DesignWidth="480" d:DesignHeight="768"
    FontFamily="{StaticResource PhoneFontFamilyNormal}"
    FontSize="{StaticResource PhoneFontSizeNormal}"
    Foreground="{StaticResource PhoneForegroundBrush}"
    SupportedOrientations="PortraitOrLandscape" Orientation="Portrait"
    shell:SystemTray.IsVisible="True">

    <ScrollViewer x:Name="ContentGrid" Grid.Row="1" VerticalScrollBarVisibility="Auto">
        <!--You must apply a background to the StackPanel control or you will be unable to pan the contents.-->
        <StackPanel Background="Transparent" >
            <!--Adding various controls and UI elements.-->
            <Button Content="This is a Button" />
            <Rectangle Width="100" Height="100" Margin="12,0" HorizontalAlignment="Left" Fill="{StaticResource PhoneAccentBrush}"/>
            <Rectangle Width="100" Height="100" HorizontalAlignment="Center" Fill="{StaticResource PhoneAccentBrush}"/>
            <Rectangle Width="100" Height="100" Margin="12,0" HorizontalAlignment="Right" Fill="{StaticResource PhoneAccentBrush}"/>
            <TextBlock Text="This is a line of text sample that will wrap in portrait mode but not landscape." TextWrapping="Wrap"  />
            <CheckBox Content="A CheckBox" />
            <RadioButton Content="A RadioButton" />
        </StackPanel>
    </ScrollViewer>

</phone:PhoneApplicationPage>
คำอธิบาย
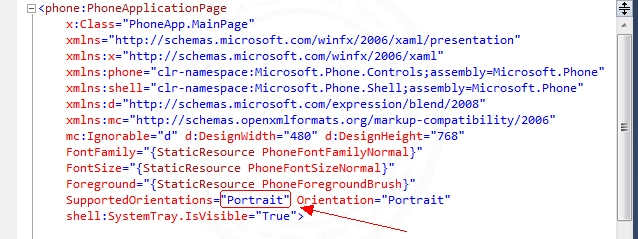
เปลี่ยนจาก SupportedOrientations="Portrait" เป็น SupportedOrientations="PortraitOrLandscape"

ScrollViewer// เมื่อข้อมูลมีขนาดความกว้างหรือสูงมากกว่าหน้าจอปัจจุบัน จะสามารถเลื่อนขึ้นลงซ้ายขวาด้วย Scrollbar
StackPanel// ใช้ในการ Group หรือครอบคลุม Control อื่น ๆ ให้อยู่ภายใต้ StackPanel ที่สร้างขึ้น
แสดงผล Design แบบ UI บน Tools ของ Visal Studio
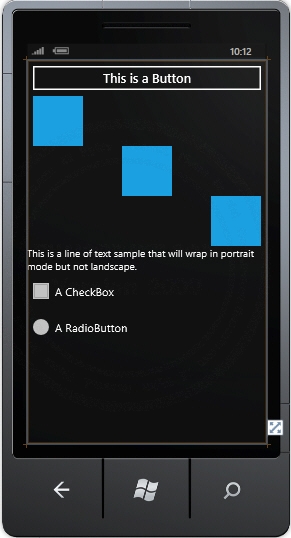
Screenshot แสดงผลบน Emulator
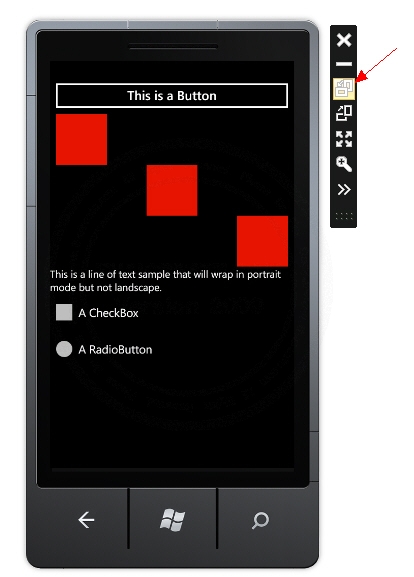
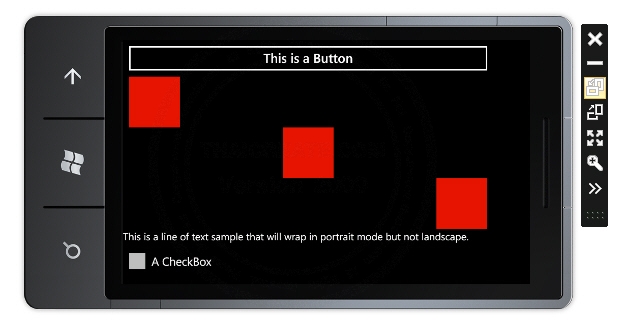
แสดงผลบน Emulator สามารถคลิกเพื่อดูมุมมองในแนวนอน
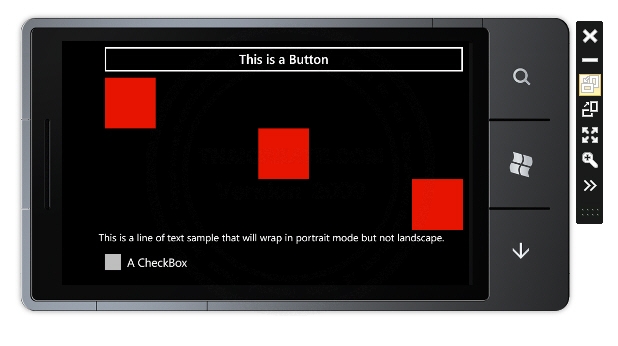
แสดงผลในแนวนอน
แสดงผลในแนวนอน กลับอีกด้าน
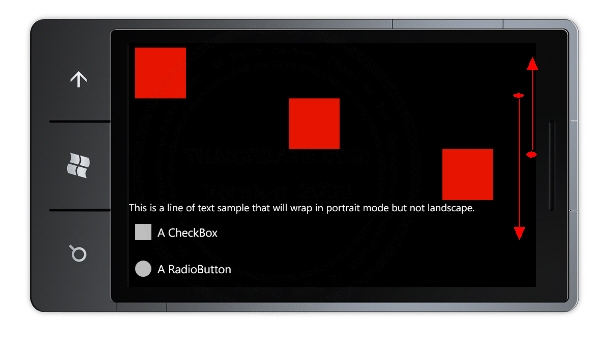
สามารถเลื่อน Scroll ขึ้นลงได้
จากตัวอย่างและภาพประกอบจะเห็นว่าแค่กำหนด SupportedOrientations="PortraitOrLandscape" ก็จะสามารถแสดงผลหน้าจอได้ตั้งแนวตั้งและแนวนอน โดยการแสดงผลของโปรแกรมจะแสดงผลได้อย่างถูกต้อง
Example 2 การใช้ Grid และการกำหนด Row และ Column เมื่อแสดงผลบนโหมดแนวนอน Orientations Landscape
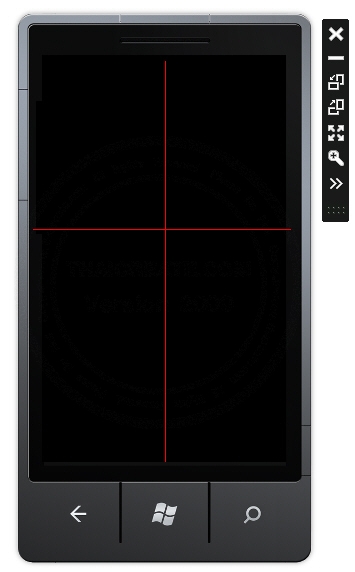
ออกแบบ Grid ในรูปแบบ 2 x2 (2 Row และ 2 Column)
MainPage.xaml
<phone:PhoneApplicationPage
    x:Class="PhoneApp.MainPage"
    xmlns="http://schemas.microsoft.com/winfx/2006/xaml/presentation"
    xmlns:x="http://schemas.microsoft.com/winfx/2006/xaml"
    xmlns:phone="clr-namespace:Microsoft.Phone.Controls;assembly=Microsoft.Phone"
    xmlns:shell="clr-namespace:Microsoft.Phone.Shell;assembly=Microsoft.Phone"
    xmlns:d="http://schemas.microsoft.com/expression/blend/2008"
    xmlns:mc="http://schemas.openxmlformats.org/markup-compatibility/2006"
    mc:Ignorable="d" d:DesignWidth="480" d:DesignHeight="768"
    FontFamily="{StaticResource PhoneFontFamilyNormal}"
    FontSize="{StaticResource PhoneFontSizeNormal}"
    Foreground="{StaticResource PhoneForegroundBrush}"
    SupportedOrientations="PortraitOrLandscape " Orientation="Portrait"
    shell:SystemTray.IsVisible="True"
    OrientationChanged="PhoneApplicationPage_OrientationChanged" >

    <!--LayoutRoot is the root grid where all page content is placed-->
    <Grid x:Name="LayoutRoot" Background="Transparent" ShowGridLines="True">

        <!--Create a 2 x 2 grid to store an title image and button layout.-->
        <Grid.RowDefinitions>
            <RowDefinition Height="Auto"/>
            <RowDefinition Height="*"/>
        </Grid.RowDefinitions>

        <Grid.ColumnDefinitions>
            <ColumnDefinition Width="Auto"/>
            <ColumnDefinition Width="*"/>
        </Grid.ColumnDefinitions>

        <!--Add an image to the grid. Ensure that the image height and width are set to 300 and 500, respectively, for this example.-->
        <Image x:Name="Image1" Grid.Row="0" Grid.Column="0" Stretch="Fill" HorizontalAlignment="Center" VerticalAlignment="Top" Source="TestImage.jpg" Height="300" Width="500"/>


        <!--Add a StackPanel with buttons to the row beneath the image.-->
        <StackPanel x:Name="buttonList" Grid.Row="1" Grid.Column="0" HorizontalAlignment="Center" >
            <Button Content="Action 1" />
            <Button Content="Action 2" />
            <Button Content="Action 3" />
            <Button Content="Action 4" />
        </StackPanel>
    </Grid>

</phone:PhoneApplicationPage>
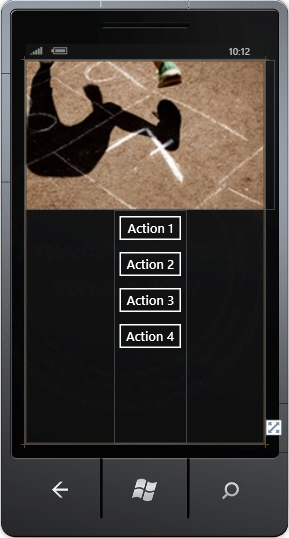
มุมมองบน Design
คำอธิบาย
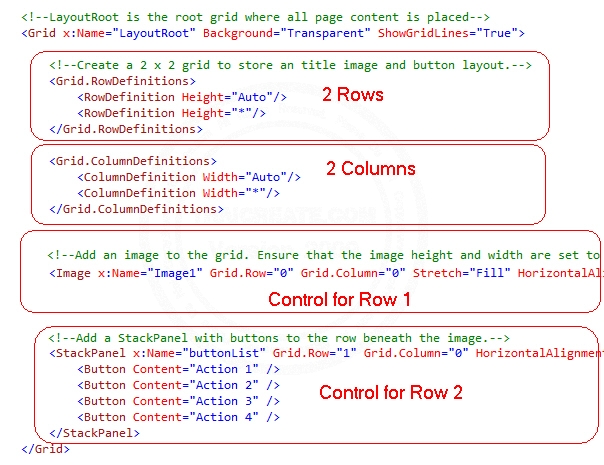
Grid จะถุกแบ่งเป็น 2 Rows และ 2 Column และวาง Control ในตำแหน่งต่าง ๆ ของ Grid ซึ่งจะได้ผลลัพธ์เหมือนในภาพ Screenshot
จากภาพจะเห็นว่า Column ที่สองจะไม่ถูกแสดงผล เพราะกำหนด ColumnDefinition Width="*" ซึ่ง * จะหมายถึงในกรณีที่ไม่มี Control จะไม่แสดง Column นั้น ๆ
หลังจากออกแบบหน้า Design บน XAML เรียบร้อยแล้ว สิ่งที่ขาดไม่ได้คือการสร้าง Event เมื่อมีการเปลี่ยนมุมมองในรูปแบบของแนวนอน
OrientationChanged="PhoneApplicationPage_OrientationChanged"
สร้าง Event เมื่อมีการเปลี่ยนมุมมองเป็นแนวนอน
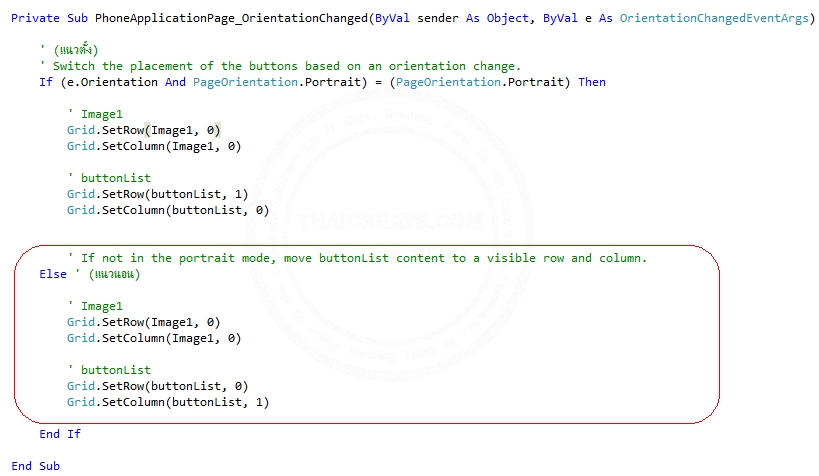
จาก Code จะเห็นว่าหลังจากเปลี่ยนมุมมองให้อยู่ในแนวนอน จะมีการเปลี่ยนตำแหน่งของ Row และ Column ของ Control ที่อ้างถึง
เพิ่มเติม ในกรณีที่ต้องการตรวจสอบทิศทางว่าเป็นการเปลี่ยนมุมมองในทิศทางใดสามารถใช้คำสั่ง
e.Orientation.ToString()
ซึ่งจะได้ทิศทางการหมุ่นของโปรแกรม ในทิศทางต่าง ๆ
Screenshot
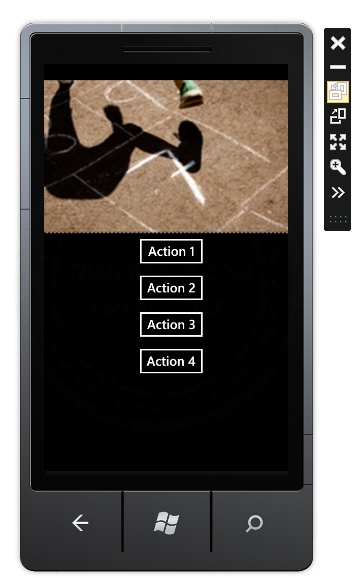
มุมมองในแนวตั้ง
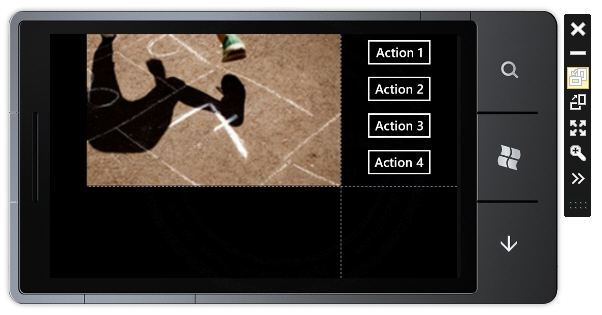
มุมมองในแนวนอนจะเห็นว่าหลังจากเปลี่ยนเป็นมุมมองให้อยู่ในรูปแบบของแนวนอน จะมีการย้านตำแหน่งของ Control ที่มีชื่อว่า buttonList ให้ไปอยู่ในตำแหน่ง Row = 0 และ Column = 1 ซึ่งจะได้ผลดังภาพ
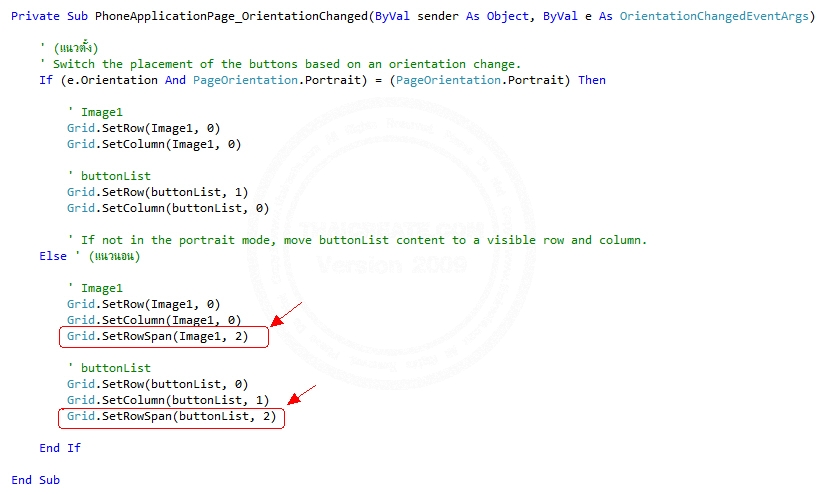
และเมื่อ SetRowSpan เพื่อ Merge Cell ใน Row เพื่อให้ Cell เป็นชุดเดียวกัน
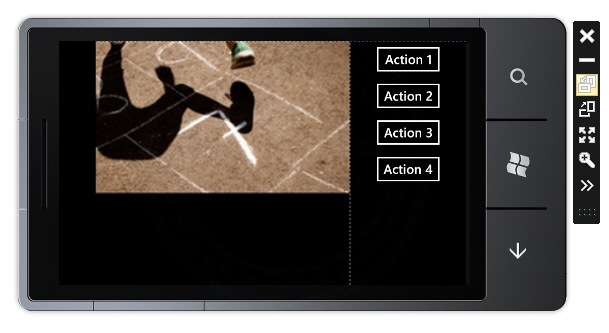
ผลลัพธ์ที่ได้จะถูกแบ่งเป็น 1 Row และ 2 Column
Code ที่เป็น VB.NET และ C#
MainPage.xaml.vb(VB.NET)
Partial Public Class MainPage
    Inherits PhoneApplicationPage

    ' Constructor
    Public Sub New()
        InitializeComponent()
    End Sub

    Private Sub PhoneApplicationPage_OrientationChanged(ByVal sender As Object, ByVal e As OrientationChangedEventArgs)

        ' (แนวตั้ง)
        ' Switch the placement of the buttons based on an orientation change.
        If (e.Orientation And PageOrientation.Portrait) = (PageOrientation.Portrait) Then

            ' Image1
            Grid.SetRow(Image1, 0)
            Grid.SetColumn(Image1, 0)

            ' buttonList
            Grid.SetRow(buttonList, 1)
            Grid.SetColumn(buttonList, 0)

            ' If not in the portrait mode, move buttonList content to a visible row and column.
        Else ' (แนวนอน)

            ' Image1
            Grid.SetRow(Image1, 0)
            Grid.SetColumn(Image1, 0)
            Grid.SetRowSpan(Image1, 2)

            ' buttonList
            Grid.SetRow(buttonList, 0)
            Grid.SetColumn(buttonList, 1)
            Grid.SetRowSpan(buttonList, 2)

        End If

    End Sub

End Class
MainPage.xaml.cs (C#)
public class MainPage : PhoneApplicationPage {

    //  Constructor
    public MainPage() {
        InitializeComponent();
    }

    private void PhoneApplicationPage_OrientationChanged(object sender, OrientationChangedEventArgs e) {
        //  (แนวตั้ง)
        //  Switch the placement of the buttons based on an orientation change.
        if (((e.Orientation && PageOrientation.Portrait)
                    == PageOrientation.Portrait)) {
            //  Image1
            Grid.SetRow(Image1, 0);
            Grid.SetColumn(Image1, 0);
            //  buttonList
            Grid.SetRow(buttonList, 1);
            Grid.SetColumn(buttonList, 0);
            //  If not in the portrait mode, move buttonList content to a visible row and column.
        }
        else {
            //  (แนวนอน)
            //  Image1
            Grid.SetRow(Image1, 0);
            Grid.SetColumn(Image1, 0);
            Grid.SetRowSpan(Image1, 2);
            //  buttonList
            Grid.SetRow(buttonList, 0);
            Grid.SetColumn(buttonList, 1);
            Grid.SetRowSpan(buttonList, 2);
        }
    }
}
Example 3 แบ่ง Grid เป็น 3 แถว และ 2 คอลัมบ์ และการเปลี่ยนมุมมองของ Layout บนตำแหน่งของ Grid
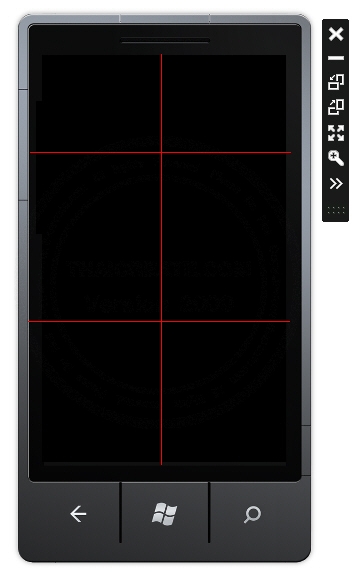
ออกแบบ Grid ในรูปแบบ 3x2 (3 Row และ 2 Column)
MainPage.xaml
<phone:PhoneApplicationPage
    x:Class="PhoneApp.MainPage"
    xmlns="http://schemas.microsoft.com/winfx/2006/xaml/presentation"
    xmlns:x="http://schemas.microsoft.com/winfx/2006/xaml"
    xmlns:phone="clr-namespace:Microsoft.Phone.Controls;assembly=Microsoft.Phone"
    xmlns:shell="clr-namespace:Microsoft.Phone.Shell;assembly=Microsoft.Phone"
    xmlns:d="http://schemas.microsoft.com/expression/blend/2008"
    xmlns:mc="http://schemas.openxmlformats.org/markup-compatibility/2006"
    mc:Ignorable="d" d:DesignWidth="480" d:DesignHeight="768"
    FontFamily="{StaticResource PhoneFontFamilyNormal}"
    FontSize="{StaticResource PhoneFontSizeNormal}"
    Foreground="{StaticResource PhoneForegroundBrush}"
    SupportedOrientations="PortraitOrLandscape " Orientation="Portrait"
    shell:SystemTray.IsVisible="True"
    OrientationChanged="PhoneApplicationPage_OrientationChanged" >

    <!--LayoutRoot is the root grid where all page content is placed-->
    <Grid x:Name="LayoutRoot" Background="Transparent" ShowGridLines="True">

        <!--Create a 3 x 2 grid to store an title image and button layout.-->
        <Grid.RowDefinitions>
            <RowDefinition Height="Auto"/>
            <RowDefinition Height="*"/>
            <RowDefinition Height="*"/>
        </Grid.RowDefinitions>

        <Grid.ColumnDefinitions>
            <ColumnDefinition Width="Auto"/>
            <ColumnDefinition Width="*"/>
        </Grid.ColumnDefinitions>

        <!--TitlePanel contains the name of the application and page title-->
        <!-- Rows 1 -->
        <StackPanel x:Name="TitlePanel" Grid.Row="0" Grid.Column="0">
            <TextBlock x:Name="ApplicationTitle" Text="MY APPLICATION" Style="{StaticResource PhoneTextNormalStyle}"/>
            <TextBlock x:Name="PageTitle" Text="page name" Margin="9,-7,0,0" Style="{StaticResource PhoneTextTitle1Style}"/>
        </StackPanel>

        <!--Add an image to the grid. Ensure that the image height and width are set to 300 and 500, respectively, for this example.-->
        <!-- Rows 2 -->
        <Image x:Name="Image1" Grid.Row="1" Grid.Column="0" Stretch="Fill" HorizontalAlignment="Center" VerticalAlignment="Top" Source="TestImage.jpg" Height="300" Width="500"/>

        <!--Add a StackPanel with buttons to the row beneath the image.-->
        <!-- Rows 3 -->
        <StackPanel x:Name="buttonList" Grid.Row="2" Grid.Column="0" HorizontalAlignment="Center" >
            <Button Content="Action 1" />
            <Button Content="Action 2" />
            <Button Content="Action 3" />
            <Button Content="Action 4" />
        </StackPanel>

    </Grid>

</phone:PhoneApplicationPage>
XAML Layout
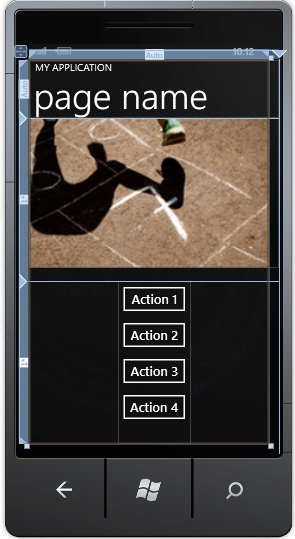
Design UI บน Visual Studio
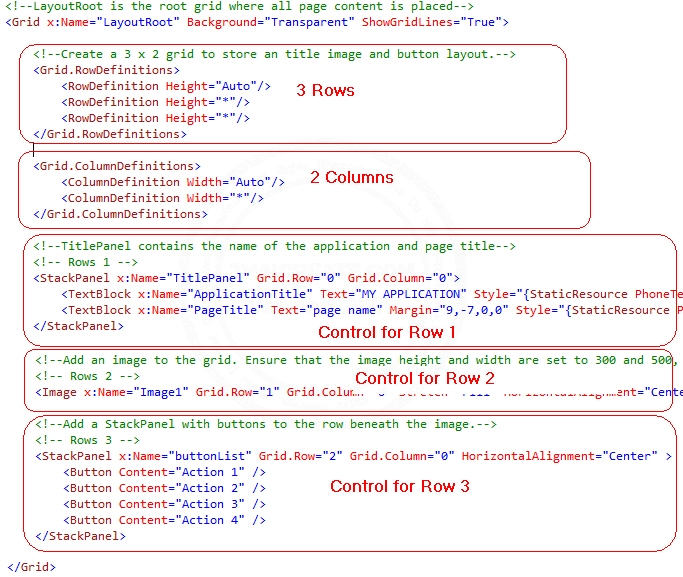
คำอธิบายตำแหน่งต่าง ๆ ของ Control ที่ถูกจัดวางบน Grid
Screenshot ทดสอบรันผ่าน Emulator
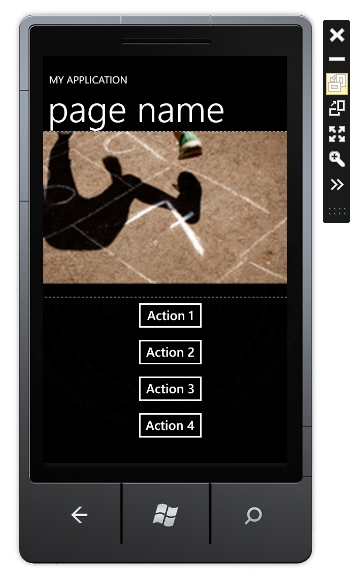
ครั้งแรกสุดในแนวตั้งจะเห็นว่าจะมีการแสดงผลใน Row 0 , 1, 2 อยู่ในตำแหน่ง Column ที่ 0
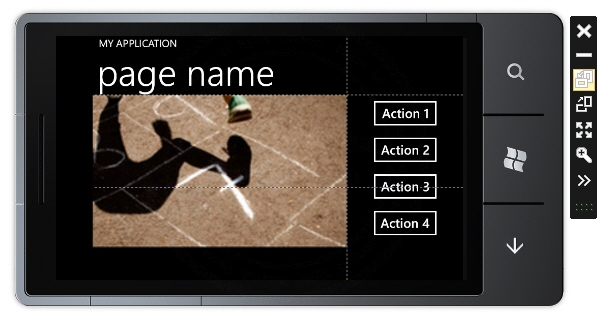
เมื่อแนวนอนจะมีการย้ายตำแหน่งของ Control ไปยังตำแหน่ง Column ของ Grid ที่กำหนด เพื่อให้สามารถแสดงผลได้อย่างสวยงาม
Code ที่เป็น VB.NET และ C#
MainPage.xaml.vb
Partial Public Class MainPage
    Inherits PhoneApplicationPage

    ' Constructor
    Public Sub New()
        InitializeComponent()
    End Sub


    Private Sub PhoneApplicationPage_OrientationChanged(ByVal sender As Object, ByVal e As OrientationChangedEventArgs)

        ' (แนวตั้ง)
        ' Switch the placement of the buttons based on an orientation change.
        If (e.Orientation And PageOrientation.Portrait) = (PageOrientation.Portrait) Then

            ' TitlePanel
            Grid.SetRow(TitlePanel, 0)
            Grid.SetColumn(TitlePanel, 0)

            ' Image1
            Grid.SetRow(Image1, 1)
            Grid.SetColumn(Image1, 0)

            ' buttonList
            Grid.SetRow(buttonList, 2)
            Grid.SetColumn(buttonList, 0)

            ' If not in the portrait mode, move buttonList content to a visible row and column.
        Else ' (แนวนอน)

            ' TitlePanel
            Grid.SetRow(TitlePanel, 0)
            Grid.SetColumn(TitlePanel, 0)

            ' Image1
            Grid.SetRow(Image1, 1)
            Grid.SetColumn(Image1, 0)
            Grid.SetRowSpan(Image1, 2)

            ' buttonList
            Grid.SetRow(buttonList, 1)
            Grid.SetColumn(buttonList, 1)
            Grid.SetRowSpan(buttonList, 2)

        End If

    End Sub

End Class
MainPage.xaml.cs
public class MainPage : PhoneApplicationPage {

    //  Constructor
    public MainPage() {
        InitializeComponent();
    }

    private void PhoneApplicationPage_OrientationChanged(object sender, OrientationChangedEventArgs e) {
        //  (แนวตั้ง)
        //  Switch the placement of the buttons based on an orientation change.
        if (((e.Orientation && PageOrientation.Portrait)
                    == PageOrientation.Portrait)) {
            //  TitlePanel
            Grid.SetRow(TitlePanel, 0);
            Grid.SetColumn(TitlePanel, 0);
            //  Image1
            Grid.SetRow(Image1, 1);
            Grid.SetColumn(Image1, 0);
            //  buttonList
            Grid.SetRow(buttonList, 2);
            Grid.SetColumn(buttonList, 0);
            //  If not in the portrait mode, move buttonList content to a visible row and column.
        }
        else {
            //  (แนวนอน)
            //  TitlePanel
            Grid.SetRow(TitlePanel, 0);
            Grid.SetColumn(TitlePanel, 0);
            //  Image1
            Grid.SetRow(Image1, 1);
            Grid.SetColumn(Image1, 0);
            Grid.SetRowSpan(Image1, 2);
            //  buttonList
            Grid.SetRow(buttonList, 1);
            Grid.SetColumn(buttonList, 1);
            Grid.SetRowSpan(buttonList, 2);
        }
    }
}
สามารถดาวน์โหลด Code ได้จากส่วนท้ายของบทความ
สรุป
จากตัวอย่าง 2-3 ตัวในบทความนี้ เราจะเห็นว่าการจัดวาง Layout ของ XAML บน Windows Phone จะมีการทำงานคล้าย ๆ กับการจัดวาง Layout ของ Web บน HTML ที่อยู่ในรูปของ Table และการออกแบบโปรแกรมที่ดี จะต้องสามารถรองรับการแสดงผลได้ทั้งแนวตั้งและแนวนอน โดย Layout จะต้องรองรับต่อการเปลี่ยนมุมมองได้ทั้ง 2 แบบ
.
|
 ช่วยกันสนับสนุนรักษาเว็บไซต์ความรู้แห่งนี้ไว้ด้วยการสนับสนุน Source Code 2.0 ของทีมงานไทยครีเอท ช่วยกันสนับสนุนรักษาเว็บไซต์ความรู้แห่งนี้ไว้ด้วยการสนับสนุน Source Code 2.0 ของทีมงานไทยครีเอท
|
|
| |
By : |
ThaiCreate.Com Team (บทความเป็นลิขสิทธิ์ของเว็บไทยครีเอทห้ามนำเผยแพร่ ณ เว็บไซต์อื่น ๆ) |
| |
Score Rating : |
    |
|
| |
Create/Update Date : |
2012-08-20 21:36:17 /
2017-03-25 21:44:07 |
| |
Download : |

|
|
|
Sponsored Links / Related |
|
|
|
|
|
|

|