Windows Phone การใช้งาน Panorama Control ร่วมกับ Pivot Control |
Windows Phone การใช้งาน Panorama Control ร่วมกับ Pivot Control บทความการใช้งาน Pivit Controls ร่วมกับ Panorama Controls ซึ่งถ้าเราได้ลองใช้ Conrols ทั้ง 2 ตัวนี้จะเห็นว่าลักษณ์การทำงานจะคล้าย ๆ กัน แต่แตกต่างกันตรงที่ Panorama จะมี Background และ Header รวมทั้ง Header ของ Item มาเกี่ยวข้องด้วย แต่การใช้งาน Items ต่าง ๆ และการกำหนดุณสมบัติของ Controls จะคล้าย ๆ กัน
ในตัวอย่างนี้จะออกแบบ Application เป็น 3 Page คือ MainPage, Panorama Page และ Pivot Page โดยใน Main Page จะทำปุ่ม Button เพื่อคลิกไปยัง Page ที่เป็น Panorama และ Pivot
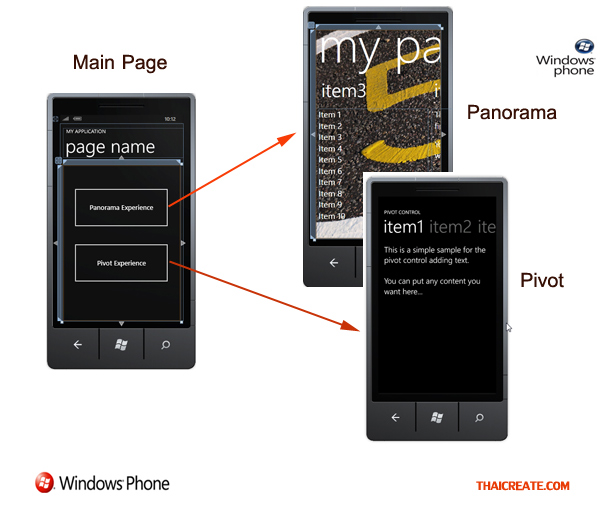
รูปภาพแสดง Main Page , Panorama Page และ Pivot Page และการทำงานของ Page
รู้จักกับ Panorama Control บน Windows Phone Application
รู้จักกับ Pivot Control บน Windows Phone Application
เริ่มต้นการสร้าง Panorama และ Pivot
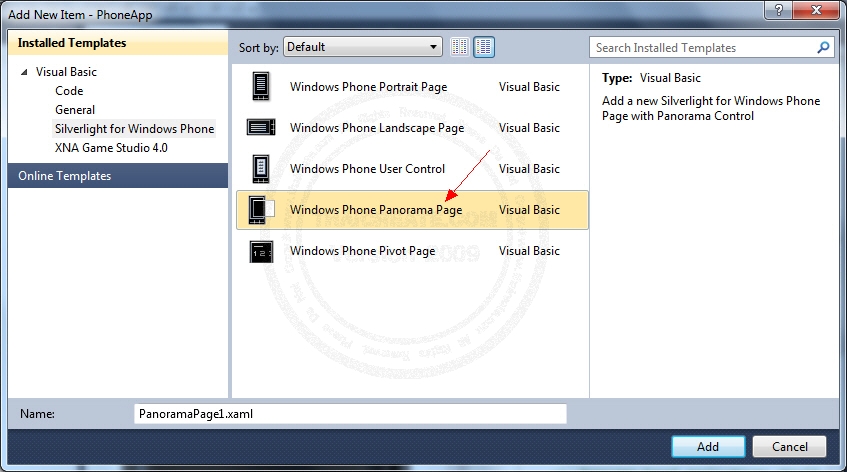
การสร้าง Item Page ของ Panorama ให้เลือกที่ Windows Phone Panorama Page
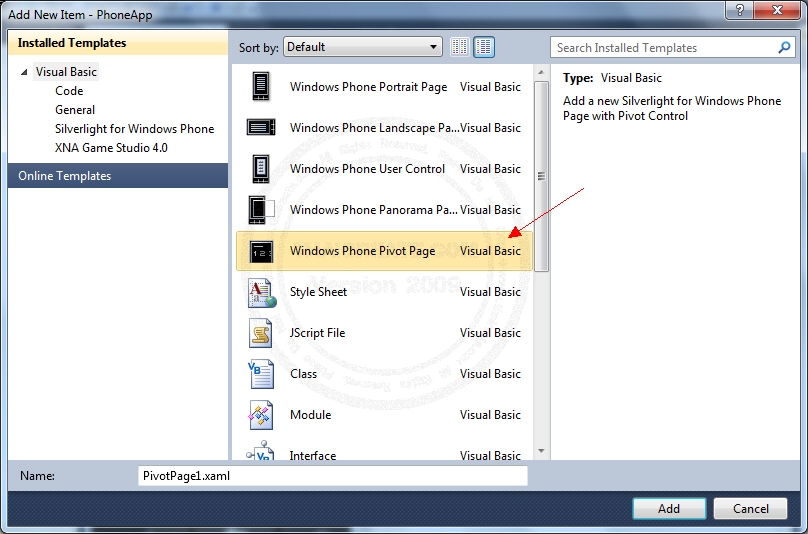
การสร้าง Item Page ของ Pivot ให้เลือกที่ Windows Phone Pivot Page
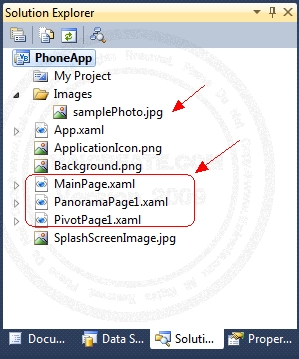
ไฟล์ทั้งหมดของ Project ซึ่งในส่วนของ Panorama จะมี Background สำหรับแสดงผลด้วย
MainPage.xaml
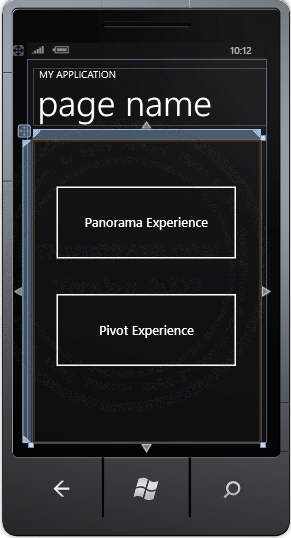
ออกแบบหน้าจอดังรูป
    <!--LayoutRoot is the root grid where all page content is placed-->
    <Grid x:Name="LayoutRoot" Background="Transparent">
        <Grid.RowDefinitions>
            <RowDefinition Height="Auto"/>
            <RowDefinition Height="*"/>
        </Grid.RowDefinitions>

        <!--TitlePanel contains the name of the application and page title-->
        <StackPanel x:Name="TitlePanel" Grid.Row="0" Margin="12,17,0,28">
            <TextBlock x:Name="ApplicationTitle" Text="MY APPLICATION" Style="{StaticResource PhoneTextNormalStyle}"/>
            <TextBlock x:Name="PageTitle" Text="page name" Margin="9,-7,0,0" Style="{StaticResource PhoneTextTitle1Style}"/>
        </StackPanel>

        <!--ContentPanel - place additional content here-->
        <Grid x:Name="ContentPanel" Grid.Row="1" Margin="12,0,12,0">
            <Button Content="Panorama Experience" Height="168" HorizontalAlignment="Left" Margin="35,82,0,0" Name="btnPanorama" VerticalAlignment="Top" Width="383" Click="btnPanorama_Click" />
            <Button Content="Pivot Experience" Height="168" HorizontalAlignment="Left" Margin="35,297,0,0" Name="btnPivot" VerticalAlignment="Top" Width="383" Click="btnPivot_Click" />

        </Grid>
    </Grid>
XAML Design ของ MainPage
VB.NET
    Private Sub btnPanorama_Click(sender As System.Object, e As System.Windows.RoutedEventArgs)
        NavigationService.Navigate(New Uri("/PanoramaPage1.xaml", UriKind.Relative))
    End Sub

    Private Sub btnPivot_Click(sender As System.Object, e As System.Windows.RoutedEventArgs)
        NavigationService.Navigate(New Uri("/PivotPage1.xaml", UriKind.Relative))
    End Sub
C#
private void btnPanorama_Click(System.Object sender, System.Windows.RoutedEventArgs e)
{
	NavigationService.Navigate(new Uri("/PanoramaPage1.xaml", UriKind.Relative));
}

private void btnPivot_Click(System.Object sender, System.Windows.RoutedEventArgs e)
{
	NavigationService.Navigate(new Uri("/PivotPage1.xaml", UriKind.Relative));
}
คำสั่งของ VB.NET และ C# ในการควบคุมการทำงานของปุ่ม Button
PanoramaPage1.xaml
    <!--LayoutRoot contains the root grid where all other page content is placed-->
    <Grid x:Name="LayoutRoot">
        <controls:Panorama Title="my pano">

            <!--Assigns a background image to the Panorama control-->
            <controls:Panorama.Background>
                <ImageBrush ImageSource="Images/samplePhoto.jpg"/>
            </controls:Panorama.Background>


            <!--Panorama item one-->
            <controls:PanoramaItem Header="item1">
                <Grid>
                    <!--This code creates two TextBlock controls and places them in a StackPanel control-->
                    <StackPanel>
                        <TextBlock
                    Text="This is a text added to the first panorama item control"
                    Style="{StaticResource PhoneTextLargeStyle}"
                    TextWrapping="Wrap"/>
                        <TextBlock Text=" "/>
                        <TextBlock
                    Text="You can put any content you want here..."
                    Style="{StaticResource PhoneTextLargeStyle}"
                    TextWrapping="Wrap"/>
                    </StackPanel>
                </Grid>

            </controls:PanoramaItem>

            <!--Panorama item two-->
            <controls:PanoramaItem Header="item2" Orientation="Horizontal">
                <!-- Assigns a border to the PanoramaItem control and background for the content section. -->
                <Grid>
                    <Border
                BorderBrush="{StaticResource PhoneForegroundBrush}"
                BorderThickness="{StaticResource PhoneBorderThickness}"
                Background="#80808080">
                        <TextBlock
                    Text="This content is very wide and can be panned horizontally."
                    Style="{StaticResource PhoneTextExtraLargeStyle}"
                    HorizontalAlignment="Center"
                    VerticalAlignment="Center" >
                        </TextBlock>

                    </Border>
                </Grid>
            </controls:PanoramaItem>


            <!--Panorama item three-->
            <controls:PanoramaItem Header="item3">
                <Grid>
                    <ListBox FontSize="{StaticResource PhoneFontSizeLarge}">
                        <ListBoxItem Content="Item 1" />
                        <ListBoxItem Content="Item 2" />
                        <ListBoxItem Content="Item 3" />
                        <ListBoxItem Content="Item 4" />
                        <ListBoxItem Content="Item 5" />
                        <ListBoxItem Content="Item 6" />
                        <ListBoxItem Content="Item 7" />
                        <ListBoxItem Content="Item 8" />
                        <ListBoxItem Content="Item 9" />
                        <ListBoxItem Content="Item 10" />
                    </ListBox>
                </Grid>

            </controls:PanoramaItem>

        </controls:Panorama>

    </Grid>
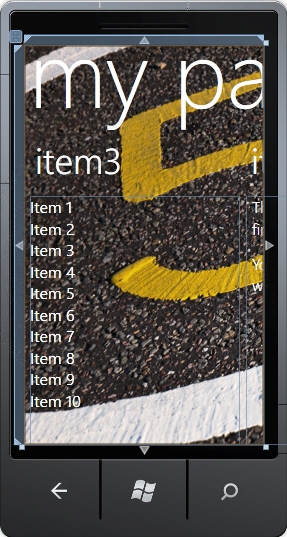
XAML Design ของ Page ที่เป็น Panorama Controls
PivotPage1.xaml
    <!--LayoutRoot is the root grid where all page content is placed-->
    <Grid x:Name="LayoutRoot" Background="Transparent">
        <!--Pivot Control-->
        <controls:Pivot Title="PIVOT CONTROL">
            <!--Pivot item one-->
            <controls:PivotItem Header="item1">
                <Grid>
                    <!--Added textbox control with formatted text-->
                    <TextBlock
       TextWrapping="Wrap"
       Style="{StaticResource PhoneTextLargeStyle}">
       <Run>This is a simple sample for the pivot control adding text.</Run>
       <LineBreak/>
       <LineBreak/>
       <Run>You can put any content you want here...</Run>
                    </TextBlock>
                </Grid>

            </controls:PivotItem>

            <!--Pivot item two-->
            <controls:PivotItem Header="item2">
                <!--Added background image and text content-->
                <Border
        BorderBrush="{StaticResource PhoneForegroundBrush}"
        BorderThickness="{StaticResource PhoneBorderThickness}">
                    <Grid>
                        <Image
                    Source="Images/samplePhoto.jpg"
                    Stretch="UniformToFill"/>
                        <TextBlock
                    Text="Here is some generic content to take up space."
                    TextWrapping="Wrap"
                    Style="{StaticResource PhoneTextExtraLargeStyle}" />
                    </Grid>
                </Border>

            </controls:PivotItem>

            <!--Pivot item three-->
            <controls:PivotItem Header="item3">
                <!--This code is a series of string text values-->
                <Grid>
                    <ListBox FontSize="{StaticResource PhoneFontSizeLarge}">
                        <ListBoxItem Content="Item 1" />
                        <ListBoxItem Content="Item 2" />
                        <ListBoxItem Content="Item 3" />
                        <ListBoxItem Content="Item 4" />
                        <ListBoxItem Content="Item 5" />
                        <ListBoxItem Content="Item 6" />
                        <ListBoxItem Content="Item 7" />
                        <ListBoxItem Content="Item 8" />
                        <ListBoxItem Content="Item 9" />
                        <ListBoxItem Content="Item 10" />
                     </ListBox>
                </Grid>

            </controls:PivotItem>

        </controls:Pivot>
    </Grid>
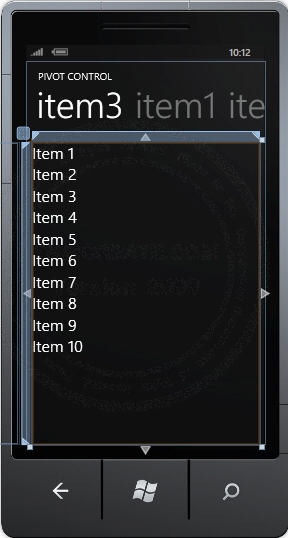
XAML Design ของ Page ที่เป็น Pivot Controls
Screenshot ทดสอบแสดงผลบน Emulator
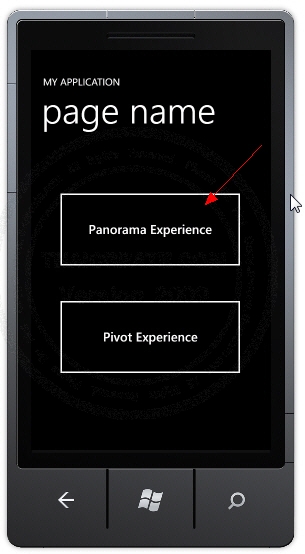
หน้าแรกของ Application
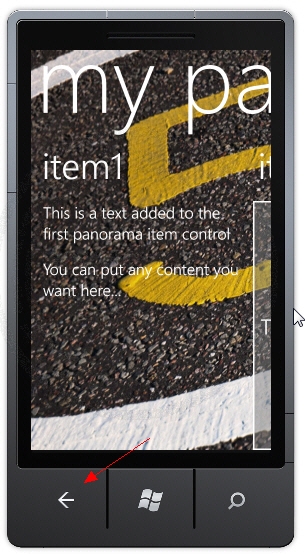
Panorama Page
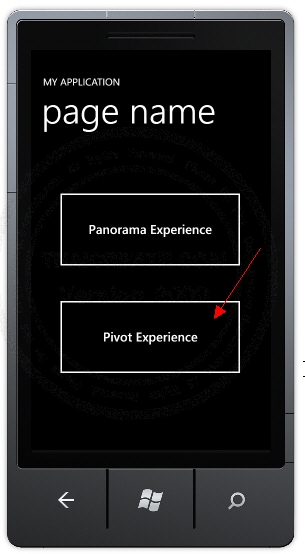
หน้าแรกของ Application ทดสอบคลิกไปยัง Pivot Page
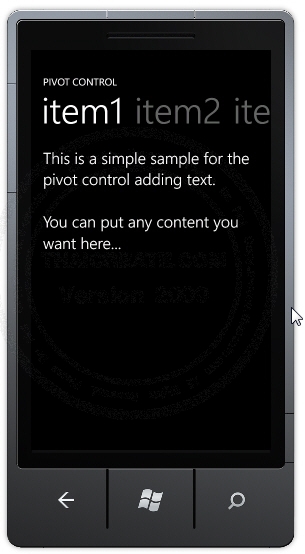
Pivot Page
|
 ช่วยกันสนับสนุนรักษาเว็บไซต์ความรู้แห่งนี้ไว้ด้วยการสนับสนุน Source Code 2.0 ของทีมงานไทยครีเอท ช่วยกันสนับสนุนรักษาเว็บไซต์ความรู้แห่งนี้ไว้ด้วยการสนับสนุน Source Code 2.0 ของทีมงานไทยครีเอท
|
|
| |
By : |
ThaiCreate.Com Team (บทความเป็นลิขสิทธิ์ของเว็บไทยครีเอทห้ามนำเผยแพร่ ณ เว็บไซต์อื่น ๆ) |
| |
Score Rating : |
   |
|
| |
Create/Update Date : |
2012-09-02 23:05:51 /
2017-03-25 22:07:36 |
| |
Download : |

|
|
|
Sponsored Links / Related |
|
|
|
|
|
|

|