การสร้าง Page และการ Link แสดงและซ่อน Uri Page Navigation บน Windows Phone |
การสร้าง Page และการ Link แสดงและซ่อน Uri Page Navigation บน Windows Phone ใน Windows Phone หน้าแต่ล่ะหน้าจะเรียกว่า Page และในกรณีที่ใน Project มี Page อยู่มากว่า 1 ตัว ก็สามารถใช้การเปลี่ยนหน้าไปยัง Page ต่าง ๆ เหมือนกับการ Link ข้อมูลบน HTML ได้ง่าย ๆ ด้วยคำสั่ง
Uri("/Destination.xaml", UriKind.Relative)
ตัวอย่างการใช้งาน
คำสั่งเมื่อต้องการไปยัง Page ต่าง ๆ
NavigationService.Navigate(New Uri("/Page2.xaml", UriKind.Relative))
กรณีที่ต้องการย้อนกลับไป Page ก่อนนี้
avigationService.GoBack()
จากรูปเป็น Model การทำงาน โดยหลังจากที่ Application เปิดขึ้นมาจะแสดง Splash Screen จากนั้นจะเข้าสู่ Page 1 ซึ่งเป็น MainPage และสามารถคลิกไปยัง Page 2 และ Page 3
MainPage.xaml
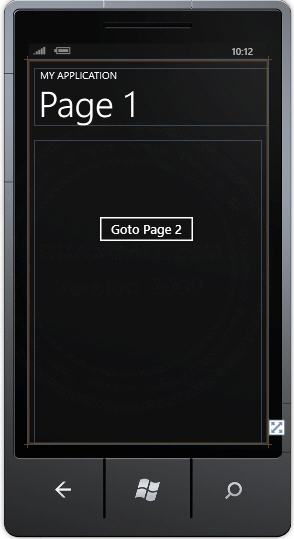
MainPage.xaml
    <!--LayoutRoot is the root grid where all page content is placed-->
    <Grid x:Name="LayoutRoot" Background="Transparent">
        <Grid.RowDefinitions>
            <RowDefinition Height="Auto"/>
            <RowDefinition Height="*"/>
        </Grid.RowDefinitions>

        <!--TitlePanel contains the name of the application and page title-->
        <StackPanel x:Name="TitlePanel" Grid.Row="0" Margin="12,17,0,28">
            <TextBlock x:Name="ApplicationTitle" Text="MY APPLICATION" Style="{StaticResource PhoneTextNormalStyle}"/>
            <TextBlock x:Name="PageTitle" Text="Page 1" Margin="9,-7,0,0" Style="{StaticResource PhoneTextTitle1Style}"/>
        </StackPanel>

        <!--ContentPanel - place additional content here-->
        <Grid x:Name="ContentPanel" Grid.Row="1" Margin="12,0,12,0">
            <Button Content="Goto Page 2" Height="72" HorizontalAlignment="Left" Margin="94,143,0,0" Name="btnGoPage2" VerticalAlignment="Top" Width="264" />
        </Grid>
    </Grid>
MainPage.xaml.vb (VB.NET)
Partial Public Class MainPage
    Inherits PhoneApplicationPage

    ' Constructor
    Public Sub New()
        InitializeComponent()
    End Sub


    Private Sub btnGoPage2_Click(sender As System.Object, e As System.Windows.RoutedEventArgs) Handles btnGoPage2.Click
        NavigationService.Navigate(New Uri("/Page2.xaml", UriKind.Relative))
    End Sub

End Class
MainPage.xaml.cs (C#)
using System;
using System.Collections;
using System.Collections.Generic;
using System.Data;
using System.Diagnostics;
public partial class MainPage : PhoneApplicationPage
{

	// Constructor
	public MainPage()
	{
		InitializeComponent();
	}


	private void btnGoPage2_Click(System.Object sender, System.Windows.RoutedEventArgs e)
	{
		NavigationService.Navigate(new Uri("/Page2.xaml", UriKind.Relative));
	}

}
สร้าง Page ขึ้นมาใหม่ชื่อว่า Page2 และ Page3
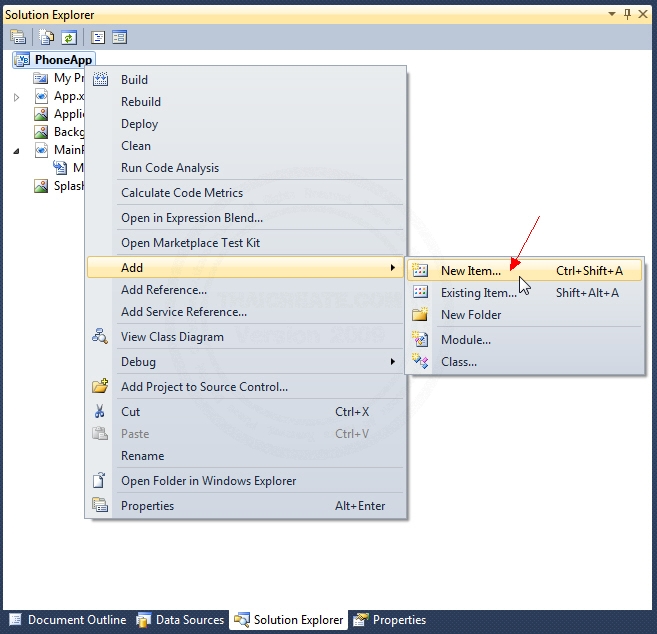
คลิกขวาที่ Project -> Add -> New Items
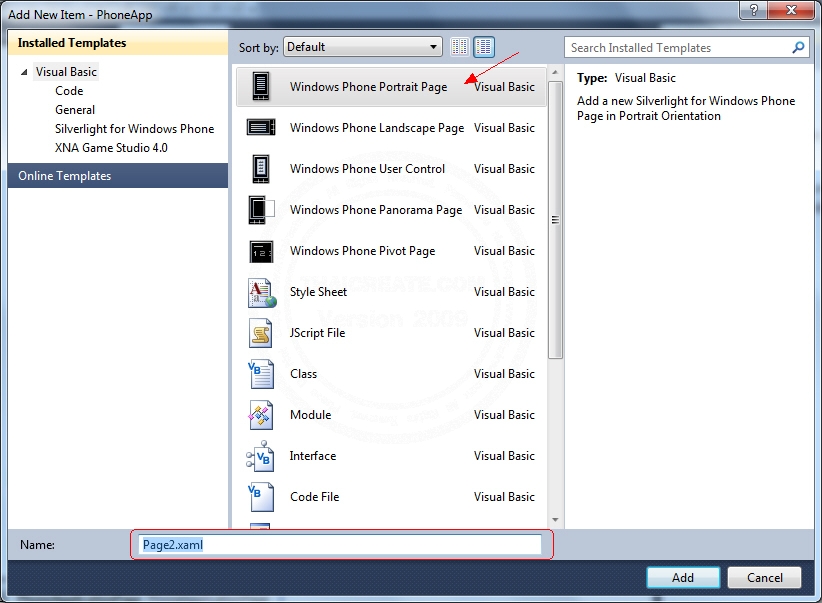
เลือกเป็น Windows Phone Portrait Page และกำหนดชื่อเป็น Page2.xaml
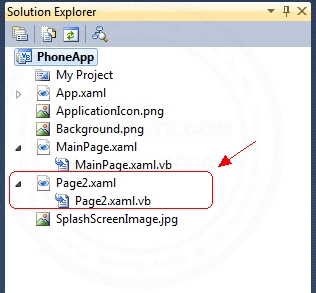
ไฟล์ Page2.xaml และ Page2.xaml.vb แสดงบน Project
Page2.xaml
ออกแบบ Screen บน Page ของ Page2.xaml ดังภาพ
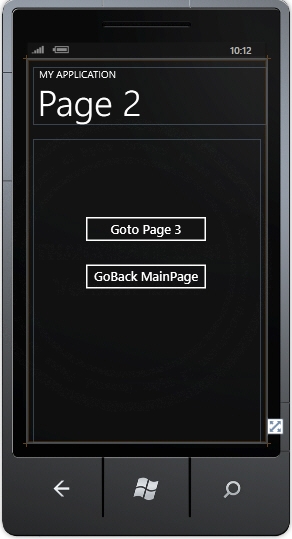
Page2.xaml
    <!--LayoutRoot is the root grid where all page content is placed-->
    <Grid x:Name="LayoutRoot" Background="Transparent">
        <Grid.RowDefinitions>
            <RowDefinition Height="Auto"/>
            <RowDefinition Height="*"/>
        </Grid.RowDefinitions>

        <!--TitlePanel contains the name of the application and page title-->
        <StackPanel x:Name="TitlePanel" Grid.Row="0" Margin="12,17,0,28">
            <TextBlock x:Name="ApplicationTitle" Text="MY APPLICATION" Style="{StaticResource PhoneTextNormalStyle}"/>
            <TextBlock x:Name="PageTitle" Text="Page 2" Margin="9,-7,0,0" Style="{StaticResource PhoneTextTitle1Style}"/>
        </StackPanel>

        <!--ContentPanel - place additional content here-->
        <Grid x:Name="ContentPanel" Grid.Row="1" Margin="12,0,12,0">
            <Button Content="Goto Page 3" Height="72" HorizontalAlignment="Left" Margin="94,143,0,0" Name="btnGoPage3" VerticalAlignment="Top" Width="264" />
            <Button Content="GoBack MainPage" Height="72" HorizontalAlignment="Left" Margin="94,238,0,0" Name="btnGoBackMainPage" VerticalAlignment="Top" Width="264" />
        </Grid>
    </Grid>
Page2.xaml.vb (VB.NET)
Partial Public Class Page2
    Inherits PhoneApplicationPage

    Public Sub New()
        InitializeComponent()
    End Sub


    Private Sub btnGoPage3_Click(sender As System.Object, e As System.Windows.RoutedEventArgs) Handles btnGoPage3.Click
        NavigationService.Navigate(New Uri("/Page3.xaml", UriKind.Relative))
    End Sub

    Private Sub btnGoBackMainPage_Click(sender As System.Object, e As System.Windows.RoutedEventArgs) Handles btnGoBackMainPage.Click
        NavigationService.GoBack()
    End Sub
End Class
Page2.xaml.cs (C#)
using System;
using System.Collections;
using System.Collections.Generic;
using System.Data;
using System.Diagnostics;
public partial class Page2 : PhoneApplicationPage
{

	public Page2()
	{
		InitializeComponent();
	}


	private void btnGoPage3_Click(System.Object sender, System.Windows.RoutedEventArgs e)
	{
		NavigationService.Navigate(new Uri("/Page3.xaml", UriKind.Relative));
	}

	private void btnGoBackMainPage_Click(System.Object sender, System.Windows.RoutedEventArgs e)
	{
		NavigationService.GoBack();
	}
}
สร้าง Page3.xaml เข้ามาใน Project
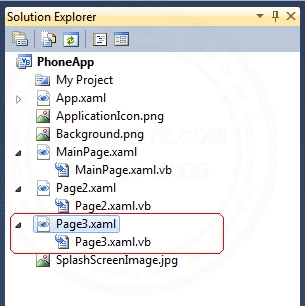
รายการ Page3.xaml และ Page3.xaml.vb เข้ามาใน Project
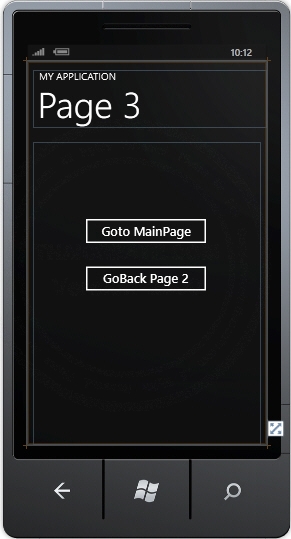
ออกแบบ Layout ด้วย Control ดังภาพ
Page3.xaml
    <!--LayoutRoot is the root grid where all page content is placed-->
    <Grid x:Name="LayoutRoot" Background="Transparent">
        <Grid.RowDefinitions>
            <RowDefinition Height="Auto"/>
            <RowDefinition Height="*"/>
        </Grid.RowDefinitions>

        <!--TitlePanel contains the name of the application and page title-->
        <StackPanel x:Name="TitlePanel" Grid.Row="0" Margin="12,17,0,28">
            <TextBlock x:Name="ApplicationTitle" Text="MY APPLICATION" Style="{StaticResource PhoneTextNormalStyle}"/>
            <TextBlock x:Name="PageTitle" Text="Page 3" Margin="9,-7,0,0" Style="{StaticResource PhoneTextTitle1Style}"/>
        </StackPanel>

        <!--ContentPanel - place additional content here-->
        <Grid x:Name="ContentPanel" Grid.Row="1" Margin="12,0,12,0">
            <Button Content="Goto MainPage" Height="72" HorizontalAlignment="Left" Margin="94,143,0,0" Name="btnGoMainPage" VerticalAlignment="Top" Width="264" />
            <Button Content="GoBack Page 2" Height="72" HorizontalAlignment="Left" Margin="94,238,0,0" Name="btnGoBackPage2" VerticalAlignment="Top" Width="264" />
        </Grid>
    </Grid>
Page3.xaml.vb (VB.NET)
Partial Public Class Page3
    Inherits PhoneApplicationPage

    Public Sub New()
        InitializeComponent()
    End Sub

    Private Sub btnGoMainPage_Click(sender As System.Object, e As System.Windows.RoutedEventArgs) Handles btnGoMainPage.Click
        NavigationService.Navigate(New Uri("/MainPage.xaml", UriKind.Relative))
    End Sub

    Private Sub btnGoBackPage2_Click(sender As System.Object, e As System.Windows.RoutedEventArgs) Handles btnGoBackPage2.Click
        NavigationService.GoBack()
    End Sub

End Class
Page3.xaml.cs (C#)
using System;
using System.Collections;
using System.Collections.Generic;
using System.Data;
using System.Diagnostics;
public partial class Page3 : PhoneApplicationPage
{

	public Page3() {
		InitializeComponent();
	}

	private void btnGoPage3_Click(System.Object sender, System.Windows.RoutedEventArgs e)
	{
		NavigationService.Navigate(new Uri("/Page3.xaml", UriKind.Relative));
	}

	private void btnGoBackMainPage_Click(System.Object sender, System.Windows.RoutedEventArgs e)
	{
		NavigationService.GoBack();
	}
}
Screenshot
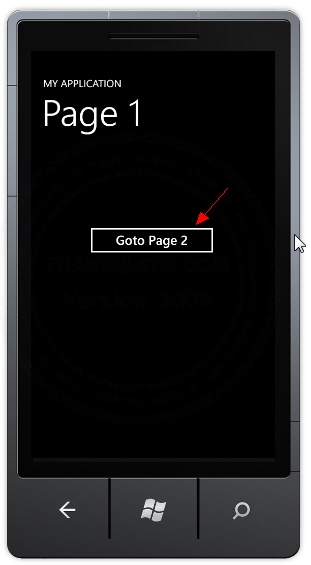
สามารถคลิกไปยัง Goto Page 2
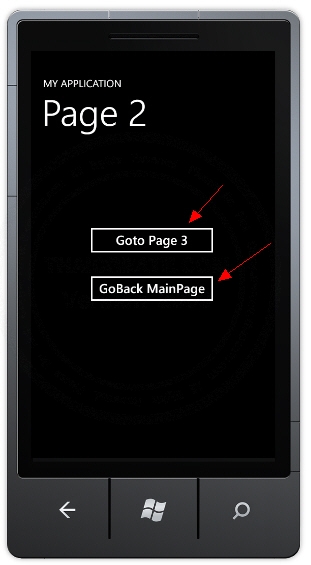
เมื่ออยู่ Page 2 สามารถ Goto Page 3 หรือ GoBack MainPage
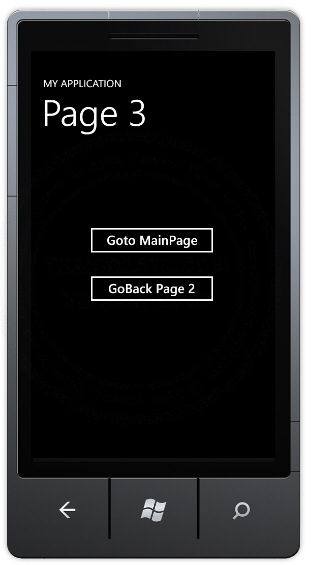
เมื่ออยู่ Page 2 สามารถ GoBack Page 2 หรือ Goto MainPage
.
|