Windows Phone 8 and Azure Blob Storage (Windows Azure) |
Windows Phone 8 and Azure Blob Storage (Windows Azure) ในบทความแรกของ Azure Storage นี้จะเป็นการเขียน Windows Phone กับ Windows Azure Blob Storage กับการจัดเก็บข้อมูลบน Storage โดยจะยกตัวอย่างการ Upload ไฟล์รูปภาพ (Image) จาก Isolated Storage ซึ่งเป็น Storage ที่อยู่บน Windows Phone ไปจัดเก็บไว้บน Blob การเรียกใช้งานไฟล์บน Blob และการจัดเก็บไฟล์บน Blob ในรูปแบบต่าง ๆ (สำหรับบทความนี้จะใช้เป็นการจัดเก็บรูปภาพ แต่ทั้งนี้สามารถประยุกต์การใช้งานกับไฟล์ชนิดต่าง ๆ ได้อีกมากมาย)
 โครงสร้างของ Blob จะแบ่งเป็นขั้นลำดับคือ Account -> Container -> Entity (ซึ่งไฟล์จะถูกจัดเก็บไว้ที่นี่)
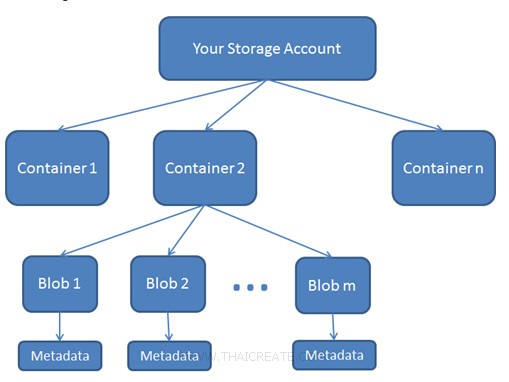 ตัวอย่างการจัดเก็บไฟล์แบบ Blob มีโครงสร้างที่จัดเก็บง่ายและเรียกใช้งานง่าย ซึ่งเราสามารถสร้าง Container เพื่อแยกกลุ่มของ Blob
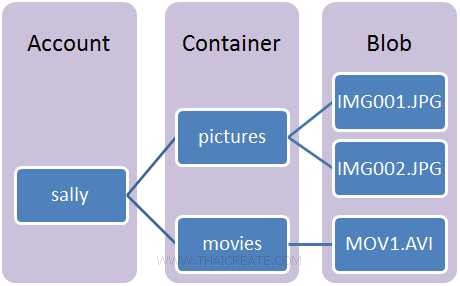 ตัวอย่างการจัดเก็บไฟล์แบบ Blob มีโครงสร้างที่จัดเก็บง่ายและเรียกใช้งานง่าย
การติดตั้ง Library API : Windows Phone 8 and Windows Azure Storage
ขั้นตอนการเเขียน Windows Phone กับ Blob (Windows Azure Storage) ในขั้นแรกสุดเราหลังจากที่เราสร้าง Services ของ Storage บน Azure Portal Management เรียบร้อยแล้ว คือจะต้องสร้าง Container (เปรียบเหมือน Folder) ไว้สำหรับการจัดเก็บ Blob
เรียกใช้ Class ของ Azure Storage
using Microsoft.WindowsAzure.Storage;
using Microsoft.WindowsAzure.Storage.Blob;
using Microsoft.WindowsAzure.Storage.Auth;
สิ่งที่จะต้องเตรียมคือ Account และ API Key
DefaultEndpointsProtocol=https;AccountName=[yourAccount];AccountKey=[yourKey]
สร้าง Connection สำหรับการเชื่อมต่อ
// Create the connectionstring
String StorageConnectionString = "DefaultEndpointsProtocol=https;AccountName=[yourAccount];AccountKey=[yourKey]";
ทำการเชื่อมต่อไปยัง Azure Storage
// Retrieve storage account from connection string.
 CloudStorageAccount storageAccount = CloudStorageAccount.Parse(StorageConnectionString);
การเรียกใช้งาน Blob Services
// Create the blob client.
CloudBlobClient blobClient = storageAccount.CreateCloudBlobClient();
หลังจากนั้นเราสามารถทำการสร้าง Container ตาม Code นี้
Code การสร้าง Container
    public partial class MainPage : PhoneApplicationPage
    {
        // Constructor
        public MainPage()
        {
            InitializeComponent();
            Loaded += MainPage_Loaded;
        }

        private async void MainPage_Loaded(object sender, System.Windows.RoutedEventArgs e)
        {
            // Create the connectionstring
            String StorageConnectionString = "DefaultEndpointsProtocol=https;AccountName=[yourAccount];AccountKey=[yourKey]";

            // Retrieve storage account from connection string.
            CloudStorageAccount storageAccount = CloudStorageAccount.Parse(StorageConnectionString);

            // Create the blob client.
            CloudBlobClient blobClient = storageAccount.CreateCloudBlobClient();

            // Retrieve a reference to a container. (pictures)
            CloudBlobContainer container1 = blobClient.GetContainerReference("pictures");
            await container1.CreateIfNotExistsAsync();

            // Retrieve a reference to a container. (movies)
            CloudBlobContainer container2 = blobClient.GetContainerReference("movies");
            await container2.CreateIfNotExistsAsync();

        }
    }
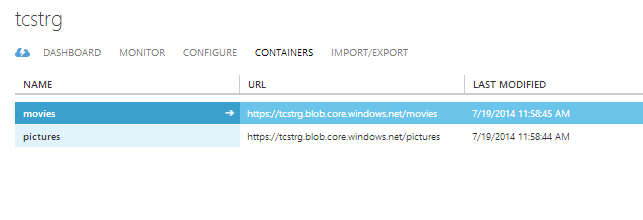
จาก Code จะได้ Container ชื่อว่า pictures และ movies
Example 1 การ Upload ไฟล์และจัดเก็บไว้บน Blob
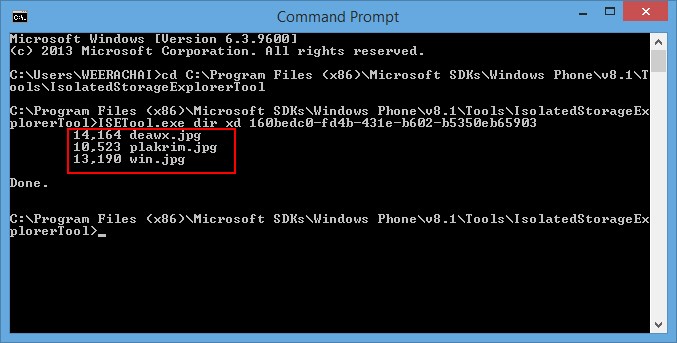
ตัวอย่างไฟล์ที่อยู่ใน Isolated Storage บน Windows Phone โดยเราจะ Upload ไฟล์นี้ไปจัดเก็บไว้บน Blob
    public partial class MainPage : PhoneApplicationPage
    {
        // Constructor
        public MainPage()
        {
            InitializeComponent();
            Loaded += MainPage_Loaded;
        }

        private async void MainPage_Loaded(object sender, System.Windows.RoutedEventArgs e)
        {
            // Create the connectionstring
            String StorageConnectionString = "DefaultEndpointsProtocol=https;AccountName=[yourAccount];AccountKey=[yourKey]";

            // Retrieve storage account from connection string.
            CloudStorageAccount storageAccount = CloudStorageAccount.Parse(StorageConnectionString);

            // Create the blob client.
            CloudBlobClient blobClient = storageAccount.CreateCloudBlobClient();

            // Retrieve reference to a previously created container.
            CloudBlobContainer container = blobClient.GetContainerReference("pictures");

            string sFileName = "win.jpg";

            // Get image from Isolated
            using (IsolatedStorageFile myIsolatedStorage = IsolatedStorageFile.GetUserStoreForApplication())
            {
                using (IsolatedStorageFileStream fileStream = myIsolatedStorage.OpenFile(sFileName, FileMode.Open, FileAccess.Read))
                {
                    // Upload to blob
                    CloudBlockBlob blockBlob = container.GetBlockBlobReference(sFileName);
                    await blockBlob.UploadFromStreamAsync(fileStream);
                }
            }

        }
    }

หลังจากที่ Run โปรแกรมจะแสดง File Picker ให้เลือกเพื่อ Upload ไว้บน Blob

เปิดดูรายการไฟล์บน Azure Portal Management
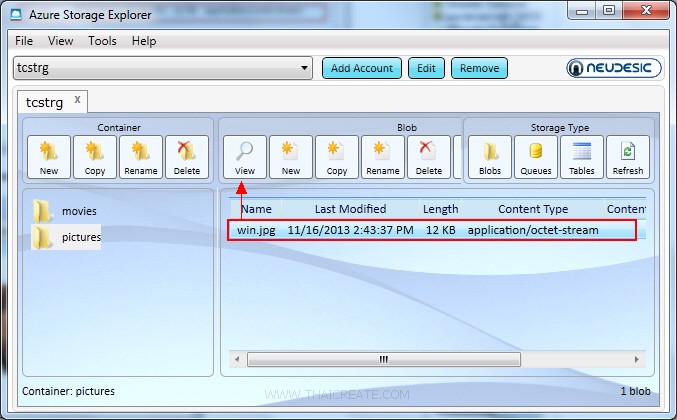
จะเห็นว่ามีรายการไฟล์ที่ถูก Upload เข้าไป
เมื่อใช้ Azure Storage Explorer ดูในส่วนของไฟล์ ก็จะถูก Upload ขึ้นไป เลือกดูผ่านโปรแกรม Azure Storage Explorer เลือก View
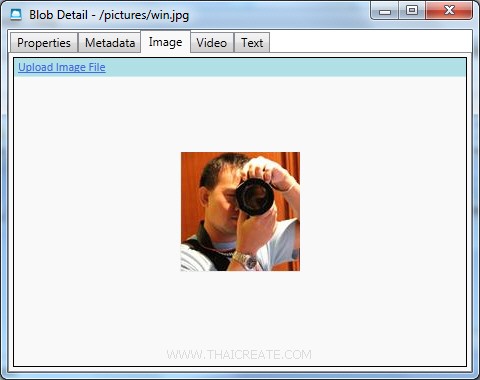
กรณีที่เป็น Image ก็จะแสดงรูปภาพใน Tags ของ Image
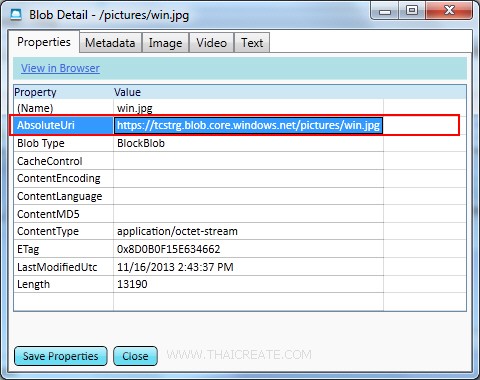
เป็น URL ที่อยู่ของ Blob ซึ่งตอนที่เรียกใช้ไฟล์รูปภาพ เราสามารถเรียกใช้ผ่าน URL นี้
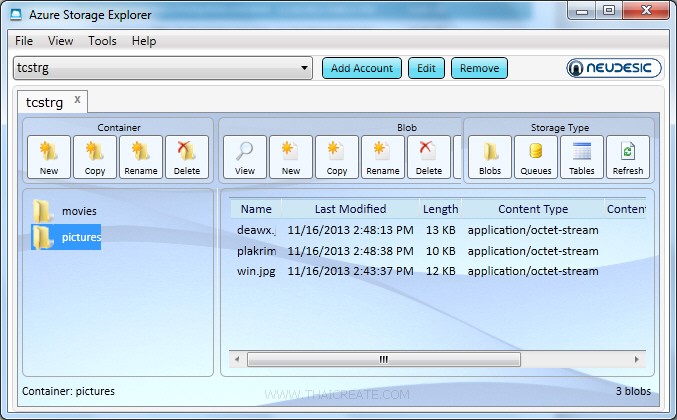
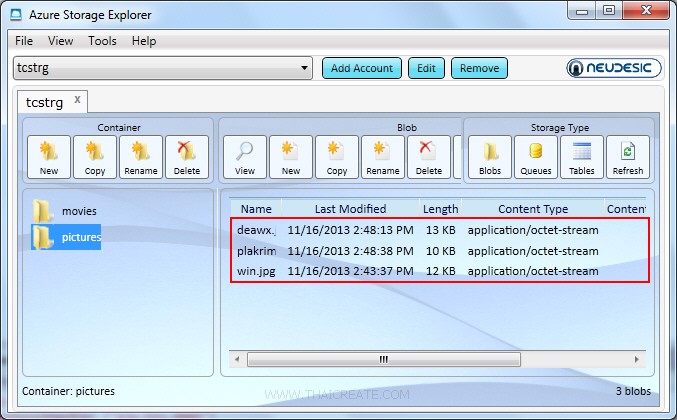
ทดสอบการ Upload ไฟล์อื่น ๆ ซึ่งเมื่อรายการไฟล์มีมากกว่า 1 ไฟล์ก็จะแสดงรายการดังภาพ
Example 2 การแสดง (List) รายการไฟล์ที่จัดเก็บไว้บน Blob
    public partial class MainPage : PhoneApplicationPage
    {
        // Constructor
        public MainPage()
        {
            InitializeComponent();
            Loaded += MainPage_Loaded;
        }

        private async void MainPage_Loaded(object sender, System.Windows.RoutedEventArgs e)
        {
            // Create the connectionstring
            String StorageConnectionString = "DefaultEndpointsProtocol=https;AccountName=[yourAccount];AccountKey=[yourKey]";

            // Retrieve storage account from connection string.
            CloudStorageAccount storageAccount = CloudStorageAccount.Parse(StorageConnectionString);

            // Create the blob client.
            CloudBlobClient blobClient = storageAccount.CreateCloudBlobClient();

            // Retrieve reference to a previously created container.
            CloudBlobContainer container = blobClient.GetContainerReference("pictures");

            // Variable for parameters.
            BlobContinuationToken continuationToken = null;
            string prefix = null;
            bool useFlatBlobListing = true;
            BlobListingDetails blobListingDetails = BlobListingDetails.All;
            int maxBlobsPerRequest = 10;
            List<IListBlobItem> blobs = new List<IListBlobItem>();

            // Get list item blob.
            var listingResult = await container.ListBlobsSegmentedAsync(prefix, useFlatBlobListing, blobListingDetails, maxBlobsPerRequest, continuationToken, null, null);
            continuationToken = listingResult.ContinuationToken;
            blobs.AddRange(listingResult.Results);

            // Display blob item
            foreach (IListBlobItem item in blobs)
            {
                if (item.GetType() == typeof(CloudBlockBlob))
                {
                    CloudBlockBlob blob = (CloudBlockBlob)item;
                    // blob.Properties.Length + " - " + blob.Uri
                    this.lblResult.Text = this.lblResult.Text + blob.Properties.Length + " - " + blob.Uri + Environment.NewLine;
                }
            }

        }
    }
14164 - https://tcstrg.blob.core.windows.net/pictures/deawx.jpg
10523 - https://tcstrg.blob.core.windows.net/pictures/plakrim.jpg
14290 - https://tcstrg.blob.core.windows.net/pictures/win.jpg
แสดงรายการไฟล์ที่อยู่บน Blob พร้อมทั้ง URL ที่สามารถเรียกใช้งานได้
Example 3 การลบไฟล์ (Delete) ที่อยู่บน Blob

เป็นไฟล์ที่อยู่บน Blob
    public partial class MainPage : PhoneApplicationPage
    {
        // Constructor
        public MainPage()
        {
            InitializeComponent();
            Loaded += MainPage_Loaded;
        }

        private async void MainPage_Loaded(object sender, System.Windows.RoutedEventArgs e)
        {
            // Create the connectionstring
            String StorageConnectionString = "DefaultEndpointsProtocol=https;AccountName=[yourAccount];AccountKey=[yourKey]";

            // Retrieve storage account from connection string.
            CloudStorageAccount storageAccount = CloudStorageAccount.Parse(StorageConnectionString);

            // Create the blob client.
            CloudBlobClient blobClient = storageAccount.CreateCloudBlobClient();

            // Retrieve reference to a previously created container.
            CloudBlobContainer container = blobClient.GetContainerReference("pictures");

            // Retrieve reference to a blob named
            CloudBlockBlob blockBlob = container.GetBlockBlobReference("deawx.jpg");

            // Delete the blob.
            await blockBlob.DeleteAsync();

        }
    }
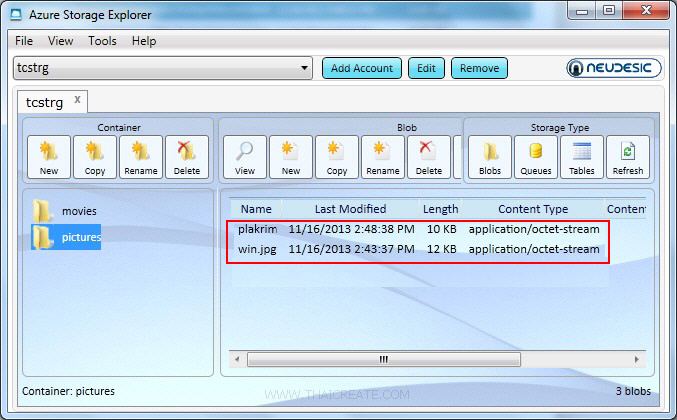
หลังจากที่ไฟล์ถูกลบแล้ว รายการบน Blob จะถูกลบออกไปด้วย
|
 ช่วยกันสนับสนุนรักษาเว็บไซต์ความรู้แห่งนี้ไว้ด้วยการสนับสนุน Source Code 2.0 ของทีมงานไทยครีเอท ช่วยกันสนับสนุนรักษาเว็บไซต์ความรู้แห่งนี้ไว้ด้วยการสนับสนุน Source Code 2.0 ของทีมงานไทยครีเอท
|
|
| |
By : |
ThaiCreate.Com Team (บทความเป็นลิขสิทธิ์ของเว็บไทยครีเอทห้ามนำเผยแพร่ ณ เว็บไซต์อื่น ๆ) |
| |
Score Rating : |
    |
|
| |
Create/Update Date : |
2014-07-27 19:06:28 /
2017-03-25 22:36:55 |
| |
Download : |
No files |
|
|
Sponsored Links / Related |
|
|
|
|
|
|

|