WebSocket ตอนที่ 4 : Client เชื่อมต่อ Servcies ของ WebSocket การรับ-ส่งข้อมูล Real Time ด้วย PHP |
WebSocket ตอนที่ 4 : Client เชื่อมต่อ Servcies ของ WebSocket การรับ-ส่งข้อมูล Real Time ด้วย PHP หลังจากที่เราได้ทำการสร้าง Services ของ WebSockets ของ Server เรียบร้อยแล้ว ขั้นตอนถัดไปคือการเขียนฝั่ง Client เพื่อจะทำการเชื่อมต่อและรับ-ส่ง ข้อมูลแบบ Real time และก่อนการเชื่อมต่อด้วย Client ในส่วนของ Server จะต้องทำการรัน Services ของ WebSockets ให้ทำงานตลอดเวลา เพราะ Service ตัวนี้จะทำหน้าที่ในการตรวจสอบการเชื่อมต่อและ Push รายการข้อความใหม่ๆ ไปยัง Client
ในการเชื่อมต่อจากก Client ไป Services ของ WebSocket ที่อยู่ในฝั่ง Web Server จะใช้คำสั่งของ JavaScript ในการเชื่อมต่อ ซึ่งรูปแบบการเชื่อมต่อนั้นเป็นคำสั่งที่ง่าย ๆ เพียงเปิด Connection ทำการเชื่อมต่อ และก็ตามด้วยการ Implements ตัว method หรือ event ที่ทำหน้าที่เปลี่ยนเหมือน callback คอยรับคำสั่งต่างๆ ที่ถูกส่งมาจาก Server
เริ่มต้นด้วยการเปิด Connection เพื่อเชื่อมต่อไปยัง Services ของ WebSocket
// Open Connection
socket = new WebSocket('ws://localhost:8089');
Implements Event
// This event occurs when socket connection is established.
socket.onopen = function(e) {

};

// This event occurs when client receives data from server.
socket.onmessage = function(e) {
	onMessage(e)
};

// This event occurs when there is any error in communication.
socket.onerror = function(e) {
	onError(e)
};
โดย
socket.onopen : เมื่อเชื่อมต่อสำเร็จจะทำงานที่ Event นี้
socket.onmessage : เป็น Event เมื่อ Server ส่งข้อมูล Real time กลับมา ซึ่ง Event นี้จะทำงานทุกๆ ครั้งที่มีข้อมูลถูกส่งเข้ามา
socket.onerror : เป็น Event เมื่อโปรแกรมทำงานผิดพลาด
เมื่อกต้องการส่งข้อความไปยัง Server
socket.send(strMessage);
ตัวอย่าง
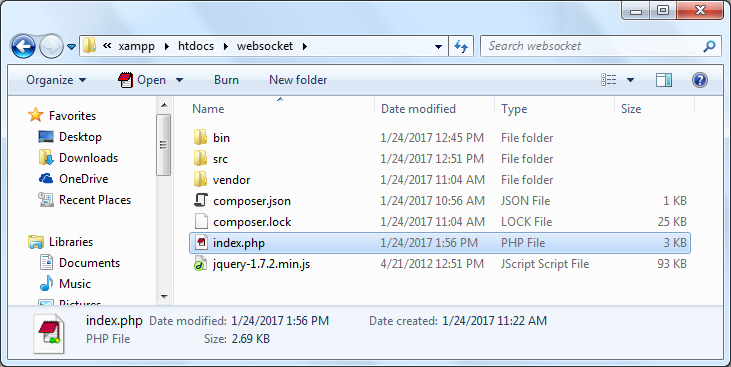
สร้างไฟล์ index.php เข้ามาในโปรเจค
index.php
<!DOCTYPE html>
<html>
    <head>
        <title>PHP WebSocket Chat</title>
        <link type="text/css" rel="stylesheet" href="style.css" />
        <script src="jquery-1.7.2.min.js"></script>
    </head>

    <style type="text/css">

		body {
			font:12px arial;
			color: #222;
			text-align:center;
			padding:35px;
		}

		#chatbox {
			text-align:left;
			margin:0 auto;
			margin-bottom:25px;
			padding:10px;
			background:#fff;
			height:270px;
			width:430px;
			border:1px solid #ACD8F0;
			overflow:auto;
		}

    </style>
    <body>
        <div id="ws_support"></div>
        <div id="wrapper">
            <div id="menu">
                <h3 class="welcome">PHP Web Chat</h3>
            </div>
            <div id="chatbox"></div>
               Name <input name="txtName" type="text" id="txtName" size="10"/>
                Message <input name="txtMessage" type="text" id="txtMessage" size="35" placeholder="" />
                <input name="btnSend" type="button"  id="btnSend" value="Send" />
        </div>
    </body>
</html>

<script language="javascript">

var socket;

function webSocketSupport()
{
    if (browserSupportsWebSockets() === false) {
        $('#ws_support').html('<h2>Sorry! Your web browser does not supports web sockets</h2>');
        $('#wrapper').hide();
        return;
    }

	// Open Connection
    socket = new WebSocket('ws://localhost:8089');

    socket.onopen = function(e) {
        writeMessage("You have have successfully connected to the server");
    };

    socket.onmessage = function(e) {
        onMessage(e)
    };

    socket.onerror = function(e) {
        onError(e)
    };

}

function onMessage(e) {
    writeMessage('<span style="color: blue;"> ' + e.data + '</span>');
}

function onError(e) {
    writeMessage('<span style="color: red;">Error!!</span> ' + e.data);
}

function doSend() {

	if ($('#txtName').val() == '') {
        alert('Enter your [Name]');
		$('#txtName').focus();
		return '';
    } else if ($('#txtMessage').val() == '') {
        alert('Enter your [Message]');
		$('#txtMessage').focus();
		return '';
    }

    var strMessage = '@<b>' + $('#txtName').val() + '</b>: ' + $('#txtMessage').val();
    socket.send(strMessage);
    writeMessage(strMessage);

    $('#txtMessage').val('');
	$('#txtMessage').focus();
}

function writeMessage(message) {
	$('#chatbox').append(message + '<br>');
}

function browserSupportsWebSockets() {
    if ("WebSocket" in window)
    { return true; }
    else
    {  return false; }
}

$(document).ready(function() {
		webSocketSupport();
});

$('#btnSend').click(function () {
	doSend();
});

</script>
จากตัวอย่างนี้เป็นรูปแบบการทำงานแบบง่าย ๆ คือ ให้ User ทำการ ส่งข้อความพูดคุย Chat ระหว่างกัน
ทดสอบการทำงาน

ก่อนการทำงานจะต้องทำการ Run ตัว Servces ทิ้งไว้ซะก่อน
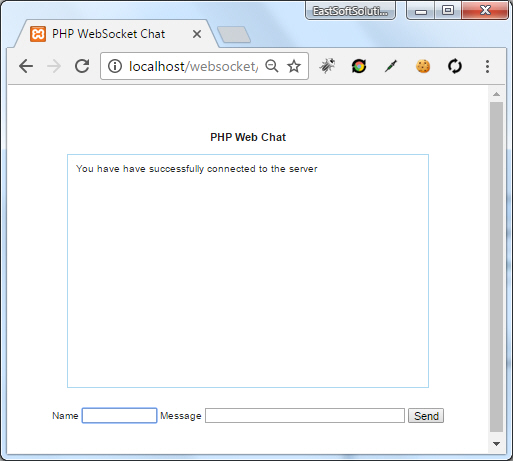
รันโปรแกรม

เนื่องจากเราจะทดสอบระบบ Chat ให้ทดสอบเปิดหน้าจอหลายๆ หน้าจอ และใช้ชื่อในส่วนของ Name ที่แตกต่างกัน
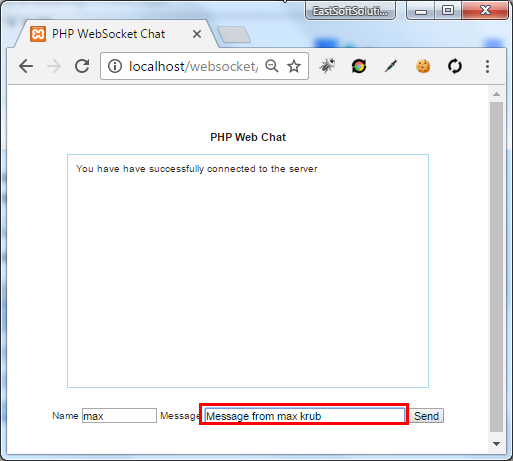
ทดสอบการส่ง Message จากหน้าจอใดหน้าจอหนึ่ง
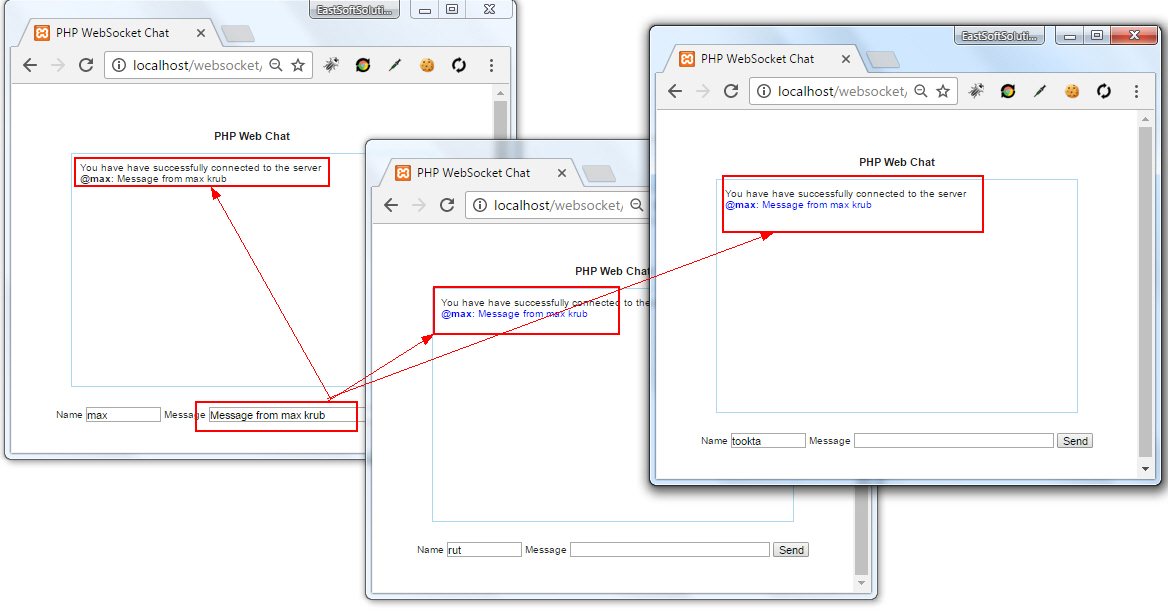
จะเห็นว่าทุกๆ Client จะได้รับข้อความแบบ Real time ทันที
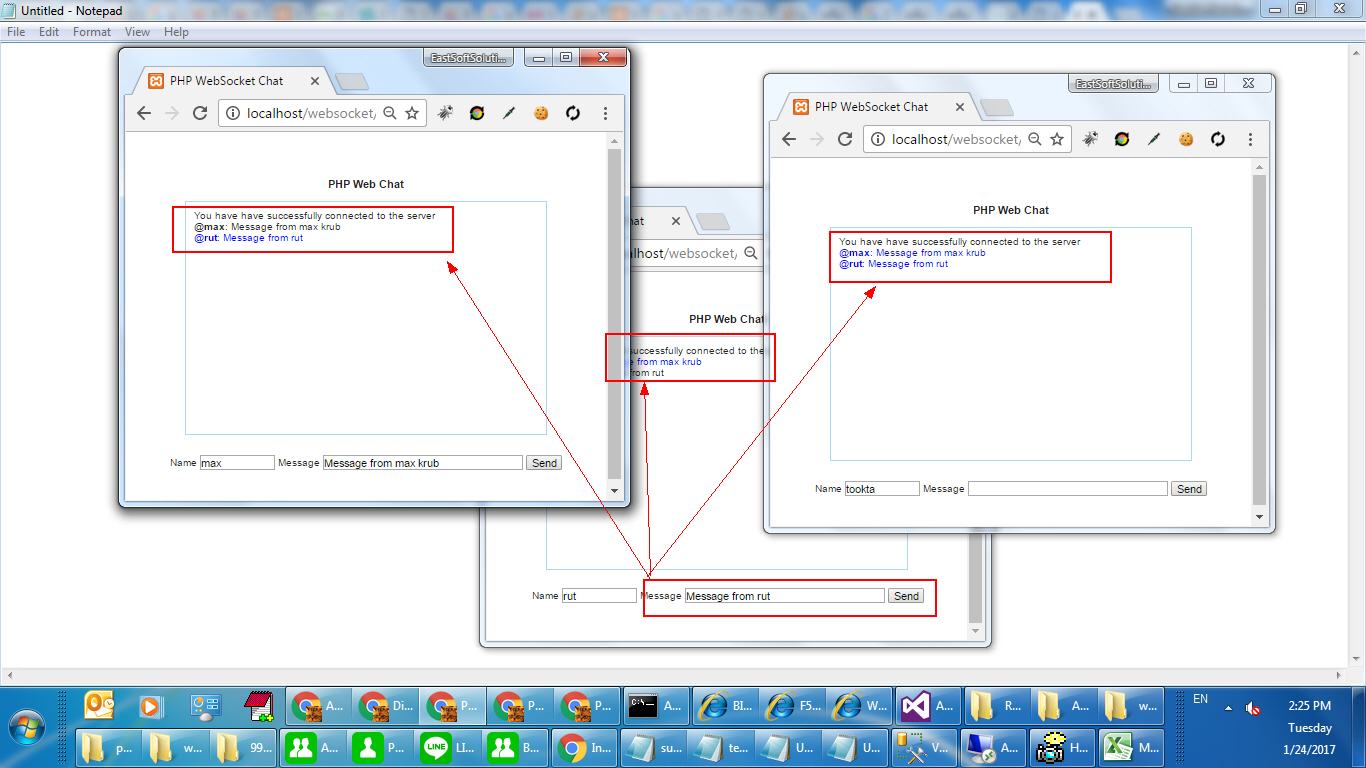
ทดสอบการ Client อื่นๆ ก็จะได้ผลลัพธ์เช่นเดียวกัน

เมื่อตรวจสอบที่ Services จะเห็นว่ามี Log เกิดขึ้น ซึ่งเกิดจาก function onMessage ที่อยู่ในไฟล์ Connection.php
Note!. จากตัวอย่างนี้จะเห็นว่า Client ที่ส่งออกจะไม่ได้รับในส่วนของ Event ของ socket.onmessage ซึ่งในกรณีที่ต้องการให้ Client ที่ส่งได้รับ Event นี้ด้วยให้ไปแก้ในส่วนของ Connection.php จาก
    public function onMessage(ConnectionInterface $from, $msg) {
        $numRecv = count($this->clients) - 1;
        echo sprintf('Connection %d sending message "%s" to %d other connection%s' . "\n"
                , $from->resourceId, $msg, $numRecv, $numRecv == 1 ? '' : 's');

        foreach ($this->clients as $client) {
            if ($from !== $client) {
                // The sender is not the receiver, send to each client connected
                $client->send($msg);
            }
        }
    }
เป็น
    public function onMessage(ConnectionInterface $from, $msg) {
        $numRecv = count($this->clients) - 1;
        echo sprintf('Connection %d sending message "%s" to %d other connection%s' . "\n"
                , $from->resourceId, $msg, $numRecv, $numRecv == 1 ? '' : 's');

        foreach ($this->clients as $client) {
            // The sender is not the receiver, send to each client connected
            $client->send($msg);
        }
    }
และในกรณีที่ต้องการเขียนเงื่อนไขอื่นๆ เพิ่มเติม เช่น จัดเก็บข้อมูลลงใน Database หรือจะส่งให้เฉพาะ Client อาจจะต้องทำการตรวจสอบ $from กับ $msg ที่ส่งมาว่า มีเงื่อนไขอย่างไรบ้างที่จะเลือกเฉพาะบาง Client ได้ เช่น ส่ง $msg ที่เป็น json ที่ประกอบด้วย to,message
.
|
 ช่วยกันสนับสนุนรักษาเว็บไซต์ความรู้แห่งนี้ไว้ด้วยการสนับสนุน Source Code 2.0 ของทีมงานไทยครีเอท ช่วยกันสนับสนุนรักษาเว็บไซต์ความรู้แห่งนี้ไว้ด้วยการสนับสนุน Source Code 2.0 ของทีมงานไทยครีเอท
|
|
| |
By : |
ThaiCreate.Com Team (บทความเป็นลิขสิทธิ์ของเว็บไทยครีเอทห้ามนำเผยแพร่ ณ เว็บไซต์อื่น ๆ) |
| |
Score Rating : |
    |
|
| |
Create/Update Date : |
2017-01-26 13:24:18 /
2017-03-25 02:00:42 |
| |
Download : |
No files |
|
|
Sponsored Links / Related |
|
|
|
|
|
|

|