WebSocket ตอนที่ 3 : การสร้าง Server ทำหน้าที่ รับ-ส่ง ข้อมูล Real Time ด้วย PHP |
WebSocket ตอนที่ 3 : การสร้าง Server ทำหน้าที่ รับ-ส่ง ข้อมูล Real Time ด้วย PHP ในขั้นตอนแรกของการเขียน Web Sockets ขั้นแรกเราจะต้องสร้าง Service ที่จะทำหน้าที่คอยตรวจสอบการเชื่อมต่อจาก Client มายัง Server และตรวจสอบสถานะของทุกๆ Client ที่เชื่อมต่อเข้ามา และช่องทางในการเชื่อมต่อนั้นจะ Protocol TCP ในรูปแบบของ Host Name/IP และตามด้วย Port
เช่น
ws://localhost:8089
ซึ่งในนี้นี้จะเชื่อมต่อแบบ localhost และ port: 8089 ในกรณีที่ใช้งานจริงก็จะเป็น Domain Name หรือ IP เช่น ws://https://www.thaicreate.com:8089
Note! ในการเชื่อมต่อนั้นจะต้องตรวจสอบให้แน่ใจว่า Network ยอมให้มีการเชื่อมต่อ โดยไม่ติด Block port หรือ Firewall
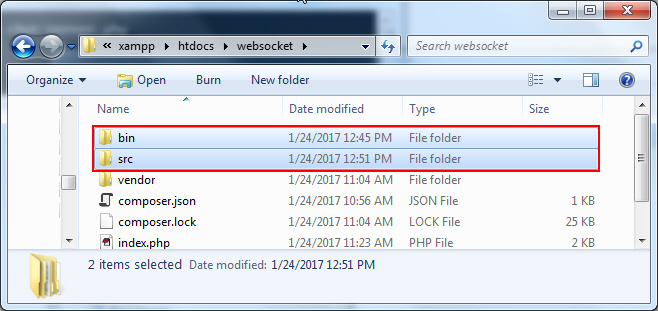
ให้สร้างโฟเดอร์ตามโครงสร้างที่เราได้กำหนดไว้ใน Composer ตอนที่ Install Library คือ
bin/
src/MyApp/

โฟเดอร์ ที่ถูกสร้างขึ้นมาใหม่

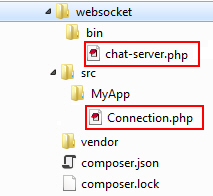
ในการสร้าง Services ของ WebSockets เราจะใช้ไฟล์ 2 ตัวคือ chat-server.php และ Connection.php
โดย Connection.php เป็นไฟล์สำหรับเก็บคำสั่งต่างๆ ที่จะเกิดขึ้นกับ Services ส่วน chat-server.php เป็นตัว run services
class Chat implements MessageComponentInterface {
    public function onOpen(ConnectionInterface $conn) {
    }

    public function onMessage(ConnectionInterface $from, $msg) {
    }

    public function onClose(ConnectionInterface $conn) {
    }

    public function onError(ConnectionInterface $conn, \Exception $e) {
    }
}
โดย
onOpen - เมื่อ User เชื่อมต่อเข้ามา Event นี้จะทำงาน
onMessage - เมื่อ Message ถูกส่งมาจาก Client และเราจะ Push กลับไปที่ method นี้
onClose - เมื่อ User ปิดการเชื่อมต่อ
onError - เมื่อเกิด Error ข้อผิดพลาด
src\MyApp\Connection.php
<?php

namespace MyApp;

use Ratchet\MessageComponentInterface;
use Ratchet\ConnectionInterface;

class Connection implements MessageComponentInterface {

    protected $clients;

    public function __construct() {
        $this->clients = new \SplObjectStorage;
        echo "Congratulations! the server is now running\n";
    }

    public function onOpen(ConnectionInterface $conn) {
        // Store the new connection to send messages to later
        $this->clients->attach($conn);

        echo "New connection! ({$conn->resourceId})\n";
    }

    public function onMessage(ConnectionInterface $from, $msg) {
        $numRecv = count($this->clients) - 1;
        echo sprintf('Connection %d sending message "%s" to %d other connection%s' . "\n"
                , $from->resourceId, $msg, $numRecv, $numRecv == 1 ? '' : 's');

        foreach ($this->clients as $client) {
            if ($from !== $client) {
                // The sender is not the receiver, send to each client connected
                $client->send($msg);
            }
        }
    }

    public function onClose(ConnectionInterface $conn) {
        // The connection is closed, remove it, as we can no longer send it messages
        $this->clients->detach($conn);

        echo "Connection {$conn->resourceId} has disconnected\n";
    }

    public function onError(ConnectionInterface $conn, \Exception $e) {
        echo "An error has occurred: {$e->getMessage()}\n";

        $conn->close();
    }

}
?>
Method ที่เราสนใจจะอยู่ที่ onMessage ซึ่งทำงาน รับ-ส่ง ข้อมูลระหว่าง Server -> Client ในกรณีที่เราจะจัดเก็บก็ให้ใส่คำสั่งต่างๆ ที่นี่ได้เลย
bin\chat-server.php
<?php

use Ratchet\Server\IoServer;
use Ratchet\Http\HttpServer;
use Ratchet\WebSocket\WsServer;
use MyApp\Connection;

require dirname(__DIR__) . '/vendor/autoload.php';

$server = IoServer::factory(
                new HttpServer(
                new WsServer(
                new Connection()  ) ), 8089
);

$server->run();
?>
เป็นไฟล์สำหรับ Run Services โดยรันภายใต้ Port : 8089
จาก Code จะเห็นว่าหลักๆ ในฝั่งของ Service ของ WebSockets เราจะใช้แค่ 2 ไฟล์เท่านั้น และคำสั่งก็ไม่เยอะด้วย และสามารถพัฒนาต่อยอดได้โดยไม่ยาก
ทดสอบการทำงาน
D:\xampp\htdocs\websocket\bin>php chat-server.php

รันคำสั่ง php chat-server.php ภายใต้ bin โฟเดอร์ ถ้าขึ้นเหมือนในรูป แสดงว่าตอนนี้ Services ของ WebSocket ทำงานที่ Server เรียบร้อยแล้ว
สำหรับการเชื่อมต่อจาก Client สามารถอ่านได้จากหัว้อถัดไป
.
|
 ช่วยกันสนับสนุนรักษาเว็บไซต์ความรู้แห่งนี้ไว้ด้วยการสนับสนุน Source Code 2.0 ของทีมงานไทยครีเอท ช่วยกันสนับสนุนรักษาเว็บไซต์ความรู้แห่งนี้ไว้ด้วยการสนับสนุน Source Code 2.0 ของทีมงานไทยครีเอท
|
|
| |
By : |
ThaiCreate.Com Team (บทความเป็นลิขสิทธิ์ของเว็บไทยครีเอทห้ามนำเผยแพร่ ณ เว็บไซต์อื่น ๆ) |
| |
Score Rating : |
    |
|
| |
Create/Update Date : |
2017-01-26 13:24:05 /
2017-03-25 02:01:01 |
| |
Download : |
No files |
|
|
Sponsored Links / Related |
|
|
|
|
|
|

|