ตอนที่ 5 : iOS / iPhone สร้างตาราง Table บน Mobile Services และการ Insert ข้อมูล |
ตอนที่ 5 : iOS / iPhone สร้างตาราง Table บน Mobile Services และการ Insert ข้อมูล บทความนี้ขอต่อจากตอนที่แล้ว ซึ่งจะเป็นการสร้าง Table ไว้สำหรับจัดเก็บข้อมูลบน Mobile Services และ การเขียน iOS App เพื่อ สร้าง Column หรือฟิวด์ พร้อม ๆ กับการส่งข้อมูลจาก iOS แล้วนำไปจัดเก็บ Insert ไว้ใน Table ของ Mobile Services บน Windows Azure

ตอนนี้เรามี Mobile Services อยู่ 1 ตัว
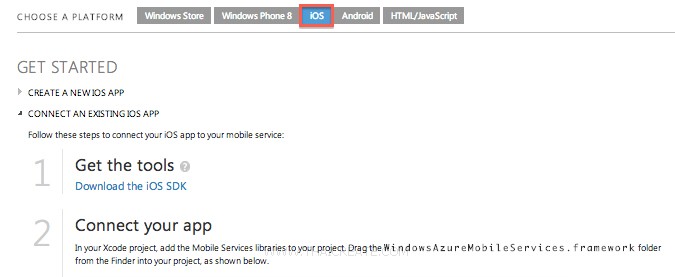
เลือก iOS
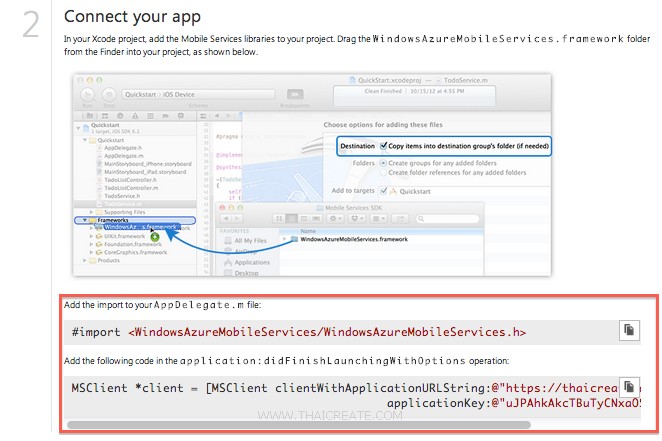
ในหน้า Get Started จะแสดงรายละเอียดของการเชื่อมต่อ และได้อธิบายไว้ในบทความก่อน ๆ หน้านี้แล้ว ในขั้นตอนนี้ยังไม่ต้องทำอะไร
ขั้นตอนการสร้าง Table หรือตาราง
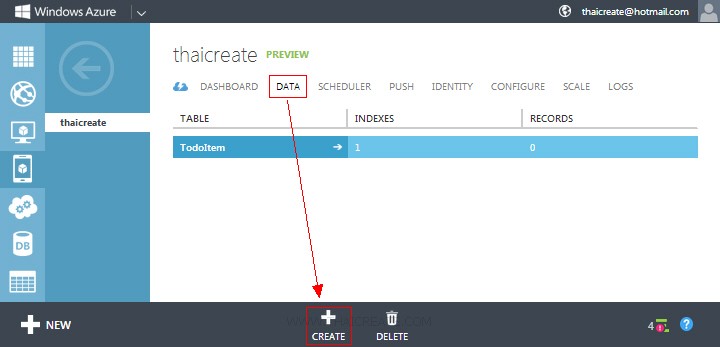
คลิกที่ DATA และเลือก CREATE
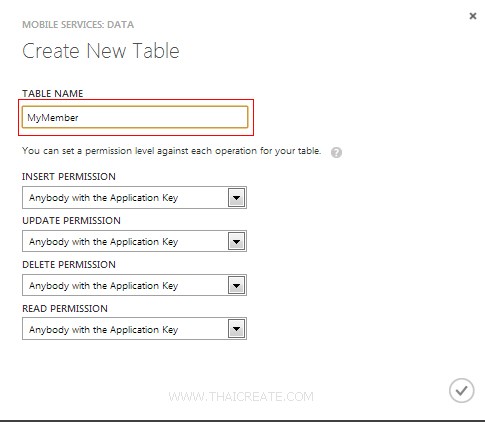
ใส่ชื่อตารางในที่นี้จะใส่เป็น MyMember

ได้ตารางขึ้นมา 1 รายการชื่อว่า MyMember
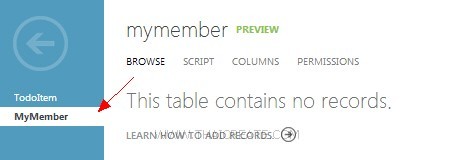
ให้คลิกเข้าไปใน Table (ตาราง) ซึ่งตอนนี้ยังไม่มี Column และ Rows
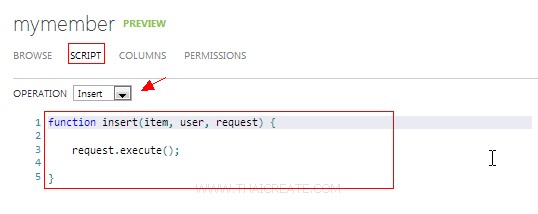
เมนู SCRIPT เป็นพวก Script ที่ไว้ทำหน้าที่รับข้อมูลจาก iOS แล้ว Insert ลงใน Table การทำงานคล้าย ๆ กับ Stored Procedure ซึ่งเราสามารถเขียน Script เพิ่มเติมได้ แต่ตอนนี้แนะนำให้กำหนดเป็นค่า Default ซะก่อน
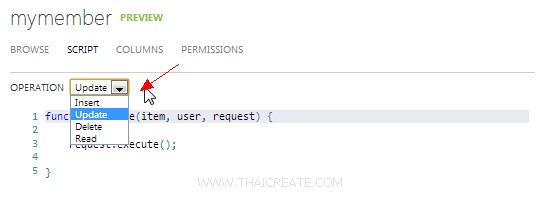
หลัก ๆ จะมีอยู่ 4 ตัวคือ Insert , Update , Delete , Read
กลับมาบน Project ของ iOS บน Xcode
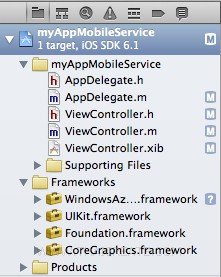
ตอนนี้ Project ของเรายังไม่มีอะไร เป็นเพียงโครงสร้างเปล่า ๆ ที่ประกอบด้วย xib, .h และ .m จำนวน 1 ชุด และมีการเรียกใช้ Framework ของ WindowsAzureMobileServices.framework (วิธี Import ดูได้จากบทความก่อนหน้านี้)
ในการเขียน iOS ติดต่อกับ Table ที่อยู่บน Mobile Services เราจะสร้าง Class ไว้สำหรับการจัดการกับ Table นั้น ๆ โดยให้เราสร้าง Class ที่เป็น .h และ .m ขึ้นมา 1 ชุด (ไม่ต้องใช้ .xib)
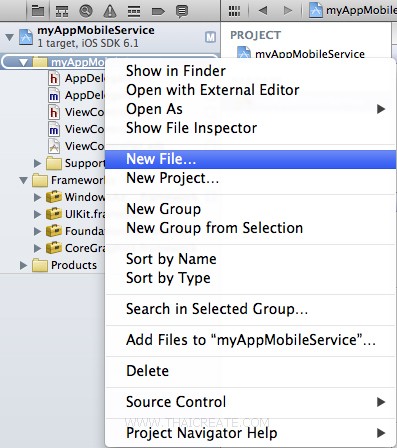
คลิกขวาที่ Project -> New File...
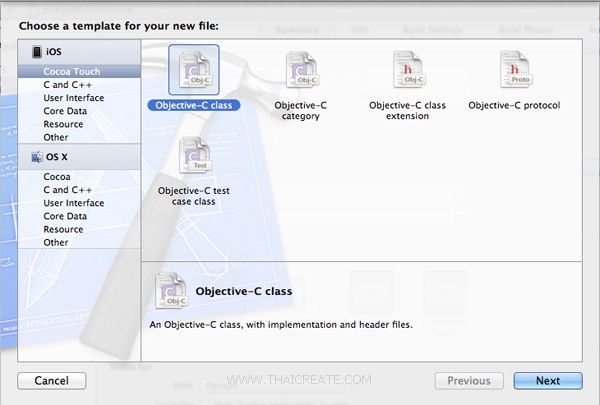
เลือก Objective-C Class
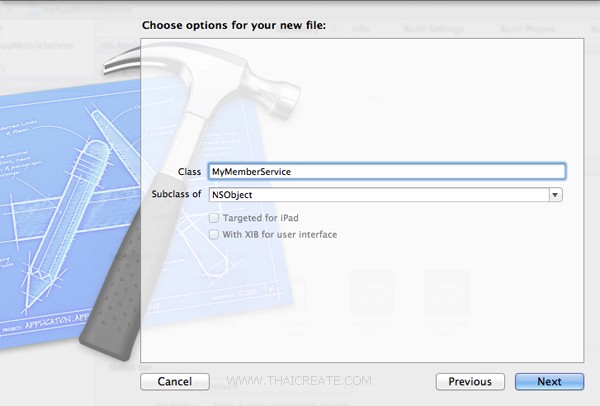
เนื่องจาก Table ใน Mobile Services ชื่อว่า MyMember เลยตั้งชื่อว่า MyMemberService และเลือก Subclass เป็น NSObject (สามารถตั้งเป็นชื่ออะไรก็ได้)
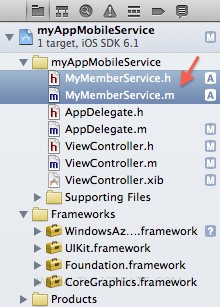
ได้ Class ไฟล์ชื่อ MyMemberService.h และ MyMemberService.m ขึ้นมา 1 ชุด และมีคำสั่งต่าง ๆ ดังนี้
MyMemberService.h
//
//  MyMemberService.h
//  myAppMobileService
//
//  Created by Weerachai on 7/21/56 BE.
//  Copyright (c) 2556 Weerachai. All rights reserved.
//

#import <WindowsAzureMobileServices/WindowsAzureMobileServices.h>
#import <Foundation/Foundation.h>


typedef void (^QSCompletionBlock) ();
typedef void (^QSBusyUpdateBlock) (BOOL busy);


@interface MyMemberService : NSObject

@property (nonatomic, strong)   NSArray *items;
@property (nonatomic, strong)   MSClient *client;
@property (nonatomic, copy)     QSBusyUpdateBlock busyUpdate;


+ (MyMemberService *)defaultService;


- (void)addItem:(NSDictionary *)item
     completion:(QSCompletionBlock)completion;

- (void)handleRequest:(NSURLRequest *)request
                 next:(MSFilterNextBlock)next
             response:(MSFilterResponseBlock)response;

@end
MyMemberService.m
//
//  MyMemberService.m
//  myAppMobileService
//
//  Created by Weerachai on 7/21/56 BE.
//  Copyright (c) 2556 Weerachai. All rights reserved.
//

#import "MyMemberService.h"
#import <WindowsAzureMobileServices/WindowsAzureMobileServices.h>


@interface MyMemberService() <MSFilter>

@property (nonatomic, strong)   MSTable *table;
@property (nonatomic)           NSInteger busyCount;

@end

@implementation MyMemberService

@synthesize items;


+ (MyMemberService *)defaultService
{
    // Create a singleton instance of MyMemberService
    static MyMemberService* service;
    static dispatch_once_t onceToken;
    dispatch_once(&onceToken, ^{
        service = [[MyMemberService alloc] init];
    });

    return service;
}

-(MyMemberService *)init
{
    self = [super init];

    if (self)
    {
        // Initialize the Mobile Service client with your URL and key
        MSClient *client = [MSClient clientWithApplicationURLString:@"https://thaicreate.azure-mobile.net/"
        applicationKey:@"uJPAhkAkcTBuTyCNxaOSnDKFzkoYqB49"];

        // Add a Mobile Service filter to enable the busy indicator
        self.client = [client clientWithFilter:self];

        // Create an MSTable instance to allow us to work with the TodoItem table
        self.table = [_client tableWithName:@"MyMember"];

        self.items = [[NSMutableArray alloc] init];
        self.busyCount = 0;
    }

    return self;
}


-(void)addItem:(NSDictionary *)item completion:(QSCompletionBlock)completion
{
    // Insert the item into the TodoItem table and add to the items array on completion
    [self.table insert:item completion:^(NSDictionary *result, NSError *error)
     {
         [self logErrorIfNotNil:error];

         NSUInteger index = [items count];
         [(NSMutableArray *)items insertObject:result atIndex:index];

         // Let the caller know that we finished
         completion();
     }];
}

- (void)busy:(BOOL)busy
{
    // assumes always executes on UI thread
    if (busy)
    {
        if (self.busyCount == 0 && self.busyUpdate != nil)
        {
            self.busyUpdate(YES);
        }
        self.busyCount ++;
    }
    else
    {
        if (self.busyCount == 1 && self.busyUpdate != nil)
        {
            self.busyUpdate(FALSE);
        }
        self.busyCount--;
    }
}

- (void)logErrorIfNotNil:(NSError *) error
{
    if (error)
    {
        NSLog(@"ERROR %@", error);
    }
}


- (void)handleRequest:(NSURLRequest *)request
                 next:(MSFilterNextBlock)next
             response:(MSFilterResponseBlock)response
{
    // A wrapped response block that decrements the busy counter
    MSFilterResponseBlock wrappedResponse = ^(NSHTTPURLResponse *innerResponse, NSData *data, NSError *error)
    {
        [self busy:NO];
        response(innerResponse, data, error);
    };

    // Increment the busy counter before sending the request
    [self busy:YES];
    next(request, wrappedResponse);
}

@end
Class เหล่านี้ผมทำการ Apply มาจากตัวอย่าง Demo ของ Windows Azure ฉะนั้น มันสามารถทำงานได้เป็นอย่างดี และโครงสร้างนี้เป็น มาตรฐาน สามารถนำไป Apply ได้กับการเขียนในรูปแบบต่าง ๆ โดยเราแค่เขียน function / method เพิ่มตามที่ต้องการเท่านั้น
ประเด็นสำคัญจะอยู่ที่
-(MyMemberService *)init
{
    self = [super init];

    if (self)
    {
        // Initialize the Mobile Service client with your URL and key
        MSClient *client = [MSClient clientWithApplicationURLString:@"https://thaicreate.azure-mobile.net/"
        applicationKey:@"uJPAhkAkcTBuTyCNxaOSnDKFzkoYqB49"];

        // Add a Mobile Service filter to enable the busy indicator
        self.client = [client clientWithFilter:self];

        // Create an MSTable instance to allow us to work with the TodoItem table
        self.table = [_client tableWithName:@"MyMember"];

        self.items = [[NSMutableArray alloc] init];
        self.busyCount = 0;
    }

    return self;
}
อันนี้เป็นการกำหนด App URL และ App Key ที่อยู่ใน Mobile Services ของเรา และที่สำคัญคือชื่อ Table
-(void)addItem:(NSDictionary *)item completion:(QSCompletionBlock)completion
{
    // Insert the item into the TodoItem table and add to the items array on completion
    [self.table insert:item completion:^(NSDictionary *result, NSError *error)
     {
         [self logErrorIfNotNil:error];

         NSUInteger index = [items count];
         [(NSMutableArray *)items insertObject:result atIndex:index];

         // Let the caller know that we finished
         completion();
     }];
}
เป็น method สำหรับการ Insert ข้อมูล
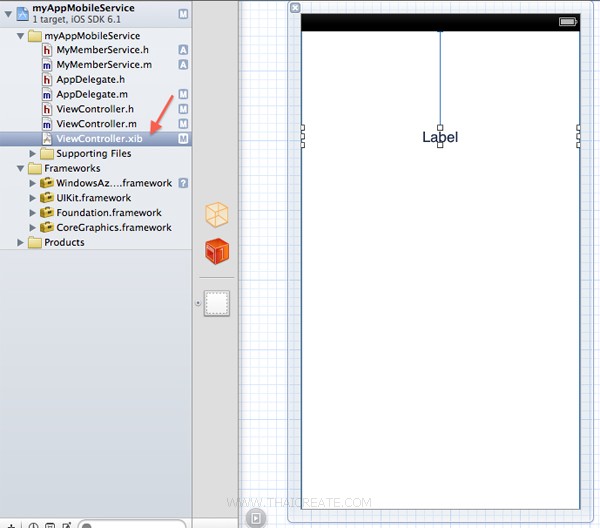
กลับมายังหน้า View ของ App ให้ทำการสร้าง Label ดังรูป เพื่อไว้แสดงข้อความเมื่อทำการ Insert ข้อมูลเรียบร้อย โดยทำการเชื่อม IBOutlet
ให้เรียบร้อยด้วย จากนั้นในไฟล์ ViewController.h และ ViewController.m ขียนคำสั่งดังนี้
ViewController.h
//
//  ViewController.h
//  myAppMobileService
//
//  Created by Weerachai on 5/12/56 BE.
//  Copyright (c) 2556 Weerachai. All rights reserved.
//

#import <UIKit/UIKit.h>

@interface ViewController : UIViewController
{
    IBOutlet UILabel *lblStatus;
}

@end
ViewController.m
//
//  ViewController.m
//  myAppMobileService
//
//  Created by Weerachai on 5/12/56 BE.
//  Copyright (c) 2556 Weerachai. All rights reserved.
//

#import <WindowsAzureMobileServices/WindowsAzureMobileServices.h>
#import "MyMemberService.h"

#import "ViewController.h"

@interface ViewController ()

// Private properties
@property (strong, nonatomic)   MyMemberService   *memberService;

@end


@implementation ViewController

@synthesize memberService;


- (void)viewDidLoad
{
    [super viewDidLoad];

    // Start Service
    self.memberService = [MyMemberService defaultService];

    // Add Data Table Service
    NSDictionary *item = @{ @"name":@"Win", @"email":@"[email protected]" };
    [self.memberService addItem:item completion:^
     {
         lblStatus.text = @"Insert Data Successfully.";
     }];
}

- (void)didReceiveMemoryWarning
{
    [super didReceiveMemoryWarning];
    // Dispose of any resources that can be recreated.
}

- (void)dealloc {
    [lblStatus release];
    [super dealloc];
}
@end
เป็นการเรียกใช้งาน Class สำหรับการ Insert ข้อมูลไปไว้บน Mobile Services ของ Windows Azure โดยประเด็นสำคัญอยู่ที่
// Start Service
self.memberService = [MyMemberService defaultService];
// Add Data Table Service
NSDictionary *item = @{ @" name":@"Win", @" email":@" [email protected]" };
[self.memberService addItem:item completion:^
{
lblStatus.text = @"Insert Data Successfully.";
}];
คำสั่งนี้จะเป็นการ Insert ข้อมูลไปจัดเก็บไว้ที่ Table ของ Mobile Services และเราจะเห็นว่า ตั้งแต่เราสร้าง Table เรายังไม่มีการสร้าง Column หรือฟิวด์เลย เพราะเราไม่จำเป็ฯจะต้องสร้าง เพราะเมื่อมีการ Insert ข้อมูลเข้าไปใหม่ ถ้าฟิวด์ไหนไม่มี จะมีการสร้างขึ้นใหม่ให้
อัตโนมัติ และในตัวอย่างนี้เรามีอยู่ 2 ฟิวด์คือ name และ email
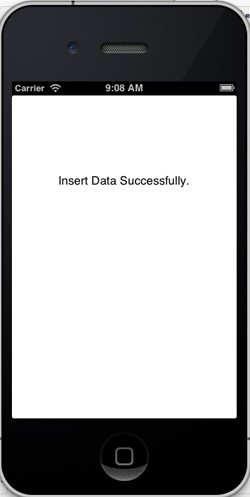
ทดสอบการรัน App

เมื่อกลับไปดูที่ Data บน Mobile Services ข้อมูลจะถูก Insert เข้า ซึ่งเราจะเห็นว่ามี Column ชื่อ id ด้วย เพราะ Column นี้จำเป็นที่ระบบจะสร้างให้อัตโนัติ และเราสามารถเรียกมันใช้งานได้เช่นกัน
ดาวน์โหลดได้จากข้างล่างของบทความ
บทความถัดไปที่แนะนำให้อ่าน
บทความที่เกี่ยวข้อง
| Property & Method (Others Related) |
|
 ช่วยกันสนับสนุนรักษาเว็บไซต์ความรู้แห่งนี้ไว้ด้วยการสนับสนุน Source Code 2.0 ของทีมงานไทยครีเอท ช่วยกันสนับสนุนรักษาเว็บไซต์ความรู้แห่งนี้ไว้ด้วยการสนับสนุน Source Code 2.0 ของทีมงานไทยครีเอท
|
|
| |
By : |
ThaiCreate.Com Team (บทความเป็นลิขสิทธิ์ของเว็บไทยครีเอทห้ามนำเผยแพร่ ณ เว็บไซต์อื่น ๆ) |
| |
Score Rating : |
 |
|
| |
Create/Update Date : |
2013-06-15 19:50:17 /
2017-03-24 11:45:32 |
| |
Download : |

|
|
|
Sponsored Links / Related |
|
|
|
|
|
|

|