ตอนที่ 12 : Scripts to authorize users in Mobile Services บน Windows Phone |
ตอนที่ 12 : Scripts to authorize users in Mobile Services บน Windows Phone บน Mobile Services ของ Windows Azure เราสามารถทำการเขียน Script เพื่อทำการ authorize authenticated users หมายถึงการระบุข้อมูลเฉพาะ id ของตัวเอง โดยสามารถที่จะเขียน Script เพื่อให้ข้อมูลนั้น ๆ เป็นของ users และตอนที่แสดงผลก็สามารถที่จะเลือกข้อมูลเฉพาะของ users นั้น ๆ ได้ ตัวอย่างเช่น
insert() เป็นการเขียน Script ส่วนของของคำสั่ง Insert บน Mobile Services
function insert(item, user, request) {
  item.userId = user.userId;
  request.execute();
}
read() เป็นการเขียน Script ส่วนของของคำสั่ง Read บน Mobile Services
function insert(item, user, request) {
  item.userId = user.userId;
  request.execute();
}
เมื่อกำหนดเงื่อนไขตามตัวอย่างก็จะดึงเฉพาะของ User นั้น ๆ ที่ Authen เข้ามาในระบบ
User ที่ Authentication หมายถึง user ที่ authentication ผ่าน identity provider ผ่านพวก Google , Microsoft , Facebook ,Twitter
นอกจากนี้เรายังสามารถเขียน Query ในฝั่งของ Windows Phone เพื่อให้ทำงานอื่น ๆ ได้หลากหลาย เช่น
ตรวจสอบความยาวของข้อมูลจะต้องไม่เกิน 10 ตัวอีกษร
function insert(item, user, request) {
    if (item.text.length > 10) {
        request.respond(statusCodes.BAD_REQUEST, 'Text length must be under 10');
    } else {
        request.execute();
    }
}
กำหนดค่าไปใน Query ตอนที่ทำการ insert()
function insert(item, user, request) {
    item.scriptComment =
        'this was added by a script and will be saved to the database';
    request.execute();
}
กำหนดค่าเข้าไปใน Query ตอนที่มีการ update()
function update(item, user, request) {
    item.scriptComment =
        'this was added by a script and will be saved to the database';
    request.execute();
}
สร้างเงื่อนไขตอนที่มีการ read()
function read(query, user, request) {
    // Only return records for the current user
    query.where({ userid: user.userId});
    request.execute();
}
insert() ข้อมูล column ชื่อว่า owner เท่ากับ user ที่ทำการ authen
function insert(item, user, request) {
    item.owner = user.userId;
    request.execute();
}
query ข้อมูลจาก user ที่ authen
function read(query, user, request) {
    query.where({
        owner: user.userId
    });
    request.execute();
}
ตรวจสอบข้อมูล่า user ที่ส่งมาจาก item กับที่ authen ตรงกันหรือไม่
function insert(item, user, request) {
    if (item.userId !== user.userId) {
        request.respond(statusCodes.FORBIDDEN,
        'You may only insert records with your userId.');
    } else {
        request.execute();
    }
}
ตรวจสอบการอ่านข้อมูล และการเพิ่มข้อมูล column ที่ query แล้ว
function read(query, user, request) {
    request.execute({
        success: function(results) {
            results.forEach(function(r) {
                r.scriptComment =
                'this was added by a script after querying the database';
            });
            request.respond();
        }
    });
}
ตัวอย่างการ update และการสร้าง log
function update(item, user, request) {
  request.execute({
    error: function(err) {
      // Do some custom logging, then call respond.
      request.respond();
    }
  });
}
การเขียน query ก่อนการ insert()
function insert(item, user, request) {
        var todoItemTable = tables.getTable('TodoItem');
        // Check the supplied custom parameter to see if
        // we should allow duplicate text items to be inserted.
        if (request.parameters.duplicateText === 'false') {
            // Find all existing items with the same text
            // and that are not marked 'complete'.
            todoItemTable.where({
                text: item.text,
                complete: false
            }).read({
                success: insertItemIfNotComplete
            });
        } else {
            request.execute();
        }

        function insertItemIfNotComplete(existingItems) {
            if (existingItems.length > 0) {
                request.respond(statusCodes.CONFLICT,
                    "Duplicate items are not allowed.");
            } else {
                // Insert the item as normal.
                request.execute();
            }
        }
    }
อ่านเพิ่มเติมได้ที่นี่
Example ตัวอย่างการเขียน Script และ Query แบบง่าย ๆ

ตอนนี้เรามี Mobile Service อยู่ 1 รายการ

มีตารางชื่อว่า MyMember มีข้อมูลอยู่ 4 รายการ
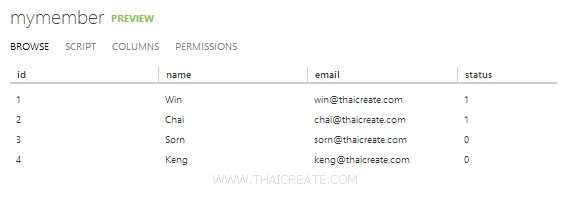
มีข้อมูลอยู่ 4 รายการ
กลับมายัง Project ของ Windows Phone บน Visual Studio
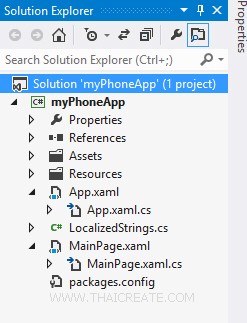
โครงสร้างไฟล์
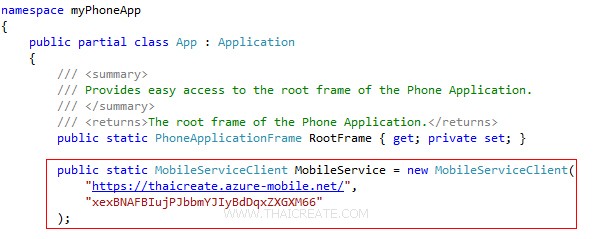
ในไฟล์ App.xaml.cs ให้ Copy Url และ key มาวางดังรูป จากนั้นออกแบบ Layout และเขียน Code ดังนี้
MainPage.xaml
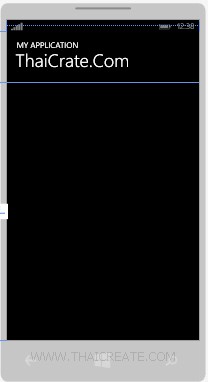
<phone:PhoneApplicationPage
    x:Class="myPhoneApp.MainPage"
    xmlns="http://schemas.microsoft.com/winfx/2006/xaml/presentation"
    xmlns:x="http://schemas.microsoft.com/winfx/2006/xaml"
    xmlns:phone="clr-namespace:Microsoft.Phone.Controls;assembly=Microsoft.Phone"
    xmlns:shell="clr-namespace:Microsoft.Phone.Shell;assembly=Microsoft.Phone"
    xmlns:d="http://schemas.microsoft.com/expression/blend/2008"
    xmlns:mc="http://schemas.openxmlformats.org/markup-compatibility/2006"
    mc:Ignorable="d"
    FontFamily="{StaticResource PhoneFontFamilyNormal}"
    FontSize="{StaticResource PhoneFontSizeNormal}"
    Foreground="{StaticResource PhoneForegroundBrush}"
    SupportedOrientations="Portrait" Orientation="Portrait"
    shell:SystemTray.IsVisible="True">

    <!--LayoutRoot is the root grid where all page content is placed-->
    <Grid x:Name="LayoutRoot" Background="Transparent">
        <Grid.RowDefinitions>
            <RowDefinition Height="Auto"/>
            <RowDefinition Height="*"/>
        </Grid.RowDefinitions>

        <!--TitlePanel contains the name of the application and page title-->
        <StackPanel x:Name="TitlePanel" Grid.Row="0" Margin="12,17,0,28">
            <TextBlock Text="MY APPLICATION" Style="{StaticResource PhoneTextNormalStyle}" Margin="12,0"/>
            <TextBlock Text="ThaiCrate.Com" Margin="9,-7,0,0" Style="{StaticResource PhoneTextTitle1Style}" FontSize="45"/>
        </StackPanel>

        <!--ContentPanel - place additional content here-->
        <Grid x:Name="ContentPanel" Grid.Row="1" Margin="12,0,12,0">

            <phone:LongListSelector Grid.Row="4" Grid.ColumnSpan="2" Name="myListItems">
                <phone:LongListSelector.ItemTemplate>
                    <DataTemplate>

                        <StackPanel Orientation="Horizontal" Margin="0,0,0,17">
                            <StackPanel Width="50">
                                <TextBlock Text="{Binding Id}" TextWrapping="Wrap" Margin="5,0,0,0" Style="{StaticResource PhoneTextSubtleStyle}"/>
                            </StackPanel>
                            <StackPanel Width="80">
                                <TextBlock Text="{Binding Name}" TextWrapping="Wrap" Margin="5,0,0,0" Style="{StaticResource PhoneTextSubtleStyle}"/>
                            </StackPanel>
                            <StackPanel Width="250">
                                <TextBlock Text="{Binding Email}" TextWrapping="Wrap" Margin="5,0,0,0" Style="{StaticResource PhoneTextSubtleStyle}"/>
                            </StackPanel>
                            <StackPanel Width="50">
                                <TextBlock Text="{Binding Status}" TextWrapping="Wrap" Margin="5,0,0,0" Style="{StaticResource PhoneTextSubtleStyle}"/>
                            </StackPanel>
                        </StackPanel>

                    </DataTemplate>
                </phone:LongListSelector.ItemTemplate>
            </phone:LongListSelector>

        </Grid>

      </Grid>

</phone:PhoneApplicationPage>
MainPage.xaml.cs
using System;
using System.Collections.Generic;
using System.Linq;
using System.Net;
using System.Windows;
using System.Windows.Controls;
using System.Windows.Navigation;
using Microsoft.Phone.Controls;
using Microsoft.Phone.Shell;
using myPhoneApp.Resources;

using Microsoft.WindowsAzure.MobileServices;
using Newtonsoft.Json;

namespace myPhoneApp
{

    public class MyMember
    {
        public int Id { get; set; }

        [JsonProperty(PropertyName = "name")]
        public string Name { get; set; }

        [JsonProperty(PropertyName = "email")]
        public string Email { get; set; }

        [JsonProperty(PropertyName = "status")]
        public string Status { get; set; }
    }

    public partial class MainPage : PhoneApplicationPage
    {

        private MobileServiceCollection<MyMember, MyMember> items;
        private IMobileServiceTable<MyMember> memberTable = App.MobileService.GetTable<MyMember>();

        // Constructor
        public MainPage()
        {
            InitializeComponent();
        }

        private async void RefreshMemberItems()
        {
            try
            {
                items = await memberTable.ToCollectionAsync();
            }
            catch (MobileServiceInvalidOperationException e)
            {
                MessageBox.Show(e.Message, "Error loading items", MessageBoxButton.OK);
            }

            myListItems.ItemsSource = items;
        }

        protected override void OnNavigatedTo(NavigationEventArgs e)
        {
            RefreshMemberItems();
        }

    }

}
ไฟล์ Layout และ C#

สังเกตุว่าตอนนี้จะใช้การอ่านข้อมูลจาก Table ทั้งหมด
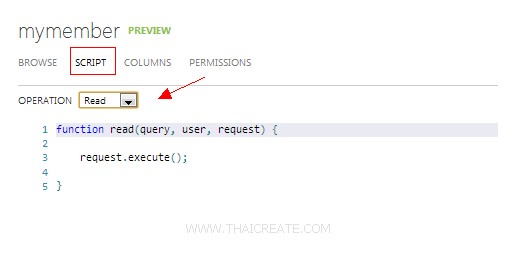
บน query ของ read() ก็ยังไม่ได้เขียนอะไรเพิ่ม
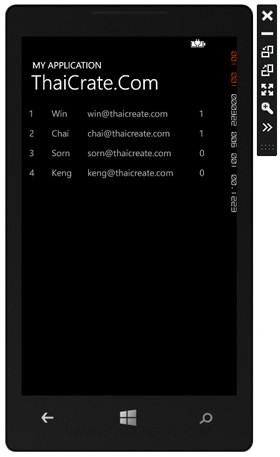
ผลลัพธ์ที่ได้
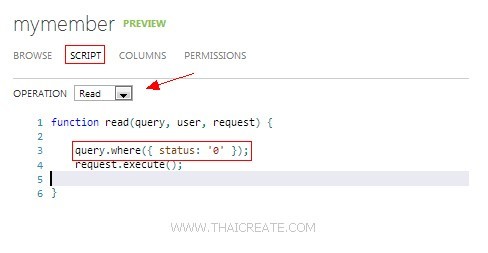
ลองแก้ไข Script บน Mobile Services ให้แก้คำสั่ง read() เป็นตามในรูปภาพ
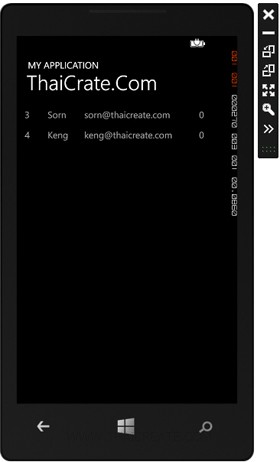
ผลลัพธ์ที่ได้เหมือนทำการแก้ไข Script บน Mobile Service ของ Windows Azure
สำหรับการเขียนและใช้งาน Scripts อยากให้ลองเข้าไปศึกษาในบทความนี้ครับ
สามารถทำการดาวน์โหลด Code ทั้งหมดได้จากท้ายบทความ
บทความถัดไปที่แนะนำให้อ่าน
บทความที่เกี่ยวข้อง
|