ตอนที่ 2 : ASP.Net ติดต่อกับฐานข้อมูล SQL Azure/SQL Database บน Azure |
ตอนที่ 2 : ASP.Net ติดต่อกับฐานข้อมูล SQL Azure/SQL Database บน Azure ในการเขียน ASP.Net และทำงานบน Web Site ของ Windows Azure เราสามารถที่จะทำการสร้าง SQL Azure หรือ SQL Database ขึ้นมาใช้งานได้ทันที ด้วยการเลือก Create SQL Database พร้อมกับ Web Site โดยเมื่อหลังจากที่สร้าง Web Site พร้อมกับ SQL Database แล้ว จะมีการสร้าง Service ของ SQL Database มาให้อัตโนมัติ และเราสามารถที่จะเขียน ASP.Net เพื่อติดต่อกับ Database ผ่าน Connection String ที่กำหนดขึ้น หรือจะเขียน Application อื่น ๆ ที่อยู่คนล่ะแห่งเพื่อเรียกใช้ SQL Database ก็ได้เช่นเดียวกัน โดยใน SQL Database และสามารถที่จะกำหนด Allow ของ IP ที่จะทำการเชื่อมต่อ ในการที่จะกำหนดความปลอดภัยของ Database ได้อีกด้วย
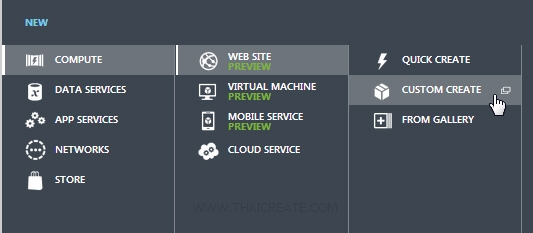
เริ่มต้นด้วยการสร้าง Web Site ด้วยการคลิกที่ NEW -> COMPUTE -> WEB SITE -> CUSTOM CREATE
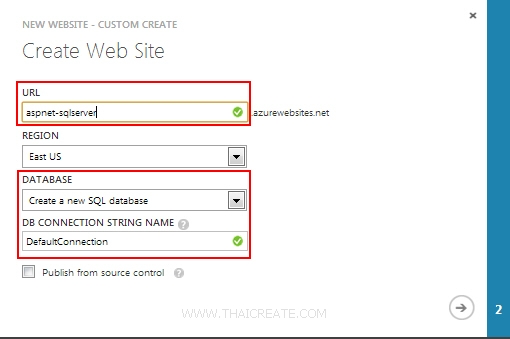
กรอก URL ของ Web Site พร้อมกับคลิกเลือก Create a SQL Database
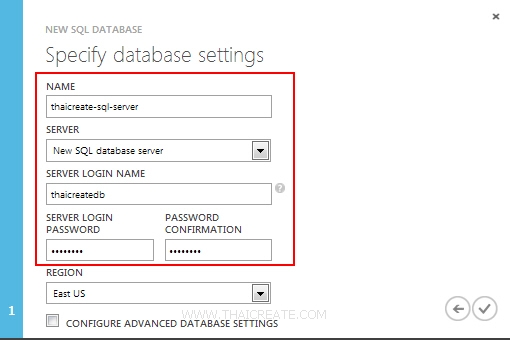
กำหนดชื่อ Database / User / Password และไปขึ้นตอนถัดไป

หลังจากที่ Create Web Site เรียบร้อย เราก็จะได้ Web Site ดังรูป

และเมื่อคลิกที่ Service ของ SQL DATABASE ก็จะเห็นรายการของ SQL Database แสดงขึ้นมา 1 รายการ
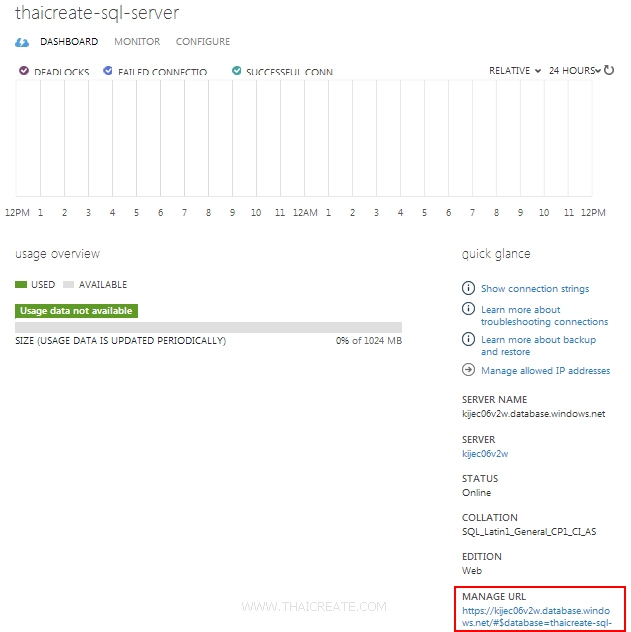
คลิกที่หน้า Dashboard ของ SQL Database แสดงรายละเอียดต่าง ๆ ของ SQL เช่น SERVER NAME ของ Database และจะเห็นเมนูว่า MANAGE URL (ใช้จัดการกับ SQL Server ผ่านเว็บ)
การจัดการกับ SQL Database ในการจัดการกับ SQL Database สามารถทำได้ 2 วิธีคือ ผ่าน URL และผ่าน Tools ของ SQL Server Management Studio
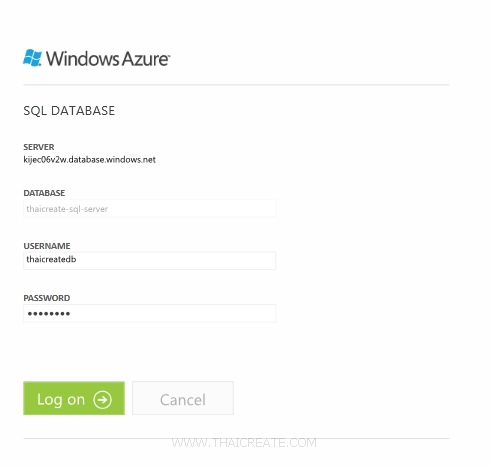
กรณีที่ MANAGE ผ่าน URL ให้กรอก Username และ Password ที่ได้จากขั้นตอนการ Create
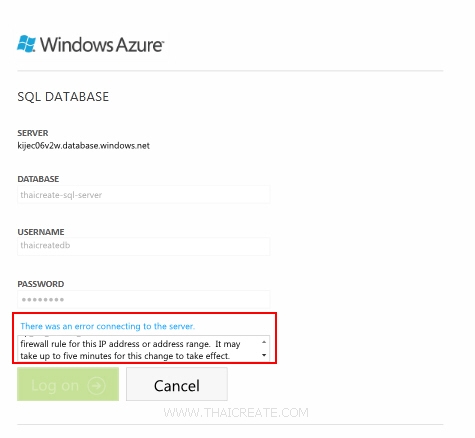
จะเห็นว่าตอนนี้มี Error แจ้งว่า
Firewall check failed. Cannot open server 'kijec06v2w' requested by the login. Client with IP address '14.207.13.132' is not allowed to access the server. To enable access, use the SQL Azure Portal or run sp_set_firewall_rule on the master database to create a firewall rule for this IP address or address range. It may take up to five minutes for this change to take effect.
นั้นหมายถึงว่า IP ที่เราทำการเชื่อมต่อเพื่อไปจัดการกับ SQL Database นั้นไม่ได้มีการ Allow ไว้
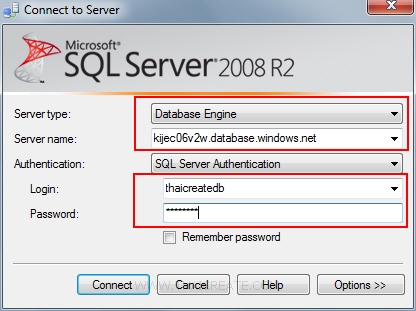
เมื่อทำการ Connect ผ่าน SQL Server Management Studio จากเครื่อง Client ของเรา ก็จะได้ผลลัพธ์เช่นเดียวกัน
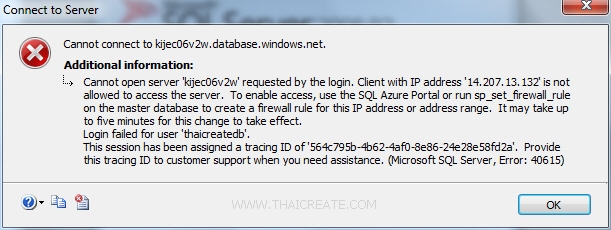
แสดง Error ว่ายังไม่มีการ Allow หมายเลข IP ที่จะขอเชื่อมต่อ
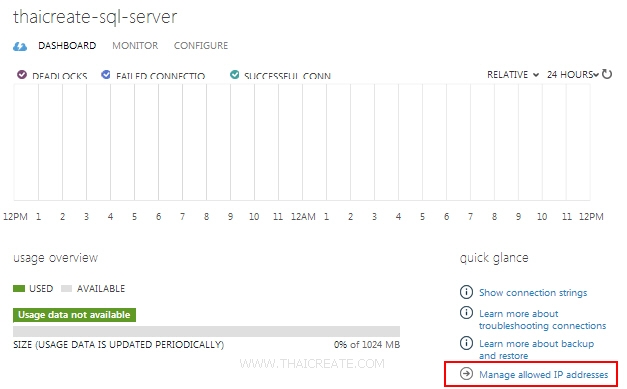
ให้กลับมาที่หน้า Dashboard ของ SQL Database คลิกที่ Manage allow ip addresses

จะเห็นว่ามีหมายเลข IP ของเราแสดงเป็นค่า Default (ในกรณี IP แบบ Dynamic จะต้องเพิ่มทุกครั้ง)
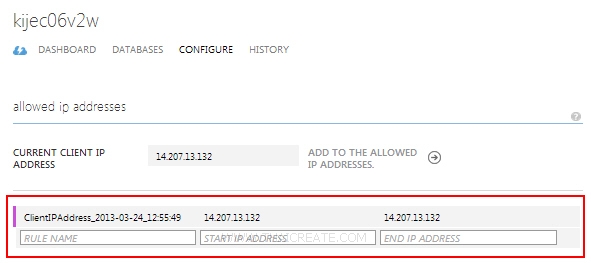
ให้เพิ่มเข้ามาในรายการ Allow IP

จากนั้นคลิกที่ SAVE
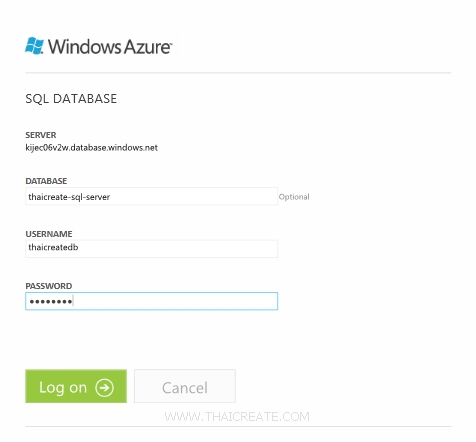
ทดสอบการ Manage ผ่าน URL อีกครั้ง
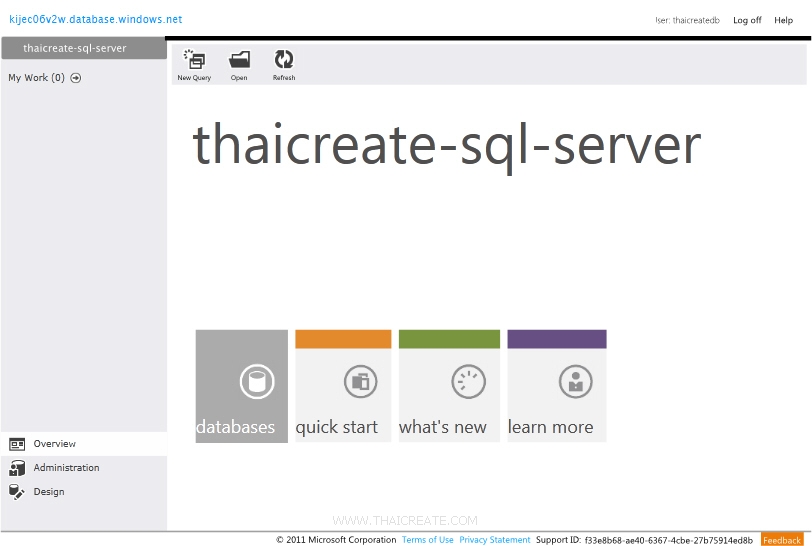
สามารถเข้าสู่หน้าจอการ Manage ของ SQL Database ผ่าน URL ได้แล้ว
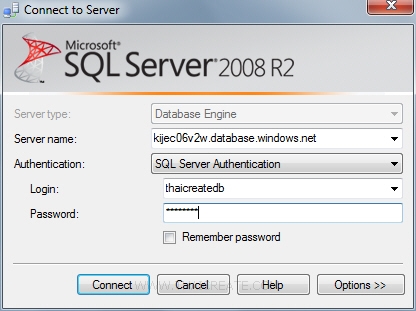
ทดสอบการเชื่อมต่อ SQL Server Management Studio อีกครั้ง
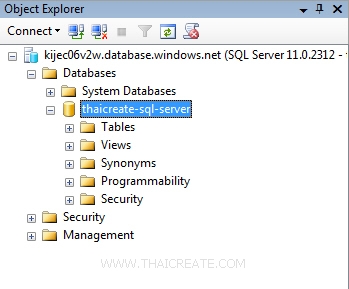
เข้าสู่หน้าจอ SQL Server Management Studio สำหรับการจัด Database ของ SQL Database บน Windows Azure ซึ่งเราสามารถเพิ่มแก้ไขตารางต่าง ๆ จากเครื่อง Client ของเราได้ทันที
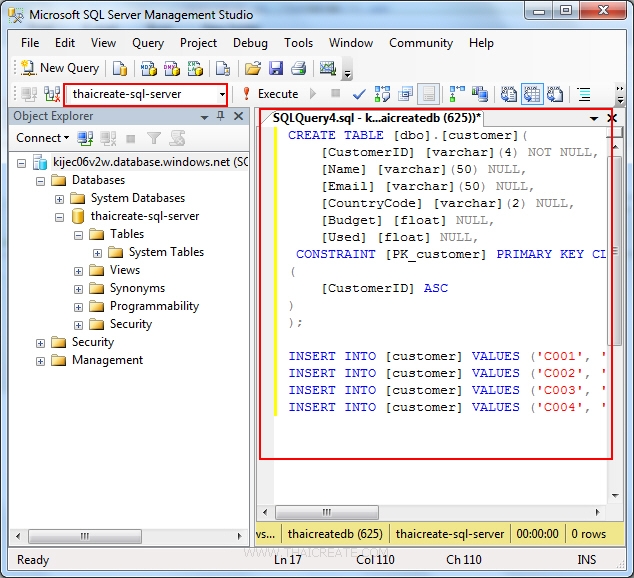
ทดสอบการสร้าง ตารางและข้อมูลง่าย ๆ ด้วยการสร้างผ่านการ Run ผ่าน Query
CREATE TABLE [dbo].[customer](
	[CustomerID] [varchar](4) NOT NULL,
	[Name] [varchar](50) NULL,
	[Email] [varchar](50) NULL,
	[CountryCode] [varchar](2) NULL,
	[Budget] [float] NULL,
	[Used] [float] NULL,
 CONSTRAINT [PK_customer] PRIMARY KEY CLUSTERED
(
	[CustomerID] ASC
)
);

INSERT INTO [customer] VALUES ('C001', 'Win Weerachai', '[email protected]', 'TH', 1000000, 600000);
INSERT INTO [customer] VALUES ('C002', 'John  Smith', '[email protected]', 'UK', 2000000, 800000);
INSERT INTO [customer] VALUES ('C003', 'Jame Bond', '[email protected]', 'US', 3000000, 600000);
INSERT INTO [customer] VALUES ('C004', 'Chalee Angel', '[email protected]', 'US', 4000000, 100000);
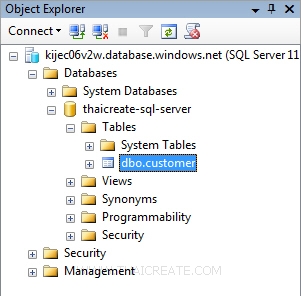
หลังจากสร้างเสร็จแล้วให้ Refresh ซะ 1 ครั้ง จากนั้นก็จะได้ Table ชื่อว่า customer ดังรูป
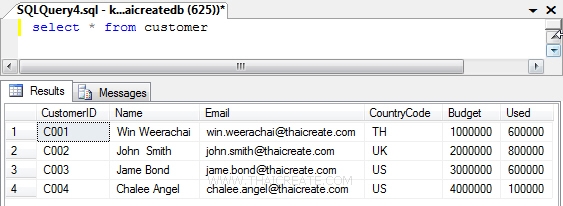
ข้อมูลใน Table ที่ชื่อว่า customer ซึ่งเราจะใช้ ASP.Net ในการที่จะดึงข้อมูลเหล่านี้มาแสดง
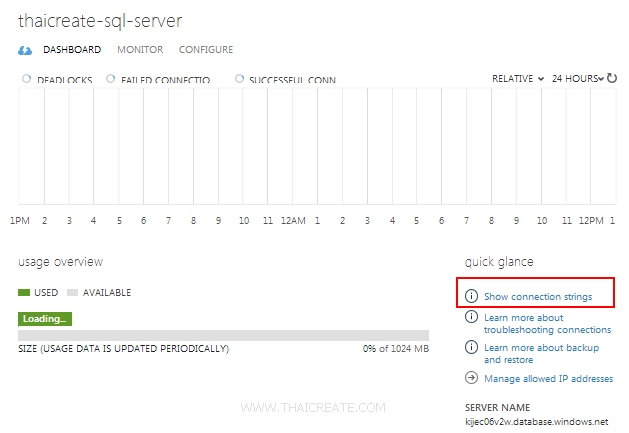
เราสามารถที่จะดู Connection String ได้จากเมนู Dashboard และ Show connection sring
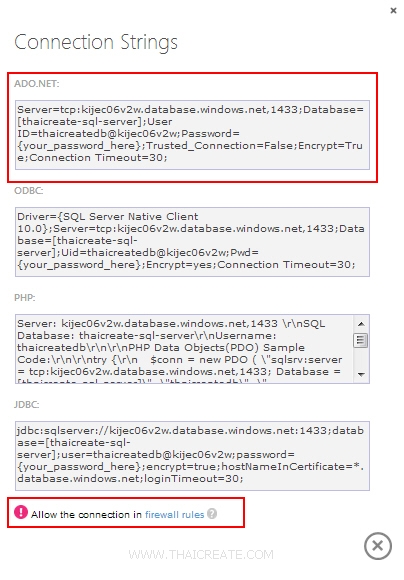
เป็น Connection String ในรูปแบบต่าง ๆ อย่าลืมว่าในกรณีที่ Client เรียกใช้จากแหล่งอื่น ๆ อย่าลืมกำหนด Allow IP ด้วย
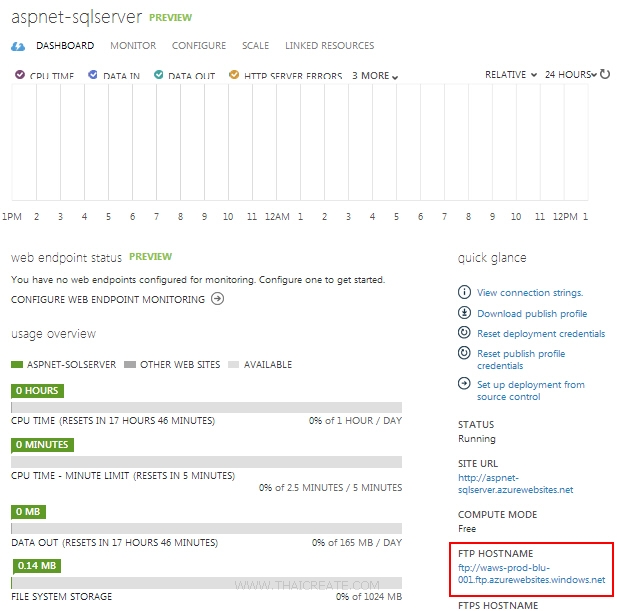
กลับมาหน้า Dashboard ของ Web Site ก็จะมีข้อมูลอื่น ๆ เช่นกัน เช่นข้อมูลเกี่ยวกับการ Upload ผ่าน FTP และ Git
อ่านเพิ่มเติม
ทดสอบการสร้าง ASP.NET แบบง่าย ๆ เพื่อติดต่อกับ SQL Database
Connection String
Server=kijec06v2w.database.windows.net;Uid=thaicreatedb;PASSWORD=qwer123*;database=thaicreate-sql-server;Max Pool Size=400;Connect Timeout=600;
default.aspx
<%@ Import Namespace="System.Data"%>
<%@ Import Namespace="System.Data.SqlClient"%>
<%@ Page Language="VB" %>
<script runat="server">

	Dim objConn As SqlConnection
	Dim objCmd As SqlCommand

    Sub Page_Load(sender As Object, e As EventArgs)
		Dim strConnString As String
		strConnString = "Server=kijec06v2w.database.windows.net;Uid=thaicreatedb;PASSWORD=qwer123*;database=thaicreate-sql-server;Max Pool Size=400;Connect Timeout=600;"
		objConn = New SqlConnection(strConnString)
		objConn.Open()

		BindData()
    End Sub

	Sub BindData()
		Dim strSQL As String
		strSQL = "SELECT * FROM customer"

		Dim dtReader As SqlDataReader
		objCmd = New SqlCommand(strSQL, objConn)
		dtReader = objCmd.ExecuteReader()

		'*** BindData to Repeater ***'
		myRepeater.DataSource = dtReader
		myRepeater.DataBind()

		dtReader.Close()
		dtReader = Nothing

	End Sub

	Sub Page_UnLoad()
		objConn.Close()
		objConn = Nothing
	End Sub


</script>
<html>
<head>
<title>ThaiCreate.Com</title>
</head>
<body>
	<form id="form1" runat="server">
    <asp:Repeater id="myRepeater" runat="server">
	<HeaderTemplate>
		<table border="1">
			<tr>
				<th>CustomerID</th>
				<th>Name</th>
				<th>Email</th>
				<th>CountryCode</th>
				<th>Budget</th>
				<th>Used</th>
			</tr>
	</HeaderTemplate>
	<ItemTemplate>
		<tr>
			<td align="center"><asp:Label id="lblCustomerID" runat="server" Text='<%#Container.DataItem("CustomerID") %>'></asp:Label></td>
			<td><asp:Label id="lblName" runat="server" Text='<%#Container.DataItem("Name") %>'></asp:Label></td>
			<td><asp:Label id="lblEmail" runat="server" Text='<%#Container.DataItem("Email") %>'></asp:Label></td>
			<td align="center"><asp:Label id="lblCountryCode" runat="server" Text='<%#Container.DataItem("CountryCode") %>'></asp:Label></td>
			<td align="right"><asp:Label id="lblBudget" runat="server" Text='<%#Container.DataItem("Budget") %>'></asp:Label></td>
			<td align="right"><asp:Label id="lblUsed" runat="server" Text='<%#Container.DataItem("Used") %>'></asp:Label></td>
		</tr>
	</ItemTemplate>
	<AlternatingItemTemplate>
		<tr bgcolor="#e8e8e8">
			<td align="center"><asp:Label id="lblCustomerID" runat="server" Text='<%#Container.DataItem("CustomerID") %>'></asp:Label></td>
			<td><asp:Label id="lblName" runat="server" Text='<%#Container.DataItem("Name") %>'></asp:Label></td>
			<td><asp:Label id="lblEmail" runat="server" Text='<%#Container.DataItem("Email") %>'></asp:Label></td>
			<td align="center"><asp:Label id="lblCountryCode" runat="server" Text='<%#Container.DataItem("CountryCode") %>'></asp:Label></td>
			<td align="right"><asp:Label id="lblBudget" runat="server" Text='<%#Container.DataItem("Budget") %>'></asp:Label></td>
			<td align="right"><asp:Label id="lblUsed" runat="server" Text='<%#Container.DataItem("Used") %>'></asp:Label></td>
		</tr>
	</AlternatingItemTemplate>
	</asp:Repeater>
	</form>
</body>
</html>
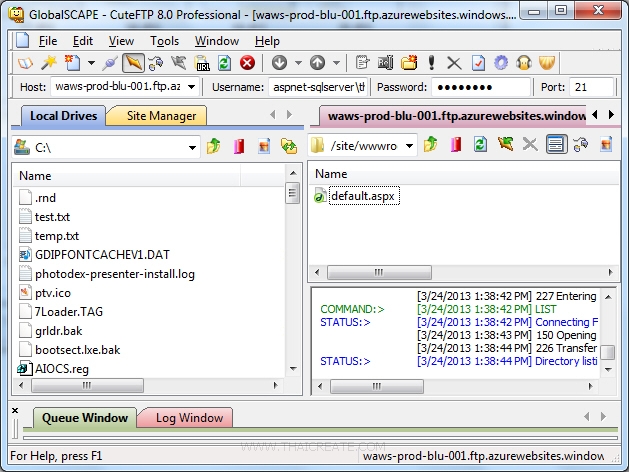
จากนั้นให้ทำการ Upload ด้วย FTP ไปไว้บน Web Site
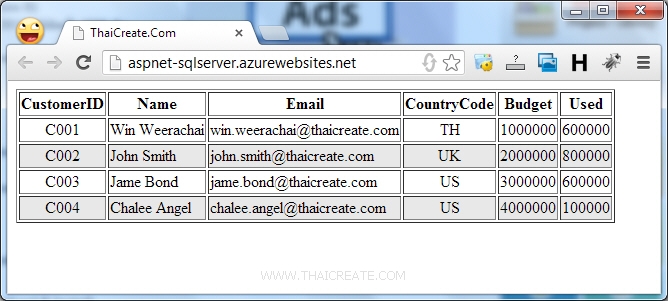
ทดสอบเรียกผ่าน Web Site ของ Windows Azure ก็จะได้ผลลัพธ์ดังรูป
อ่านเพิ่มเติม
|
 ช่วยกันสนับสนุนรักษาเว็บไซต์ความรู้แห่งนี้ไว้ด้วยการสนับสนุน Source Code 2.0 ของทีมงานไทยครีเอท ช่วยกันสนับสนุนรักษาเว็บไซต์ความรู้แห่งนี้ไว้ด้วยการสนับสนุน Source Code 2.0 ของทีมงานไทยครีเอท
|
|
| |
By : |
ThaiCreate.Com Team (บทความเป็นลิขสิทธิ์ของเว็บไทยครีเอทห้ามนำเผยแพร่ ณ เว็บไซต์อื่น ๆ) |
| |
Score Rating : |
   |
|
| |
Create/Update Date : |
2013-03-25 10:04:01 /
2017-03-24 10:22:47 |
| |
Download : |
No files |
|
|
Sponsored Links / Related |
|
|
|
|
|
|

|