ตอนที่ 7 : Windows Store App : Update Data (Azure Mobile Services) |
ตอนที่ 7 : Windows Store App : Update Data (Azure Mobile Services) บทความการเขียน Windows Store App เพื่อทำการ Update หรือแก้ไขข้อมูลในตารางของ Mobile Services ที่อยู่บน Windows Azure โดยในตัวอย่างนี้จะออกแบบ Page เป็น 2 Form ด้วยกัน คือ Page แรกใช้ Listbox แสดงรายการข้อมูลทั้งหมด ส่วน Page ที่สองสำหรับแสดงข้อมูลที่ได้เลือก เพื่อทำการแสดงช่อง Textbox ไว้สำหรับแก้ไขข้อมูล
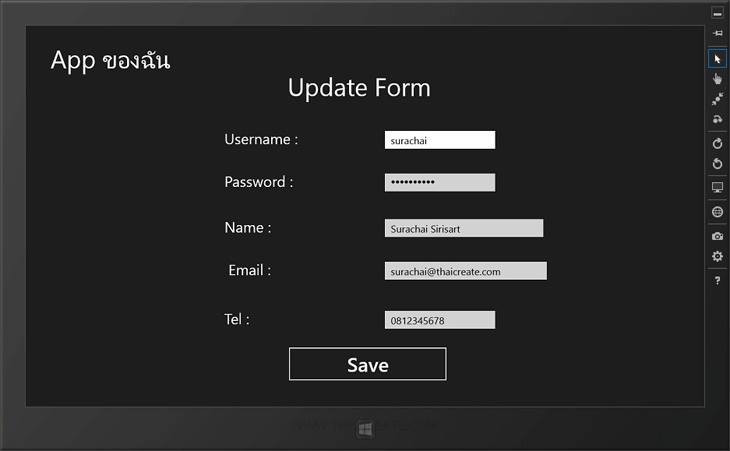 Windows Store App Mobile Services Update Form
สำหรับขั้นตอนนั้นก็คือสร้าง Page แรกด้วย Listbox จากนั้นดึงข้อมูลมาจาก Mobile Services และแต่ล่ะ Item สามารถที่จะเลือกรายการเพื่อ Update ด้วยการส่งค่า id ไปยัง Page ที่สอง ใน Page นี้จะมีหน้าที่ไปดึงพวกรายละเอียดต่าง ๆ มาแสดงใน Textbox เพื่อรอทำการแก้ไข Update ข้อมูล
Example ตัวอย่างการทำระบบแก้ไข Update Data ที่อยู่บน Mobile Services ด้วย Windows Store App

ตอนนี้เรามี Mobile Service อยู่ 1 รายการ

ชื่อตารางว่า MyMember

มีข้อมูลอยู่ทั้งหมด 3 รายการ
กลับมายัง Project ของ Windows Store App บน Visual Studio
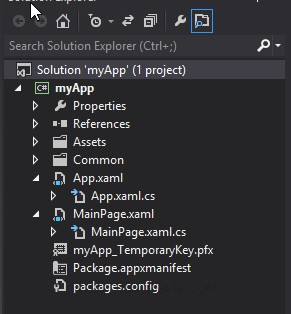
โครงสร้างไฟล์ ไฟล์ชุดแรกจะเป็น MainPage.xaml และ MainPage.xaml.cs สำหรับหน้า แสดงข้อมูลใน Listbox
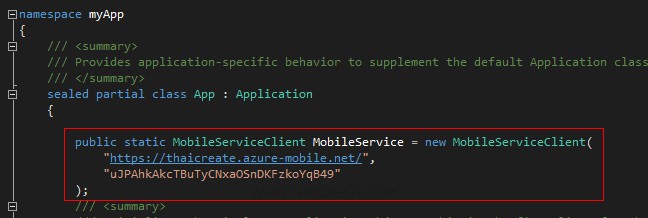
ในไฟล์ App.xaml.cs ให้ Copy Url และ key มาวางดังรูป จากนั้นออกแบบ Layout และเขียน Code ดังนี้
MainPage.xaml
<Page
    x:Class="myApp.MainPage"
    xmlns="http://schemas.microsoft.com/winfx/2006/xaml/presentation"
    xmlns:x="http://schemas.microsoft.com/winfx/2006/xaml"
    xmlns:local="using:myApp"
    xmlns:d="http://schemas.microsoft.com/expression/blend/2008"
    xmlns:mc="http://schemas.openxmlformats.org/markup-compatibility/2006"
    mc:Ignorable="d">

    <Grid Background="{StaticResource ApplicationPageBackgroundThemeBrush}">

        <TextBlock HorizontalAlignment="Left" Margin="50,41,0,0" TextWrapping="Wrap" VerticalAlignment="Top" FontSize="50" Width="355" Height="80">
        	<Run Text="App ของฉัน"/>
        	<LineBreak/>
        	<Run/>
        </TextBlock>

        <ListBox x:Name="myListbox" HorizontalAlignment="Left" Height="504" Margin="50,121,0,0" VerticalAlignment="Top" Width="1270" RenderTransformOrigin="-0.055,-1.65" Background="{StaticResource ApplicationPageBackgroundThemeBrush}" SelectionChanged="myListbox_SelectionChanged">
            <ListBox.ItemTemplate>
                <DataTemplate>
                    <StackPanel Orientation="Horizontal" Margin="0,0,0,17">
                        <StackPanel Width="50">
                            <TextBlock Text="{Binding Id}" TextWrapping="Wrap" FontSize="35" Foreground="#FFBFB9B9" Margin="5,0,0,0"/>
                        </StackPanel>
                        <StackPanel Width="400">
                            <TextBlock Text="{Binding Name}" TextWrapping="Wrap" FontSize="35" Foreground="#FFBFB9B9" Margin="5,0,0,0"/>
                        </StackPanel>
                        <StackPanel Width="500">
                            <TextBlock Text="{Binding Email}" TextWrapping="Wrap" FontSize="35" Foreground="#FFBFB9B9" Margin="5,0,0,0"/>
                        </StackPanel>
                    </StackPanel>

                </DataTemplate>
            </ListBox.ItemTemplate>
        </ListBox>


    </Grid>
</Page>
MainPage.xaml.cs
using System;
using System.Collections.Generic;
using System.IO;
using System.Linq;
using Windows.Foundation;
using Windows.Foundation.Collections;
using Windows.UI.Xaml;
using Windows.UI.Xaml.Controls;
using Windows.UI.Xaml.Controls.Primitives;
using Windows.UI.Xaml.Data;
using Windows.UI.Xaml.Input;
using Windows.UI.Xaml.Media;
using Windows.UI.Xaml.Navigation;

using Microsoft.WindowsAzure.MobileServices;
using Newtonsoft.Json;
using Windows.UI.Popups;

// The Blank Page item template is documented at http://go.microsoft.com/fwlink/?LinkId=234238

namespace myApp
{
    /// <summary>
    /// An empty page that can be used on its own or navigated to within a Frame.
    /// </summary>
    ///
    public class MyMember
    {
        public int Id { get; set; }

        [JsonProperty(PropertyName = "username")]
        public string Username { get; set; }

        [JsonProperty(PropertyName = "password")]
        public string Password { get; set; }

        [JsonProperty(PropertyName = "name")]
        public string Name { get; set; }

        [JsonProperty(PropertyName = "tel")]
        public string Tel { get; set; }

        [JsonProperty(PropertyName = "email")]
        public string Email { get; set; }
    }

    public sealed partial class MainPage : Page
    {

        private MobileServiceCollection<MyMember, MyMember> items;
        private IMobileServiceTable<MyMember> memberTable = App.MobileService.GetTable<MyMember>();

        public MainPage()
        {
            this.InitializeComponent();
        }


        /// </summary>
        /// <param name="e">Event data that describes how this page was reached.  The Parameter
        /// property is typically used to configure the page.</param>
        protected override void OnNavigatedTo(NavigationEventArgs e)
        {
            RefreshMemberItems();
        }

        private async void RefreshMemberItems()
        {
            try
            {
                items = await memberTable.ToCollectionAsync();
            }
            catch (MobileServiceInvalidOperationException e)
            {
                throw e;
            }

            myListbox.ItemsSource = items;
        }

        private void myListbox_SelectionChanged(object sender, SelectionChangedEventArgs e)
        {
            MyMember member = (sender as ListBox).SelectedItem as MyMember;
            this.Frame.Navigate(typeof(UpdatePage), member.Id.ToString());
        }

    }
}
เพิ่ม Page ขึ้นมาอีก 1 ชุด สำหรับหน้า Update Page
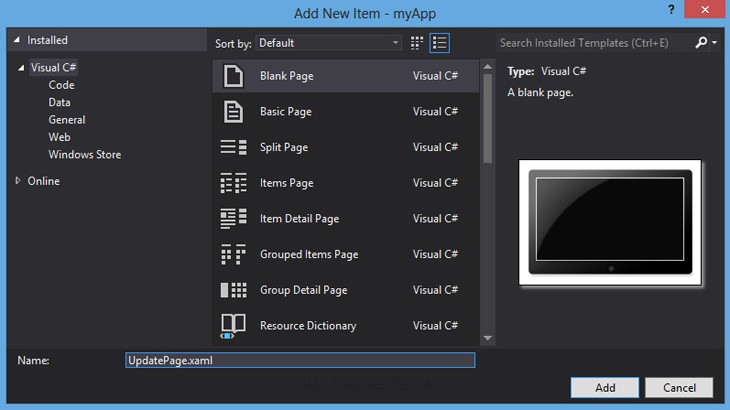
คลิกขวาที่ Solution -> Add -> New Item... เลือก Windows Store Page แบบ Blank Page ชื่อเป็น UpdatePage.xaml
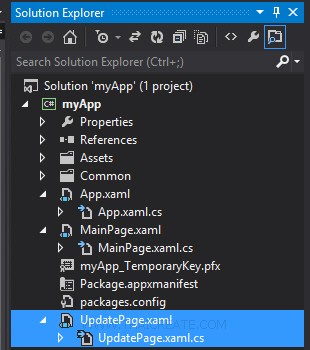
ได้ไฟล์ UpdatePage.xaml และ UpdatePage.xaml.cs
UpdatePage.xaml
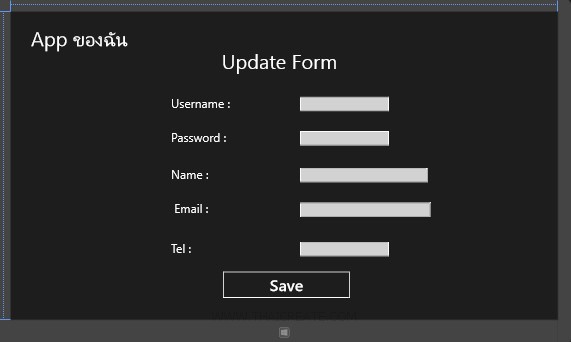
<Page
    x:Class="myApp.UpdatePage"
    xmlns="http://schemas.microsoft.com/winfx/2006/xaml/presentation"
    xmlns:x="http://schemas.microsoft.com/winfx/2006/xaml"
    xmlns:local="using:myApp"
    xmlns:d="http://schemas.microsoft.com/expression/blend/2008"
    xmlns:mc="http://schemas.openxmlformats.org/markup-compatibility/2006"
    mc:Ignorable="d">

    <Grid Background="{StaticResource ApplicationPageBackgroundThemeBrush}">

        <TextBlock HorizontalAlignment="Left" Margin="50,41,0,0" TextWrapping="Wrap" VerticalAlignment="Top" FontSize="50" Width="355" Height="80">
        	<Run Text="App ของฉัน"/>
        	<LineBreak/>
        	<Run/>
        </TextBlock>

        <Grid x:Name="ContentPanel" Margin="12,2,12,-2">
            <TextBlock HorizontalAlignment="Left" Margin="515,95,0,0" TextWrapping="Wrap" Text="Update Form" VerticalAlignment="Top" FontSize="50"/>

            <TextBlock HorizontalAlignment="Left" Margin="388,210,0,0" TextWrapping="Wrap" Text="Username :" VerticalAlignment="Top" FontSize="30"/>
            <TextBox x:Name="txtUsername" HorizontalAlignment="Left" Height="36" Margin="711,210,0,0" TextWrapping="Wrap" VerticalAlignment="Top" Width="222" FontSize="20"/>

            <TextBlock HorizontalAlignment="Left" Margin="388,296,0,0" TextWrapping="Wrap" Text="Password :" VerticalAlignment="Top" FontSize="30"/>
            <PasswordBox x:Name="txtPassword" HorizontalAlignment="Left" Margin="711,296,0,0" VerticalAlignment="Top" Width="222" RenderTransformOrigin="1.072,1.969" Height="36"/>

            <TextBlock HorizontalAlignment="Left" Margin="388,388,0,0" TextWrapping="Wrap" Text="Name :" VerticalAlignment="Top" FontSize="30"/>
            <TextBox x:Name="txtName" HorizontalAlignment="Left" Height="36" Margin="711,388,0,0" TextWrapping="Wrap" VerticalAlignment="Top" Width="319" FontSize="20"/>

            <TextBlock HorizontalAlignment="Left" Margin="396,474,0,0" TextWrapping="Wrap" Text="Email :" VerticalAlignment="Top" FontSize="30"/>
            <TextBox x:Name="txtEmail" HorizontalAlignment="Left" Height="36" Margin="711,474,0,0" TextWrapping="Wrap" VerticalAlignment="Top" Width="326" FontSize="20"/>

            <TextBlock HorizontalAlignment="Left" Margin="388,573,0,0" TextWrapping="Wrap" Text="Tel :" VerticalAlignment="Top" FontSize="30"/>
            <TextBox x:Name="txtTel" HorizontalAlignment="Left" Height="36" Margin="711,573,0,0" TextWrapping="Wrap" VerticalAlignment="Top" Width="222" FontSize="20"/>

            <Button x:Name="btnSave" Content="Save" HorizontalAlignment="Left" Margin="515,644,0,0" VerticalAlignment="Top" Click="btnSave_Click" RenderTransformOrigin="8.238,3.789" FontSize="40" Width="323"/>
        </Grid>


    </Grid>
</Page>
UpdatePage.xaml.cs
using System;
using System.Collections.Generic;
using System.IO;
using System.Linq;
using Windows.Foundation;
using Windows.Foundation.Collections;
using Windows.UI.Xaml;
using Windows.UI.Xaml.Controls;
using Windows.UI.Xaml.Controls.Primitives;
using Windows.UI.Xaml.Data;
using Windows.UI.Xaml.Input;
using Windows.UI.Xaml.Media;
using Windows.UI.Xaml.Navigation;

using Microsoft.WindowsAzure.MobileServices;
using Newtonsoft.Json;
using Windows.UI.Popups;

// The Blank Page item template is documented at http://go.microsoft.com/fwlink/?LinkId=234238

namespace myApp
{
    /// <summary>
    /// An empty page that can be used on its own or navigated to within a Frame.
    /// </summary>
    public sealed partial class UpdatePage : Page
    {

        private MobileServiceCollection<MyMember, MyMember> items;
        private IMobileServiceTable<MyMember> memberTable = App.MobileService.GetTable<MyMember>();
        string id;

        public UpdatePage()
        {
            this.InitializeComponent();
        }

        /// <summary>
        /// Invoked when this page is about to be displayed in a Frame.
        /// </summary>
        /// <param name="e">Event data that describes how this page was reached.  The Parameter
        /// property is typically used to configure the page.</param>
        protected override void OnNavigatedTo(NavigationEventArgs e)
        {
            id = e.Parameter as string;
            InfoMember();
        }

        private async void InfoMember()
        {
            try
            {

                items = await memberTable
                .Where(memberItem => memberItem.Id == Convert.ToInt32(id))
                .ToCollectionAsync();

                if (items.Count > 0)
                {
                    MyMember member = items[0];
                    txtUsername.Text = member.Username.ToString();
                    txtPassword.Password = member.Password.ToString();
                    txtName.Text = member.Name.ToString();
                    txtEmail.Text = member.Email.ToString();
                    txtTel.Text = member.Tel.ToString();
                }
                else
                {
                    MessageDialog msgDialog = new MessageDialog("Not found Data!", "Error :");
                    await msgDialog.ShowAsync();
                }
            }
            catch (MobileServiceInvalidOperationException ex)
            {
                throw ex;
            }
        }

        private async void btnSave_Click(object sender, RoutedEventArgs e)
        {
            try
            {
                //** Get Item for Update ***/
                items = await memberTable
                .Where(memberItem => memberItem.Id == Convert.ToInt32(id))
                .ToCollectionAsync();

                MyMember member = items[0];
                member.Name = txtName.Text;
                member.Password = txtPassword.Password;
                member.Name = txtName.Text;
                member.Email = txtEmail.Text;
                member.Tel = txtTel.Text;

                //*** Update Record ***/
                await memberTable.UpdateAsync(member);

                // Dialog
                MessageDialog msgDialog = new MessageDialog("Update Data Successfully.", "Status :");
                await msgDialog.ShowAsync();
                this.Frame.Navigate(typeof(MainPage), member.Id.ToString());

            }
            catch (MobileServiceInvalidOperationException ex)
            {
                throw ex;
            }
        }

    }
}
Screenshot
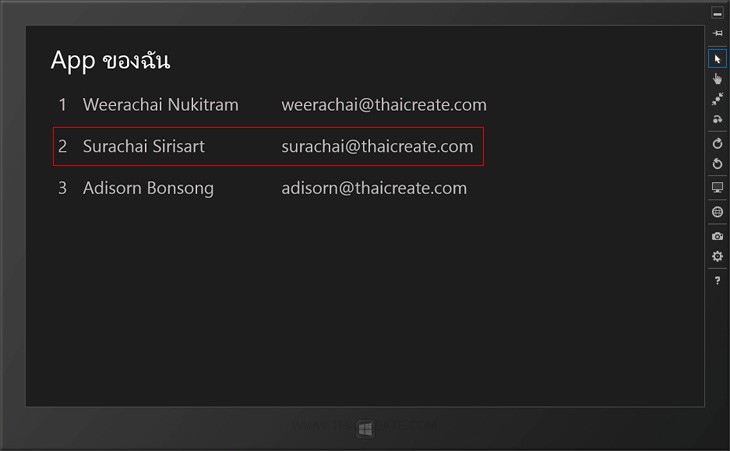
หน้าแสดงรายการข้อมูลทั้งหมดที่มาจาก Mobile Services ให้คลิกเพื่อเลือกทำการแก้ไขข้อมูล

แสดง Page สำหรับการแก้ไขข้อมูล
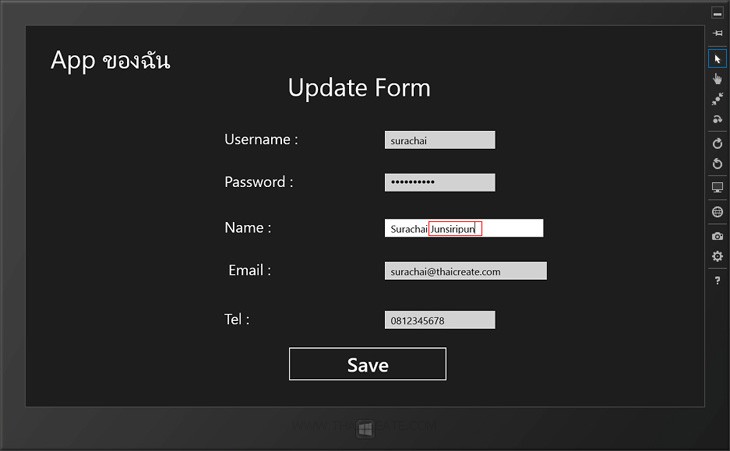
ทดสอบการแก้ไขข้อมูล และ Update ข้อมูลไปยัง Mobile Services
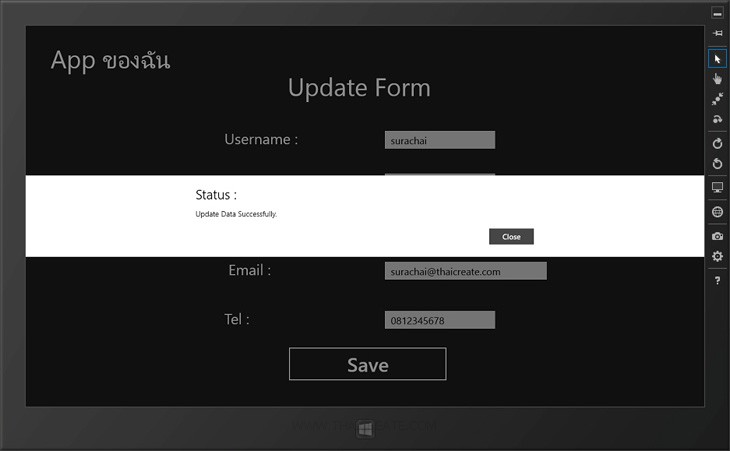
ผลการ Update ข้อมูล
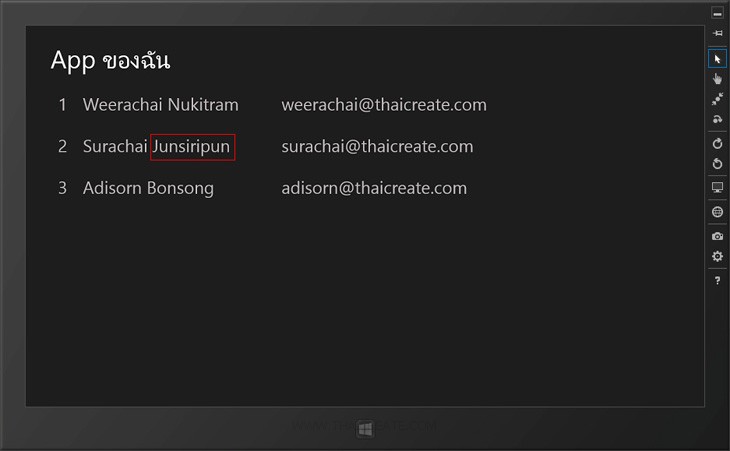
ในหน้า ListBox ข้อมูลถูก Update เรียบร้อยแล้ว

เมื่อกลับไปยัง Mobile Services ที่อยู่บน Windows Azure ข้อมูลก็จะถูก Update เรียบร้อย
สามารถทำการดาวน์โหลด Code ทั้งหมดได้จากไฟล์แนบของบทความนี้
|