Windows Store Apps and Bing Maps Zoom Level / Current Location (C#) |
Windows Store Apps and Bing Maps Zoom Level / Current Location (C#) บทความก่อนหน้านี้เราได้เรียนรู้วิธีการเรียกใช้ Bing Maps บน Windows Store Apps แล้ว ในหัวข้อนี้เราจะมารู้จักการเรียกใช้งาน Bing Maps เบื้องต้น เช่นการ Zoom หรือ ขยาย Maps พร้อมกับการหาตำแหน่ง Location ของ อุปกรณ์ที่เรียกใช้ Apps และวิธีการปักหมุด หรือ Pin Marker บน Bing Maps แบบง่าย ๆ โดยคุณสมบัติต่าง ๆ เหล่านี้เราสามารถกำหนดได้ทั้งใน XAML หรือจะเขียนควบคุมด้วยภาษา C# ก็สามารถทำได้ผลลัพธ์ที่เหมือนกัน
Zoom Level เป็นระดับการขยาย Map
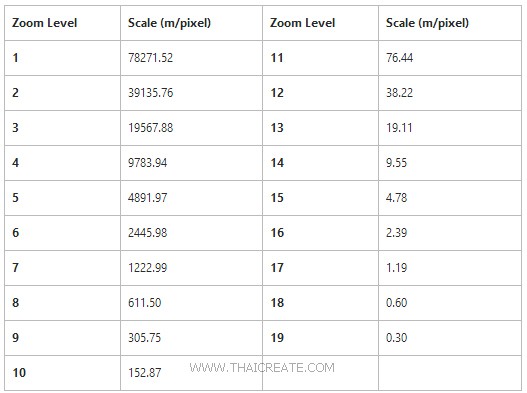
บน Bing Maps สามารถขยายได้ถึงระดับ 19 ซึ่งสามารถมองเห็นหลังคารถ หรือ หลังคาบ้าน ได้ชัดเจน
XAML กำหนดค่าบน XAML
ZoomLevel="12"
Example 1 การเขียน Windows Store Apps เพื่อแสดง Bing Maps และการกำหนดค่า Zoom Level
MainPage.xaml
<Page
    x:Class="WindowsStoreApps.MainPage"
    xmlns="http://schemas.microsoft.com/winfx/2006/xaml/presentation"
    xmlns:x="http://schemas.microsoft.com/winfx/2006/xaml"
    xmlns:local="using:WindowsStoreApps"
    xmlns:d="http://schemas.microsoft.com/expression/blend/2008"
    xmlns:mc="http://schemas.openxmlformats.org/markup-compatibility/2006"
    mc:Ignorable="d"
    xmlns:bm="using:Bing.Maps">

    <Grid Background="{ThemeResource ApplicationPageBackgroundThemeBrush}">

        <bm:Map x:Name="myMap">
            <bm:Map.Center>
                <bm:Location />
            </bm:Map.Center>
        </bm:Map>

    </Grid>

</Page>
MainPage.xaml.cs
using System;
using System.Collections.Generic;
using System.IO;
using System.Linq;
using Windows.Devices.Geolocation;
using Windows.Foundation;
using Windows.Foundation.Collections;
using Windows.UI.Core;
using Windows.UI.Xaml;
using Windows.UI.Xaml.Controls;
using Windows.UI.Xaml.Controls.Primitives;
using Windows.UI.Xaml.Data;
using Windows.UI.Xaml.Input;
using Windows.UI.Xaml.Media;
using Windows.UI.Xaml.Navigation;

using Bing.Maps;

// The Blank Page item template is documented at http://go.microsoft.com/fwlink/?LinkId=234238

namespace WindowsStoreApps
{
    /// <summary>
    /// An empty page that can be used on its own or navigated to within a Frame.
    /// </summary>
    ///

    public sealed partial class MainPage : Page
    {
        public MainPage()
        {
            this.InitializeComponent();
             InitializeMap();
        }


        void InitializeMap()
        {
              myMap.Center = new Location(13.716667, 100.516670);
              myMap.Credentials = "INSERT_YOUR_BING_MAP_KEY";
              myMap.ZoomLevel = 19;
              myMap.MapType = MapType.Aerial;
              myMap.Width = 800;
              myMap.Height = 800;
        }
    }

}
Result
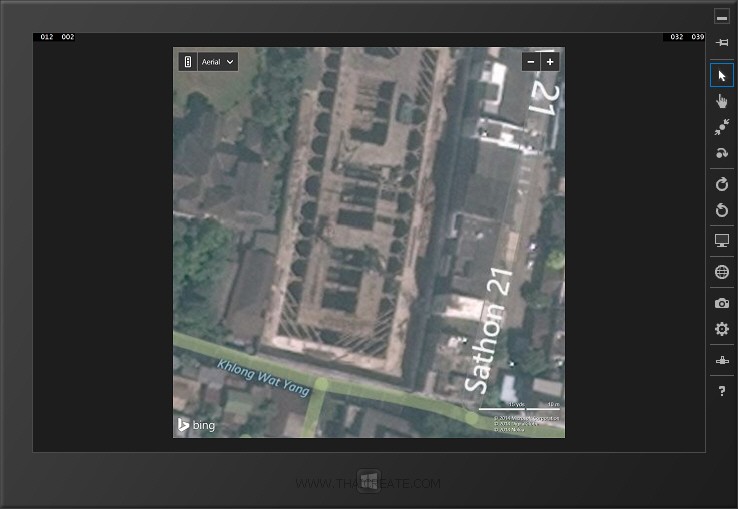
แสดง Maps ใน Zoom Level ที่ 19 ซึ่งเห็นหลังคารถ หรือ หลังคาบ้านชัดเจน
Example 2 การเขียน Windows Store Apps เพื่อปักหมุด Pin บน Bing Maps
Syntax
            // Pin
            Pushpin pushpin = new Pushpin();
            MapLayer.SetPosition(pushpin, new Location(13.815361, 100.560822));
            myMap.Children.Add(pushpin);
ซึ่งตำแหน่งที่ปักหมุดจะต้องเป็นค่า Latitude และ Longitude มาดูตัวอย่าง
MainPage.xaml
<Page
    x:Class="WindowsStoreApps.MainPage"
    xmlns="http://schemas.microsoft.com/winfx/2006/xaml/presentation"
    xmlns:x="http://schemas.microsoft.com/winfx/2006/xaml"
    xmlns:local="using:WindowsStoreApps"
    xmlns:d="http://schemas.microsoft.com/expression/blend/2008"
    xmlns:mc="http://schemas.openxmlformats.org/markup-compatibility/2006"
    mc:Ignorable="d"
    xmlns:bm="using:Bing.Maps">

    <Grid Background="{ThemeResource ApplicationPageBackgroundThemeBrush}">

        <bm:Map  x:Name="myMap">
            <bm:Map.Center>
                <bm:Location />
            </bm:Map.Center>
        </bm:Map>

    </Grid>

</Page>
MainPage.xaml.cs
using System;
using System.Collections.Generic;
using System.IO;
using System.Linq;
using Windows.Devices.Geolocation;
using Windows.Foundation;
using Windows.Foundation.Collections;
using Windows.UI.Core;
using Windows.UI.Xaml;
using Windows.UI.Xaml.Controls;
using Windows.UI.Xaml.Controls.Primitives;
using Windows.UI.Xaml.Data;
using Windows.UI.Xaml.Input;
using Windows.UI.Xaml.Media;
using Windows.UI.Xaml.Navigation;

using Bing.Maps;
using Windows.UI.Popups;

// The Blank Page item template is documented at http://go.microsoft.com/fwlink/?LinkId=234238

namespace WindowsStoreApps
{
    /// <summary>
    /// An empty page that can be used on its own or navigated to within a Frame.
    /// </summary>
    ///

    public sealed partial class MainPage : Page
    {

        public MainPage()
        {
            this.InitializeComponent();
             InitializeMap();
        }


        void InitializeMap()
        {

            double lat = 13.815361;
            double lon =100.560822;

            // Map Center
            myMap.Credentials = "INSERT_YOUR_BING_MAP_KEY";
            myMap.Center = new Location(lat, lon);
            myMap.ZoomLevel = 19;
            myMap.MapType = MapType.Aerial;
            myMap.Width = 800;
            myMap.Height = 800;

            // Pin
            Pushpin pushpin = new Pushpin();
            pushpin.Tapped += new TappedEventHandler(pushpinTapped);
            MapLayer.SetPosition(pushpin, new Location(13.815361, 100.560822));
            myMap.Children.Add(pushpin);

        }

        private async void pushpinTapped(object sender, TappedRoutedEventArgs e)
        {
            MessageDialog dialog = new MessageDialog("This is Central Patpharo.");
            await dialog.ShowAsync();
        }

    }

}
Result
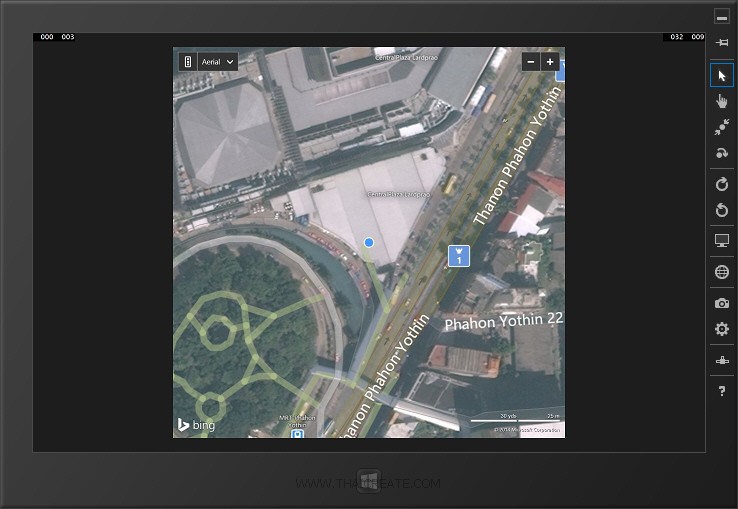
แสดง Bing Maps และการปักหมุด Pin

แสดง Event เมื่อมีการคลิกที่ Event บน Pin หรือ หมุด
Example 3 การเขียน Windows Store Apps เพื่อปักหมุด Pin บน Bing Maps มากกว่า 1 จุด
Syntax
        void InitializeMap()
        {

            double lat = 13.815361;
            double lon =100.560822;

            // Map Center
            myMap.Credentials = "ApIK4f8y5DWR-_8PTeiEBjnO1kcZJPpW3XJ4vzHHumF54wWLQvASeSmGWGkJObw0";
            myMap.Center = new Location(lat, lon);
            myMap.ZoomLevel = 17;
            myMap.MapType = MapType.Aerial;
            myMap.Width = 800;
            myMap.Height = 800;

            // Pin 1
            double lat1 = 13.815361;
            double lon1 = 100.560822;
            Pushpin pushpin1 = new Pushpin();
            MapLayer.SetPosition(pushpin1, new Location(lat1, lon1));
            myMap.Children.Add(pushpin1);

            // Pin 2
            double lat2 = 13.81433;
            double lon2 = 100.560162;
            Pushpin pushpin2 = new Pushpin();
            MapLayer.SetPosition(pushpin2, new Location(lat2, lon2));
            myMap.Children.Add(pushpin2);

        }
กรณีปักหมุดมากกว่า 1 ตำแหน่ง
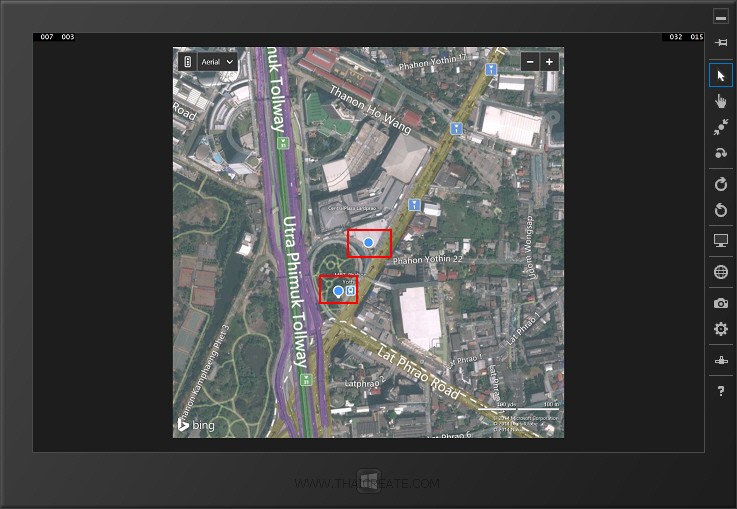
แสดงหมุดหรือ Pin มากกว่า 1 จุด
Example 4 การเขียน Windows Store Apps เพื่อปักหมุด และแสดง Location ของ อุปรกรณ์ที่ติดตั้งและเปิด Apps อยู่
Syntax
var location = new Geolocator();

location.DesiredAccuracy = PositionAccuracy.High;
Geoposition pos = await location.GetGeopositionAsync();

double lat = pos.Coordinate.Latitude;
double lon = pos.Coordinate.Longitude;
เป็นคำสั่งสำหรับการดึงค่า Latitude และ Longitude ของ อุปรกรณ์ที่ติดตั้งและเปิด Apps อยู่
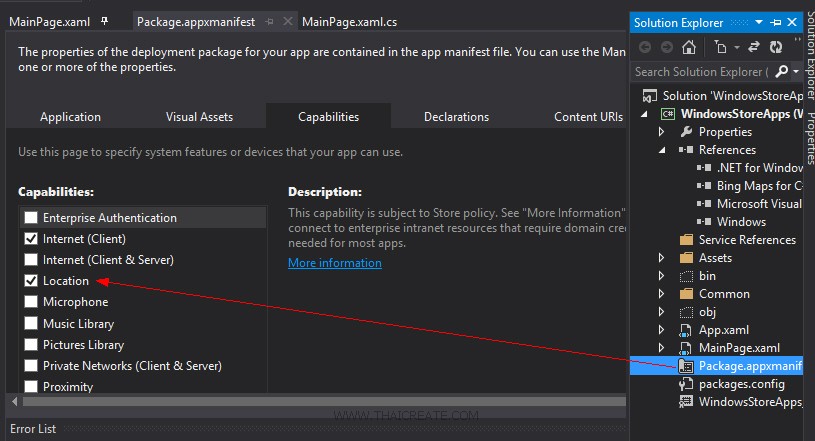
บน Apps จะต้องมีการ Allow ตัว Location ด้วย
MainPage.xaml
<Page
    x:Class="WindowsStoreApps.MainPage"
    xmlns="http://schemas.microsoft.com/winfx/2006/xaml/presentation"
    xmlns:x="http://schemas.microsoft.com/winfx/2006/xaml"
    xmlns:local="using:WindowsStoreApps"
    xmlns:d="http://schemas.microsoft.com/expression/blend/2008"
    xmlns:mc="http://schemas.openxmlformats.org/markup-compatibility/2006"
    mc:Ignorable="d"
    xmlns:bm="using:Bing.Maps">

    <Grid Background="{ThemeResource ApplicationPageBackgroundThemeBrush}">

        <bm:Map  x:Name="myMap">
            <bm:Map.Center>
                <bm:Location />
            </bm:Map.Center>
        </bm:Map>

    </Grid>

</Page>
MainPage.xaml.cs
using System;
using System.Collections.Generic;
using System.IO;
using System.Linq;
using Windows.Devices.Geolocation;
using Windows.Foundation;
using Windows.Foundation.Collections;
using Windows.UI.Core;
using Windows.UI.Xaml;
using Windows.UI.Xaml.Controls;
using Windows.UI.Xaml.Controls.Primitives;
using Windows.UI.Xaml.Data;
using Windows.UI.Xaml.Input;
using Windows.UI.Xaml.Media;
using Windows.UI.Xaml.Navigation;

using Bing.Maps;
using Windows.UI.Popups;

// The Blank Page item template is documented at http://go.microsoft.com/fwlink/?LinkId=234238

namespace WindowsStoreApps
{
    /// <summary>
    /// An empty page that can be used on its own or navigated to within a Frame.
    /// </summary>
    ///

    public sealed partial class MainPage : Page
    {

        public MainPage()
        {
            this.InitializeComponent();
             InitializeMap();
        }


        async void InitializeMap()
        {

            var location = new Geolocator();

            location.DesiredAccuracy = PositionAccuracy.High;
            Geoposition pos = await location.GetGeopositionAsync();

            double lat = pos.Coordinate.Latitude;
            double lon = pos.Coordinate.Longitude;

            // Map Center
            myMap.Credentials = "ApIK4f8y5DWR-_8PTeiEBjnO1kcZJPpW3XJ4vzHHumF54wWLQvASeSmGWGkJObw0";
            myMap.Center = new Location(lat, lon);
            myMap.ZoomLevel = 19;
            myMap.MapType = MapType.Aerial;
            myMap.Width = 800;
            myMap.Height = 800;

            // Pin Current Location
            Pushpin pushpin = new Pushpin();
            pushpin.Tapped += new TappedEventHandler(pushpinTapped);
            MapLayer.SetPosition(pushpin, new Location(lat, lon));
            myMap.Children.Add(pushpin);

        }

        private async void pushpinTapped(object sender, TappedRoutedEventArgs e)
        {
            MessageDialog dialog = new MessageDialog("Your current Location.");
            await dialog.ShowAsync();
        }


    }

}
Result

ก่อนการทำงานจะมีให้ยืนยันการอรุญาติให้เรียกใช้งาน Location ของเรา
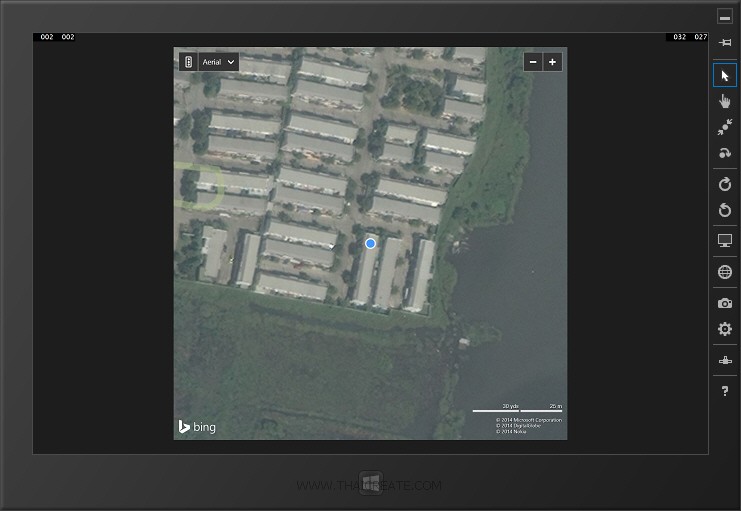
แสดงหมุด และ Location บน Apps
.
|
 ช่วยกันสนับสนุนรักษาเว็บไซต์ความรู้แห่งนี้ไว้ด้วยการสนับสนุน Source Code 2.0 ของทีมงานไทยครีเอท ช่วยกันสนับสนุนรักษาเว็บไซต์ความรู้แห่งนี้ไว้ด้วยการสนับสนุน Source Code 2.0 ของทีมงานไทยครีเอท
|
|
| |
By : |
ThaiCreate.Com Team (บทความเป็นลิขสิทธิ์ของเว็บไทยครีเอทห้ามนำเผยแพร่ ณ เว็บไซต์อื่น ๆ) |
| |
Score Rating : |
  |
|
| |
Create/Update Date : |
2014-06-23 13:11:34 /
2017-03-19 15:04:51 |
| |
Download : |
No files |
|
|
Sponsored Links / Related |
|
|
|
|
|
|

|