Windows Store App and Posting Data PHP & MySQL (C#) |
Windows Store App and Posting Data PHP & MySQL (C#) บทความก่อนหน้านี้เราได้เรียนรู้วิธีการดึงค่า PHP กับ MySQL ที่อยู่บน Web Server ผ่าน HTTP / URL แล้ว แต่ในบทความนี้เราจะสลับตรงกันข้าม คือ เราจะใช้ Windows Store Apps ส่งค่าต่าง ๆ Insert บน PHP กับ MySQL Database สำหรับหลักการนั้น จะใช้รูปแบบการส่งข้อมูลแบบ POST โดยจะทำการรับค่าจาก Input ของ TextBox ที่อยู่บน Windows Store Apps จากนั้นนำค่าที่ได้ส่งไปยัง URL ของ PHP/MySQL ที่อยู่บน Server ทำหน้าที่ Insert ข้อมูลเหล่านั้นลงใน Database
ฝั่ง Web Server (PHP/MySQL)
MySQL Table บน Web Server

CREATE TABLE `customer` (
  `CustomerID` varchar(4) NOT NULL,
  `Name` varchar(50) NOT NULL,
  `Email` varchar(50) NOT NULL,
  `CountryCode` varchar(2) NOT NULL,
  `Budget` double NOT NULL,
  `Used` double NOT NULL,
  PRIMARY KEY  (`CustomerID`)
) ENGINE=MyISAM DEFAULT CHARSET=utf8;

INSERT INTO `customer` VALUES ('C001', 'Win Weerachai', '[email protected]', 'TH', 1000000, 600000);
INSERT INTO `customer` VALUES ('C002', 'John Smith', '[email protected]', 'UK', 2000000, 800000);
INSERT INTO `customer` VALUES ('C003', 'Jame Born', '[email protected]', 'US', 3000000, 600000);
INSERT INTO `customer` VALUES ('C004', 'Chalee Angel', '[email protected]', 'US', 4000000, 100000);
PHP ที่ทำหน้าที่รับข้อมูลจาก Windows Store Apps และ Insert ลงใน MySQL Database
addData.php
<?php
	$objConnect = mysql_connect("localhost","root","root");
	$objDB = mysql_select_db("mydatabase");

	$sCustomerID = $_POST["pCustomerID"];
	$sName = $_POST["pName"];
	$sEmail = $_POST["pEmail"];
	$sCountryCode = $_POST["pCountryCode"];
	$sBudget = $_POST["pBudget"];
	$sUsed = $_POST["pUsed"];

	/*** Check CustomerID Exists ***/
	$strSQL = "SELECT * FROM customer WHERE CustomerID = '".$sCustomerID."' ";
	$objQuery = mysql_query($strSQL);
	$objResult = mysql_fetch_array($objQuery);
	if($objResult)
	{
		$arr['StatusID'] = "0";
		$arr['Error'] = "CustomerID Exists!";
		echo json_encode($arr);
		exit();
	}

	/*** Check Email Exists ***/
	$strSQL = "SELECT * FROM customer WHERE Email = '".$sEmail."' ";
	$objQuery = mysql_query($strSQL);
	$objResult = mysql_fetch_array($objQuery);
	if($objResult)
	{
		$arr['StatusID'] = "0";
		$arr['Error'] = "Email Exists!";
		echo json_encode($arr);
		exit();
	}

	/*** Insert ***/
	$strSQL = "INSERT INTO customer (CustomerID,Name,Email,CountryCode,Budget,Used)
		VALUES (
			'".$sCustomerID."',
			'".$sName."',
			'".$sEmail."',
			'".$sCountryCode."',
			'".$sBudget."',
			'".$sUsed."'
			)
		";

	$objQuery = mysql_query($strSQL);
	if(!$objQuery)
	{
		$arr['StatusID'] = "0";
		$arr['Error'] = "Cannot save data!";
	}
	else
	{
		$arr['StatusID'] = "1";
		$arr['Error'] = "";
	}

	/**
		$arr['StatusID'] // (0=Failed , 1=Complete)
		$arr['Error'] // Error Message
	*/

	mysql_close($objConnect);

	echo json_encode($arr);
?>
ในฝั่งของ PHP จะเห็นว่ามีการตรวจสอบความถูกต้องของข้อมูล และสถานะการ Insert โดยจะมีการส่งสถานะกลับไปยัง Windows Store Apps อยู่ 2 ตัวแปรคือ
StatusID : ส่งค่า (0=Failed , 1=Complete)
Error : ข้อความที่ผิดพลาด
โดยทั้ง 2 ตัวแปรนี้ส่งกลับไปในรูปแบบของ JSON Code
ฝั่ง Windows Store Apps (C#)
สร้าง Class สำหรับ Mapping Status
        public class Status
        {
            public string StatusID { get; set; }
            public string Error { get; set; }
        }
สร้างชุดคำสั่งการเชื่อมต่อกับ HTTP และการส่งค่าตัวแปร Input TextBox ไปกับ POST พร้อมทั้งดึง Status ที่ถูกส่งมาจาก Web Server
            HttpClient http = new System.Net.Http.HttpClient();

            var content = new FormUrlEncodedContent(new[]
                    {
                        new KeyValuePair<string, string>("pCustomerID", this.txtCustomerID.Text),
                        new KeyValuePair<string, string>("pName", this.txtName.Text),
                        new KeyValuePair<string, string>("pEmail", this.txtEmail.Text),
                        new KeyValuePair<string, string>("pCountryCode", this.txtCountryCode.Text),
                        new KeyValuePair<string, string>("pBudget", this.txtBudget.Text),
                        new KeyValuePair<string, string>("pUsed",this.txtUsed.Text)
                    });

            HttpResponseMessage response = await http.PostAsync("http://localhost/myweb/addData.php", content);
            response.EnsureSuccessStatusCode();

            string result = string.Empty;
            result = await response.Content.ReadAsStringAsync();
ลองมาดูตัวอย่างแบบเต็ม ๆ
Example การเขียน Windows Store Apps เพื่อส่งข้อมูลไป Insert บน Web Server (PHP/MySQL)
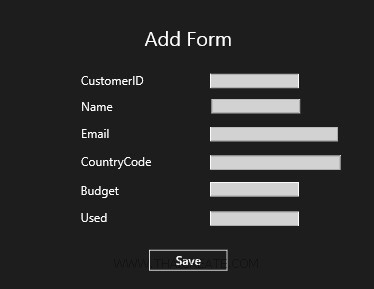
ออกแบบหน้าจอดังรูป
MainPage.xaml
<Page
    x:Class="WindowsStoreApps.MainPage"
    xmlns="http://schemas.microsoft.com/winfx/2006/xaml/presentation"
    xmlns:x="http://schemas.microsoft.com/winfx/2006/xaml"
    xmlns:local="using:WindowsStoreApps"
    xmlns:d="http://schemas.microsoft.com/expression/blend/2008"
    xmlns:mc="http://schemas.openxmlformats.org/markup-compatibility/2006"
    mc:Ignorable="d">


    <Grid Background="{ThemeResource ApplicationPageBackgroundThemeBrush}">

        <!--ContentPanel - place additional content here-->
        <Grid x:Name="ContentPanel" Margin="12,2,12,-2">
            <TextBlock HorizontalAlignment="Left" Margin="547,95,0,0" TextWrapping="Wrap" Text="Add Form" VerticalAlignment="Top" FontSize="50"/>

            <TextBlock HorizontalAlignment="Left" Margin="388,210,0,0" TextWrapping="Wrap" Text="CustomerID" VerticalAlignment="Top" FontSize="30"/>
            <TextBox x:Name="txtCustomerID" HorizontalAlignment="Left" Height="36" Margin="711,210,0,0" TextWrapping="Wrap" VerticalAlignment="Top" Width="222" FontSize="20" FontFamily="Global User Interface"/>

            <TextBlock HorizontalAlignment="Left" Margin="388,277,0,0" TextWrapping="Wrap" Text="Name" VerticalAlignment="Top" FontSize="30"/>
            <TextBox x:Name="txtName" HorizontalAlignment="Left" Height="36" Margin="708,277,0,0" TextWrapping="Wrap" VerticalAlignment="Top" Width="222" FontSize="20" FontFamily="Global User Interface"/>

            <TextBlock HorizontalAlignment="Left" Margin="388,343,0,0" TextWrapping="Wrap" Text="Email" VerticalAlignment="Top" FontSize="30"/>
            <TextBox x:Name="txtEmail" HorizontalAlignment="Left" Height="36" Margin="711,343,0,0" TextWrapping="Wrap" VerticalAlignment="Top" Width="319" FontSize="20"/>

            <TextBlock HorizontalAlignment="Left" Margin="388,414,0,0" TextWrapping="Wrap" Text="CountryCode" VerticalAlignment="Top" FontSize="30"/>
            <TextBox x:Name="txtCountryCode" HorizontalAlignment="Left" Height="36" Margin="711,414,0,0" TextWrapping="Wrap" VerticalAlignment="Top" Width="326" FontSize="20"/>

            <TextBlock HorizontalAlignment="Left" Margin="387,485,0,0" TextWrapping="Wrap" Text="Budget" VerticalAlignment="Top" FontSize="30"/>
            <TextBox x:Name="txtBudget" HorizontalAlignment="Left" Height="36" Margin="711,481,0,0" TextWrapping="Wrap" VerticalAlignment="Top" Width="222" FontSize="20" FontFamily="Global User Interface"/>

            <TextBlock HorizontalAlignment="Left" Margin="387,553,0,0" TextWrapping="Wrap" Text="Used" VerticalAlignment="Top" FontSize="30"/>
            <TextBox x:Name="txtUsed" HorizontalAlignment="Left" Height="36" Margin="711,554,0,0" TextWrapping="Wrap" VerticalAlignment="Top" Width="222" FontSize="20" FontFamily="Global User Interface"/>

            <Button x:Name="btnSave" Content="Save" HorizontalAlignment="Left" Margin="555,647,0,0" VerticalAlignment="Top" Click="btnSave_Click" RenderTransformOrigin="8.238,3.789" FontSize="30" Width="202" FontFamily="Global User Interface"/>


        </Grid>


    </Grid>

</Page>
MainPage.xaml.cs
using System;
using System.Collections.Generic;
using System.IO;
using System.Linq;
using Windows.Devices.Geolocation;
using Windows.Foundation;
using Windows.Foundation.Collections;
using Windows.UI.Core;
using Windows.UI.Xaml;
using Windows.UI.Xaml.Controls;
using Windows.UI.Xaml.Controls.Primitives;
using Windows.UI.Xaml.Data;
using Windows.UI.Xaml.Input;
using Windows.UI.Xaml.Media;
using Windows.UI.Xaml.Navigation;

using System.Net.Http;

using System.Xml.Linq;
using System.Runtime.Serialization;
using System.Runtime.Serialization.Json;
using System.Collections.ObjectModel;
using System.Text;
using Windows.UI.Popups;

// The Blank Page item template is documented at http://go.microsoft.com/fwlink/?LinkId=234238

namespace WindowsStoreApps
{
    /// <summary>
    /// An empty page that can be used on its own or navigated to within a Frame.
    /// </summary>
    ///

    public sealed partial class MainPage : Page
    {
        public MainPage()
        {
            this.InitializeComponent();
        }

        public class Status
        {
            public string StatusID { get; set; }
            public string Error { get; set; }
        }

        public static Status ReadToObject(string json)
        {
            Status deserialized = new Status();
            MemoryStream ms = new MemoryStream(Encoding.UTF8.GetBytes(json));
            DataContractJsonSerializer ser = new DataContractJsonSerializer(deserialized.GetType());
            deserialized = ser.ReadObject(ms) as Status;
            return deserialized;
        }

        private async void btnSave_Click(object sender, RoutedEventArgs e)
        {
            HttpClient http = new System.Net.Http.HttpClient();

            var content = new FormUrlEncodedContent(new[]
                    {
                        new KeyValuePair<string, string>("pCustomerID", this.txtCustomerID.Text),
                        new KeyValuePair<string, string>("pName", this.txtName.Text),
                        new KeyValuePair<string, string>("pEmail", this.txtEmail.Text),
                        new KeyValuePair<string, string>("pCountryCode", this.txtCountryCode.Text),
                        new KeyValuePair<string, string>("pBudget", this.txtBudget.Text),
                        new KeyValuePair<string, string>("pUsed",this.txtUsed.Text)
                    });

            HttpResponseMessage response = await http.PostAsync("http://localhost/myweb/addData.php", content);
            response.EnsureSuccessStatusCode();

            string result = string.Empty;
            result = await response.Content.ReadAsStringAsync();

            Status status = ReadToObject(result);
            if(status.StatusID == "0") // Error
            {
                MessageDialog msgDialog = new MessageDialog(status.Error, "Error");
                await msgDialog.ShowAsync();
            }
            else // Complete
            {
                MessageDialog msgDialog = new MessageDialog("Send data to Server Completed!", "Success");
                await msgDialog.ShowAsync();
            }

        }

    }
}
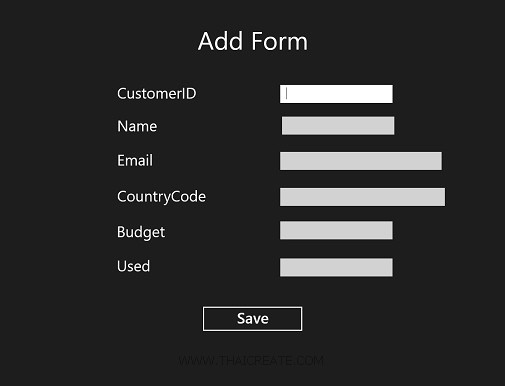
ทดสอบการทำงาน
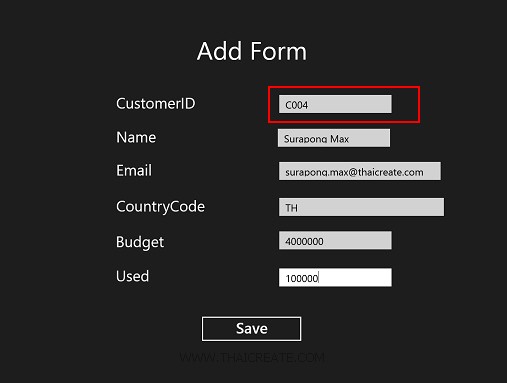
กรอกข้อมูลเพื่อที่จะส่งไปยัง Web Server โดยในขั้นต้น จะทดสอบการกรอกข้อมูล CustomerID ซ้ำ ซึ่งมีอยู่บน Web Server แล้ว
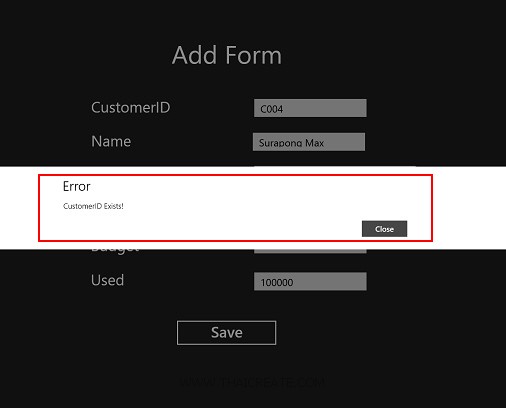
จะเห็นว่าโปรแกรมแจ้งกลับมาว่า มีข้อมูล CustomerID ซ้ำ
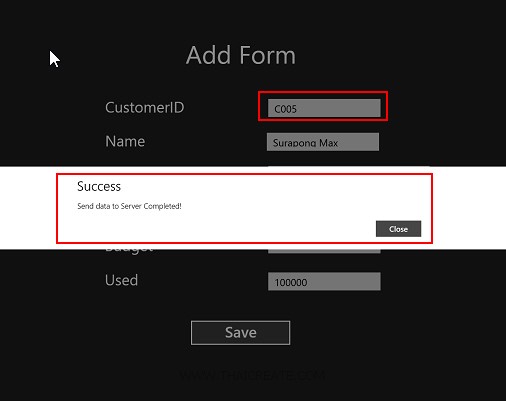
ถ้าไม่มีอะไรผิดพลาด ข้อมูลจะถูก Insert ลงบน Database และส่งสถานะ Success กลับมายัง Windows Store Apps

เมื่อกลับไปดู Table บน Web Server จะเห็นว่าข้อมูลถูก Insert เรียบร้อยแล้ว
.
|