Windows Store Apps and SQL Azure Database (C# , Windows Azure) |
Windows Store Apps and SQL Azure Database (C# , Windows Azure) สำหรับ SQL Azure เป็นบริการ Cloud Database ของ Windows Azure ที่มี Engine การทำงานเหมือนกับ SQL Server Database แต่จะอยู่ใรูปแบบของ Cloud Database นั่นหมายถึงว่า มันทำงานเป็นแบบ Online ประโยชน์ก็คือ เราสามารถมี Database โดยไม่ต้องจำเป็นจะต้องมี Server หรือตั้ง Server เอง สามารถเรียกใช้งานหรือเชื่อมได้จากทุกที่ที่มีการเชื่อมต่อผ่าน Internet ช่วยลดต้นทุนและประหยัดการใช้งานอย่างมาก เพราะค่าบริการเริ่มต้น 20 MB จะฟรี หรือ 1G ค่าบริการเพียงเดือนล่ะประมาณ 9$ เท่านั้น
 Windows Store Apps and SQL Azure Database (C# , Windows Azure)
ในปัจจุบัน Windows Store Apps ยังไม่มี SDK ที่จะช่วยให้การเขียนและติดต่อระหว่าง Windows Store Apps กับ SQL Azure ได้โดยตรง และคิดว่าไม่น่าจะมีให้ออกมา เพราะน่าจะมีผลในด้านความปลอดภัยในการใช้งาน เพราะการเชื่อมต่อกับ SQL Azure จะต้องอาศัย User/Password ด้วยทุกครั้ง และคงจะไม่ใช่วิธีที่ถูกต้อง ที่จะใส่ User/Password ให้กับ App ทุก App ที่ติดใช้งาน ฉะนั้นวิธีที่น่าจะถูกต้องที่สุดคือการจะต้องมี Services กลางที่ทำหน้าที่ ติดต่อกับ SQL Azure ส่วน Apps ต่าง ๆ ก็เรียกผ่าน Services อีกชั้นหนึ่ง ซึ่งวิธ๊ที่ใช้ก็จะแนะนำ Web Services ดช่นเดียวกับการติดต่อกับ Database อื่น ๆ
เริ่มต้นด้วยการสร้าง Service ของ SQL Azure บน Portal Management ของ Windows Azure
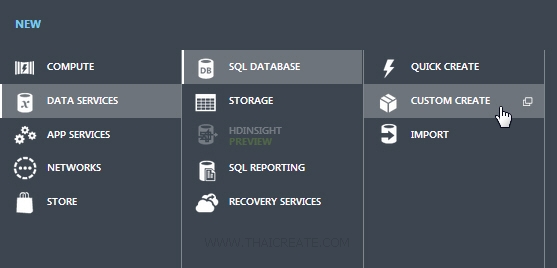
ด้วยการคลิกที่ NEW -> DATA SERVICES -> SQL DATABASE -> CUSTOM CREATE
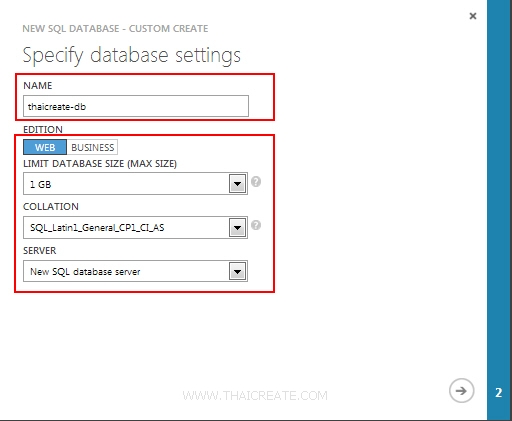
กรอกชื่อ Database เลือกเป็นแบบ WEB และในส่วนของ Server ให้เลือกเป็น New SQL database server
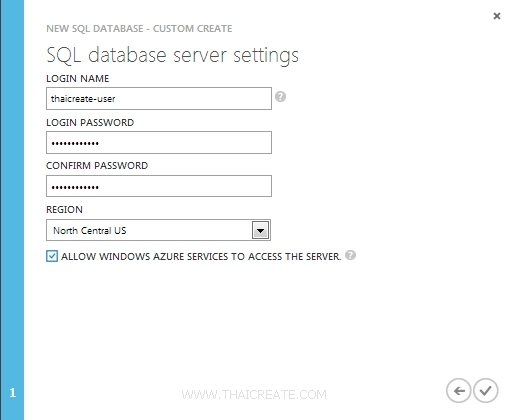
กำหนด Username และ Password สำหรับ SQL Database

และเมื่อคลิกที่ Service ของ SQL DATABASE ก็จะเห็นรายการของ SQL Database แสดงขึ้นมา 1 รายการ
SQL Database Info ข้อมูลการเชื่อมต่อมายัง SQL Azure
Server Name : bc6hela9fr.database.windows.net
Server : bc6hela9fr
User : thaicreate-user
Password : password@123
Database Name : thaicreate-db
ConnectionString ที่ได้
Driver={SQL Server Native Client 10.0};Server=tcp:bc6hela9fr.database.windows.net,1433;Database=thaicreate-db;Uid=thaicreate-user@bc6hela9fr;Pwd=password@123;Encrypt=yes;Connection Timeout=30;
อ่านเพิ่มเติม การสร้าง SQL Azure และการใช้งาน SQL Database บน Windows Azure
ขั้นตอนต่อไปคือการ Remote เชื่อมต่อไปยัง SQL Azure ผ่าน SQL Server Management Studio
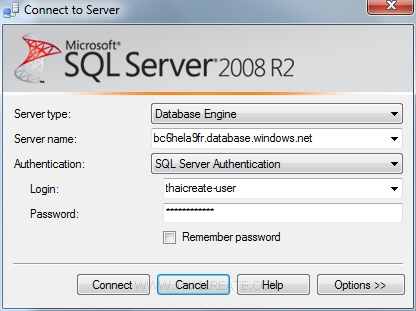
าร Login ผ่าน SQL Server Management Studio เข้าสู่หน้าจอด้วย Username และ Password ของ SQL Database ทีได้กำหนดขึ้น
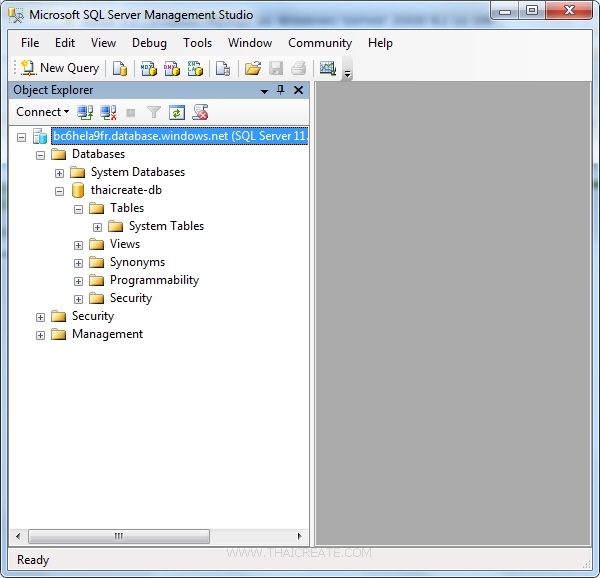
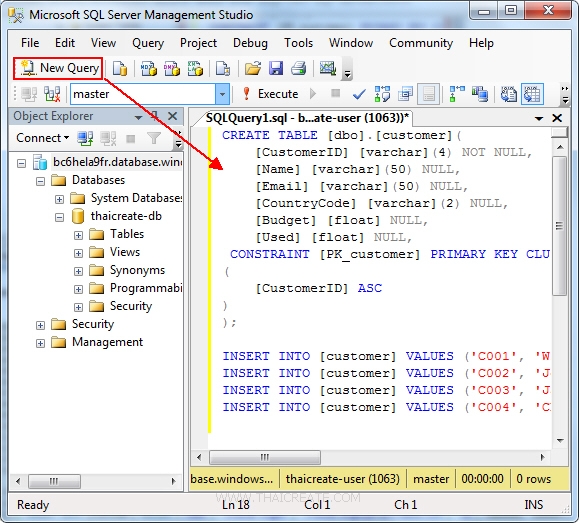
การใช้งาน SQL Azure Login ผ่าน SQL Server Management Studio จะต้องใช้งานในรูปแบบของ Query ซึ่งในตัวอย่างกรณีสร้าง Table จะใช้การเขียน Query แทน ซึ่งใน SQL Server ปกติ จะมีหน้าจอ GUI ให้เราเลือกสร้างแต่ล่ะ Column
หน้าจอ SQL Database เมื่อ Login ผ่าน SQL Server Management Studio ซึ่งการใช้งานอาจจะไม่เหมือนกับ SQL Server แต่จะสามารถใช้งานในบาง Feature ที่คล้าย ๆ กัน
CREATE TABLE [dbo].[customer](
	[CustomerID] [varchar](4) NOT NULL,
	[Name] [varchar](50) NULL,
	[Email] [varchar](50) NULL,
	[CountryCode] [varchar](2) NULL,
	[Budget] [float] NULL,
	[Used] [float] NULL,
 CONSTRAINT [PK_customer] PRIMARY KEY CLUSTERED
(
	[CustomerID] ASC
)
);

INSERT INTO [customer] VALUES ('C001', 'Win Weerachai', '[email protected]', 'TH', 1000000, 600000);
INSERT INTO [customer] VALUES ('C002', 'John  Smith', '[email protected]', 'UK', 2000000, 800000);
INSERT INTO [customer] VALUES ('C003', 'Jame Bond', '[email protected]', 'US', 3000000, 600000);
INSERT INTO [customer] VALUES ('C004', 'Chalee Angel', '[email protected]', 'US', 4000000, 100000);
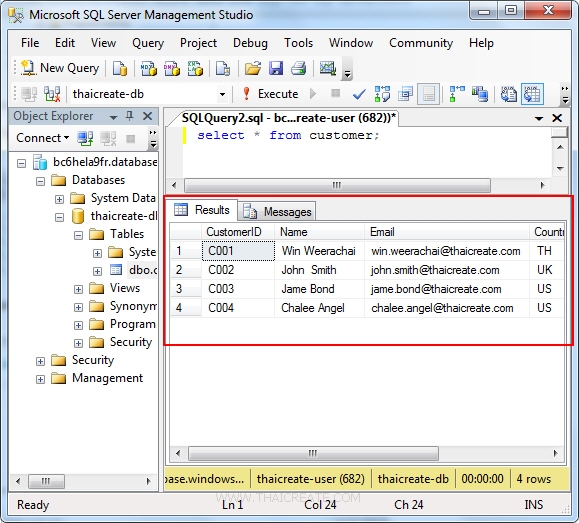
คลิกที่ Execute เพื่อรัน Query ในการสร้าง Table และ Insert
อ่านเพิ่มเติม : เชื่อมต่อ SQL Database ผ่าน SQL Server Management Studio (SSMS)
ขั้นตอนถัดไปคือการสร้าง Web Services เพื่อเรียกใช้งาน SQL Azure ซึ่งในบทความนี้จะใช้ ASP.Net เป็นตัวที่จะทำหน้าที่เป็น Web Services
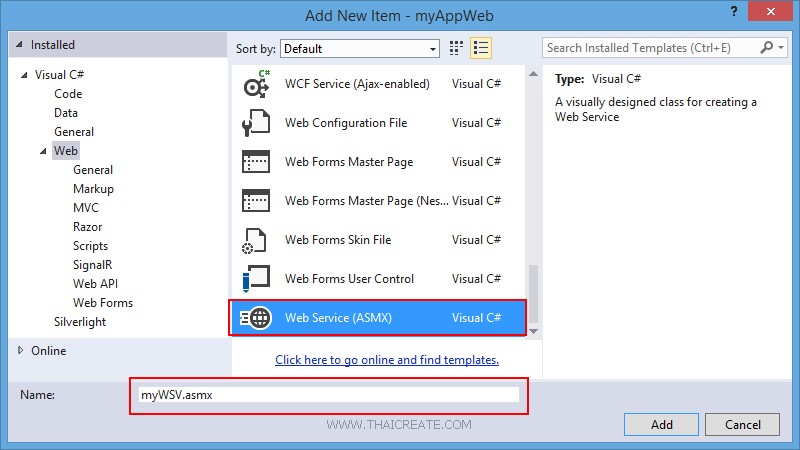
ในการสร้าง Web Services ด้วย ASP.Net ให้เลือกสร้าง Item ชื่อว่า Web Services (ASMX) โดยไฟล์ Web Services ของ ASP.Net จะได้นามสกุลไฟล์เป็น .asmx
เรียกใช้งาน Class สำหรับติดต่อกับ SQL Azure และการสร้าง JSON ซึ่งสามารถใช้ System.Data.SqlClient
using System.Data;
using Newtonsoft.Json;
using System.Data.SqlClient;
คำสั่งการติดต่อกับ SQL Azure
            strConnString = "Driver={SQL Server Native Client 10.0};Server=tcp:bc6hela9fr.database.windows.net,1433;Database=thaicreate-db;Uid=thaicreate-user@bc6hela9fr;Pwd=password@123;Encrypt=yes;Connection Timeout=30;";
            strSQL = "SELECT * FROM customer";

            objConn.ConnectionString = strConnString;

            objCmd.Connection = objConn;
            objCmd.CommandText = strSQL;
            objCmd.CommandType = CommandType.Text;
การแปลงค่าเป็น JSON
string json = JsonConvert.SerializeObject(dt, Formatting.Indented);
return json;
Code ทั้งหมด
using System;
using System.Collections.Generic;
using System.Linq;
using System.Web;
using System.Web.Services;

using System.Data;
using Newtonsoft.Json;
using System.Data.SqlClient;

namespace myAppWeb
{
    /// <summary>
    /// Summary description for myWSV
    /// </summary>
    [WebService(Namespace = "http://tempuri.org/")]
    [WebServiceBinding(ConformsTo = WsiProfiles.BasicProfile1_1)]
    [System.ComponentModel.ToolboxItem(false)]
    // To allow this Web Service to be called from script, using ASP.NET AJAX, uncomment the following line.
    // [System.Web.Script.Services.ScriptService]
    public class myWSV : System.Web.Services.WebService
    {

        [WebMethod]
        public string getCustomerData()
        {
            SqlConnection objConn = new SqlConnection();
            SqlCommand objCmd = new SqlCommand();
            SqlDataAdapter dtAdapter = new SqlDataAdapter();

            DataSet ds = new DataSet();
            DataTable dt;
            String strConnString, strSQL;


            strConnString = "Driver={SQL Server Native Client 10.0};Server=tcp:bc6hela9fr.database.windows.net,1433;Database=thaicreate-db;Uid=thaicreate-user@bc6hela9fr;Pwd=password@123;Encrypt=yes;Connection Timeout=30;";
            strSQL = "SELECT * FROM customer";

            objConn.ConnectionString = strConnString;

            objCmd.Connection = objConn;
            objCmd.CommandText = strSQL;
            objCmd.CommandType = CommandType.Text;

            dtAdapter.SelectCommand = objCmd;

            dtAdapter.Fill(ds);
            dt = ds.Tables[0];

            dtAdapter = null;
            objConn.Close();
            objConn = null;

            string json = JsonConvert.SerializeObject(dt, Formatting.Indented);
            return json;
        }

    }
}
เป็นไฟล์ Web Services และการติดต่อกับ SQL Azure ซึ่งเราจะส่งค่า JSON กลับมา
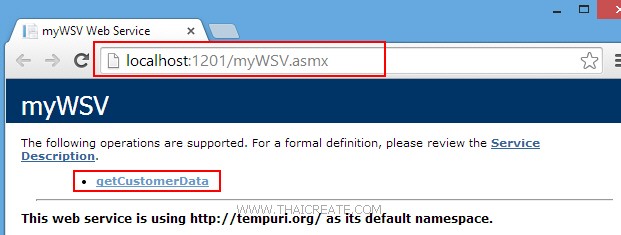
ทดสอบการทำงานของ Web Services
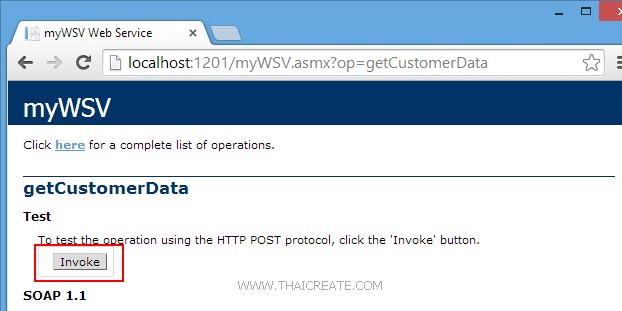
คลิก Invoke
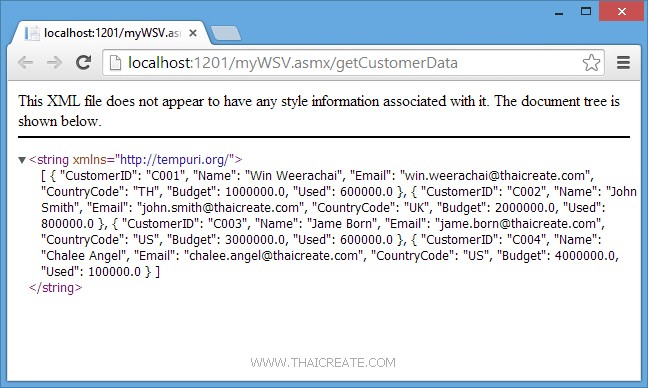
เป็นตัวอย่างไฟล์ JSON ที่ถูกส่งมาจาก Web Services
[ { "CustomerID": "C001", "Name": "Win Weerachai", "Email": "[email protected]", "CountryCode": "TH", "Budget": 1000000.0, "Used": 600000.0 }, { "CustomerID": "C002", "Name": "John Smith", "Email": "[email protected]", "CountryCode": "UK", "Budget": 2000000.0, "Used": 800000.0 }, { "CustomerID": "C003", "Name": "Jame Born", "Email": "[email protected]", "CountryCode": "US", "Budget": 3000000.0, "Used": 600000.0 }, { "CustomerID": "C004", "Name": "Chalee Angel", "Email": "[email protected]", "CountryCode": "US", "Budget": 4000000.0, "Used": 100000.0 } ]
ขั้นตอนถัดไป การสร้าง Windows Store Apps เพื่อเรียกใช้งาน Web Services ที่ติดต่อกับ SQL Azure
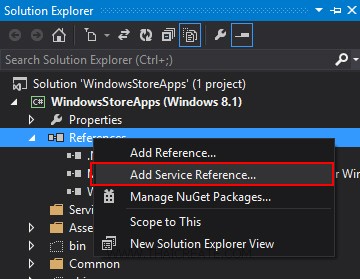
คลิกวาที่ Reference เลือก Add Service Reference
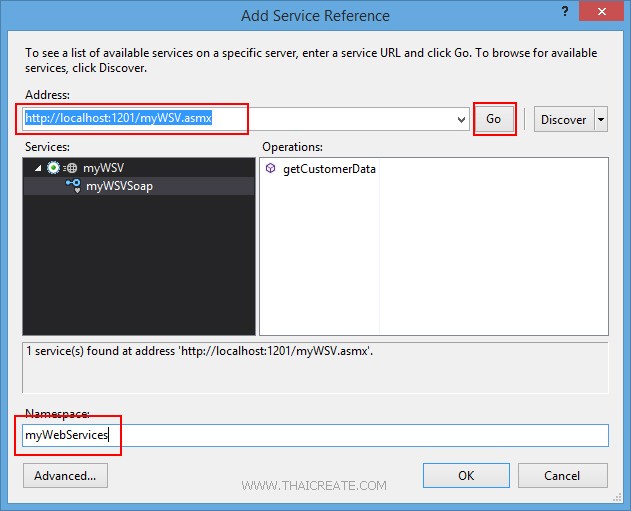
จากนั้นกรอก URL ของ Services และระบุชื่อ Services Name ที่ต้องการเรียกใช้งาน
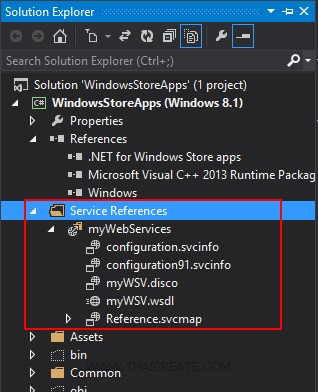
ได้ Services เรียบร้อยแล้ว จากนั้นเราจะเรียกใช้งาน Web Services บน Windows Store Apps
MainPage.xaml
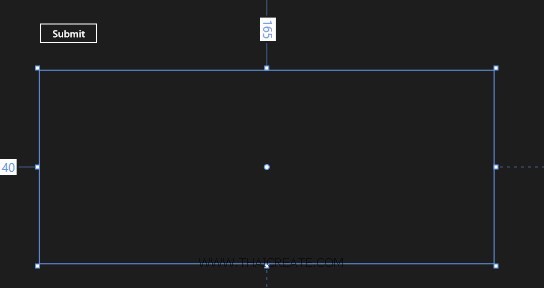
ออกแบบหน้าจอดังรูป
<Page
    x:Class="WindowsStoreApps.MainPage"
    xmlns="http://schemas.microsoft.com/winfx/2006/xaml/presentation"
    xmlns:x="http://schemas.microsoft.com/winfx/2006/xaml"
    xmlns:local="using:WindowsStoreApps"
    xmlns:d="http://schemas.microsoft.com/expression/blend/2008"
    xmlns:mc="http://schemas.openxmlformats.org/markup-compatibility/2006"
    mc:Ignorable="d">


    <Grid Background="{ThemeResource ApplicationPageBackgroundThemeBrush}">

        <Button x:Name="btnSubmit" Content="Submit" HorizontalAlignment="Left" Margin="137,68,0,0" VerticalAlignment="Top" FontSize="20" Width="120" Click="btnSubmit_Click"/>

        <ListView x:Name="myListView" HorizontalAlignment="Left" Height="386" Margin="140,165,0,0" VerticalAlignment="Top" Width="907">
            <ListView.ItemTemplate>
                <DataTemplate>
                    <StackPanel Orientation="Horizontal" Margin="0,0,0,17">
                        <StackPanel Width="80">
                            <TextBlock Text="{Binding CustomerID}" TextWrapping="Wrap" FontSize="20" Foreground="#FFBFB9B9" Margin="5,0,0,0" FontFamily="Global User Interface"/>
                        </StackPanel>
                        <StackPanel Width="150">
                            <TextBlock Text="{Binding Name}" TextWrapping="Wrap" FontSize="20" Foreground="#FFBFB9B9" Margin="5,0,0,0"/>
                        </StackPanel>
                        <StackPanel Width="300">
                            <TextBlock Text="{Binding Email}" TextWrapping="Wrap" FontSize="20" Foreground="#FFBFB9B9" Margin="5,0,0,0"/>
                        </StackPanel>
                        <StackPanel Width="50">
                            <TextBlock Text="{Binding CountryCode}" TextWrapping="Wrap" FontSize="20" Foreground="#FFBFB9B9" Margin="5,0,0,0"/>
                        </StackPanel>
                        <StackPanel Width="100">
                            <TextBlock Text="{Binding Budget}" TextWrapping="Wrap" FontSize="20" Foreground="#FFBFB9B9" Margin="5,0,0,0"/>
                        </StackPanel>
                        <StackPanel Width="100">
                            <TextBlock Text="{Binding Used}" TextWrapping="Wrap" FontSize="20" Foreground="#FFBFB9B9" Margin="5,0,0,0"/>
                        </StackPanel>
                    </StackPanel>
                </DataTemplate>
            </ListView.ItemTemplate>
        </ListView>

    </Grid>

</Page>
MainPage.xaml.cs
using System;
using System.Collections.Generic;
using System.IO;
using System.Linq;
using Windows.Devices.Geolocation;
using Windows.Foundation;
using Windows.Foundation.Collections;
using Windows.UI.Core;
using Windows.UI.Xaml;
using Windows.UI.Xaml.Controls;
using Windows.UI.Xaml.Controls.Primitives;
using Windows.UI.Xaml.Data;
using Windows.UI.Xaml.Input;
using Windows.UI.Xaml.Media;
using Windows.UI.Xaml.Navigation;

using WindowsStoreApps.myWebServices;

using System.Xml.Linq;
using System.Runtime.Serialization;
using System.Runtime.Serialization.Json;
using System.Collections.ObjectModel;
using System.Text;

// The Blank Page item template is documented at http://go.microsoft.com/fwlink/?LinkId=234238

namespace WindowsStoreApps
{
    /// <summary>
    /// An empty page that can be used on its own or navigated to within a Frame.
    /// </summary>
    ///

    public sealed partial class MainPage : Page
    {
        public MainPage()
        {
            this.InitializeComponent();
        }

        public class myCustomer
        {
            public string CustomerID { get; set; }
            public string Name { get; set; }
            public string Email { get; set; }
            public string CountryCode { get; set; }
            public string Budget { get; set; }
            public string Used { get; set; }
        }

        private async void btnSubmit_Click(object sender, RoutedEventArgs e)
        {

            var client = new myWebServices.myWSVSoapClient();
            var result = await client.getCustomerDataAsync();

            string jsonData = result.Body.getCustomerDataResult;

            MemoryStream ms = new MemoryStream(Encoding.UTF8.GetBytes(jsonData));
            ObservableCollection<myCustomer> list = new ObservableCollection<myCustomer>();
            DataContractJsonSerializer serializer = new DataContractJsonSerializer(typeof(ObservableCollection<myCustomer>));
            list = (ObservableCollection<myCustomer>)serializer.ReadObject(ms);

            this.myListView.ItemsSource = list;

        }

    }

}
Result
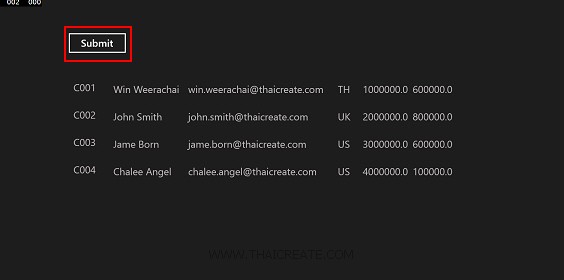
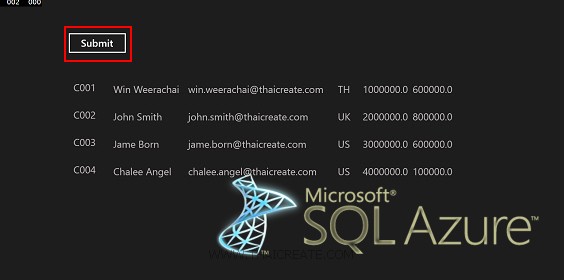
ค่าที่ได้จาก Web Services ที่อ่านจาก SQL Azure
เพิ่มเติม สำหรับวิธีการ Add / Insert / Delete ข้อมูล สามารถดูตัวอย่างได้จากบทความ Windows Store Apps กับ SQL Server Database ซึ่งจะมีรูปแบบการใช้งานที่เหมือนกัน
|