Windows Store Apps and Timer / Trigger / Thread (C#) |
Windows Store Apps and Timer / Trigger / Thread (C#) ในการเขียนโปรแกรม .NET Application เกือบทุกประเภทของโปรแกรม จะต้องมี Timer และ Trigger เข้ามาเกี่ยวข้อง ประโยชน์ของ Timer คือใช้สำหรับการกำหนดหรือสร้าง Trigger หรือเรียก Event Tick ต่าง ๆ ที่ต้องการให้โปรแกรมทำงานตามระยะหรือทุก ๆ ครั้งที่ต้องการ เช่น ในขณะที่เปิดหน้าจอ Application อยู่นั้น เราต้องการตรวจสอบว่าระหว่างนั้นได้เกิดเหตุการณ์อะไรขึ้น ระหว่าง Application กับ Server เช่น มีข้อมูลใหม่เข้ามาหรือไม่ หรือมีข้อความที่ต้องการแจ้งให้ผู้ใช้ทราบทางหน้าจอ ซึ่งเหตุการณ์เหล่า ๆ นี้เราไม่สามารถเขียนโปรแกรมสร้าง Event ต่าง ๆ ได้ เพราะ Event ส่วนมากจะต้องเกิดเมื่อผู้ใช้ได้กระทำการต่าง ๆ บนหน้าจอ Application และจะหายไปหลังจากทำงานเสร็จสิ้น
 Windows Store Apps and Timer / Trigger / Thread (C#)
Thread
สำหรับ Thread นั้นเป็น Background Process ใช้สำหรับการจัดการกับ Process ที่เกิดขึ้นพร้อม ๆ กันหลาย Process โดย Process เหล่าต่าง ๆ ที่ถูกควบคุมด้วย Thread จะแยกการทำงานของแต่ล่ะ Prcess อิสระต่อกัน ทั้งค่าตัวแปรต่าง ๆ ที่เกิดขึ้นและถูกเก็บลงในหน่วยความจำ ที่เกิดขึ้นในขณะนั้น ๆ ซึ่งในกรณีที่เราไม่ได้ใช้ Thread เข้ามาจัดการกับ Process ต่าง ๆ บน Application ปัญหาที่เกิดขึ้นคือ เมื่อเกิด Process เหล่านั้นขึ้นโปรแกรมอาจจะหน้าจอค้าง และรอจนกว่าการทำงานนั้น ๆ จะเสร็จสิ้น หรือกรณีที่มี Process ซ้ำซ้อน Process ใหม่อาจจะไปหยุดการทำงานของ Process ที่กำลังทำงานอยู่และการใช้ค่าตัวแปรต่าง ๆ อาจจะซ้ำซ้อนกัน
Thread ที่ใช้ควบคุม Process ในกรณีที่เกิด Process ต่าง ๆ ขึ้น Process ที่ถูกให้สั่งทำงานไปแล้ว จะสามารถทำงานอื่น ๆ ต่อไปได้จนเสร็จสิ้นงานของตัวเอง และในกรณีที่กำหนดเป็น Backgroud Process ในหน้าจอ Application หนึ่ง ๆ นั้น ในระหว่างที่ Process กำลังทำงานใน Thread สามารถสั่งให้ Process นั้น ๆ แสดงผลลัพธ์ออกทางหน้าจอ Interface หรือแสดงผลบน Controls ตัวเดียวกันได้เช่นเดียวกัน
Example 1 ตัวอย่างการใช้ Timer และ Timer Tick เพื่อสร้าง Event
Syntax
dt.Interval = new TimeSpan(0, 0, 0, 0, 1000);
dt.Tick += ticks_Tick;
dt.Start();

private void ticks_Tick(object sender, object e)
{

}
จาก Syntax เป็นตัวอย่างการสร้าง Event ของ Timer ให้ทำงาน ticks_Tick ทุก ๆ 1 นาที
MainPage.xaml
<Page
    x:Class="WindowsStoreApps.MainPage"
    xmlns="http://schemas.microsoft.com/winfx/2006/xaml/presentation"
    xmlns:x="http://schemas.microsoft.com/winfx/2006/xaml"
    xmlns:local="using:WindowsStoreApps"
    xmlns:d="http://schemas.microsoft.com/expression/blend/2008"
    xmlns:mc="http://schemas.openxmlformats.org/markup-compatibility/2006"
    mc:Ignorable="d">

    <Grid Background="{StaticResource ApplicationPageBackgroundThemeBrush}">

        <TextBlock x:Name="lblResult" HorizontalAlignment="Left" TextWrapping="Wrap" Text="Result" FontSize="20" VerticalAlignment="Top" Margin="162,158,0,0" Height="30" Width="369"/>

    </Grid>

</Page>

ออกแบบหน้าจอดังรูป
MainPage.xaml.cs
using System;
using System.Collections.Generic;
using System.IO;
using System.Linq;
using Windows.Devices.Geolocation;
using Windows.Foundation;
using Windows.Foundation.Collections;
using Windows.UI.Core;
using Windows.UI.Xaml;
using Windows.UI.Xaml.Controls;
using Windows.UI.Xaml.Controls.Primitives;
using Windows.UI.Xaml.Data;
using Windows.UI.Xaml.Input;
using Windows.UI.Xaml.Media;
using Windows.UI.Xaml.Navigation;

using Windows.System.Threading;

// The Blank Page item template is documented at http://go.microsoft.com/fwlink/?LinkId=234238

namespace WindowsStoreApps
{
    /// <summary>
    /// An empty page that can be used on its own or navigated to within a Frame.
    /// </summary>
    ///
    public sealed partial class MainPage : Page
    {

        DispatcherTimer dt = new DispatcherTimer();

        public MainPage()
        {
            this.InitializeComponent();

            dt.Interval = new TimeSpan(0, 0, 0, 0, 1000);
            dt.Tick += ticks_Tick;
            dt.Start();
        }

        private void ticks_Tick(object sender, object e)
        {
            this.lblResult.Text = DateTime.Now.ToString();
        }

    }
}
Result

จากตัวอย่างแสดง Timer ซึ่งจะทำงานทุก ๆ 1 นาที และในตัวอย่างจะเป็นการแสดงเวลาของเครื่อง Update ทุก ๆ นาที

แสดงเวลาที่ Update จากเครื่อง
Example 2 ตัวอย่างการใช้ Thread และการ Handle Thread การ Update result ในช่วงที่ Thread ทำงาน
Syntax
IAsyncAction ThreadPoolWorkItem = Windows.System.Threading.ThreadPool.RunAsync((source) =>
    {
	Dispatcher.RunAsync(Windows.UI.Core.CoreDispatcherPriority.High,
	    () =>
	    {
		// Update result
	    });
    });
เป็น Syntax การทำงานในรูปแบบของ Thread
ตัวอย่างการทดสอบการใช้ Thread และการแสดงผลค่าในระหว่างที่ Thread กำลังทำงาน

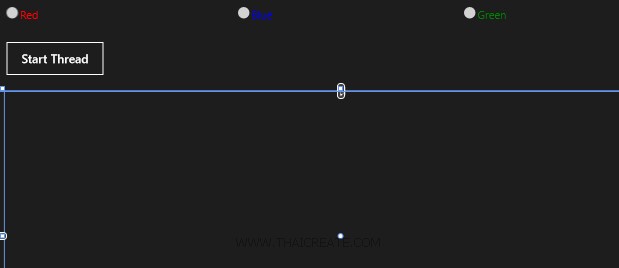
ออกแบบหน้าจอและ Layout ดังรูป
MainPage.xaml
<Page
    x:Class="WindowsStoreApps.MainPage"
    xmlns="http://schemas.microsoft.com/winfx/2006/xaml/presentation"
    xmlns:x="http://schemas.microsoft.com/winfx/2006/xaml"
    xmlns:local="using:WindowsStoreApps"
    xmlns:d="http://schemas.microsoft.com/expression/blend/2008"
    xmlns:mc="http://schemas.openxmlformats.org/markup-compatibility/2006"
    mc:Ignorable="d">

    <!--LayoutRoot contains the root grid where all other page content is placed-->
    <Grid x:Name="LayoutRoot" Background="{StaticResource ApplicationPageBackgroundThemeBrush}">
        <Grid.RowDefinitions>
            <RowDefinition Height="Auto"/>
            <RowDefinition Height="*"/>
        </Grid.RowDefinitions>

        <!--TitlePanel contains the name of the application and page title-->
        <StackPanel x:Name="TitlePanel" Margin="12,17,0,0" Height="171">
            <Grid Height="70">
                <Grid.ColumnDefinitions>
                    <ColumnDefinition Width="*"/>
                    <ColumnDefinition Width="*"/>
                    <ColumnDefinition Width="*"/>
                </Grid.ColumnDefinitions>
                <RadioButton Content="Red" Height="70" Name="rdoRed" Margin="0,0,28,0" Foreground="RED" FontSize="22" />
                <RadioButton Grid.Column="1" Content="Blue" Height="70" Name="rdoBlue" Margin="12,0,26,0" Foreground="BLUE" FontSize="22"  />
                <RadioButton Grid.Column="2" Content="Green" Height="70" Name="rdoGreen" Margin="12,0" Foreground="GREEN" FontSize="22" />
            </Grid>
            <Button Content="Start Thread" Height="72" Name="btnStartThread" Width="200" Click="btnStartThread_Click" FontSize="24" />
        </StackPanel>

        <!--ContentPanel - place additional content here-->
        <StackPanel x:Name="ContentPanel" Grid.Row="1" Margin="12,0,12,0">
        </StackPanel>

    </Grid>

</Page>
จากนั้นทดสอบสร้าง Code ดังนี้
MainPage.xaml.cs
using System;
using System.Collections.Generic;
using System.IO;
using System.Linq;
using Windows.Devices.Geolocation;
using Windows.Foundation;
using Windows.Foundation.Collections;
using Windows.UI.Core;
using Windows.UI.Xaml;
using Windows.UI.Xaml.Controls;
using Windows.UI.Xaml.Controls.Primitives;
using Windows.UI.Xaml.Data;
using Windows.UI.Xaml.Input;
using Windows.UI.Xaml.Media;
using Windows.UI.Xaml.Navigation;

using Windows.System.Threading;
using System.Threading.Tasks;


// The Blank Page item template is documented at http://go.microsoft.com/fwlink/?LinkId=234238

namespace WindowsStoreApps
{
    /// <summary>
    /// An empty page that can be used on its own or navigated to within a Frame.
    /// </summary>
    ///
    public sealed partial class MainPage : Page
    {

        private SolidColorBrush SelColor;

        public MainPage()
        {
            this.InitializeComponent();
        }

        private void btnStartThread_Click(object sender, RoutedEventArgs e)
        {
            if ((rdoRed.IsChecked == true))
            {
                SelColor = new SolidColorBrush(Windows.UI.Colors.Red);
            }
            else if ((rdoBlue.IsChecked == true))
            {
                SelColor = new SolidColorBrush(Windows.UI.Colors.Blue);
            }
            else if ((rdoGreen.IsChecked == true))
            {
                SelColor = new SolidColorBrush(Windows.UI.Colors.Green);
            }


            ThreadStart();
        }

        private async void ThreadStart()
        {
            SolidColorBrush strColor = SelColor;
            string strReturn;
            for (int i = 0; (i <= 5); i++)
            {
                await Task.Run(() => { new System.Threading.ManualResetEvent(false).WaitOne(2000); });
                strReturn = "Loop(" + i + ") - " + DateTime.Now.ToString();

                IAsyncAction ThreadPoolWorkItem = Windows.System.Threading.ThreadPool.RunAsync((source) =>
                    {
                        Dispatcher.RunAsync(Windows.UI.Core.CoreDispatcherPriority.High,
                            () =>
                            {
                                TextBlock textBlock = new TextBlock();
                                textBlock.Text = strReturn;
                                textBlock.FontSize = 24;
                                textBlock.Foreground = strColor;
                                ContentPanel.Children.Add(textBlock);
                            });
                    });

            }

        }

    }
}
คำอธิบาย
จาก Code ที่เป็น C# วัตถุประสงค์คือต้องการให้ผู้ใช้คลิกที่ RadioButton ซึ่งมีอยู่ 3 รายการคือ Read, Blue และ Green และคลิกที่ Button เพื่อเริ่มการทำงานของ Thread โดยจะมีการจัดเก็บค่าสีที่ได้เลือกไว้เพื่อนำไปใช้ใน Process ของ Thread
            for (int i = 0; (i <= 5); i++)
            {
                await Task.Run(() => { new System.Threading.ManualResetEvent(false).WaitOne(2000); });

            }
สังเกตุว่าใน Thread จะมีการสั่งให้ Process ทำงานครั้งล่ะ 6 คือ Loop (0-5) และทุก ๆ Loop หยุด 2 วินาที และหลังจากนั้นให้ส่งผลลัพธ์ไปยังหน้าจอของ Application
    for (int i = 0; (i <= 5); i++)
    {
	await Task.Run(() => { new System.Threading.ManualResetEvent(false).WaitOne(2000); });
	strReturn = "Loop(" + i + ") - " + DateTime.Now.ToString();

	IAsyncAction ThreadPoolWorkItem = Windows.System.Threading.ThreadPool.RunAsync((source) =>
	    {
		Dispatcher.RunAsync(Windows.UI.Core.CoreDispatcherPriority.High,
		    () =>
		    {
			TextBlock textBlock = new TextBlock();
			textBlock.Text = strReturn;
			textBlock.FontSize = 24;
			textBlock.Foreground = strColor;
			ContentPanel.Children.Add(textBlock);
		    });
	    });

    }
แสดงผลลัพธ์ด้วยการแสดงผลบน TextBlock ซึ่งใน ContentPanel จะใช้ StackPanel ในการแสดงผล และจะได้ผล TextBlock ยาวลงมาเรื่อย ๆ ตามจำนวน Thread ที่เกิดขึ้น และ TextBlock แต่ล่ะรายการก็จะแสดงสีที่ได้เลือกไว้
Result ทดสอบบน Emulator

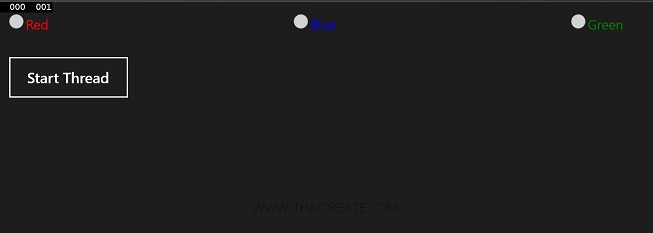
หน้าจอแรกเมื่อโปรแกรมทำงาน
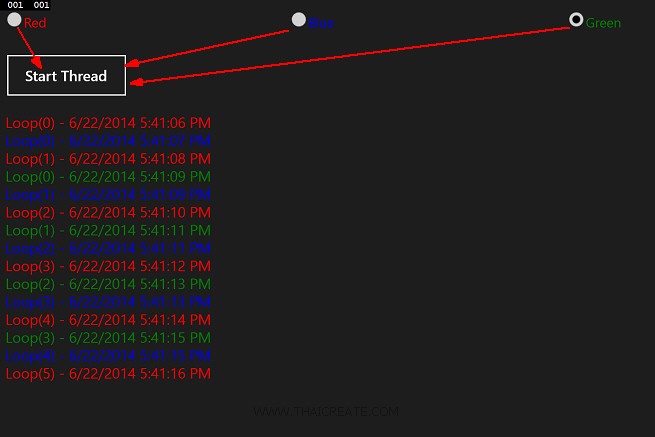
เราจะมาทดสอบการทำงานของ Thread ด้วยการ ทดสอบการคลิกที่ RadioButton แต่ล่ะตัว
Red -> Start Thread
Blue -> Start Thread
Green -> Thread

สิ่งที่ได้เมื่อคลิก 3 รายการคือ Thread จะทำงานอยู่ 3 Process แต่ล่ะ Process ก็จะ Loop 0-5 และแสดงผลลัพธ์ออกมาทางหน้าจอ Application ซึ่งในแต่ล่ะผลลัพธ์จะแสดงค่า DateTime , Loop , ThreadID และสี Color ที่ได้เลือกไว้ในขั้นตอนแรก โดยการทำงานทั้ง 3 Process จะไม่มีการค้างหน้าจอของ Application และแต่ล่ะ Thread มีการแยกค่าตัวแปรกันอย่างชัดเจน
สรุป
จากตัวอย่างง่าย ๆ นี้เราจะได้เข้าใจหลักการพื้นฐานและการทำงานของ Thread ที่จะเข้ามาควบคุมการทำงานของ Process และจะเป็นพื้นฐานในการต่อยอดในการเขียนโปรแกรมที่มีความซับซ้อนยิ่งขึ้น และการใช้งาน Thread ก็ค่อนข่างที่จะจำเป็น ต่อการนำไปใช้ในการเขียนโปรแกรมอย่างยิ่ง ยิ่งเราได้เข้าใจ Concept และการทำงานแล้ว จะสามารถเกิด Idea ต่าง ๆ ขึ้นมากมาย หรือไม่ลองสังเกตุจาก Application ต่าง ๆ ที่ใช้อยู่บน Apps นั้นว่า กระบวนการต่าง ๆ ที่เกิดขึ้นระหว่างการแลกเปลี่ยนข้อมูลนั้น มีแนวคิดและวิธีการอย่างไร สิ่งเหล่านี้จะช่วยให้เราเกิดไอเดีย การนำไปใช้ หรือศึกษาวิธีการต่าง ๆ ในการเขียนโปรแกรม
|
 ช่วยกันสนับสนุนรักษาเว็บไซต์ความรู้แห่งนี้ไว้ด้วยการสนับสนุน Source Code 2.0 ของทีมงานไทยครีเอท ช่วยกันสนับสนุนรักษาเว็บไซต์ความรู้แห่งนี้ไว้ด้วยการสนับสนุน Source Code 2.0 ของทีมงานไทยครีเอท
|
|
| |
By : |
ThaiCreate.Com Team (บทความเป็นลิขสิทธิ์ของเว็บไทยครีเอทห้ามนำเผยแพร่ ณ เว็บไซต์อื่น ๆ) |
| |
Score Rating : |
   |
|
| |
Create/Update Date : |
2014-06-23 13:19:50 /
2017-03-19 15:11:31 |
| |
Download : |
No files |
|
|
Sponsored Links / Related |
|
|
|
|
|
|

|